White Chocolate Raspberry Pumpkin Bars No Bake Delight

WANT TO SAVE THIS RECIPE?

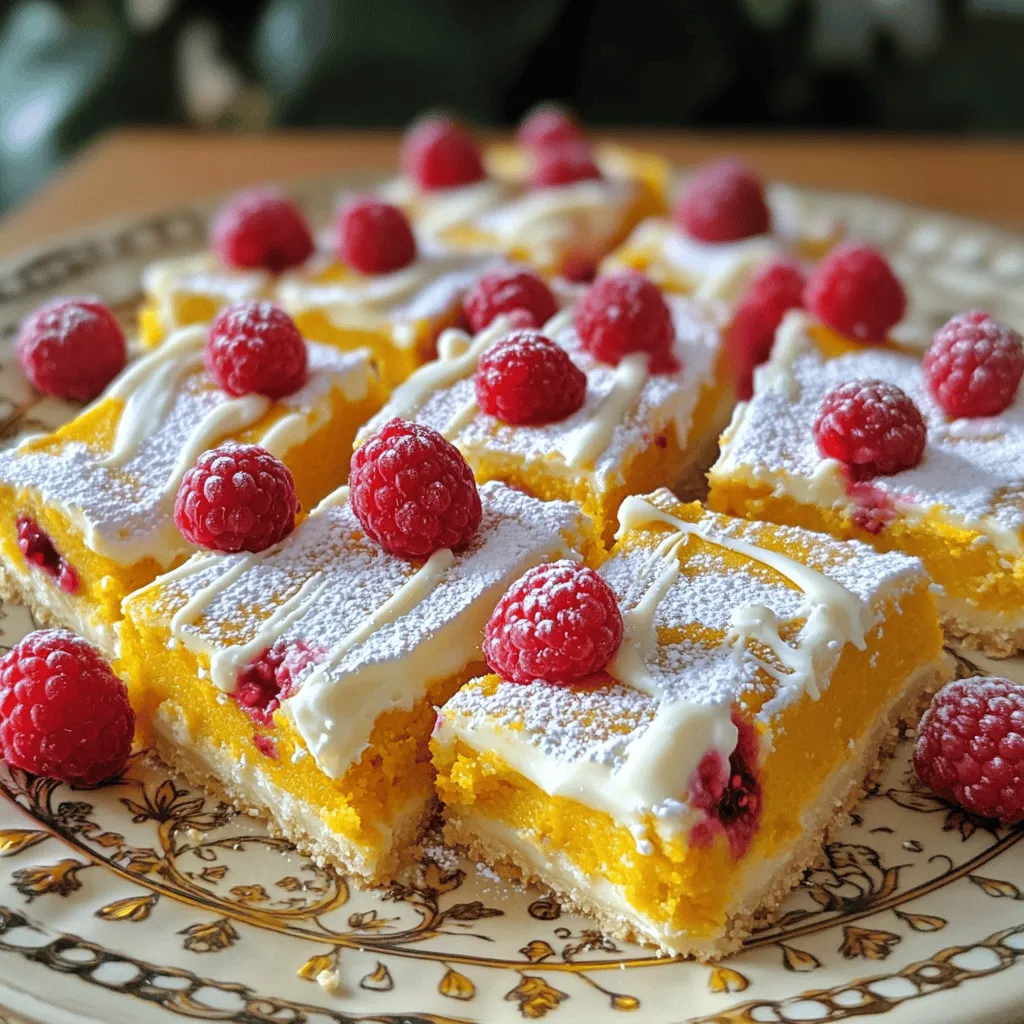
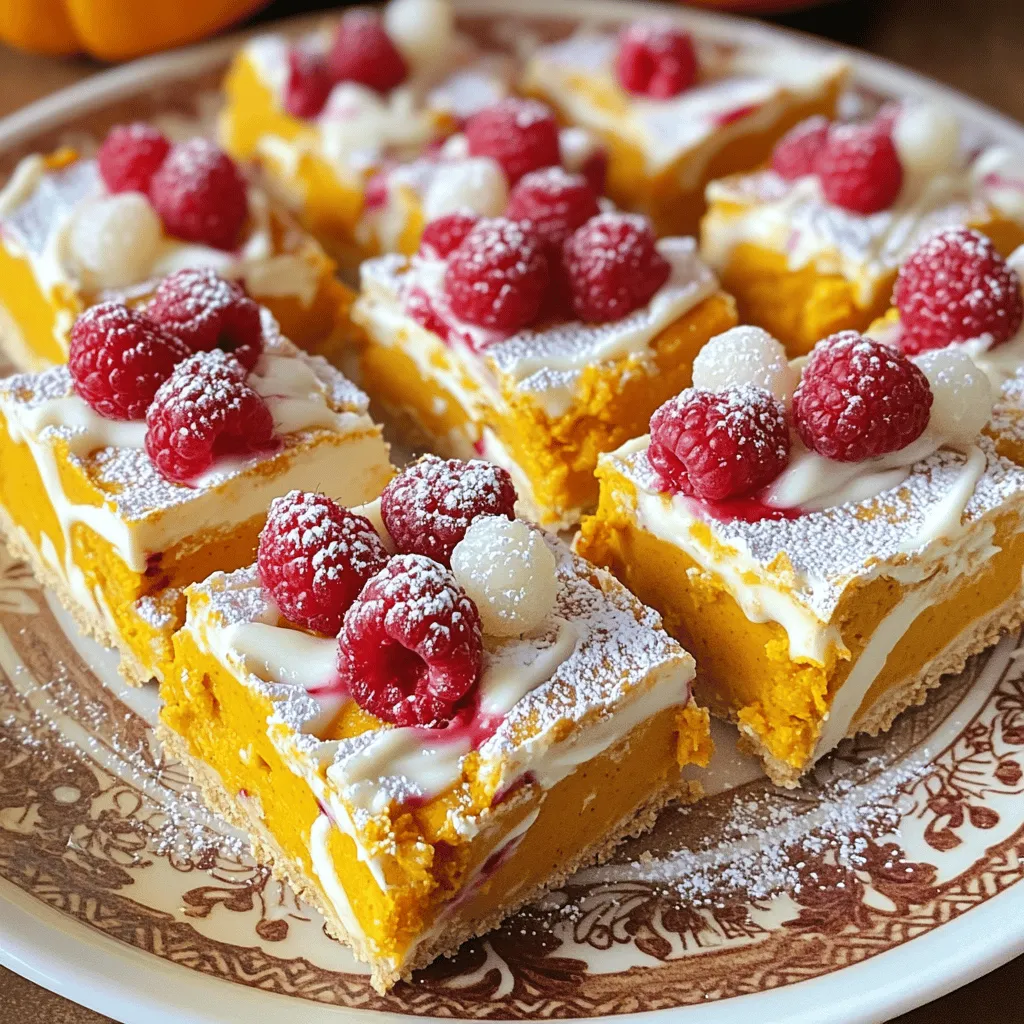
Are you ready to indulge in a treat that’s easy and delicious? My White Chocolate Raspberry Pumpkin Bars are a no-bake delight you can whip up in no time. Packed with vibrant flavors and simple ingredients, these bars will please any crowd. Whether you’re hosting a party or craving a sweet snack, follow my guide for the perfect dessert experience. Let’s dive in and create something scrumptious together!

To make these tasty white chocolate raspberry pumpkin bars, you need these basic ingredients: - 1 cup graham cracker crumbs - 1/2 cup unsalted butter, melted - 1/4 cup brown sugar - 1 (8 oz) package cream cheese, softened - 1 cup pure pumpkin puree - 1/2 cup powdered sugar - 1 teaspoon vanilla extract - 1 teaspoon pumpkin spice - 1 cup white chocolate chips, melted - 1 cup fresh raspberries These ingredients blend together to create a creamy, rich filling. The graham cracker crust provides a perfect base, while the white chocolate adds a nice touch. You can make your bars even better with some optional toppings. Here are a few ideas: - Whipped cream - Extra melted white chocolate drizzle - More fresh raspberries These toppings add flavor and make your bars look great. Plus, they add a fun texture contrast. If you need to swap some ingredients, here are some easy substitutions: - Use coconut oil instead of butter for a dairy-free option. - Swap the cream cheese for a vegan cream cheese for a plant-based treat. - Use maple syrup instead of brown sugar for a natural sweetener. These swaps keep the bars delicious while catering to different diets. Don’t be afraid to get creative! To start, gather these ingredients: - 1 cup graham cracker crumbs - 1/2 cup unsalted butter, melted - 1/4 cup brown sugar In a mixing bowl, combine the graham cracker crumbs, melted butter, and brown sugar. Mix these ingredients until they blend well. You want a sandy texture. Next, press this mixture firmly into the bottom of a 9x9-inch baking dish. This will form a solid crust. Make sure it is even and compact. Now, refrigerate this base for about 10 minutes. This helps it set nicely. For the filling, you will need: - 1 (8 oz) package cream cheese, softened - 1 cup pure pumpkin puree - 1/2 cup powdered sugar - 1 teaspoon vanilla extract - 1 teaspoon pumpkin spice In another bowl, beat the softened cream cheese until it is smooth. This step is essential for a creamy texture. Next, add the pumpkin puree, powdered sugar, vanilla extract, and pumpkin spice. Mix these ingredients until they are well combined and creamy. This mixture should be thick but smooth. The flavors blend beautifully here. Now it’s time to combine our layers. First, melt 1 cup of white chocolate chips. Let them cool slightly before adding to the pumpkin mixture. Gently fold the melted white chocolate into the pumpkin cream cheese mixture until fully mixed in. Spread this creamy filling evenly over the chilled graham cracker crust. Now, take 1 cup of fresh raspberries. Evenly distribute them on top of the filling. Gently press them into the mixture. This adds a nice burst of flavor. Cover the dish with plastic wrap. Chill in the refrigerator for at least 4 hours. This will help the bars set. Once firm, cut into squares or bars. You can serve each piece with a dollop of whipped cream, if you want. Enjoy your delicious creation! To make your filling extra creamy, start with soft cream cheese. I let it sit at room temperature for about 30 minutes. This helps it blend better. When mixing, use a hand mixer. This tool gives you a smooth texture. After mixing the cream cheese, add the pumpkin puree slowly. This keeps the mixture from getting too thick. Lastly, fold in the melted white chocolate gently. This way, you keep the light and airy texture. Once you mix the filling, spread it over the crust evenly. Make sure to press it down lightly. This helps it set well. After layering, cover the dish with plastic wrap. It helps keep moisture in while it chills. I recommend refrigerating the bars for at least four hours. For best results, chill them overnight. This allows the flavors to blend and the bars to firm up. When it’s time to serve, cut the bars into squares. I like to use a sharp knife for clean edges. You can top each bar with whipped cream for extra creaminess. A drizzle of melted white chocolate adds a nice touch. For a pop of color, add a few fresh raspberries on top. This makes the bars look beautiful and appetizing. Enjoy these bars cold for the best flavor! {{image_2}} You can switch up the fruit in these bars. Try using strawberries or blueberries. Both fruits bring a fresh taste. You can even mix different fruits for added flavor. Just chop the fruit into small pieces. Press them gently into the top layer before chilling. You might want to change the chocolate base. Use dark chocolate instead of white chocolate. This swap adds a rich flavor. You can also try milk chocolate for a sweeter taste. Just melt the chocolate and mix it in the same way. Want a healthier twist? You can use whole grain graham crackers. This change boosts fiber. Swap cream cheese for Greek yogurt for less fat. You can also cut back on sugar by using honey or maple syrup. These swaps keep the bars tasty but lighter. To store leftovers, cut the bars into squares. Place them in an airtight container. Make sure to layer parchment paper between the bars. This keeps them from sticking together. Store the container in the fridge. The bars will stay fresh and tasty this way. Enjoy them within a week for the best flavor. You can freeze these bars for longer storage. First, cut the bars into squares. Then, wrap each square tightly in plastic wrap. Place the wrapped bars in a freezer-safe container. You can also use a zip-top bag. Make sure to remove as much air as possible. The bars can freeze for up to three months. When ready to eat, simply thaw them in the fridge overnight. These no-bake bars have a good shelf life. If you store them in the refrigerator, they last about five to seven days. If frozen, they can last up to three months. Keep an eye on any changes in smell or texture. If anything seems off, it’s best to toss them. Enjoy them fresh for the best taste! Yes, you can use dark or milk chocolate instead of white chocolate. Each will give a unique taste. Dark chocolate adds a rich flavor. Milk chocolate makes the bars sweeter. Just melt it the same way as white chocolate. Make sure to adjust the sugar if you use dark chocolate, as it is less sweet. These bars need at least 4 hours to chill. This time helps them set well. You want them firm and easy to cut. If you have the time, chill them overnight for the best texture. The longer they chill, the better they taste. If you don't have raspberries, try fresh strawberries or blueberries. Both fruits work well in this recipe. You can also use chopped cherries or even peaches. Just make sure to keep the fruit fresh for the best flavor. Each substitute will add a new twist to your bars. No-bake bars are easy and fun to make. We covered simple ingredients, tasty toppings, and swaps for your pantry needs. I shared step-by-step instructions to prepare, mix, and chill your bars perfectly. Tips for a creamy filling and how to serve them can help elevate your treats. You can also customize with different fruits and healthier options. Store them well for lasting freshness. Feel free to explore substitutes and answers to common questions. Now, you're ready to create delightful no-bake bars everyone will enjoy.

Ingredients

Basic Ingredients for No-Bake Bars

To make these tasty white chocolate raspberry pumpkin bars, you need these basic ingredients:

– 1 cup graham cracker crumbs

– 1/2 cup unsalted butter, melted

– 1/4 cup brown sugar

– 1 (8 oz) package cream cheese, softened

– 1 cup pure pumpkin puree

– 1/2 cup powdered sugar

– 1 teaspoon vanilla extract

– 1 teaspoon pumpkin spice

– 1 cup white chocolate chips, melted

– 1 cup fresh raspberries

These ingredients blend together to create a creamy, rich filling. The graham cracker crust provides a perfect base, while the white chocolate adds a nice touch.

Optional Toppings

You can make your bars even better with some optional toppings. Here are a few ideas:

– Whipped cream

– Extra melted white chocolate drizzle

– More fresh raspberries

These toppings add flavor and make your bars look great. Plus, they add a fun texture contrast.

Ingredient Substitutions

If you need to swap some ingredients, here are some easy substitutions:

– Use coconut oil instead of butter for a dairy-free option.

– Swap the cream cheese for a vegan cream cheese for a plant-based treat.

– Use maple syrup instead of brown sugar for a natural sweetener.

These swaps keep the bars delicious while catering to different diets. Don’t be afraid to get creative!

Step-by-Step Instructions

Preparing the Base

To start, gather these ingredients:

– 1 cup graham cracker crumbs

– 1/2 cup unsalted butter, melted

– 1/4 cup brown sugar

In a mixing bowl, combine the graham cracker crumbs, melted butter, and brown sugar. Mix these ingredients until they blend well. You want a sandy texture. Next, press this mixture firmly into the bottom of a 9×9-inch baking dish. This will form a solid crust. Make sure it is even and compact. Now, refrigerate this base for about 10 minutes. This helps it set nicely.

Mixing the Filling

For the filling, you will need:

– 1 (8 oz) package cream cheese, softened

– 1 cup pure pumpkin puree

– 1/2 cup powdered sugar

– 1 teaspoon vanilla extract

– 1 teaspoon pumpkin spice

In another bowl, beat the softened cream cheese until it is smooth. This step is essential for a creamy texture. Next, add the pumpkin puree, powdered sugar, vanilla extract, and pumpkin spice. Mix these ingredients until they are well combined and creamy. This mixture should be thick but smooth. The flavors blend beautifully here.

Layering and Chilling the Bars

Now it’s time to combine our layers. First, melt 1 cup of white chocolate chips. Let them cool slightly before adding to the pumpkin mixture. Gently fold the melted white chocolate into the pumpkin cream cheese mixture until fully mixed in.

Spread this creamy filling evenly over the chilled graham cracker crust. Now, take 1 cup of fresh raspberries. Evenly distribute them on top of the filling. Gently press them into the mixture. This adds a nice burst of flavor.

Cover the dish with plastic wrap. Chill in the refrigerator for at least 4 hours. This will help the bars set. Once firm, cut into squares or bars. You can serve each piece with a dollop of whipped cream, if you want. Enjoy your delicious creation!

Tips & Tricks

Best Practices for Creamy Filling

To make your filling extra creamy, start with soft cream cheese. I let it sit at room temperature for about 30 minutes. This helps it blend better. When mixing, use a hand mixer. This tool gives you a smooth texture. After mixing the cream cheese, add the pumpkin puree slowly. This keeps the mixture from getting too thick. Lastly, fold in the melted white chocolate gently. This way, you keep the light and airy texture.

Cooling and Setting Tips

Once you mix the filling, spread it over the crust evenly. Make sure to press it down lightly. This helps it set well. After layering, cover the dish with plastic wrap. It helps keep moisture in while it chills. I recommend refrigerating the bars for at least four hours. For best results, chill them overnight. This allows the flavors to blend and the bars to firm up.

Serving Suggestions

When it’s time to serve, cut the bars into squares. I like to use a sharp knife for clean edges. You can top each bar with whipped cream for extra creaminess. A drizzle of melted white chocolate adds a nice touch. For a pop of color, add a few fresh raspberries on top. This makes the bars look beautiful and appetizing. Enjoy these bars cold for the best flavor!

Variations

Different Fruit Options

You can switch up the fruit in these bars. Try using strawberries or blueberries. Both fruits bring a fresh taste. You can even mix different fruits for added flavor. Just chop the fruit into small pieces. Press them gently into the top layer before chilling.

Chocolate Base Adjustments

You might want to change the chocolate base. Use dark chocolate instead of white chocolate. This swap adds a rich flavor. You can also try milk chocolate for a sweeter taste. Just melt the chocolate and mix it in the same way.

Healthier Ingredient Alternatives

Want a healthier twist? You can use whole grain graham crackers. This change boosts fiber. Swap cream cheese for Greek yogurt for less fat. You can also cut back on sugar by using honey or maple syrup. These swaps keep the bars tasty but lighter.

Storage Info

How to Store Leftovers

To store leftovers, cut the bars into squares. Place them in an airtight container. Make sure to layer parchment paper between the bars. This keeps them from sticking together. Store the container in the fridge. The bars will stay fresh and tasty this way. Enjoy them within a week for the best flavor.

Freezing Instructions

You can freeze these bars for longer storage. First, cut the bars into squares. Then, wrap each square tightly in plastic wrap. Place the wrapped bars in a freezer-safe container. You can also use a zip-top bag. Make sure to remove as much air as possible. The bars can freeze for up to three months. When ready to eat, simply thaw them in the fridge overnight.

Shelf Life of No-Bake Bars

These no-bake bars have a good shelf life. If you store them in the refrigerator, they last about five to seven days. If frozen, they can last up to three months. Keep an eye on any changes in smell or texture. If anything seems off, it’s best to toss them. Enjoy them fresh for the best taste!

FAQs

Can I use a different type of chocolate?

Yes, you can use dark or milk chocolate instead of white chocolate. Each will give a unique taste. Dark chocolate adds a rich flavor. Milk chocolate makes the bars sweeter. Just melt it the same way as white chocolate. Make sure to adjust the sugar if you use dark chocolate, as it is less sweet.

How long do these bars need to chill?

These bars need at least 4 hours to chill. This time helps them set well. You want them firm and easy to cut. If you have the time, chill them overnight for the best texture. The longer they chill, the better they taste.

What can I substitute for raspberries?

If you don’t have raspberries, try fresh strawberries or blueberries. Both fruits work well in this recipe. You can also use chopped cherries or even peaches. Just make sure to keep the fruit fresh for the best flavor. Each substitute will add a new twist to your bars.

No-bake bars are easy and fun to make. We covered simple ingredients, tasty toppings, and swaps for your pantry needs. I shared step-by-step instructions to prepare, mix, and chill your bars perfectly. Tips for a creamy filling and how to serve them can help elevate your treats. You can also customize with different fruits and healthier options. Store them well for lasting freshness. Feel free to explore substitutes and answers to common questions. Now, you’re ready to create delightful no-bake bars everyone will enjoy.

To make these tasty white chocolate raspberry pumpkin bars, you need these basic ingredients: - 1 cup graham cracker crumbs - 1/2 cup unsalted butter, melted - 1/4 cup brown sugar - 1 (8 oz) package cream cheese, softened - 1 cup pure pumpkin puree - 1/2 cup powdered sugar - 1 teaspoon vanilla extract - 1 teaspoon pumpkin spice - 1 cup white chocolate chips, melted - 1 cup fresh raspberries These ingredients blend together to create a creamy, rich filling. The graham cracker crust provides a perfect base, while the white chocolate adds a nice touch. You can make your bars even better with some optional toppings. Here are a few ideas: - Whipped cream - Extra melted white chocolate drizzle - More fresh raspberries These toppings add flavor and make your bars look great. Plus, they add a fun texture contrast. If you need to swap some ingredients, here are some easy substitutions: - Use coconut oil instead of butter for a dairy-free option. - Swap the cream cheese for a vegan cream cheese for a plant-based treat. - Use maple syrup instead of brown sugar for a natural sweetener. These swaps keep the bars delicious while catering to different diets. Don’t be afraid to get creative! To start, gather these ingredients: - 1 cup graham cracker crumbs - 1/2 cup unsalted butter, melted - 1/4 cup brown sugar In a mixing bowl, combine the graham cracker crumbs, melted butter, and brown sugar. Mix these ingredients until they blend well. You want a sandy texture. Next, press this mixture firmly into the bottom of a 9x9-inch baking dish. This will form a solid crust. Make sure it is even and compact. Now, refrigerate this base for about 10 minutes. This helps it set nicely. For the filling, you will need: - 1 (8 oz) package cream cheese, softened - 1 cup pure pumpkin puree - 1/2 cup powdered sugar - 1 teaspoon vanilla extract - 1 teaspoon pumpkin spice In another bowl, beat the softened cream cheese until it is smooth. This step is essential for a creamy texture. Next, add the pumpkin puree, powdered sugar, vanilla extract, and pumpkin spice. Mix these ingredients until they are well combined and creamy. This mixture should be thick but smooth. The flavors blend beautifully here. Now it’s time to combine our layers. First, melt 1 cup of white chocolate chips. Let them cool slightly before adding to the pumpkin mixture. Gently fold the melted white chocolate into the pumpkin cream cheese mixture until fully mixed in. Spread this creamy filling evenly over the chilled graham cracker crust. Now, take 1 cup of fresh raspberries. Evenly distribute them on top of the filling. Gently press them into the mixture. This adds a nice burst of flavor. Cover the dish with plastic wrap. Chill in the refrigerator for at least 4 hours. This will help the bars set. Once firm, cut into squares or bars. You can serve each piece with a dollop of whipped cream, if you want. Enjoy your delicious creation! To make your filling extra creamy, start with soft cream cheese. I let it sit at room temperature for about 30 minutes. This helps it blend better. When mixing, use a hand mixer. This tool gives you a smooth texture. After mixing the cream cheese, add the pumpkin puree slowly. This keeps the mixture from getting too thick. Lastly, fold in the melted white chocolate gently. This way, you keep the light and airy texture. Once you mix the filling, spread it over the crust evenly. Make sure to press it down lightly. This helps it set well. After layering, cover the dish with plastic wrap. It helps keep moisture in while it chills. I recommend refrigerating the bars for at least four hours. For best results, chill them overnight. This allows the flavors to blend and the bars to firm up. When it’s time to serve, cut the bars into squares. I like to use a sharp knife for clean edges. You can top each bar with whipped cream for extra creaminess. A drizzle of melted white chocolate adds a nice touch. For a pop of color, add a few fresh raspberries on top. This makes the bars look beautiful and appetizing. Enjoy these bars cold for the best flavor! {{image_2}} You can switch up the fruit in these bars. Try using strawberries or blueberries. Both fruits bring a fresh taste. You can even mix different fruits for added flavor. Just chop the fruit into small pieces. Press them gently into the top layer before chilling. You might want to change the chocolate base. Use dark chocolate instead of white chocolate. This swap adds a rich flavor. You can also try milk chocolate for a sweeter taste. Just melt the chocolate and mix it in the same way. Want a healthier twist? You can use whole grain graham crackers. This change boosts fiber. Swap cream cheese for Greek yogurt for less fat. You can also cut back on sugar by using honey or maple syrup. These swaps keep the bars tasty but lighter. To store leftovers, cut the bars into squares. Place them in an airtight container. Make sure to layer parchment paper between the bars. This keeps them from sticking together. Store the container in the fridge. The bars will stay fresh and tasty this way. Enjoy them within a week for the best flavor. You can freeze these bars for longer storage. First, cut the bars into squares. Then, wrap each square tightly in plastic wrap. Place the wrapped bars in a freezer-safe container. You can also use a zip-top bag. Make sure to remove as much air as possible. The bars can freeze for up to three months. When ready to eat, simply thaw them in the fridge overnight. These no-bake bars have a good shelf life. If you store them in the refrigerator, they last about five to seven days. If frozen, they can last up to three months. Keep an eye on any changes in smell or texture. If anything seems off, it’s best to toss them. Enjoy them fresh for the best taste! Yes, you can use dark or milk chocolate instead of white chocolate. Each will give a unique taste. Dark chocolate adds a rich flavor. Milk chocolate makes the bars sweeter. Just melt it the same way as white chocolate. Make sure to adjust the sugar if you use dark chocolate, as it is less sweet. These bars need at least 4 hours to chill. This time helps them set well. You want them firm and easy to cut. If you have the time, chill them overnight for the best texture. The longer they chill, the better they taste. If you don't have raspberries, try fresh strawberries or blueberries. Both fruits work well in this recipe. You can also use chopped cherries or even peaches. Just make sure to keep the fruit fresh for the best flavor. Each substitute will add a new twist to your bars. No-bake bars are easy and fun to make. We covered simple ingredients, tasty toppings, and swaps for your pantry needs. I shared step-by-step instructions to prepare, mix, and chill your bars perfectly. Tips for a creamy filling and how to serve them can help elevate your treats. You can also customize with different fruits and healthier options. Store them well for lasting freshness. Feel free to explore substitutes and answers to common questions. Now, you're ready to create delightful no-bake bars everyone will enjoy.

White Chocolate Raspberry Pumpkin Bars No Bake

Indulge in the delightful flavors of White Chocolate Raspberry Pumpkin Bars, a perfect dessert for fall! This easy recipe blends creamy pumpkin, tangy raspberries, and rich white chocolate, creating a sweet treat everyone will love. With just a few simple steps, you can impress your family and friends. Ready to make these luscious bars? Click to explore the full recipe and bring autumn sweetness to your table!

Ingredients
  

1 cup graham cracker crumbs

1/2 cup unsalted butter, melted

1/4 cup brown sugar

1 (8 oz) package cream cheese, softened

1 cup pure pumpkin puree

1/2 cup powdered sugar

1 teaspoon vanilla extract

1 teaspoon pumpkin spice

1 cup white chocolate chips, melted

1 cup fresh raspberries

Whipped cream for topping (optional)

Instructions
 

Prepare the Base: In a mixing bowl, combine the graham cracker crumbs, melted butter, and brown sugar. Mix until well combined. Press the mixture firmly into the bottom of a 9x9-inch baking dish to form a crust. Refrigerate for 10 minutes to set.

    Mix the Filling: In another bowl, beat the softened cream cheese until smooth. Add the pumpkin puree, powdered sugar, vanilla extract, and pumpkin spice. Mix until all ingredients are well combined and creamy.

      Incorporate White Chocolate: Allow the melted white chocolate chips to cool slightly, then fold them into the pumpkin cream cheese mixture until fully incorporated.

        Layer Bar: Spread the pumpkin mixture evenly over the chilled graham cracker crust. Evenly distribute the fresh raspberries on top, gently pressing them into the mixture.

          Chill: Cover the dish with plastic wrap and refrigerate for at least 4 hours, or until the bars are firm and set.

            Serve: Once chilled and set, cut into squares or bars. Serve each piece with a dollop of whipped cream, if desired.

              Prep Time: 20 minutes | Total Time: 4 hours 20 minutes | Servings: 16 bars

                - Presentation Tips: Arrange the bars on a decorative plate and drizzle with extra melted white chocolate. Garnish with additional raspberries for a vibrant touch.

                  WANT TO SAVE THIS RECIPE?