Ready to make a treat that’s fun and tasty? Strawberry Lemonade Cake Pops are a perfect choice! These sweet bites burst with fruity flavor and are easy to create. Whether you're baking for a party or just a weekend snack, you’ll enjoy the step-by-step guide here. Let’s dive into the ingredients, tips, and tricks to make your cake pops a hit!
Why I Love This Recipe
- Deliciously Refreshing: The combination of strawberries and lemon creates a bright, refreshing flavor that is perfect for any occasion.
- Fun to Make: Rolling the cake pops and decorating them adds a fun interactive element to baking, making it enjoyable for all ages.
- Perfect for Parties: These cake pops are not only delicious but also visually appealing, making them a great addition to any celebration or gathering.
- Easy to Customize: You can easily switch up the flavors or toppings to suit your taste preferences or match different themes.
Ingredients
List of Ingredients for Strawberry Lemonade Cake Pops
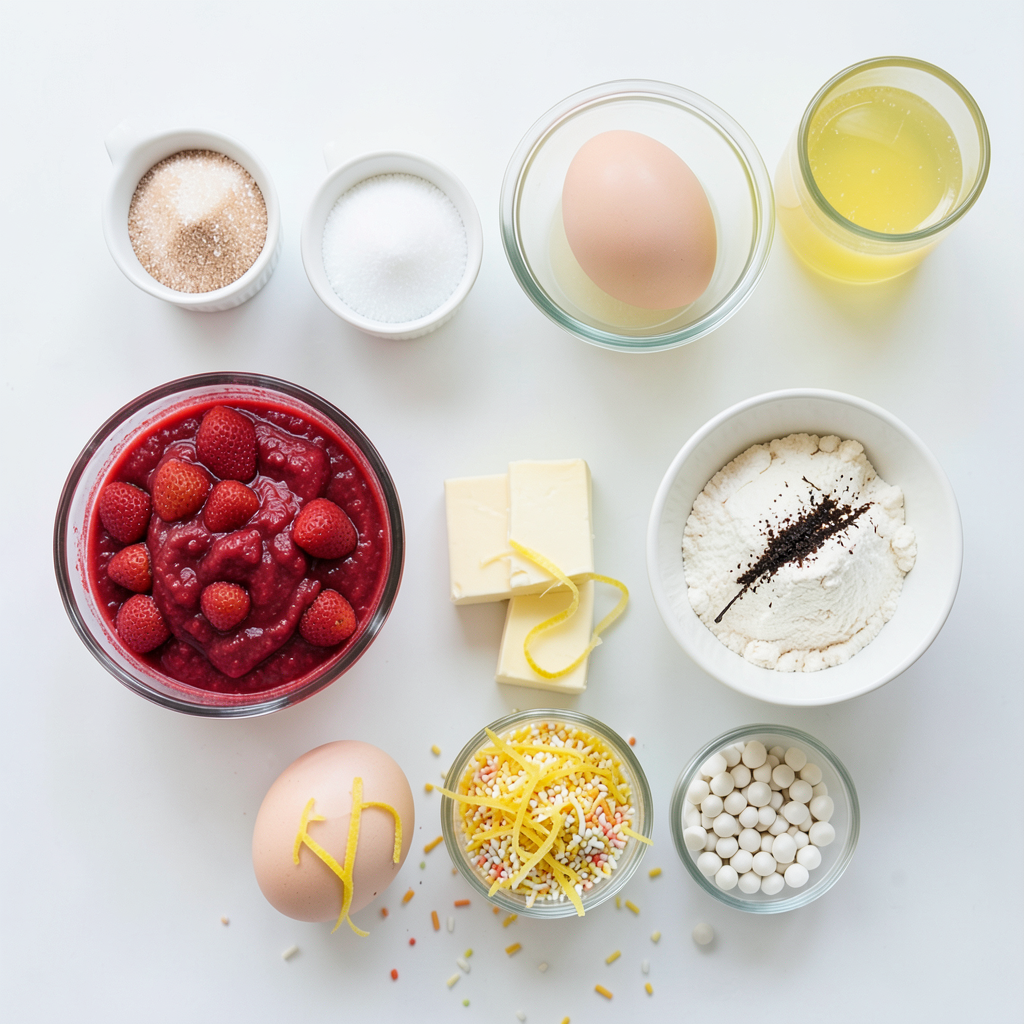
To make your Strawberry Lemonade Cake Pops, you need the following ingredients:
- 1 cup fresh strawberries, pureed
- 1/2 cup sugar
- 1/4 cup unsalted butter, softened
- 2 large eggs
- 1 teaspoon vanilla extract
- 1 1/2 cups all-purpose flour
- 2 teaspoons baking powder
- 1/4 teaspoon salt
- Zest of 1 lemon
- 1/4 cup lemonade (freshly squeezed or store-bought)
- 1 cup white chocolate chips (for coating)
- Sprinkles or crushed nuts (for decoration)
Fresh Ingredients vs. Store-Bought Options
Using fresh strawberries gives your cake pops great flavor. They add a natural sweetness. If fresh strawberries aren't available, you can use frozen strawberries. Just make sure to thaw and puree them first. For the lemonade, freshly squeezed juice adds a nice zing. Store-bought lemonade works too if you're short on time.
Suggested Substitutes for Common Allergens
If you want to make these pops allergy-friendly, here are some ideas:
- Use a dairy-free butter substitute for those who can't have dairy.
- Substitute eggs with unsweetened applesauce or a flaxseed mixture for egg-free options.
- For gluten-free cake pops, swap all-purpose flour with a gluten-free blend.
These swaps keep the fun while making it safe for everyone!
Step-by-Step Instructions
Prepping the Cake Batter
To start, you need to make the cake batter. First, pureé 1 cup of fresh strawberries. In a large bowl, combine the strawberry puree and 1/2 cup of sugar. Mix them well. Next, add 1/4 cup of softened unsalted butter. Beat this mixture until it is creamy. Then, add 2 large eggs and 1 teaspoon of vanilla extract. Mix until smooth.
In another bowl, whisk together 1 1/2 cups of all-purpose flour, 2 teaspoons of baking powder, 1/4 teaspoon of salt, and the zest of 1 lemon. Slowly add this dry mix into the wet mixture. Alternate with 1/4 cup of lemonade. Stir until just combined. This step gives the cake a nice lemony flavor.
Baking the Cake
Now, it’s time to bake! Preheat your oven to 350°F (175°C). Grease and flour an 8-inch round cake pan. Pour the batter into the prepared pan and smooth the top. Bake for 25-30 minutes. You can check if it is done by inserting a toothpick in the center. If it comes out clean, your cake is ready!
Let the cake cool in the pan for about 10 minutes. After that, turn it out onto a wire rack to cool completely. This cooling step is key before crumbling the cake.
Forming the Cake Pops
Once the cake is cool, crumble it into a large bowl. You want small pieces. Add a few tablespoons of frosting to the crumbs. You can use store-bought or homemade frosting. For a fun twist, try lemon-flavored frosting. This helps bind the mixture.
Roll the cake mixture into small balls, about 1 inch in diameter. Place them on a parchment-lined baking sheet. Insert a lollipop stick into the center of each ball. Freeze the cake pops for about 30 minutes. This helps them hold their shape.
While they are freezing, melt 1 cup of white chocolate chips in a microwave-safe bowl. Use 30-second intervals, stirring until smooth.
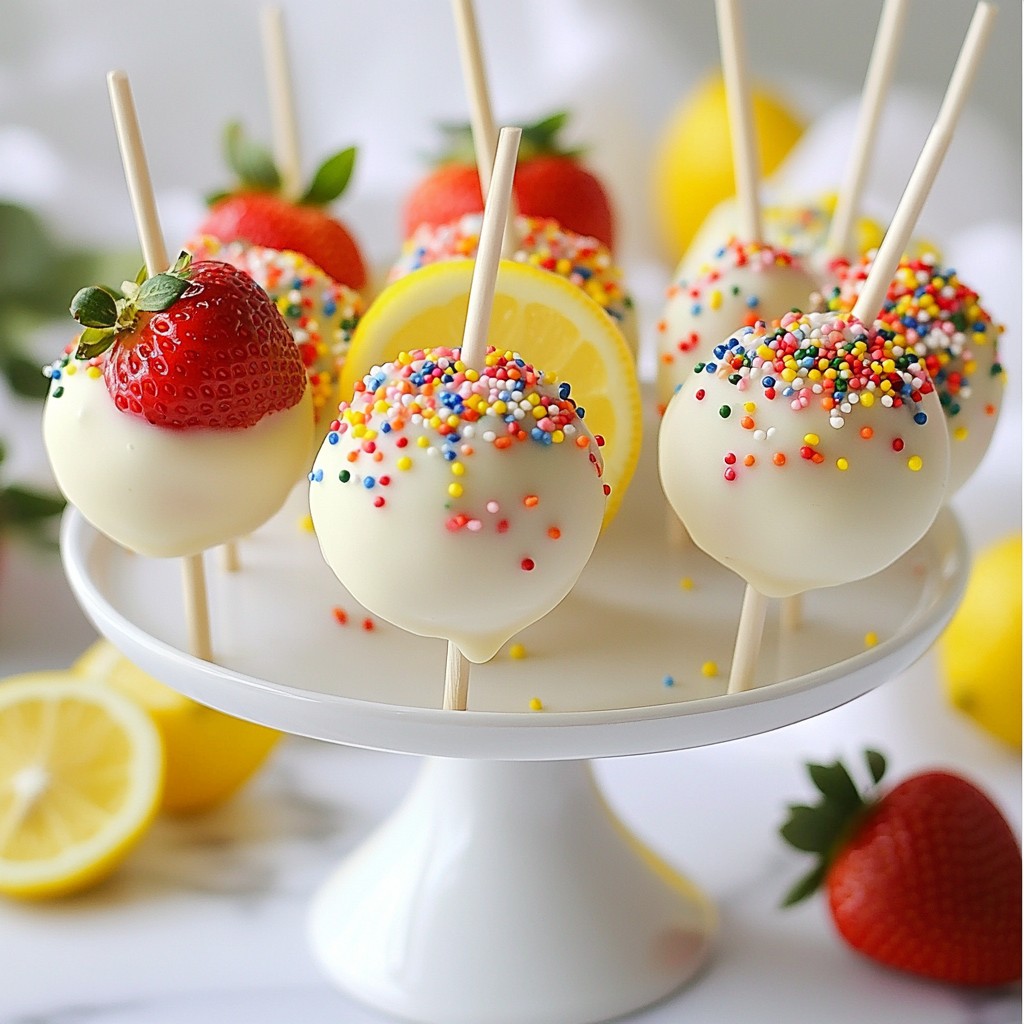
Next, dip each cake pop into the melted chocolate. Make sure to coat them evenly. Let any excess chocolate drip off. Before the chocolate hardens, add your favorite sprinkles or crushed nuts on top. Finally, place the dipped pops upright in a foam block or stand until the chocolate sets. Enjoy your tasty treats!
Tips & Tricks
Achieving the Perfect Cake Texture
To get a soft and moist cake, use fresh strawberries. Puree them well for even flavor. Mix the wet and dry ingredients separately first. This helps the cake rise better. Don’t over-mix the batter; just combine until you see no dry spots. This keeps your cake light.
How to Melt Chocolate Smoothly
For the best melted chocolate, use white chocolate chips. Place them in a microwave-safe bowl. Heat them in 30-second bursts, stirring in between. This keeps the chocolate from burning. If it gets too thick, add a tiny bit of vegetable oil. This helps it stay smooth for dipping.
Decorating Ideas for Cake Pops
Make your cake pops fun with toppings! Use colorful sprinkles or crushed nuts for texture. You can also drizzle melted chocolate in a zigzag for flair. For an extra touch, add fresh strawberries or lemon slices around your display. This makes an eye-catching treat that everyone will love!
Pro Tips
- Use Fresh Ingredients: Always opt for fresh strawberries and lemons for the best flavor in your cake pops.
- Chill Before Dipping: Ensure the cake pops are thoroughly chilled before dipping them in chocolate to maintain their shape.
- Experiment with Flavors: Feel free to mix in other flavors like lime or orange zest for a unique twist on the classic lemonade flavor.
- Decorate Creatively: Get creative with your toppings! Use different colored sprinkles or edible glitter for a fun and festive look.
Variations
Flavor Variations (e.g., Adding Other Fruits)
You can add other fruits to your cake pops for fun flavors. Try using raspberries or blueberries. Both can mix well with strawberries and add a nice twist. You can also substitute some strawberry puree with peach or mango puree. The flavor will change, but it will still be delicious. Just remember to keep the amounts balanced.
Alternative Coatings for Cake Pops
While white chocolate is tasty, you can try different coatings. Milk chocolate or dark chocolate can add a rich taste. You can also use candy melts in fun colors. These melts come in various flavors too. If you want a healthier option, consider using yogurt coating. It adds creaminess and a hint of tang.
Ideas for Themed Decorations
Decorating your cake pops can be a fun part of the process. For birthday parties, use colorful sprinkles that match the theme. You can make them look like little strawberries by using red and green icing. For summer, try lemon-shaped designs with yellow icing and lemon zest. Seasonal themes can also work well, like pumpkin for fall or snowflakes for winter. Let your creativity shine!
Storage Info
Best Practices for Storing Cake Pops
To store your cake pops, keep them in an airtight container. Line the bottom with parchment paper. This helps prevent sticking. If you have decorated the pops, place them in a single layer. Avoid stacking them, as this could ruin their look. Store the container in a cool, dry place. Cake pops stay fresh for up to one week this way.
Freezing Instructions for Long-Term Storage
If you want to keep your cake pops longer, freezing is a great option. First, allow the cake pops to set completely after coating them with chocolate. Once set, place them on a baking sheet lined with parchment paper. Freeze them for about an hour until firm. After that, transfer them to a freezer-safe bag or container. They can last for up to three months in the freezer. Remember to label the bag with the date.
How to Maintain Freshness When Serving
When serving, take out only the number of cake pops you need. Keep the rest in the container or freezer. If they are thawed, serve them at room temperature. This keeps their texture nice and soft. Avoid placing them in direct sunlight or heat, as this can cause melting. If you want to impress guests, arrange them on a decorative stand. Add some fresh strawberries or lemon slices around them for a bright touch.
FAQs
Can I use frozen strawberries instead of fresh?
Yes, you can use frozen strawberries. Just make sure to thaw and drain them. This helps remove excess water. Then, puree them as you would with fresh strawberries. The flavor will still be great!
What type of frosting works best for these cake pops?
I love using lemon-flavored frosting for a zesty kick. You can also use cream cheese frosting for a tangy touch. Store-bought frosting works just fine too. It saves time and still tastes good!
How long do strawberry lemonade cake pops last?
Store your cake pops in the fridge. They stay fresh for about 5 days. If you want to keep them longer, freeze them. They can last for up to 2 months in the freezer. Just thaw them in the fridge before serving.
In this blog, we explored how to make strawberry lemonade cake pops, detailing each step from ingredients to storage. We discussed fresh ingredients versus store-bought options and shared substitutes for allergens. I provided tips for texture, chocolate melting, and creative decorations. Variations let you play with flavors and coatings. Finally, we covered storage and freshness tips. Experimenting with cake pops can be fun. Your creativity will make every bite delicious!