Get ready for a tasty treat that screams summer! S’mores Ice Cream Sandwiches combine the classic flavors of graham crackers, chocolate, and marshmallows with rich ice cream. This easy recipe is fun to make and perfect for warm days. Whether you’re hosting a party or just want a sweet snack, these sandwiches will impress everyone. Dive into the details and create a dessert everyone will love!
Why I Love This Recipe
- Easy to Make: This recipe requires minimal effort and ingredients, making it perfect for a quick dessert.
- Perfect for Any Occasion: Whether it's a summer BBQ or a cozy winter night, these S’mores Ice Cream Sandwiches are a hit!
- Customizable: You can easily switch up the ice cream flavor or add different toppings to suit your taste.
- Deliciously Indulgent: The combination of chocolate, marshmallows, and graham crackers is a nostalgic treat that everyone loves!
Ingredients
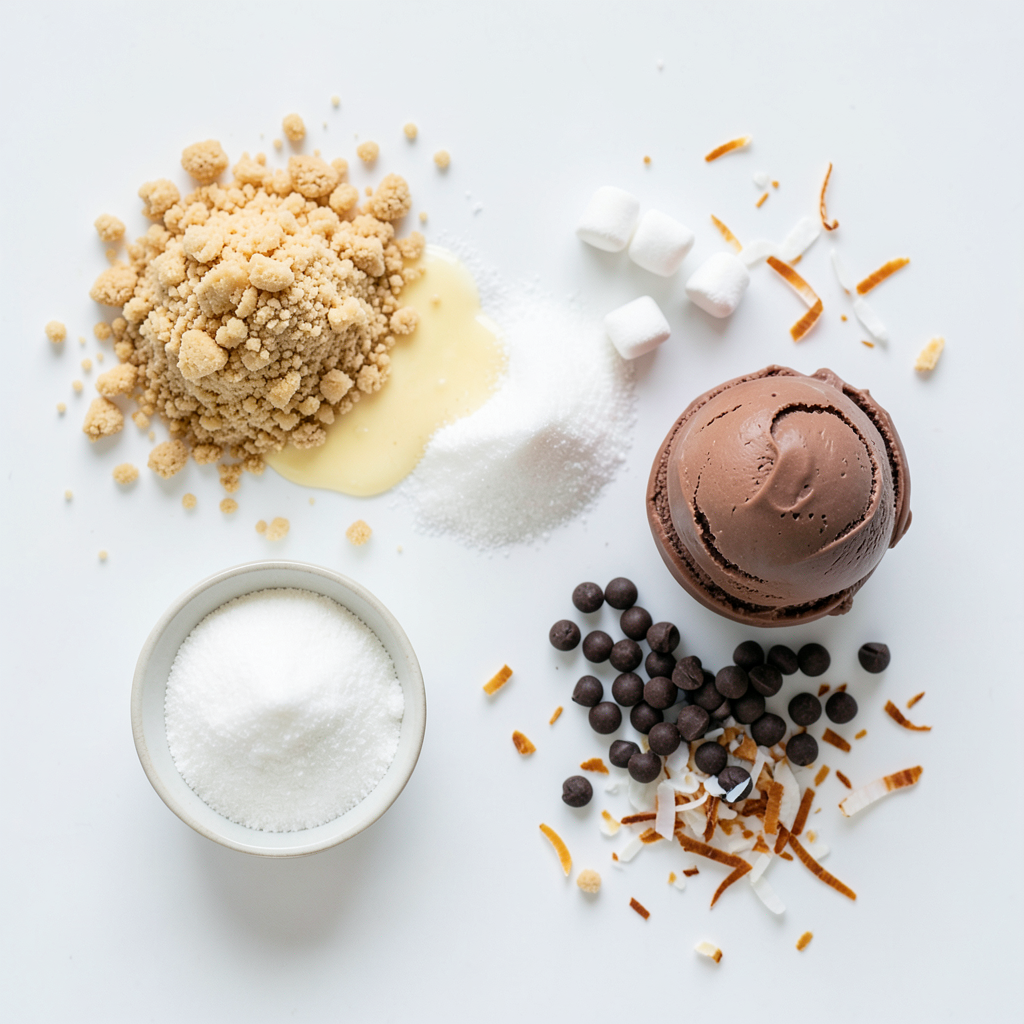
List of Ingredients for S'mores Ice Cream Sandwiches
To create these tasty S’mores Ice Cream Sandwiches, you will need:
- 1 cup graham cracker crumbs
- 1/4 cup granulated sugar
- 1/2 cup unsalted butter, melted
- 1 cup mini marshmallows
- 2 cups chocolate ice cream (or your favorite flavor)
- 1/2 cup chocolate chips (for melting)
- 1/4 cup toasted coconut flakes (optional for garnish)
These ingredients blend well to give you that classic s'mores flavor in a cool treat.
Common Substitutions
If you don't have graham cracker crumbs, you can use crushed cookies like Digestives or vanilla wafers. Instead of chocolate ice cream, try vanilla or even strawberry for a twist. For those who can't have butter, coconut oil works great as a substitute here.
Optional Add-ins for Added Flavor
You can customize your sandwiches! Add some peanut butter for a nutty touch. Try crushed nuts or candy pieces for a crunch. Want a tropical vibe? Use crushed pineapple with the toasted coconut. The options are endless, so feel free to explore flavors you love!
Step-by-Step Instructions
Preparing the Graham Cracker Crust
To make the crust, start by mixing one cup of graham cracker crumbs with a quarter cup of granulated sugar. Then, add a half cup of melted unsalted butter. Mix it well until it looks like wet sand. Next, take half of this mixture and press it firmly into the bottom of a 9x9-inch baking dish. This will be your base crust.
Assembling the Ice Cream Layers
Once your crust is ready, spread two cups of your favorite chocolate ice cream evenly over the crust. Make sure to cover it all. Then, place the dish in the freezer for about one hour. This makes the ice cream firm. After an hour, take it out and sprinkle one cup of mini marshmallows over the ice cream.
Now, melt half a cup of chocolate chips in a microwave-safe bowl. Heat them in 30-second intervals, stirring in between. Once melted, drizzle the chocolate over the marshmallows. Finally, sprinkle the remaining graham cracker mixture on top. Press it down gently to set it all together.
Freezing and Serving Suggestions
Return the dish to the freezer. Let it freeze for another 2 to 3 hours until it is completely set. After that, remove it from the freezer. Cut it into squares or rectangles for individual servings. If you want, sprinkle some toasted coconut flakes on top for a fun crunch. Enjoy your delicious S’mores Ice Cream Sandwiches!
Tips & Tricks
How to Perfect Your S'mores Ice Cream Sandwiches
To make the best S'mores Ice Cream Sandwiches, use fresh ingredients. Start with the right graham crackers. Crush them finely for a smooth crust. When mixing crumbs with butter, aim for a wet sand texture. This helps hold your sandwich together. For the ice cream, let it soften slightly before spreading. This makes it easier to layer on the crust.
Best Tools for Recipe Preparation
Having the right tools makes this recipe easier. Here’s what I recommend:
- Mixing bowls for combining ingredients
- A 9x9-inch baking dish for the layers
- A spatula for spreading ice cream
- A microwave-safe bowl for melting chocolate
- A sharp knife for cutting your sandwiches
These tools will help you create perfect sandwiches every time.
Common Mistakes to Avoid
Avoid these common pitfalls to ensure success:
- Don’t skip freezing time. Allowing layers to set is crucial.
- Use too much butter in the crust; it makes it greasy.
- Forgetting to press the crust firmly leads to crumbling.
- Not letting the ice cream soften can create a messy layer.
By steering clear of these mistakes, you'll make delicious S'mores Ice Cream Sandwiches that everyone will adore.
Pro Tips
- Chill Your Tools: Before spreading the ice cream, chill your spatula or knife in hot water and dry it off. This makes spreading easier and results in a smoother layer.
- Customize Your Flavors: Feel free to switch up the ice cream flavor to your favorite—try vanilla, strawberry, or even mint chocolate chip for a fun twist!
- Extra Crunch: For added texture, incorporate crushed nuts or additional chocolate pieces into the marshmallow layer.
- Serving Suggestions: Serve with a drizzle of chocolate sauce or a dollop of whipped cream for an indulgent touch!
Variations
Vegan S'mores Ice Cream Sandwiches
You can make vegan s'mores ice cream sandwiches using simple swaps. Replace butter with coconut oil. Use a vegan ice cream made from almond or coconut milk. They still taste great. The texture remains creamy and delicious.
Gluten-Free Options and Tips
For gluten-free options, choose gluten-free graham crackers. Many brands offer these now. Make sure your chocolate chips are also gluten-free. This way, everyone can enjoy this treat without worry. The taste will still shine through.
Flavor Variations
You can get creative with the ice cream flavors. While chocolate is classic, try vanilla or strawberry for a twist. You can also mix in some peanut butter or cookie dough chunks. The options are endless! Each flavor adds a new layer of fun.
Storage Info
Storing Leftover Ice Cream Sandwiches
To keep leftover S’mores ice cream sandwiches fresh, wrap each one tightly in plastic wrap. This helps prevent freezer burn. You can also place them in an airtight container. Make sure there is no extra air inside the container. This keeps the sandwiches from getting too icy.
Best Freezing Techniques
When you freeze these sandwiches, lay them flat in the freezer. Avoid stacking them until they are fully frozen. This ensures they hold their shape and stay intact. If you want them to last longer, consider using parchment paper between each sandwich. This makes it easier to take them out later.
Shelf Life and Freshness Tips
These ice cream sandwiches are best eaten within two weeks. They can last up to a month in the freezer, but the texture may change. To enjoy their best taste, eat them sooner rather than later. Always check for any ice crystals or a dry texture before serving. If you see that, it’s time to say goodbye!
FAQs
Can I use store-bought graham cracker crust?
Yes, you can use store-bought graham cracker crust. It saves time and effort. Just make sure to choose a crust that fits your baking dish size. Using a store-bought crust makes this treat even easier to make. You will still enjoy that classic s'mores taste.
What ice cream flavors work best for this recipe?
While chocolate ice cream shines in this recipe, you can try other flavors. Vanilla or caramel ice cream adds a fun twist. For a fruity twist, consider strawberry or raspberry. Each flavor brings its own charm to the s'mores ice cream sandwiches. Feel free to mix and match to find your favorite.
How long do the S'mores Ice Cream Sandwiches last in the freezer?
These tasty treats can last up to two weeks in the freezer. Just be sure to wrap them tightly. Use plastic wrap or an airtight container to keep them fresh. The longer they freeze, the firmer they get. Enjoy them within two weeks for the best taste and texture.
In this guide, we explored how to create delicious S'mores Ice Cream Sandwiches. We covered key ingredients, step-by-step instructions, and helpful tips. You learned about variations, storage tips, and common questions.
Remember, the joy of this treat is in its creativity. Feel free to experiment with flavors and textures. Enjoy making these fun snacks for yourself and others. You won’t regret it!