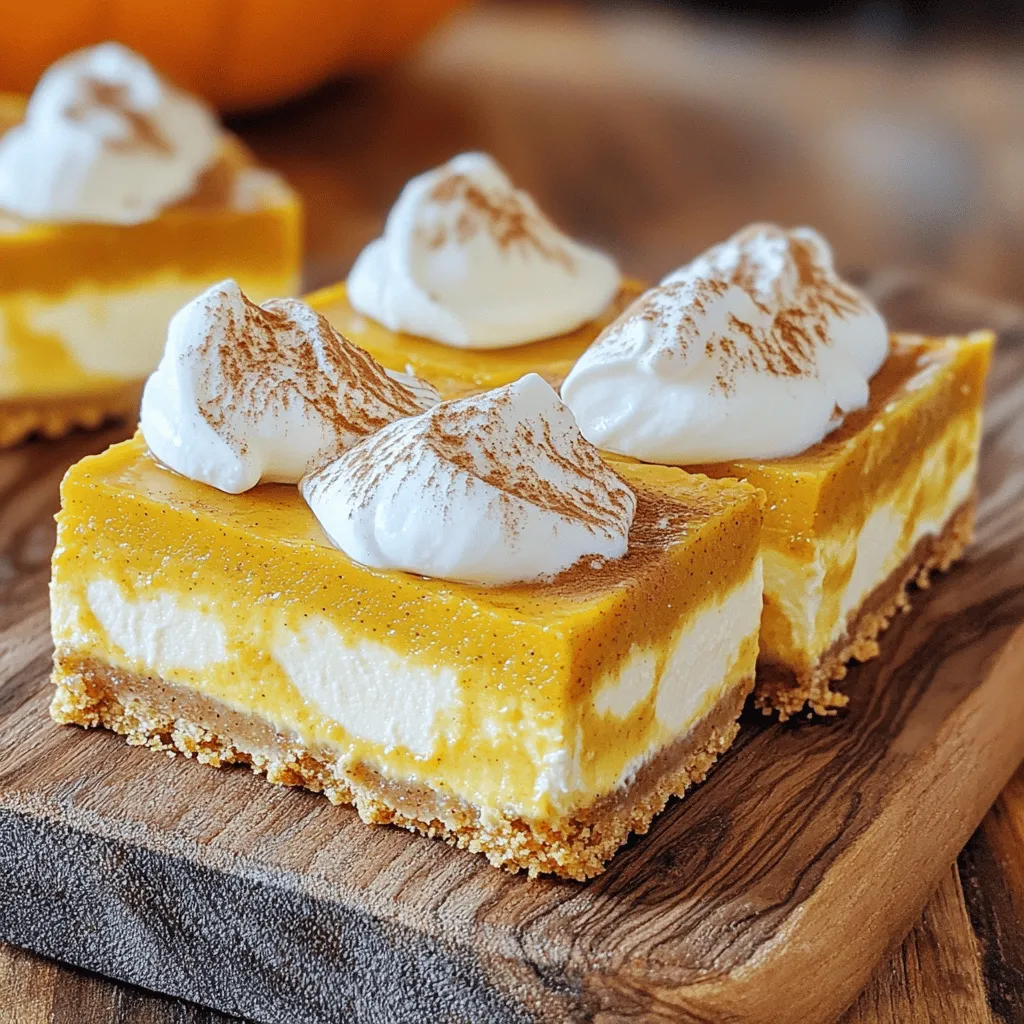
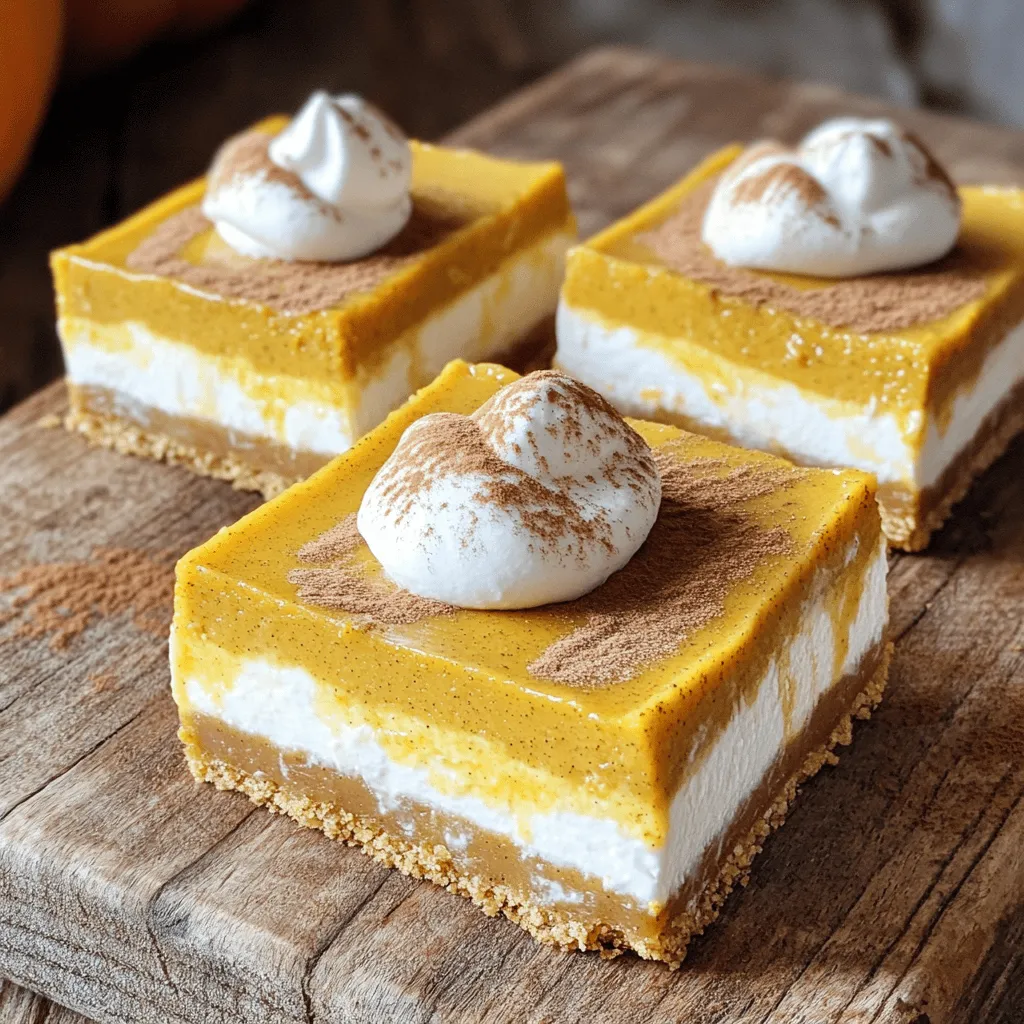
Are you ready to fall in love with dessert all over again? My Pumpkin Cheesecake Layered Bars offer a rich, sweet, and creamy treat you won’t want to miss. With layers of tasty pumpkin and cream cheese, this dish is a sweet hug for your taste buds. Get your baking gear ready, as I’ll guide you step by step to make these irresistible delights perfect for any gathering or cozy night in!
Ingredients
List of Required Ingredients
To make Pumpkin Cheesecake Layered Bars, gather these simple ingredients:
– 1 cup graham cracker crumbs
– 1/2 cup unsalted butter, melted
– 1/4 cup granulated sugar
– 2 cups pumpkin puree
– 1 teaspoon cinnamon
– 1/2 teaspoon nutmeg
– 1/4 teaspoon ginger
– 1/4 teaspoon cloves
– 1 (8 oz) package cream cheese, softened
– 1/2 cup powdered sugar
– 2 large eggs
– 1 teaspoon vanilla extract
– Pinch of salt
– Whipped cream (for serving, optional)
Notes on Ingredient Quality
Using high-quality ingredients makes a big difference. For the graham cracker crumbs, choose fresh ones from the store or crush your own. Fresh pumpkin puree offers a better flavor than canned. Always pick cream cheese that is full-fat. It makes the bars creamy and rich. Spices should be fresh for the best taste. Check the dates on your jars!
Possible Ingredient Substitutions
You can easily swap some ingredients if you need to:
– Use whole wheat graham cracker crumbs for a healthier crust.
– Substitute melted coconut oil for unsalted butter if you want a dairy-free option.
– For a spice change, add pumpkin pie spice instead of individual spices.
– Cream cheese can be replaced with a vegan cream cheese for a dairy-free treat.
– If you don’t have pumpkin puree, you can use mashed banana or applesauce, but this will change the flavor.
Step-by-Step Instructions
Preparation of Your Baking Dish
Start by preheating your oven to 350°F (175°C). This step is key to getting a good bake. Next, grab an 8×8 inch baking dish. Line it with parchment paper. Let the edges hang over the sides. This makes it easy to lift the bars out later.
Making the Graham Cracker Crust
In a medium bowl, mix together 1 cup of graham cracker crumbs, 1/2 cup of melted unsalted butter, and 1/4 cup of granulated sugar. Stir until it looks like wet sand. Press this mixture firmly into the bottom of your prepared dish. Make sure it’s even and compact. Bake the crust for 10 minutes. After baking, take it out and let it cool a bit.
Preparing the Pumpkin and Cream Cheese Mixtures
In a large bowl, combine 2 cups of pumpkin puree, 1 teaspoon of cinnamon, 1/2 teaspoon of nutmeg, 1/4 teaspoon of ginger, 1/4 teaspoon of cloves, and a pinch of salt. Mix well until smooth. Set this pumpkin mixture aside. In another bowl, beat 1 (8 oz) package of softened cream cheese until smooth. Add 1/2 cup of powdered sugar, 2 large eggs, and 1 teaspoon of vanilla extract. Beat until creamy and well mixed.
Layering the Ingredients
Pour half of the cream cheese mixture over the cooled graham cracker crust. Spread it evenly across the crust. Next, carefully layer the pumpkin mixture over the cream cheese layer. Spread it out gently. Finally, spoon dollops of the remaining cream cheese mixture on top. Use a knife to swirl it gently. Be careful not to overmix.
Baking and Cooling Process
Bake the layered bars in the oven for 35-40 minutes. The center should be set and only slightly jiggly. Once done, take it out and let it cool at room temperature for about an hour. Then, refrigerate for at least 2 hours. This cooling helps the bars firm up. When ready to serve, lift them out using the parchment paper and cut into squares. Enjoy with a dollop of whipped cream!
Tips & Tricks
How to Achieve the Perfect Swirl
To create a beautiful swirl in your Pumpkin Cheesecake Layered Bars, use a spoon. After adding the cream cheese mixture on top of the pumpkin layer, gently dollop it. Then, with the back of the spoon, swirl it lightly. Be careful not to mix too much. The goal is to see both layers. This gives your bars a stunning look.
Common Mistakes to Avoid
One common mistake is overmixing the cream cheese layer. This can lead to a dense texture. Another mistake is skipping the cooling time after baking. If you cut the bars too soon, they may fall apart. Be patient and let them cool and set in the fridge. Lastly, ensure your oven is at the right temperature. An incorrect temperature can change the baking time and texture.
Serving Suggestions and Presentation Ideas
When serving your bars, cut them into equal squares for a nice look. You can dust them with a sprinkle of cinnamon or nutmeg for flair. Adding whipped cream on top enhances the flavor and adds a touch of elegance. For a fun twist, place a small pumpkin candy on each bar. This not only looks great but also adds a sweet surprise for your guests.
Variations
Different Flavor Additions (Caramel, Chocolate)
You can add twists to your Pumpkin Cheesecake Layered Bars. Try drizzling caramel on top for a sweet touch. Just melt some caramel candies with cream and pour it over the bars before serving. For chocolate lovers, mix cocoa powder into the cream cheese layer. You can also fold chocolate chips into the pumpkin layer for a delightful surprise. Both options will give your bars a unique taste!
Gluten-Free Alternatives
If you need gluten-free bars, swap out the graham crackers. Use gluten-free cookie crumbs or almond flour mixed with butter and sugar. This will create a tasty crust that everyone can enjoy. Make sure to check labels on all ingredients to avoid gluten.
Vegan Substitutions
To make these bars vegan, substitute cream cheese with a vegan version made from cashews or tofu. Use flax eggs instead of regular eggs. Combine one tablespoon of ground flaxseed with three tablespoons of water for each egg. For the crust, you can use coconut oil instead of butter. These swaps keep the flavor while making it plant-based!
Storage Info
Best Practices for Storing Leftovers
To keep your pumpkin cheesecake layered bars fresh, first, let them cool. Once they reach room temperature, cover them tightly with plastic wrap or aluminum foil. You can also place them in an airtight container. Store them in the fridge, where they will stay good for about 5 days. If you want to keep them longer, freezing is a great option.
Freezing Instructions
You can freeze these bars for up to 3 months. First, cut them into squares. Wrap each piece in plastic wrap. Then, place the wrapped pieces in a freezer-safe bag or container. Be sure to label it with the date. When you want to enjoy them, just take out what you need and let them thaw in the fridge overnight.
Reheating Guidelines
If you prefer warm bars, you can reheat them easily. Preheat your oven to 350°F (175°C). Place the bars on a baking sheet and cover them with foil. Heat for about 10-15 minutes or until warm. For a quick option, you can use the microwave. Just warm them for 15-20 seconds, but be careful not to overheat. Enjoy them fresh and tasty!
FAQs
How long do Pumpkin Cheesecake Layered Bars last?
Pumpkin Cheesecake Layered Bars can last up to five days in the fridge. Keep them in an airtight container. This helps them stay fresh and tasty. After five days, they may start to lose flavor and texture.
Can I make these bars ahead of time?
Yes, you can make these bars ahead of time. They are perfect for parties or holiday gatherings. Just bake and chill them in the fridge. This allows the flavors to blend well. They taste even better after a day!
What can I use instead of cream cheese?
If you want to replace cream cheese, try using Greek yogurt or mascarpone. Both options add creaminess to the bars. You can also use a dairy-free cream cheese for a vegan twist. Just ensure it has a similar texture for the best results.
Can I substitute the pumpkin puree?
Yes, you can use butternut squash puree instead of pumpkin puree. It has a similar taste and texture. You can even use sweet potato puree for a different flavor. Just make sure it’s smooth to keep the bars creamy.
In this post, I shared how to make delicious pumpkin cheesecake layered bars. We covered the ingredients needed, tips for quality, and clever substitutions. You learned step-by-step how to prepare the dish, from the crust to baking. I shared tricks for the perfect swirl and ways to avoid common mistakes. Variations for flavors like caramel and vegan options were also included. Finally, I discussed storage and answering common questions. Enjoy making these tasty bars and impress your friends and family!