No-Bake Samoa Cookie Bars Delightful and Easy Recipe

WANT TO SAVE THIS RECIPE?

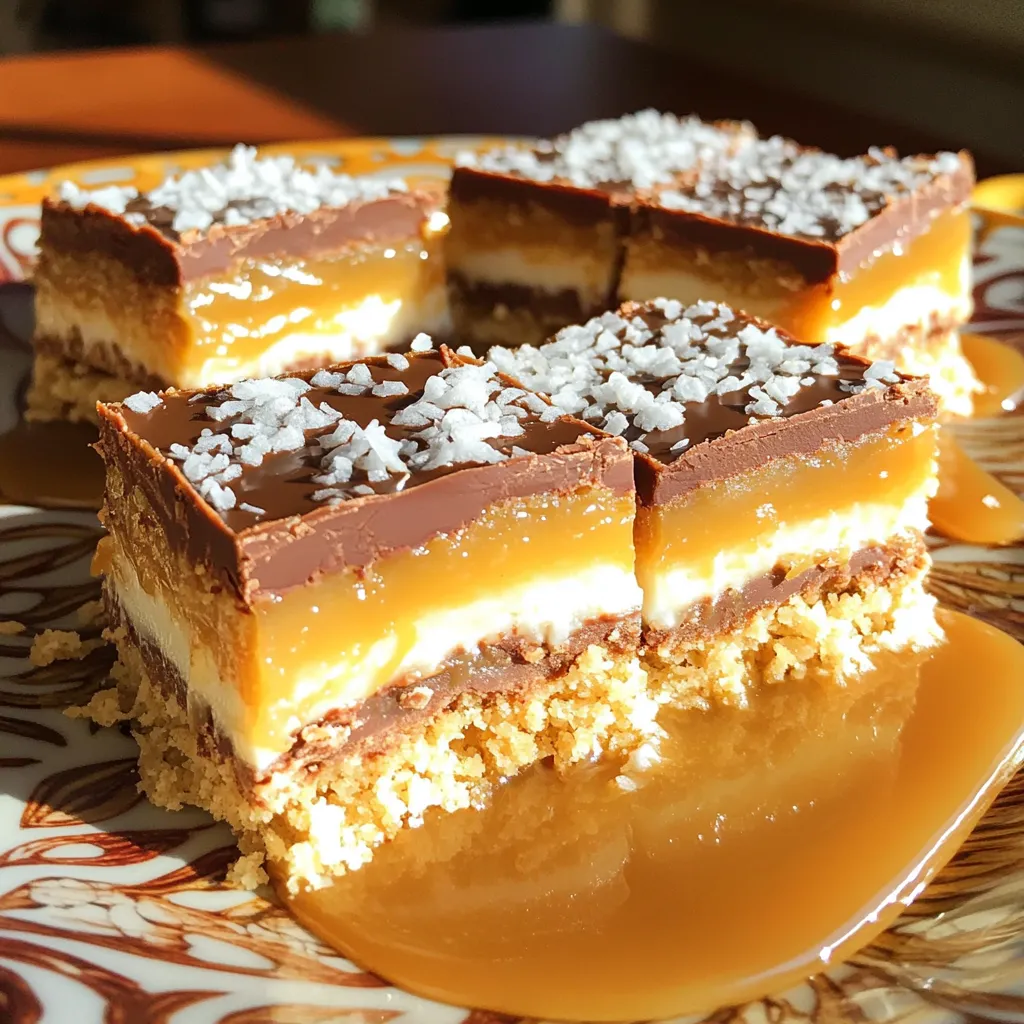
If you love sweet and crunchy treats, you’re in for a treat! My No-Bake Samoa Cookie Bars are the perfect way to satisfy your cravings. They are simple to make and packed with rich flavors. This easy recipe will show you how to create gooey layers of coconut, chocolate, and caramel without turning on the oven. Ready to bring a taste of Samoa into your kitchen? Let’s dive in!

- 1 cup graham cracker crumbs - 1 cup shredded coconut, lightly toasted - 1/2 cup unsweetened cocoa powder - 1/2 cup almond butter (or any nut butter of your choice) - 1/3 cup maple syrup - 1 teaspoon vanilla extract - 1/2 cup dark chocolate chips - 2 tablespoons coconut oil - Sea salt, for sprinkling - 1/4 cup caramel sauce (store-bought or homemade) This simple list gives you all you need to whip up these tasty bars. Each ingredient plays a key role in flavor and texture. The graham cracker crumbs give a nice base, while the toasted coconut adds a crunchy bite. You can make these bars your own! Here are some ideas: - Add chopped nuts for crunch. - Use peanut butter instead of almond butter. - Swap maple syrup with honey for a different sweetness. - Mix in chocolate chips or butterscotch chips for extra flavor. These options let you personalize your treats to suit your taste. Need to be allergy-friendly? Here are some swaps: - Use sunflower seed butter instead of nut butter for nut allergies. - Choose gluten-free graham crackers to make them gluten-free. - Replace maple syrup with agave syrup for a different sweetener. - Use dairy-free chocolate chips for a vegan option. These substitutions ensure everyone can enjoy these delightful bars without worry. First, grab a large mixing bowl. Add 1 cup of graham cracker crumbs, 1 cup of shredded coconut, and 1/2 cup of cocoa powder. Mix these dry ingredients well. Make sure there are no lumps. The toasted coconut adds a nice crunch and flavor. This mix will be the base of your bars. Now, take another bowl. In it, whisk together 1/2 cup of almond butter, 1/3 cup of maple syrup, and 1 teaspoon of vanilla extract. Whisk until smooth. The almond butter gives creaminess. Maple syrup adds sweetness. This mixture will bind all the dry ingredients together nicely. Next, pour the wet mixture into the dry ingredients. Stir until fully combined. The mixture should feel sticky. Line an 8x8-inch baking dish with parchment paper. Leave some paper hanging over the edges. This will help you lift the bars out later. Press the cookie mixture firmly into the bottom of the dish. Make sure it is even and compact. In a small saucepan, melt 1/2 cup of dark chocolate chips and 2 tablespoons of coconut oil over low heat. Stir until smooth. Drizzle half of this melted chocolate over the pressed cookie base. Next, drizzle 1/4 cup of caramel sauce on top. Use a knife to swirl it lightly. This will create a marbled effect. Then, drizzle the rest of the melted chocolate over the caramel. Sprinkle a little sea salt on top for a tasty contrast. Finally, place the dish in the fridge for at least 2 hours to set. Once set, lift the bars out using the parchment paper. Cut into squares or bars. Enjoy your delicious no-bake Samoa cookie bars! To make sure your mixture is sticky, use fresh graham cracker crumbs. Old crumbs can dry out. Also, choose almond butter that is creamy and smooth. This helps bind everything together. Mixing the wet and dry ingredients well is key. If the mix feels too dry, add a bit more maple syrup. This will help it stick together better. To melt chocolate smoothly, use low heat. Place dark chocolate chips and coconut oil in a small saucepan. Stir often as they heat up. Remove from heat when just melted. If you heat it too fast, the chocolate can burn. Use a double boiler if you have one; it helps control the heat. A smooth chocolate will drizzle nicely over the bars. If your bars don't set, they may need more time in the fridge. Be patient and let them chill for at least two hours. If they are too crumbly, this can mean too few wet ingredients. Add a bit more almond butter or syrup for better binding. If the chocolate hardens too fast, just reheat it gently. For any issues, remember, cooking is all about experimenting! {{image_2}} You can swap almond butter for other nut butters. Peanut butter adds a strong flavor. Cashew butter creates a creamier texture. Sunflower seed butter is great for nut-free diets. Each option changes the taste but keeps the bars delicious. Boost the taste of your bars with spices or extracts. Try adding a pinch of cinnamon for warmth. A touch of sea salt can enhance the sweetness. You can also mix in a splash of coconut extract for extra coconut flavor. These small changes can make a big difference. For vegan bars, use maple syrup and a dairy-free chocolate. Check that your nut butter is also vegan. To make gluten-free bars, ensure your graham cracker crumbs are gluten-free. This way, everyone can enjoy these tasty treats. To keep your No-Bake Samoa Cookie Bars fresh, store them in an airtight container. Layer parchment paper between the bars to prevent sticking. Place the container in the fridge for the best results. This will maintain their rich, chocolatey flavor and chewy texture. When stored properly, these bars last about one week in the fridge. If you want to enjoy them longer, consider freezing them. You can still savor the taste after they thaw. Just remember to keep them wrapped well. To freeze your bars, cut them into squares first. Wrap each square in plastic wrap and then place them in a freezer bag. This helps avoid freezer burn. They can last for about three months in the freezer. When you’re ready to eat, simply let them thaw in the fridge overnight. Enjoy the same great taste! Yes, you can make these bars ahead of time. They store well in the fridge. You can prepare them a day or two before serving. Just keep them in an airtight container. This way, they stay fresh and tasty! To make No-Bake Samoa Cookie Bars gluten-free, use gluten-free graham cracker crumbs. Many brands offer this option now. Check the package to ensure it is gluten-free. This small change makes the bars safe for those with gluten sensitivities. If you cannot use almond butter, try peanut butter or sunflower seed butter. Both work well in this recipe. They add creaminess and flavor, just like almond butter. Just make sure to pick one that fits your dietary needs. The bars are set when they feel firm to the touch. After two hours in the fridge, they should be ready. If you press lightly, they shouldn’t stick to your finger. If they are still soft, give them more time in the fridge. You learned how to make No-Bake Samoa Cookie Bars with easy steps. We covered key ingredients, mixing techniques, and storage tips. You can customize the recipe to fit your taste or dietary needs. Keep in mind the common issues and how to solve them to improve your bars. Overall, this treat is fun to make and delicious to eat. Enjoy creating your own version that you and your friends will love. Let your kitchen adventures begin!

Ingredients

Complete list of ingredients

– 1 cup graham cracker crumbs

– 1 cup shredded coconut, lightly toasted

– 1/2 cup unsweetened cocoa powder

– 1/2 cup almond butter (or any nut butter of your choice)

– 1/3 cup maple syrup

– 1 teaspoon vanilla extract

– 1/2 cup dark chocolate chips

– 2 tablespoons coconut oil

– Sea salt, for sprinkling

– 1/4 cup caramel sauce (store-bought or homemade)

This simple list gives you all you need to whip up these tasty bars. Each ingredient plays a key role in flavor and texture. The graham cracker crumbs give a nice base, while the toasted coconut adds a crunchy bite.

Optional ingredients for customization

You can make these bars your own! Here are some ideas:

– Add chopped nuts for crunch.

– Use peanut butter instead of almond butter.

– Swap maple syrup with honey for a different sweetness.

– Mix in chocolate chips or butterscotch chips for extra flavor.

These options let you personalize your treats to suit your taste.

Substitutions for allergy-friendly options

Need to be allergy-friendly? Here are some swaps:

– Use sunflower seed butter instead of nut butter for nut allergies.

– Choose gluten-free graham crackers to make them gluten-free.

– Replace maple syrup with agave syrup for a different sweetener.

– Use dairy-free chocolate chips for a vegan option.

These substitutions ensure everyone can enjoy these delightful bars without worry.

Step-by-Step Instructions

Preparing the dry ingredients

First, grab a large mixing bowl. Add 1 cup of graham cracker crumbs, 1 cup of shredded coconut, and 1/2 cup of cocoa powder. Mix these dry ingredients well. Make sure there are no lumps. The toasted coconut adds a nice crunch and flavor. This mix will be the base of your bars.

Mixing the wet ingredients

Now, take another bowl. In it, whisk together 1/2 cup of almond butter, 1/3 cup of maple syrup, and 1 teaspoon of vanilla extract. Whisk until smooth. The almond butter gives creaminess. Maple syrup adds sweetness. This mixture will bind all the dry ingredients together nicely.

Assembling and layering the bars

Next, pour the wet mixture into the dry ingredients. Stir until fully combined. The mixture should feel sticky. Line an 8×8-inch baking dish with parchment paper. Leave some paper hanging over the edges. This will help you lift the bars out later.

Press the cookie mixture firmly into the bottom of the dish. Make sure it is even and compact. In a small saucepan, melt 1/2 cup of dark chocolate chips and 2 tablespoons of coconut oil over low heat. Stir until smooth. Drizzle half of this melted chocolate over the pressed cookie base.

Next, drizzle 1/4 cup of caramel sauce on top. Use a knife to swirl it lightly. This will create a marbled effect. Then, drizzle the rest of the melted chocolate over the caramel. Sprinkle a little sea salt on top for a tasty contrast.

Finally, place the dish in the fridge for at least 2 hours to set. Once set, lift the bars out using the parchment paper. Cut into squares or bars. Enjoy your delicious no-bake Samoa cookie bars!

Tips & Tricks

How to ensure a sticky mixture

To make sure your mixture is sticky, use fresh graham cracker crumbs. Old crumbs can dry out. Also, choose almond butter that is creamy and smooth. This helps bind everything together. Mixing the wet and dry ingredients well is key. If the mix feels too dry, add a bit more maple syrup. This will help it stick together better.

Melting chocolate perfectly

To melt chocolate smoothly, use low heat. Place dark chocolate chips and coconut oil in a small saucepan. Stir often as they heat up. Remove from heat when just melted. If you heat it too fast, the chocolate can burn. Use a double boiler if you have one; it helps control the heat. A smooth chocolate will drizzle nicely over the bars.

Troubleshooting common issues

If your bars don’t set, they may need more time in the fridge. Be patient and let them chill for at least two hours. If they are too crumbly, this can mean too few wet ingredients. Add a bit more almond butter or syrup for better binding. If the chocolate hardens too fast, just reheat it gently. For any issues, remember, cooking is all about experimenting!

Variations

Nut butter alternatives

You can swap almond butter for other nut butters. Peanut butter adds a strong flavor. Cashew butter creates a creamier texture. Sunflower seed butter is great for nut-free diets. Each option changes the taste but keeps the bars delicious.

Flavor enhancements

Boost the taste of your bars with spices or extracts. Try adding a pinch of cinnamon for warmth. A touch of sea salt can enhance the sweetness. You can also mix in a splash of coconut extract for extra coconut flavor. These small changes can make a big difference.

Dietary modifications

For vegan bars, use maple syrup and a dairy-free chocolate. Check that your nut butter is also vegan. To make gluten-free bars, ensure your graham cracker crumbs are gluten-free. This way, everyone can enjoy these tasty treats.

Storage Info

Best practices for storing No-Bake Samoa Cookie Bars

To keep your No-Bake Samoa Cookie Bars fresh, store them in an airtight container. Layer parchment paper between the bars to prevent sticking. Place the container in the fridge for the best results. This will maintain their rich, chocolatey flavor and chewy texture.

How long do they last?

When stored properly, these bars last about one week in the fridge. If you want to enjoy them longer, consider freezing them. You can still savor the taste after they thaw. Just remember to keep them wrapped well.

Freezing tips for long-term storage

To freeze your bars, cut them into squares first. Wrap each square in plastic wrap and then place them in a freezer bag. This helps avoid freezer burn. They can last for about three months in the freezer. When you’re ready to eat, simply let them thaw in the fridge overnight. Enjoy the same great taste!

FAQs

Can I make No-Bake Samoa Cookie Bars ahead of time?

Yes, you can make these bars ahead of time. They store well in the fridge. You can prepare them a day or two before serving. Just keep them in an airtight container. This way, they stay fresh and tasty!

How do I make them gluten-free?

To make No-Bake Samoa Cookie Bars gluten-free, use gluten-free graham cracker crumbs. Many brands offer this option now. Check the package to ensure it is gluten-free. This small change makes the bars safe for those with gluten sensitivities.

What can I use instead of almond butter?

If you cannot use almond butter, try peanut butter or sunflower seed butter. Both work well in this recipe. They add creaminess and flavor, just like almond butter. Just make sure to pick one that fits your dietary needs.

How do I know when the bars are set?

The bars are set when they feel firm to the touch. After two hours in the fridge, they should be ready. If you press lightly, they shouldn’t stick to your finger. If they are still soft, give them more time in the fridge.

You learned how to make No-Bake Samoa Cookie Bars with easy steps. We covered key ingredients, mixing techniques, and storage tips. You can customize the recipe to fit your taste or dietary needs. Keep in mind the common issues and how to solve them to improve your bars. Overall, this treat is fun to make and delicious to eat. Enjoy creating your own version that you and your friends will love. Let your kitchen adventures begin!

- 1 cup graham cracker crumbs - 1 cup shredded coconut, lightly toasted - 1/2 cup unsweetened cocoa powder - 1/2 cup almond butter (or any nut butter of your choice) - 1/3 cup maple syrup - 1 teaspoon vanilla extract - 1/2 cup dark chocolate chips - 2 tablespoons coconut oil - Sea salt, for sprinkling - 1/4 cup caramel sauce (store-bought or homemade) This simple list gives you all you need to whip up these tasty bars. Each ingredient plays a key role in flavor and texture. The graham cracker crumbs give a nice base, while the toasted coconut adds a crunchy bite. You can make these bars your own! Here are some ideas: - Add chopped nuts for crunch. - Use peanut butter instead of almond butter. - Swap maple syrup with honey for a different sweetness. - Mix in chocolate chips or butterscotch chips for extra flavor. These options let you personalize your treats to suit your taste. Need to be allergy-friendly? Here are some swaps: - Use sunflower seed butter instead of nut butter for nut allergies. - Choose gluten-free graham crackers to make them gluten-free. - Replace maple syrup with agave syrup for a different sweetener. - Use dairy-free chocolate chips for a vegan option. These substitutions ensure everyone can enjoy these delightful bars without worry. First, grab a large mixing bowl. Add 1 cup of graham cracker crumbs, 1 cup of shredded coconut, and 1/2 cup of cocoa powder. Mix these dry ingredients well. Make sure there are no lumps. The toasted coconut adds a nice crunch and flavor. This mix will be the base of your bars. Now, take another bowl. In it, whisk together 1/2 cup of almond butter, 1/3 cup of maple syrup, and 1 teaspoon of vanilla extract. Whisk until smooth. The almond butter gives creaminess. Maple syrup adds sweetness. This mixture will bind all the dry ingredients together nicely. Next, pour the wet mixture into the dry ingredients. Stir until fully combined. The mixture should feel sticky. Line an 8x8-inch baking dish with parchment paper. Leave some paper hanging over the edges. This will help you lift the bars out later. Press the cookie mixture firmly into the bottom of the dish. Make sure it is even and compact. In a small saucepan, melt 1/2 cup of dark chocolate chips and 2 tablespoons of coconut oil over low heat. Stir until smooth. Drizzle half of this melted chocolate over the pressed cookie base. Next, drizzle 1/4 cup of caramel sauce on top. Use a knife to swirl it lightly. This will create a marbled effect. Then, drizzle the rest of the melted chocolate over the caramel. Sprinkle a little sea salt on top for a tasty contrast. Finally, place the dish in the fridge for at least 2 hours to set. Once set, lift the bars out using the parchment paper. Cut into squares or bars. Enjoy your delicious no-bake Samoa cookie bars! To make sure your mixture is sticky, use fresh graham cracker crumbs. Old crumbs can dry out. Also, choose almond butter that is creamy and smooth. This helps bind everything together. Mixing the wet and dry ingredients well is key. If the mix feels too dry, add a bit more maple syrup. This will help it stick together better. To melt chocolate smoothly, use low heat. Place dark chocolate chips and coconut oil in a small saucepan. Stir often as they heat up. Remove from heat when just melted. If you heat it too fast, the chocolate can burn. Use a double boiler if you have one; it helps control the heat. A smooth chocolate will drizzle nicely over the bars. If your bars don't set, they may need more time in the fridge. Be patient and let them chill for at least two hours. If they are too crumbly, this can mean too few wet ingredients. Add a bit more almond butter or syrup for better binding. If the chocolate hardens too fast, just reheat it gently. For any issues, remember, cooking is all about experimenting! {{image_2}} You can swap almond butter for other nut butters. Peanut butter adds a strong flavor. Cashew butter creates a creamier texture. Sunflower seed butter is great for nut-free diets. Each option changes the taste but keeps the bars delicious. Boost the taste of your bars with spices or extracts. Try adding a pinch of cinnamon for warmth. A touch of sea salt can enhance the sweetness. You can also mix in a splash of coconut extract for extra coconut flavor. These small changes can make a big difference. For vegan bars, use maple syrup and a dairy-free chocolate. Check that your nut butter is also vegan. To make gluten-free bars, ensure your graham cracker crumbs are gluten-free. This way, everyone can enjoy these tasty treats. To keep your No-Bake Samoa Cookie Bars fresh, store them in an airtight container. Layer parchment paper between the bars to prevent sticking. Place the container in the fridge for the best results. This will maintain their rich, chocolatey flavor and chewy texture. When stored properly, these bars last about one week in the fridge. If you want to enjoy them longer, consider freezing them. You can still savor the taste after they thaw. Just remember to keep them wrapped well. To freeze your bars, cut them into squares first. Wrap each square in plastic wrap and then place them in a freezer bag. This helps avoid freezer burn. They can last for about three months in the freezer. When you’re ready to eat, simply let them thaw in the fridge overnight. Enjoy the same great taste! Yes, you can make these bars ahead of time. They store well in the fridge. You can prepare them a day or two before serving. Just keep them in an airtight container. This way, they stay fresh and tasty! To make No-Bake Samoa Cookie Bars gluten-free, use gluten-free graham cracker crumbs. Many brands offer this option now. Check the package to ensure it is gluten-free. This small change makes the bars safe for those with gluten sensitivities. If you cannot use almond butter, try peanut butter or sunflower seed butter. Both work well in this recipe. They add creaminess and flavor, just like almond butter. Just make sure to pick one that fits your dietary needs. The bars are set when they feel firm to the touch. After two hours in the fridge, they should be ready. If you press lightly, they shouldn’t stick to your finger. If they are still soft, give them more time in the fridge. You learned how to make No-Bake Samoa Cookie Bars with easy steps. We covered key ingredients, mixing techniques, and storage tips. You can customize the recipe to fit your taste or dietary needs. Keep in mind the common issues and how to solve them to improve your bars. Overall, this treat is fun to make and delicious to eat. Enjoy creating your own version that you and your friends will love. Let your kitchen adventures begin!

No-Bake Samoa Cookie Bars

Indulge in the delightful world of No-Bake Samoa Cookie Bars that combine rich chocolate, sweet caramel, and toasted coconut for an irresistible treat! With simple ingredients like graham crackers, almond butter, and maple syrup, these bars are easy to make and perfect for any occasion. Make your dessert game strong and click through for the full recipe and tips to impress your guests with this no-bake delight!

Ingredients
  

1 cup graham cracker crumbs

1 cup shredded coconut, lightly toasted

1/2 cup unsweetened cocoa powder

1/2 cup almond butter (or any nut butter of your choice)

1/3 cup maple syrup

1 teaspoon vanilla extract

1/2 cup dark chocolate chips

2 tablespoons coconut oil

Sea salt, for sprinkling

1/4 cup caramel sauce (store-bought or homemade)

Instructions
 

In a large mixing bowl, combine the graham cracker crumbs, toasted shredded coconut, and cocoa powder. Mix well.

    In a separate bowl, whisk together the almond butter, maple syrup, and vanilla extract until smooth.

      Pour the wet mixture into the dry ingredients and stir until fully combined. The mixture should be sticky.

        Line a square baking dish (8x8 inches) with parchment paper, leaving an overhang for easy removal.

          Press the cookie mixture firmly into the bottom of the prepared baking dish to create an even layer.

            In a small saucepan, melt the dark chocolate chips and coconut oil over low heat, stirring until completely smooth.

              Remove the saucepan from heat and drizzle half of the melted chocolate over the pressed cookie base.

                Drizzle the caramel sauce on top of the chocolate layer, swirling lightly with a knife for a marbled effect.

                  Finish by drizzling the remaining melted chocolate over the caramel layer, and sprinkle a pinch of sea salt on top.

                    Place the dish in the refrigerator for at least 2 hours to set.

                      Once set, remove from the baking dish using the parchment overhang. Cut into bars or squares.

                        Prep Time: 15 minutes | Total Time: 2 hours 15 minutes | Servings: 16 bars

                          - Presentation Tips: Arrange the bars on a decorative plate and drizzle additional caramel sauce on the side for a luscious touch. Optional: Garnish with extra toasted coconut on top for added texture and visual appeal.

                            WANT TO SAVE THIS RECIPE?