Do you crave rich, sweet treats that are totally guilt-free? Let me introduce you to my irresistible vegan chocolate peanut butter cups! Made with simple, plant-based ingredients, these delightful bites combine dairy-free dark chocolate and creamy peanut butter for a perfect match. Follow my easy step-by-step guide and impress your friends and family with a dessert they won't believe is vegan. Ready to satisfy that sweet tooth? Let’s dive right in!
Why I Love This Recipe
- Decadent Flavor: The rich combination of dark chocolate and creamy peanut butter creates a dessert that's simply irresistible.
- Vegan-Friendly: This recipe allows everyone to enjoy a delicious treat without compromising on dietary choices.
- Customizable: You can easily add ingredients like crushed roasted peanuts or even a sprinkle of sea salt to suit your taste.
- Quick and Easy: With minimal prep time, you can whip up these delightful cups in no time, perfect for any occasion!
Ingredients
To make these vegan chocolate peanut butter cups, gather the following ingredients:
- 1 cup dairy-free dark chocolate chips
- 1/2 cup smooth natural peanut butter
- 3 tablespoons maple syrup
- 1 teaspoon vanilla extract
- 1/4 teaspoon sea salt
- 1/4 cup crushed roasted peanuts (optional for crunch)
These simple ingredients combine to create a rich, tasty treat. The dairy-free chocolate chips give a sweet and smooth base. Natural peanut butter adds a creamy layer full of flavor. Maple syrup brings a hint of sweetness, while vanilla extract and sea salt enhance the overall taste. If you love a bit of crunch, add some crushed roasted peanuts. Keep these ingredients handy, and you will be ready to make a delicious dessert!

Step-by-Step Instructions
Preparing the Molds
To start, you need to prepare your molds. Use cupcake liners or silicone molds for this recipe. Place cupcake liners in a muffin tin or set out silicone molds on a flat surface. This makes it easy to remove the cups later. Make sure they are stable. You don’t want them to tip over while filling.
Melting the Chocolate
Next, we melt the chocolate. In a microwave-safe bowl, add 1 cup of dairy-free dark chocolate chips. Microwave the bowl in 30-second intervals. Stir the chocolate after each interval. This step is key. Stirring helps the chocolate melt evenly and prevents it from burning.
Assembling the Cups
Now, it's time to assemble the cups. Start by creating the chocolate base. Spoon about 1 tablespoon of melted chocolate into each cupcake liner or mold. Make sure to cover the bottom. Use a brush or the back of a spoon to coat the sides slightly. This gives you a thicker layer. Place the molds in the freezer for about 10-15 minutes to set.
Next, we make the peanut butter filling. In a separate bowl, mix together 1/2 cup of smooth natural peanut butter, 3 tablespoons of maple syrup, 1 teaspoon of vanilla extract, and 1/4 teaspoon of sea salt. Stir until well combined and creamy. If you like some crunch, fold in 1/4 cup of crushed roasted peanuts.
Once the chocolate bases are set, remove them from the freezer. Spoon about 1 tablespoon of the peanut butter mixture onto each chocolate base. Spread it evenly for a nice layer.
Finally, top each cup with the remaining melted chocolate. Pour the chocolate over the peanut butter layer. Make sure to completely cover it. Smooth the tops with a spoon if needed. Return the molds to the freezer for an additional 20-30 minutes until the chocolate is fully hardened.
Tips & Tricks
Achieving the Perfect Texture
To make great vegan chocolate peanut butter cups, you need smooth chocolate. Tempering chocolate helps it set well. This means heating it gently and cooling it down. This gives the chocolate a nice shine and snap.
For a creamy peanut butter filling, mix well. Combine peanut butter, maple syrup, vanilla, and sea salt. If you want some crunch, add crushed roasted peanuts. This adds flavor and texture. Stir until it's smooth and creamy.
Serving Suggestions
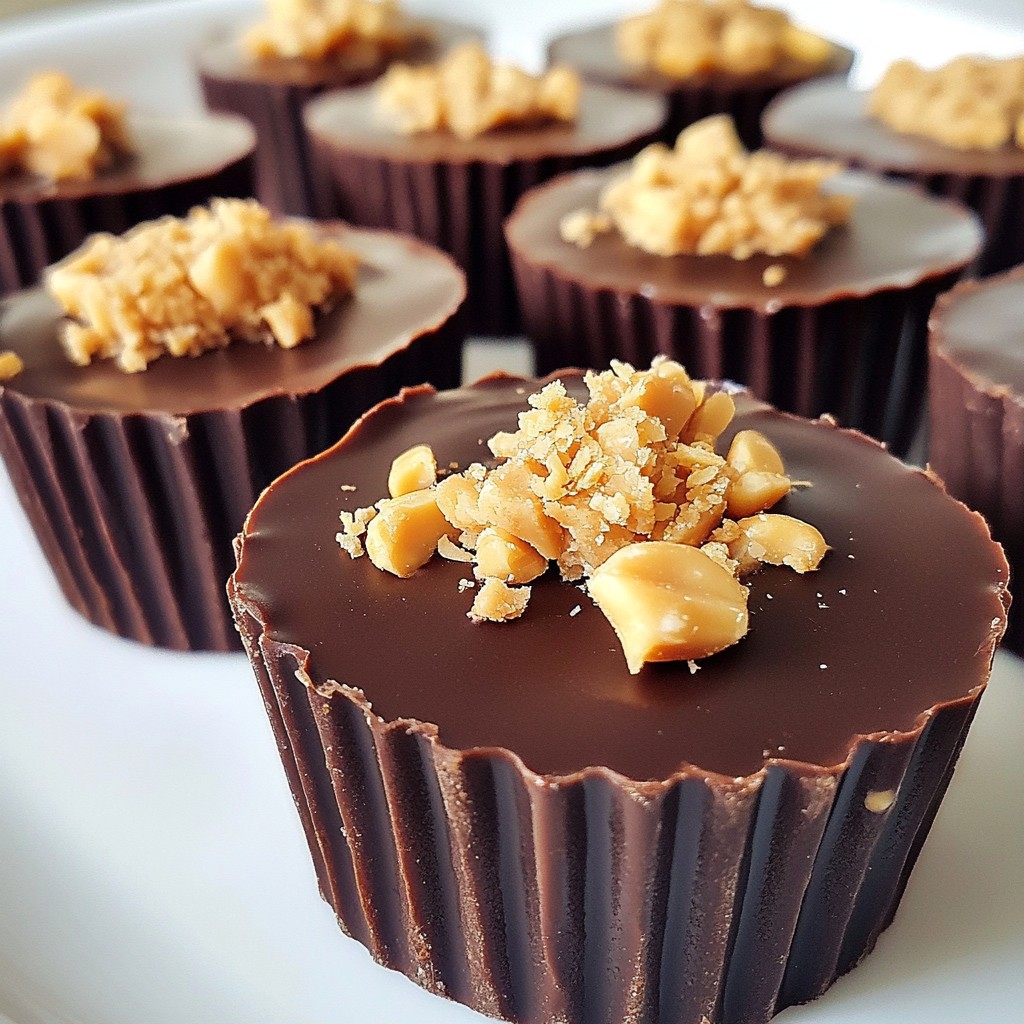
Presentation matters! Arrange your cups on a nice plate. Sprinkle some crushed peanuts or cocoa powder on top for a fancy touch. This makes them look great and adds flavor.
Pair your cups with drinks. Try almond milk or coffee for a tasty combo. The rich chocolate and creamy peanut butter go well with many beverages.
Common Mistakes to Avoid
Avoid overheating the chocolate. If you heat it too much, it gets thick and clumpy. Microwave in short bursts and stir often to keep it smooth.
Watch your filling amounts. If you add too much peanut butter, it may overflow. Use about one tablespoon per cup for the best results. Keep it balanced for a perfect bite.
Pro Tips
- Use Quality Chocolate: The better the chocolate, the better the flavor of your cups. Opt for high-quality dairy-free dark chocolate for a richer taste.
- Chill the Peanut Butter Mixture: If your peanut butter mixture is too runny, chill it in the refrigerator for a few minutes before filling the cups to achieve a thicker consistency.
- Experiment with Flavors: Feel free to add spices like cinnamon or a pinch of cayenne pepper to the peanut butter filling for a unique twist.
- Storage Tips: Keep the chocolate cups in an airtight container in the refrigerator for up to a week, or freeze them for longer storage.
Variations
Flavor Enhancements
You can make your vegan chocolate peanut butter cups even better. Adding a pinch of cinnamon gives warmth. A drop of almond extract adds a sweet layer. You can also try different nut butters. Almond or cashew butter can change the taste nicely.
Healthy Swaps
Want a healthier option? Use date syrup or agave instead of maple syrup. You can also swap peanut butter for sunflower seed butter if you need it nut-free. These changes keep the taste great while meeting your diet needs.
Presentation Variations
Make your cups look fancy. Sprinkle crushed roasted peanuts on top for a crunchy touch. You can also dust cocoa powder for a rich look. For parties, arrange them on a nice plate. It makes sharing fun and easy!
Storage Info
Best Storage Practices
To keep your vegan chocolate peanut butter cups fresh, store them in an airtight container. This helps prevent any moisture from getting in. You can keep them at room temperature or in the fridge. If you choose room temperature, make sure it’s a cool spot, away from direct sunlight.
Shelf Life of Vegan Chocolate Peanut Butter Cups
These treats last about a week at room temperature. If you put them in the fridge, they can last up to two weeks. Freezing is a great option too. If you freeze them, they can last for about three months. Just make sure to wrap them well to avoid freezer burn.
Reheating Tips
If you want to enjoy them warm, you can use a microwave. Put them in for just a few seconds. This will help soften the chocolate without melting it completely. Be careful not to overheat them; you want to keep that nice texture. Enjoy your delicious treats!
FAQs
What are vegan chocolate peanut butter cups made of?
Vegan chocolate peanut butter cups use simple, plant-based ingredients. Key ingredients include:
- 1 cup dairy-free dark chocolate chips
- 1/2 cup smooth natural peanut butter
- 3 tablespoons maple syrup
- 1 teaspoon vanilla extract
- 1/4 teaspoon sea salt
- Optional: 1/4 cup crushed roasted peanuts for crunch
These ingredients create a rich and creamy treat without any dairy.
How long do vegan chocolate peanut butter cups take to set?
These treats can set quickly. If you freeze them, they take about 30-45 minutes. Refrigerating them takes longer, about 1-2 hours. Freezing gives you a firmer cup faster, while refrigerating keeps them softer.
Can I use other nut butters?
Yes, you can! Almond butter, cashew butter, or sunflower seed butter all work well. Each nut butter adds a unique flavor. Almond butter brings a nutty taste, while cashew butter is creamier. Experiment to find your favorite!
Where can I buy vegan chocolate peanut butter cups?
You can find vegan chocolate peanut butter cups in many stores. Look for brands like Unreal, Hu Chocolate, or Justin's. Health food stores often carry them too. Check online for more options if you can't find them locally.
You’ve learned how to make vegan chocolate peanut butter cups with simple steps. From melting dark chocolate to crafting a creamy peanut butter filling, you can create a tasty treat. Remember to avoid common mistakes like overheating chocolate. Play with flavors and try different nut butters for fun spins. Store your cups properly in airtight containers to keep them fresh. Enjoy these sweet snacks anytime, whether for yourself or a gathering. Now, it's time to get baking and savor your homemade delights!