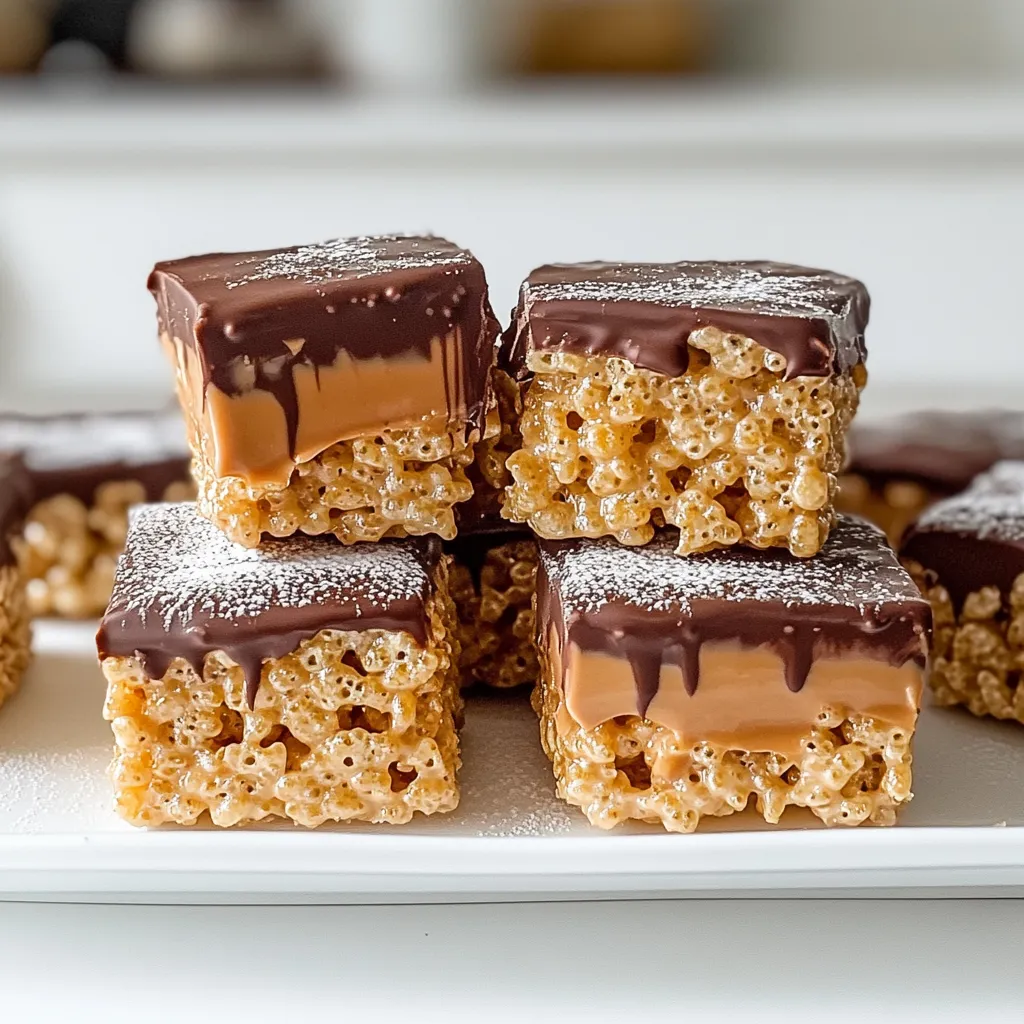
Craving a sweet treat that’s both easy and delicious? Look no further! These no-bake Chocolate Peanut Butter Rice Krispies are simple to whip up and perfect for any occasion. With just a few ingredients, you can create a crispy, chewy snack that everyone will love. Whether you’re a seasoned chef or a kitchen newbie, you can master this fun recipe in no time. Let’s dive in and get started!
Ingredients
List of Required Ingredients
To make Chocolate Peanut Butter Rice Krispies, you need these key ingredients:
– 3 cups Rice Krispies cereal
– 1 cup creamy peanut butter
– 1 cup semi-sweet chocolate chips
– 1/2 cup honey or maple syrup
– 1 teaspoon vanilla extract
– Pinch of salt
These ingredients make a tasty treat that is easy to prepare.
Optional Ingredients for Extra Sweetness
If you want to add a little more sweetness, consider these options:
– 1/4 cup powdered sugar
– A dash of sea salt for flavor balance
The powdered sugar will enhance the sweetness without overpowering the chocolate and peanut butter.
Ingredient Substitutions
You can swap some ingredients if needed:
– For a nut-free version, use sun butter instead of peanut butter.
– If you want a healthier touch, replace honey with agave syrup.
– Use dark chocolate chips for a richer taste.
These substitutions allow you to customize your treat while still enjoying the same delicious flavors!
Step-by-Step Instructions
Preparation of the Peanut Butter Mixture
To start, gather your ingredients. You will need creamy peanut butter and honey or maple syrup. In a medium saucepan, combine these two over low heat. Stir the mix gently for 2-3 minutes. This lets the peanut butter melt and blend with the syrup. Once it is smooth, take it off the heat. Next, add a teaspoon of vanilla extract and a pinch of salt for flavor. If you like, you can add powdered sugar now for extra sweetness. Mix well until the sugar is fully dissolved.
Combining Cereal and Mixture
Now, grab a large mixing bowl. Pour your prepared peanut butter mixture over 3 cups of Rice Krispies cereal. This part is fun! Gently fold the cereal into the peanut butter mix. Keep folding until every piece of cereal is coated evenly. This step is key to ensuring that every bite is delicious. You want to make sure no dry cereal remains.
Melting and Adding Chocolate Topping
Next, it’s time for the chocolate topping. Place 1 cup of semi-sweet chocolate chips in a microwave-safe bowl. Melt them in the microwave in 30-second intervals. Stir the chocolate between each interval to ensure it melts evenly. Once smooth, pour the melted chocolate over the pressed Rice Krispies mixture. Use a spatula to spread the chocolate evenly across the top. This creates a sweet layer that holds it all together. Let the chocolate set at room temperature for about 30 minutes. If you want it faster, pop it in the fridge! Once set, lift the treat out using the parchment paper and cut it into squares. Enjoy your tasty creation!
Tips & Tricks
How to Perfectly Coat the Cereal
To coat the Rice Krispies well, start with warm peanut butter. Heat it gently with honey in a saucepan. The warmth helps the mix stick better. Once it’s smooth, pour it over the cereal. Use a large bowl for easy mixing. Then, gently fold the cereal into the mix. Keep folding until every piece has a nice coat. If you rush, some pieces may miss out on the goodness.
Ensuring a Smooth Chocolate Layer
To get a smooth chocolate layer, melt chocolate chips carefully. Use a microwave-safe bowl and microwave in short bursts. Stir after each 30 seconds to avoid burning. Once melted, pour the chocolate over the Rice Krispies. Spread it evenly with a spatula for a nice finish. Make sure to cover all edges. This helps the chocolate layer set nicely and look clean.
Storing Leftovers for Freshness
To keep your treats fresh, store them in an airtight container. Place a layer of parchment paper between layers if stacking. This way, they won’t stick together. You can keep them at room temperature for a few days. For longer freshness, place them in the fridge. If you want to save them for later, consider freezing. Just remember to wrap them tightly to avoid freezer burn.
Variations
Adding Nuts or Seeds for Crunch
You can easily add nuts or seeds to your Chocolate Peanut Butter Rice Krispies. Nuts like almonds or walnuts give a nice crunch. Seeds like sunflower or pumpkin add great texture and flavor. Just chop them up a bit and mix them in with the Rice Krispies before you pour the peanut butter mixture over them. This adds healthy fats and protein, making your treat even better!
Flavor Infusions: Different Nut Butters
Using different nut butters can change the taste of your treat. Almond butter, cashew butter, or even sunflower seed butter work great. Each option gives its own unique flavor. If you want a nut-free version, sunflower seed butter is a perfect choice. Just swap it in for the peanut butter in your recipe. You’ll still get that creamy texture and delicious taste!
Making it Dairy-Free or Vegan
To make your Rice Krispies treat dairy-free or vegan, you can use dairy-free chocolate chips. Many brands offer great tasting options. Also, ensure you use maple syrup instead of honey. This keeps your recipe vegan-friendly. These swaps let everyone enjoy this tasty snack without any worries about dietary needs. Everyone can savor this easy treat!
Storage Info
Best Practices for Storing Leftovers
To keep your Chocolate Peanut Butter Rice Krispies fresh, store them in an airtight container. This helps keep them from drying out. You can place them at room temperature for up to a week. If you live in a humid area, it’s best to store them in the fridge. This keeps the chocolate layer firm and tasty. Just make sure to let them sit out for a few minutes before enjoying.
Freezing Options for Longer Shelf Life
If you want to keep these treats longer, freezing is a great option. Cut the Rice Krispies into squares first. Then, wrap each piece in plastic wrap. Place the wrapped squares in a freezer-safe bag. You can freeze them for up to three months. When you’re ready to enjoy, just take one out and let it thaw at room temperature.
How to Reheat for Enjoyment
If you prefer a warm treat, you can gently reheat them. Place a square in the microwave for about 10 seconds. This will soften the chocolate and make it melty. Check it often to avoid overheating. Enjoy your warm, gooey indulgence!
FAQs
Can I use crunchy peanut butter instead of creamy?
Yes, you can use crunchy peanut butter. It adds a fun texture. The bites will have little peanut bits that give a nice crunch. Just make sure the ratio stays the same. Use 1 cup of crunchy peanut butter for the same rich taste.
How do I know when the chocolate layer is set?
The chocolate layer is set when it feels firm to the touch. If you gently press your finger on it, it should not leave a mark. You can also check the shine. A dull finish means it’s ready. Let it sit at room temperature for about 30 minutes, or place it in the fridge for faster results.
Can I make these in advance? How long do they last?
Yes, you can make these treats ahead of time. They last about one week when stored properly. Keep them in an airtight container at room temperature. If you want them to stay fresh longer, refrigerate them. Just remember to let them sit out for a bit before serving, so they soften up!
This article covered how to make a yummy treat with peanut butter and cereal. I shared the required ingredients, as well as options for sweetening and substitutions. You learned the step-by-step process for mixing, coating, and adding chocolate. I also gave tips for coating, storing, and making fun variations. Finally, I answered common questions.
You now know how to create a delicious snack. Get cooking and enjoy!