Are you looking for a fun and tasty snack? You’ll love these BBQ Chicken Pizza Pinwheels! They are easy to make and perfect for parties or quick meals. With simple ingredients and a few easy steps, you can roll up delicious flavors that everyone will enjoy. Let's dive into how you can whip up this tasty treat!
Why I Love This Recipe
- Quick and Easy: These pinwheels can be prepared in just 15 minutes, making them a perfect snack or appetizer for busy days.
- Customizable: You can easily swap out ingredients based on your preferences or what you have on hand, allowing for endless variations.
- Flavorful and Satisfying: The combination of BBQ chicken and melty cheese creates a deliciously satisfying bite that everyone will love.
- Great for Sharing: These pinwheels make for an excellent party food, perfect for serving a crowd or enjoying with family.
Ingredients
List of Ingredients
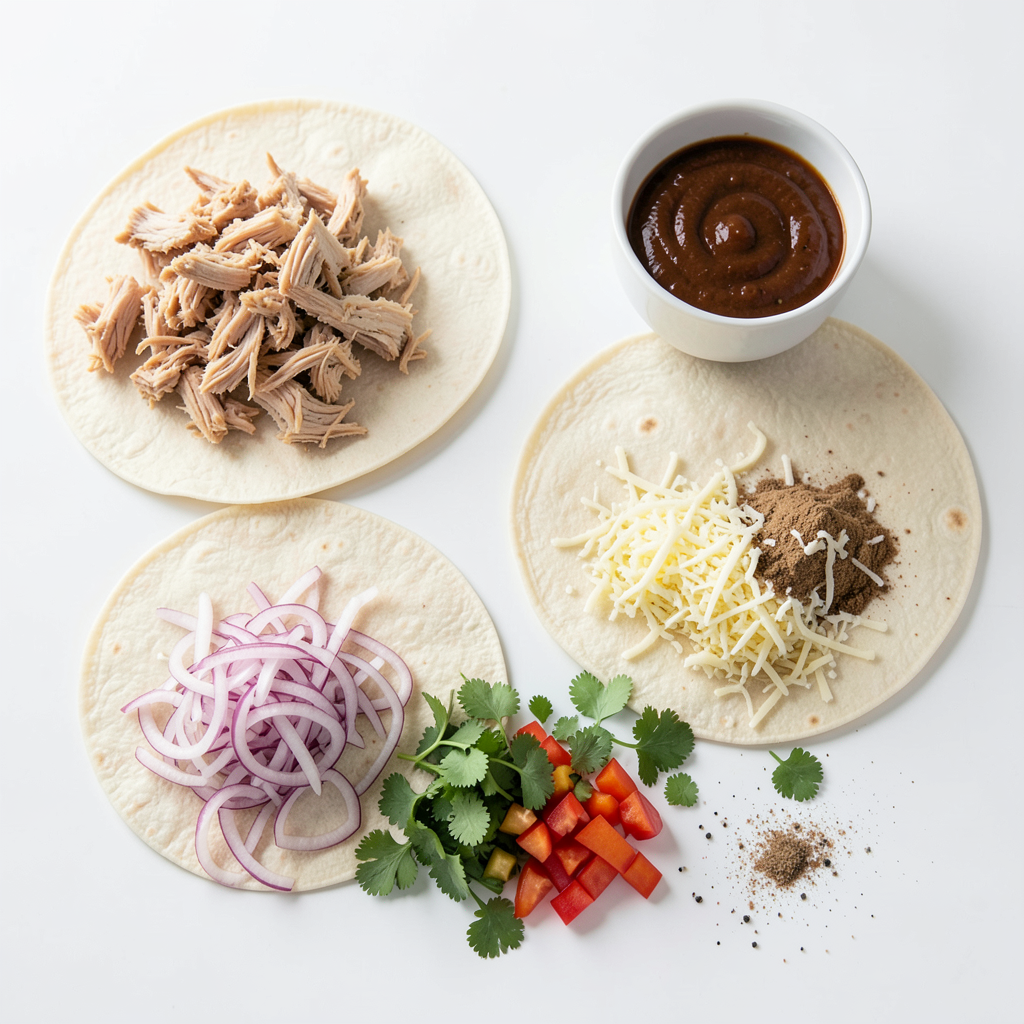
- 2 large flour tortillas
- 1 cup cooked chicken, shredded
- 1/2 cup BBQ sauce (your favorite brand)
- 1 cup shredded mozzarella cheese
- 1/2 cup red onion, thinly sliced
- 1/2 cup bell pepper, diced (any color)
- 1/4 cup fresh cilantro, chopped
- 1 teaspoon garlic powder
- 1 teaspoon onion powder
- Salt and pepper to taste
Suggested Substitutions
You can swap flour tortillas for whole wheat or corn tortillas. For chicken, shredded rotisserie works great. Use ranch or hot sauce instead of BBQ for a twist. Try cheddar cheese or pepper jack for different flavors. You can also use green onions instead of red onion. If you need a vegan option, replace chicken with shredded jackfruit and use vegan cheese.
Essential Tools Needed
- Medium mixing bowl
- Sharp knife
- Cutting board
- Baking sheet
- Parchment paper
- Measuring cups and spoons
- Rolling pin (optional for tortillas)
These ingredients and tools help you make the best BBQ chicken pizza pinwheels. They bring great taste and fun to your snack time!
Step-by-Step Instructions
Preparation of Chicken Mixture
Start by gathering your ingredients. In a medium bowl, combine the shredded chicken with BBQ sauce. Stir well until the chicken is fully coated. This mix gives your pinwheels their tasty BBQ flavor. You can use any BBQ sauce you love. Feel free to taste the mixture and adjust the sauce to your liking.
Assembling the Pinwheels
Now, lay one tortilla flat on a clean surface. Spread half of the BBQ chicken mixture evenly over the tortilla. Make sure to cover the whole surface. Next, sprinkle half of the mozzarella cheese on top. Then, add the sliced red onion, diced bell pepper, and chopped cilantro. Season with garlic powder, onion powder, salt, and pepper.
Carefully roll the tortilla tightly into a log shape. Make sure all ingredients stay inside. Repeat this with the second tortilla and the rest of the ingredients. Once you have both rolled, grab a sharp knife. Slice each log into 1-inch thick pinwheels.
Baking Instructions
Preheat your oven to 350°F (175°C). While it heats, arrange the pinwheels on a baking sheet lined with parchment paper. This keeps them from sticking. Bake for 15-20 minutes. You want the pinwheels heated through and the cheese melted. Once done, remove them from the oven and let them cool for a couple of minutes. Enjoy your delicious BBQ chicken pizza pinwheels!
Tips & Tricks
Perfect Rolling Techniques
To roll your pinwheels well, start with a flat tortilla. Spread the filling evenly. Leave a little space at the edges. This helps keep the filling inside. When you roll, use your fingers to tuck in the filling. Roll tightly but not too tight. This keeps the shape but prevents squishing. Cut the rolled tortilla carefully into 1-inch pieces. A sharp knife works best for clean cuts.
How to Ensure Cheese Melts Properly
For gooey melted cheese, use fresh mozzarella. Grate it yourself for the best melt. Spread the cheese evenly over the filling. Bake the pinwheels at 350°F for 15-20 minutes. This heat allows the cheese to melt without burning. Check the pinwheels about halfway through. If the edges look golden, they are ready.
Serving Suggestions
Serve the pinwheels warm on a nice platter. You can add a sprinkle of fresh cilantro on top for color. A small bowl of extra BBQ sauce makes a great dip. Pair these with fresh veggies, like carrot sticks or cucumber. They add a nice crunch to your snack. These pinwheels are perfect for parties or game day. Enjoy them with family and friends!
Pro Tips
- Use Rotisserie Chicken: For a quicker option, use store-bought rotisserie chicken to save time on cooking and shredding.
- Experiment with Sauces: Try different BBQ sauces or even ranch dressing for a unique flavor twist that suits your taste.
- Add More Veggies: Feel free to include additional vegetables like zucchini or spinach to enhance nutrition and flavor.
- Cool Before Slicing: Let the pinwheels cool for a few minutes before slicing to prevent the cheese from oozing out too much.
Variations
Vegetarian Option for Pinwheels
You can easily make BBQ chicken pizza pinwheels vegetarian. Instead of chicken, use black beans or chickpeas. These options add protein and fiber. Mix them with BBQ sauce for great flavor. You can also add some cooked mushrooms for extra texture. Use the same ingredients like cheese, onions, and peppers. This way, you keep the fun while making it meat-free.
Alternative Sauces and Cheeses
Feel free to switch up the BBQ sauce. Try a spicy buffalo sauce or a tangy ranch dressing. Each will give the pinwheels a new twist. For cheese, you can use pepper jack for some heat or a vegan cheese option. These changes can create a whole new taste experience. Experiment with what you love for a fun snack.
Adding Extra Vegetables or Proteins
Adding more veggies makes your pinwheels even better. Try spinach, zucchini, or jalapeños for a fresh crunch. You can also mix in cooked sausage or bacon for added flavor. Just remember to balance the flavors. You want to keep the BBQ sauce and cheese shining through. This way, every bite remains tasty and satisfying.
Storage Info
Best Way to Store Leftovers
To store leftover BBQ chicken pizza pinwheels, place them in an airtight container. If you stack them, use parchment paper between layers. This keeps them from sticking together. Store them in the fridge for up to three days. Make sure they cool down before sealing to avoid moisture buildup.
Reheating Instructions
To reheat your pinwheels, preheat the oven to 350°F (175°C). Place the pinwheels on a baking sheet. Heat them for about 10-15 minutes. This warms them up while keeping the cheese melty. You can also use a microwave, but the oven gives a better texture.
Freezing Pinwheels for Later
You can freeze pinwheels for later enjoyment. Wrap each pinwheel in plastic wrap tightly. Then, place them in a freezer bag. Squeeze out as much air as you can. They will last for up to two months in the freezer. When you're ready to eat, thaw them in the fridge overnight before reheating.
FAQs
Can I make BBQ Chicken Pizza Pinwheels ahead of time?
Yes, you can prepare BBQ Chicken Pizza Pinwheels in advance. Simply follow all steps until you bake them. After rolling the tortillas, wrap them tightly in plastic wrap. Store them in the fridge for up to 24 hours. When you're ready to eat, just slice them and bake. This saves time and makes it easy to enjoy a tasty snack.
What can I serve with BBQ Chicken Pizza Pinwheels?
BBQ Chicken Pizza Pinwheels pair well with many sides. Here are some great options:
- Fresh veggie sticks like carrots and celery
- A simple green salad with vinaigrette
- Chips and salsa for a crunchy contrast
- Extra BBQ sauce for dipping
These sides enhance the meal and add to the fun of eating.
Are BBQ Chicken Pizza Pinwheels suitable for freezing?
Yes, you can freeze BBQ Chicken Pizza Pinwheels. After slicing, place them in a single layer on a baking sheet. Freeze until solid, then transfer to a freezer bag. They can last up to three months in the freezer. When ready to eat, bake them straight from the freezer. Just add a few extra minutes to the baking time. This makes for a quick and easy snack later!
In this post, we explored how to make delicious BBQ Chicken Pizza Pinwheels. We discussed key ingredients, substitutions, and the tools you need. Step-by-step, I guided you through the preparation, assembly, and baking of these tasty snacks. Plus, I shared tips for perfect rolling and ensuring your cheese melts well. With variations for vegetarians and ideas for serving, you have many options. Store your leftovers safely, and don’t forget to check the FAQs for helpful answers. Now, you’re ready to impress your friends and family with your tasty creations!