FREE DINNER EBOOK! Get your copy!
  • Cookie Policy
  • GDPR Policy
  • Disclaimer
  • Terms Of Use
  • Visit my other site: Fun Cookie Recipes
quick dish kitchen
  • Home
  • Dinner
  • Desserts
  • Drinks
  • Appetizers
  • Contact
  • About
  • Privacy Policy
  • Home
  • Dinner
  • Desserts
  • Drinks
  • Appetizers
  • Contact
  • About
  • Privacy Policy
  • Cookie Policy
  • GDPR Policy
  • Disclaimer
  • Terms Of Use
Visit my other site: Fun Cookie Recipes

HOME / CATEGORIES /

Latest

- 4 salmon fillets (about 6 oz each) - 1/4 cup honey - 3 cloves garlic, minced - 2 tablespoons soy sauce (low sodium) - 1 tablespoon fresh ginger, grated - 1 tablespoon olive oil - 1 tablespoon sesame seeds (for garnish) - 2 green onions, chopped (for garnish) The main ingredients give this dish its sweet and savory taste. Salmon fillets are the star. They provide rich flavor and healthy fats. Honey adds sweetness and helps the glaze stick. Garlic brings depth and aroma. Together, they create a perfect balance. The additional ingredients enhance the flavors. Soy sauce adds umami, making the dish even better. Fresh ginger gives a warm, spicy kick. Olive oil is key for cooking the salmon and adds richness. For garnishes, sesame seeds and green onions add texture and color. They make the dish look pretty and taste great. You can always add more or less of these to suit your taste. Using fresh ingredients helps the salmon shine. Their flavors blend beautifully, making each bite delightful. This dish is not just easy; it’s packed with flavor, too! {{ingredient_image_1}} To start, grab a small saucepan. Add the honey, minced garlic, soy sauce, and grated ginger. Stir everything together. Heat it on medium. Let it simmer for 2 to 3 minutes. You want the sauce to thicken a bit. Once done, take it off the heat. This sauce will add great flavor to the salmon. Next, take a large skillet and preheat it on medium-high. Add the olive oil to the hot pan. While it heats, season your salmon fillets with salt and pepper on both sides. Once the skillet is hot, place the salmon fillets in it, skin side down. Sear the fillets for about 4 to 5 minutes. They should be crispy on the outside and tender inside. Now, it’s time to flip the fillets carefully. Pour half of the honey garlic sauce over the salmon. Cook it for another 3 to 4 minutes. You want the salmon to be cooked through and the sauce to become caramelized. After that, remove the skillet from the heat. Drizzle the rest of the sauce over the fillets. Transfer the glazed salmon to a serving platter. Finally, garnish with sesame seeds and chopped green onions for crunch and extra flavor. Enjoy your beautiful dish! To check for doneness, use a fork. Gently press the thickest part of the salmon. If it flakes easily, it's ready. The internal temperature should reach 145°F. For the best result, cook skin-side down first. This helps keep the fish moist and lets the skin get crispy. Using fresh ingredients makes a big difference. Fresh garlic and ginger boost the taste. You can adjust sweetness by adding more honey or saltiness with extra soy sauce. Taste as you go to find your perfect balance. Balance is key for great flavor. If your salmon fillets are thicker, cook them a bit longer. Add 2-3 minutes to the cooking time. For grilling, keep the heat medium. Grill for about 5-7 minutes on each side. Pan-searing is quicker; it should take around 4-5 minutes per side. Adjust based on your cooking method. Pro Tips Use Fresh Ingredients: Always opt for fresh salmon fillets and high-quality honey for the best flavor and texture. Monitor Cooking Time: Salmon can easily overcook, so keep an eye on it. It should be slightly opaque in the center when done. Marinate for Extra Flavor: If time allows, marinate the salmon in the honey garlic sauce for 30 minutes before cooking to enhance the flavor. Serve with Sides: Pair the glazed salmon with steamed vegetables or rice to create a well-rounded meal. {{image_2}} For oven-baked honey garlic salmon, first, preheat your oven to 400°F (200°C). Place the seasoned salmon fillets on a lined baking sheet. Drizzle half of the honey garlic sauce on top. Bake for 12-15 minutes or until the salmon flakes easily with a fork. This method gives you a tender and juicy result while allowing the sauce to caramelize nicely. Grilling adds a smoky flavor to your honey garlic salmon. Start by heating your grill to medium-high heat. Place salmon fillets skin side down on the grill. Cook for about 5-6 minutes, then flip them. Pour the remaining sauce over the salmon and grill for another 3-4 minutes. If you want to lower the heat, you can grill at medium heat for a longer time. This helps prevent the salmon from drying out. You can make this dish even better by adding seasonal veggies. Think about using asparagus, bell peppers, or zucchini. Cut them into bite-sized pieces and toss them with olive oil, salt, and pepper. Spread them around the salmon on a baking sheet or grill. Cook them at the same time as the salmon. This adds color and nutrients to your meal while keeping it tasty and fun. After cooking, let the salmon cool for about 10 minutes. This helps keep it fresh. Place the fillets in a shallow container. Use an airtight container to keep moisture in. You can also wrap the salmon in plastic wrap. Make sure to seal it well. This way, it stays tasty and safe to eat. When it’s time to enjoy the leftovers, reheating is key. The best method is to use the oven. Preheat it to 275°F (135°C). Place the salmon on a baking sheet. Cover it with foil to keep it moist. Heat for about 15 minutes. You can also use a microwave. Place the salmon on a microwave-safe plate. Cover it with a damp paper towel. Heat in short bursts of 30 seconds. Check often to avoid overcooking. In the fridge, your honey garlic glazed salmon will last for about 3 days. Make sure to store it properly. If you want to keep it longer, freezing is a great option. Wrap the salmon tightly in plastic wrap and then foil. It can last up to 2 months in the freezer. When you're ready to eat it, thaw it overnight in the fridge. This keeps the flavor and texture intact. You can make a great meal with Honey Garlic Glazed Salmon by serving it with fresh sides. Here are some ideas: - Recommended side dishes: - Steamed broccoli - Roasted asparagus - Garlic mashed potatoes - Quinoa salad - Rice pilaf You can mix and match these sides to suit your taste. Each adds flavor and texture. - Wine pairing suggestions: - A nice white wine, like Sauvignon Blanc, pairs well. - Pinot Gris also complements the dish nicely. - If you prefer red, a light Pinot Noir works well. Yes, you can use other fish if you want. Here are some good substitutes: - Substitutes for salmon: - Trout has a similar taste and texture. - Mahi-mahi is also a great choice. - Cod works too but has a milder flavor. When you choose a different fish, cooking times may change. - Adjusting cooking times: - Thinner fillets cook faster, about 3-4 minutes per side. - Thicker fillets may need 5-6 minutes per side. Always check for doneness to avoid overcooking. Knowing when your salmon is done is key to a great meal. Here are the guidelines: - Internal temperature guidelines: - The safe internal temperature for salmon is 145°F (63°C). - Use a food thermometer to check. - Visual cues for doneness: - Look for opaque flesh that flakes easily with a fork. - The skin should be crispy and golden brown. These tips ensure you serve perfectly cooked salmon every time. This article explored the simple steps to make honey garlic salmon. I covered main ingredients like salmon, honey, and garlic, and shared tips for perfect cooking. You can enhance flavors with fresh ingredients and try variations like oven-baked or grilled salmon. Storing and reheating leftovers ensures none of your dish goes to waste. Remember, cooking should be fun and rewarding, so don’t hesitate to adapt this recipe to your taste. Enjoy your cooking journey with this tasty dish!

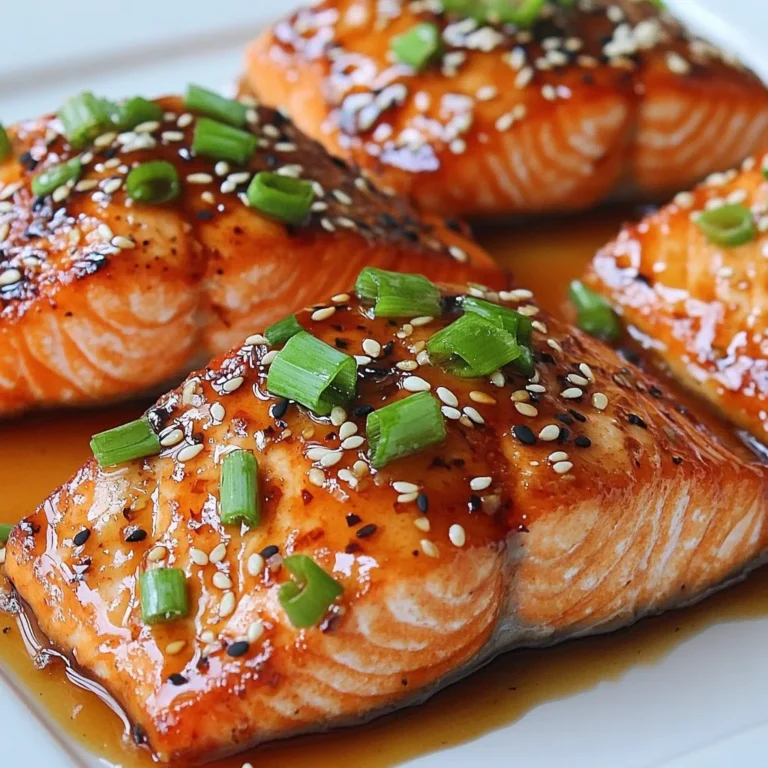
Honey Garlic Glazed Salmon Flavorful and Easy Dish

- 1 medium head of cauliflower, cut into florets - 1 cup all-purpose flour (or gluten-free flour) - 1 cup water - 1 cup buffalo sauce (store-bought or homemade) - 8 small corn or flour tortillas Cauliflower is the star of this dish. It gives the tacos their crunch and flavor. Use fresh florets for the best taste. The flour helps create a batter that sticks to the cauliflower. You can choose gluten-free flour if needed. Buffalo sauce adds a spicy kick that makes these tacos a hit! - 1 avocado, sliced - 1 cup shredded lettuce - ½ cup diced tomatoes - ½ cup crumbled blue cheese or feta (optional) These optional ingredients boost the dish. Sliced avocado adds creaminess. Shredded lettuce gives a nice crunch. Diced tomatoes add freshness and color. If you like, sprinkle blue cheese or feta for a tangy touch. - 1 teaspoon garlic powder - 1 teaspoon onion powder - 1 teaspoon smoked paprika - Salt and pepper to taste Seasonings are key to flavor. Garlic powder and onion powder add depth. Smoked paprika gives a warm, smoky taste. Don’t forget salt and pepper to enhance all the flavors. Adjust these to your liking for a perfect balance. {{ingredient_image_1}} To start, cut the cauliflower into small florets. Aim for bite-sized pieces. This will help them cook evenly. Next, make the batter. In a big bowl, mix one cup of flour, one teaspoon of garlic powder, one teaspoon of onion powder, one teaspoon of smoked paprika, salt, and pepper. Slowly add one cup of water. Whisk until the batter is smooth and creamy. Now, preheat your oven to 425°F (220°C). Line a baking sheet with parchment paper. Dip each floret into the batter, making sure to coat it well. Place the coated florets on the baking sheet. Bake them for 20 to 25 minutes. They should turn golden and crispy. Keep an eye on them to avoid burning. Once the cauliflower is done, toss it in a bowl with buffalo sauce. Make sure each piece is evenly coated. Warm your tortillas in a skillet or microwave for about 30 seconds. This makes them soft and easy to fold. Now, build your tacos! Place a good amount of buffalo cauliflower on each tortilla. Add sliced avocado, shredded lettuce, and diced tomatoes. If you like, sprinkle on some crumbled blue cheese or feta. Garnish with fresh cilantro and drizzle more buffalo sauce if you want extra heat. Enjoy your tasty buffalo cauliflower tacos! Baking vs. frying cauliflower I prefer baking cauliflower for these tacos. Baking creates a healthier dish without extra oil. Frying can add calories and grease. Plus, baking allows the cauliflower to become crispy and golden. This method keeps the flavors bright and fresh. Achieving crispy texture To get that perfect crispy texture, coat each floret well in the batter. Make sure the oven is hot enough. Preheat it to 425°F (220°C) before baking. Spread the florets out on the sheet. This gives them room to crisp up instead of steaming. Check them halfway through for even cooking. Best toppings to complement flavors These tacos shine with fresh toppings. I love using sliced avocado for creaminess. Shredded lettuce adds a nice crunch. Diced tomatoes bring a juicy burst. If you like cheese, crumbled blue cheese or feta is a great addition. Fresh cilantro also brightens the dish with its flavor. Pairing with side dishes Buffalo cauliflower tacos pair well with simple sides. Try a light salad or some roasted veggies. You could also serve them with a side of rice or quinoa. This makes for a complete meal that is both tasty and filling. Prepping cauliflower in advance You can prep the cauliflower ahead of time. Cut it into florets and make the batter. Keep them in the fridge for up to a day. This helps save time when you’re ready to cook. Just remember to toss the florets in buffalo sauce before serving. Storing and reheating instructions If you have leftovers, store them in an airtight container. They will last about three days in the fridge. To reheat, bake them in the oven for about 10 minutes at 350°F (175°C). This keeps them crispy and delicious! Pro Tips Choose the Right Cauliflower: Look for a firm head of cauliflower with tightly packed florets and vibrant green leaves for the best flavor and texture. Adjust Spice Level: If you prefer a milder taste, mix the buffalo sauce with some ranch dressing or yogurt to tone down the heat. Make It Gluten-Free: Substitute the all-purpose flour with a gluten-free flour blend to accommodate dietary restrictions without sacrificing taste. Serve Fresh: Assemble the tacos just before serving to keep the tortillas soft and the toppings crisp for the best eating experience. {{image_2}} You can easily make this dish gluten-free. Just swap regular flour for gluten-free flour. This change keeps the texture while making it safe for those with gluten allergies. If you want to skip cheese, use a vegan cheese substitute. There are many options available now. Nutritional yeast is a great choice, as it adds a cheesy flavor without dairy. For those who love heat, try a spicier buffalo sauce. Look for sauces labeled “extra hot” for a real kick. You can also mix in some cayenne pepper for added spice. Consider adding toppings like pickled red onions or jalapeños. These add crunch and a burst of flavor. A drizzle of ranch or a squeeze of lime also enhances the taste. If you want to try different proteins, consider chickpeas or lentils. They add protein and work well with the spices. If you prefer plants, mushrooms are another great option. Their texture mimics meat and pairs well with buffalo sauce. You can also change the fillings in your tacos. Try slaw made from cabbage or carrots for a fresh crunch. Black beans or corn can add more flavor and color to your dish. Store leftover buffalo cauliflower tacos in an airtight container. They stay fresh for about 3 days in the fridge. Let the tacos cool before placing them in the container. This helps keep the tortillas from getting soggy. If you can, separate the filling from the tortillas. This keeps everything crisp and tasty. You can freeze the buffalo cauliflower for later use. Place the cooled cauliflower florets in a freezer bag. Remove as much air as possible before sealing. They can last up to 2 months in the freezer. To reheat, bake them in the oven at 400°F (200°C) for 10-15 minutes. This keeps them crispy and delicious. To maintain texture and flavor, store toppings separately. Keep avocado, lettuce, and tomatoes in the fridge. Add these fresh ingredients just before serving. This helps avoid wilting and sogginess. When reheating, use the oven rather than the microwave. This way, the cauliflower stays crunchy, and the flavors shine. To make buffalo sauce, you need just a few simple ingredients: - ½ cup hot sauce (like Frank's RedHot) - ¼ cup unsalted butter - 1 tablespoon white vinegar - 1 teaspoon garlic powder - Salt to taste 1. Melt the butter in a small saucepan over low heat. 2. Add hot sauce, vinegar, garlic powder, and salt. 3. Whisk the mixture until it is smooth and combined. 4. Remove from heat and let it cool before using. This sauce is not only easy to make, but it also tastes great on many dishes! Yes, you can easily make this recipe gluten-free. Simply swap out the all-purpose flour with a gluten-free flour blend. Here are a few good options: - Almond flour - Coconut flour - Chickpea flour These alternatives work well for the batter and keep the cauliflower crispy. Just make sure to check labels for any hidden gluten. Buffalo cauliflower tacos can last in the fridge for about 3 to 5 days. To keep them fresh, store the components separately. Here are some quick tips: - Place the cauliflower in an airtight container. - Keep the tortillas wrapped in foil or plastic wrap. - Store toppings like avocado and lettuce in separate containers. This way, you can reheat the cauliflower and assemble fresh tacos whenever you want! In this post, I discussed how to make Buffalo cauliflower tacos. We covered main and optional ingredients, seasonings, and step-by-step instructions. You learned tips for cooking techniques and serving ideas. I also shared variations and storage info. Buffalo cauliflower tacos are great for any meal and cater to different diets. Try this easy recipe to impress your friends and family. Enjoy the bold flavors and health benefits!

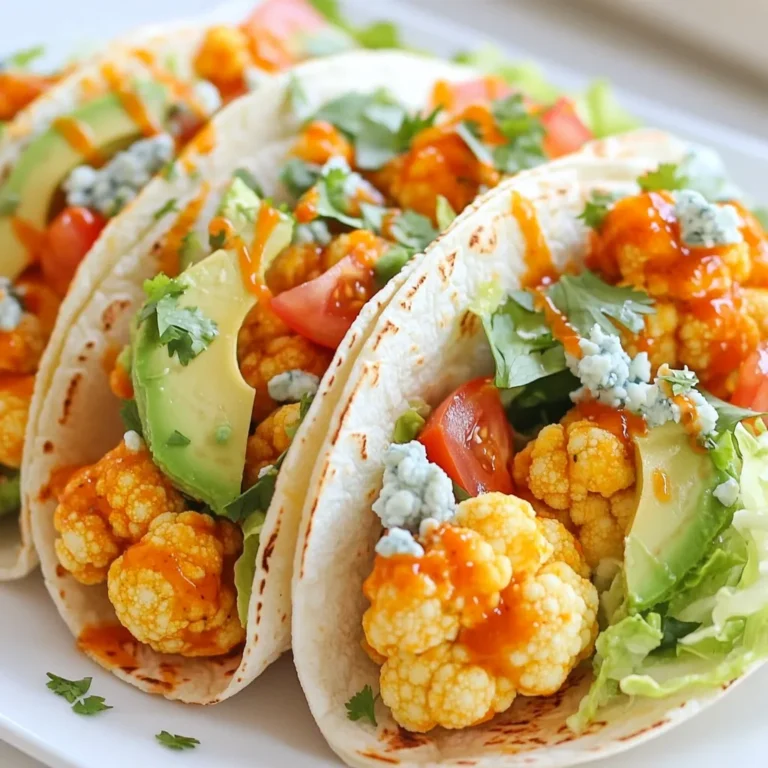
Buffalo Cauliflower Tacos Healthy and Flavorful Dish

- 2 pounds chicken wings - 1/2 cup soy sauce - 1/4 cup honey - 4 cloves garlic, minced - 1 tablespoon fresh ginger, grated - 2 tablespoons sesame oil - 1 tablespoon rice vinegar - 1 teaspoon red pepper flakes (optional) - 1 tablespoon cornstarch (for thickening) - Sesame seeds and chopped green onions for garnish You need fresh chicken wings for this recipe. Choose wings that look plump and juicy. Next, gather your marinade components. Soy sauce gives a nice salty flavor. Honey adds sweetness, while garlic and ginger bring a kick. Sesame oil adds richness, and rice vinegar gives a hint of tang. The red pepper flakes are optional. They add a bit of heat. If you like spicy food, consider including them. Lastly, gather sesame seeds and green onions. These will make your wings look pretty and add crunch. With these ingredients, you will create a dish that is both tasty and visually appealing. {{ingredient_image_1}} To make the marinade, grab a large bowl. Add the soy sauce, honey, minced garlic, grated ginger, sesame oil, rice vinegar, and red pepper flakes if you like spice. Use a whisk to mix everything well. This blend creates a sweet and savory flavor. If you want a different taste, consider adding orange juice or lime for a citrus touch. You can also swap honey for maple syrup for a different sweetness. Once your marinade is ready, add the chicken wings. Make sure they are well coated in the mixture. Cover the bowl with plastic wrap and place it in the fridge. Let the wings marinate for at least 1 hour. For more flavor, marinate them overnight. This allows the wings to soak up all the deliciousness. Now, it’s time to bake! First, preheat your oven to 400°F (200°C). Line a baking sheet with foil for easy cleanup. Place a wire rack on top of the baking sheet. This helps the hot air circulate around the wings, making them crispy. When the wings are done baking, it’s time to glaze. In the last 5 minutes, brush the thickened sauce over the wings. This adds a shiny finish and extra flavor. After they come out of the oven, sprinkle sesame seeds and chopped green onions on top. They make the wings look great and add a fresh crunch. Enjoy your Sweet Soy Garlic Wings! To get crispy wings, use a wire rack. Place the wings on the rack above a baking sheet. This lets hot air flow all around them. Bake at 400°F (200°C) for 25-30 minutes. Flip the wings halfway for even cooking. If you want extra crispiness, broil them for the last few minutes. Keep an eye on them to avoid burning. You can adjust sweetness and spice in the marinade. If you like it sweeter, add more honey. For more spice, increase the red pepper flakes. Taste your marinade before adding the wings. This way, you can find the perfect balance that suits your taste. You can make these wings ahead of time. Marinate them for at least 1 hour or overnight for more flavor. After cooking, let them cool completely. Store them in an airtight container in the fridge for up to 3 days. To reheat, bake them at 375°F (190°C) for 10-15 minutes. This will help restore their crispiness. Pro Tips Marinate for Longer: For the best flavor, marinate the wings overnight. This allows the marinade to deeply penetrate the meat, resulting in juicier and more flavorful wings. Use a Wire Rack: Elevating the wings on a wire rack while baking allows hot air to circulate around them, ensuring they become crispy on all sides and preventing sogginess. Adjust the Spice Level: If you prefer milder wings, reduce or omit the red pepper flakes. Alternatively, increase them for a spicier kick! Make Extra Sauce: If you love a saucy wing, double the marinade recipe. You can use it as a dipping sauce for added flavor when serving. {{image_2}} You can make your wings spicy by adding different chili sauces. Start with Sriracha or chili garlic sauce. Mix these into the marinade to give your wings a kick. You can adjust the spice level by adding more or less. For a fun twist, try using a sweet chili sauce for some heat and sweetness. This adds depth to the flavor and makes the wings even more exciting. If you want to use an air fryer, adjust your cooking time and temperature. Preheat your air fryer to 375°F (190°C). Cook the wings for about 20-25 minutes. Flip them halfway through for even cooking. The air fryer makes the wings crispy without deep frying. It’s a great option for a healthier version of this dish. You can enjoy these flavors with a vegetarian twist. Use cauliflower instead of chicken wings. Cut cauliflower into bite-sized florets. Marinate them just like you would the chicken. Bake or air fry at 400°F (200°C) for about 20-25 minutes. This gives you a tasty, meat-free option that everyone can enjoy. After you make your sweet soy garlic wings, they need the right care. Let the wings cool to room temperature. Then, place them in an airtight container. Store them in the fridge. They will stay fresh for about 3 to 4 days. If you want to keep them longer, consider freezing. For long-term storage, freezing is your best option. Start by cooling the wings completely. Then, wrap them tightly in plastic wrap. Next, place them in a freezer-safe bag or container. Be sure to remove as much air as possible. This helps prevent freezer burn. You can keep them frozen for up to 3 months. When it's time to enjoy those wings again, reheating them is key. The best method is to use an oven. Preheat the oven to 350°F (175°C). Place the wings on a baking sheet. Bake for about 15 to 20 minutes. This keeps them crispy and tasty. You can also use an air fryer for quick reheating. Just set it at 350°F and cook for about 5 to 10 minutes. Enjoy the delicious, crispy wings! You can serve sweet soy garlic wings with many tasty side dishes. Here are some great ideas: - Coleslaw: Its crunch pairs well with the wings. - Rice: Steamed white or brown rice soaks up the sauce. - Vegetable Sticks: Carrots and celery add a fresh crunch. - Potato Wedges: Crispy, seasoned wedges are always a hit. - Corn on the Cob: Sweet corn balances the savory wings. These options will make your meal more fun and filling. Yes! There are several gluten-free options for soy sauce. Here are a few: - Tamari: This is a popular gluten-free soy sauce. It has a similar taste. - Coconut Aminos: This is a soy-free option. It has a mild sweetness. - Liquid Aminos: This is made from soybeans but is gluten-free. These substitutes work well in the sweet soy garlic wings recipe. Yes, you can use frozen chicken wings! Here’s how to make them work: - Thawing: Always thaw wings in the fridge overnight. If you need them fast, use cold water. - Cooking Adjustments: You may need to add 5-10 minutes to the cooking time. Check for doneness. Using frozen wings is easy and still tasty! To check if the wings are done, follow these tips: - Internal Temperature: Use a meat thermometer. The wings should reach 165°F (75°C). - Color: Look for a golden brown color. This shows they are crispy and cooked. - Juices: If you cut into one, the juices should run clear, not pink. These steps will help you serve perfectly cooked wings every time. In this article, we explored the key ingredients for sweet soy garlic wings and shared step-by-step instructions for perfecting this dish. We also covered tips for crispiness, flavor variations, and storage methods. Remember, the right marinade and proper baking techniques are essential for delicious wings. Whether you're hosting friends or just enjoying a meal at home, these wings add fun and flavor to any occasion. Enjoy cooking, and don't be afraid to try new variations!

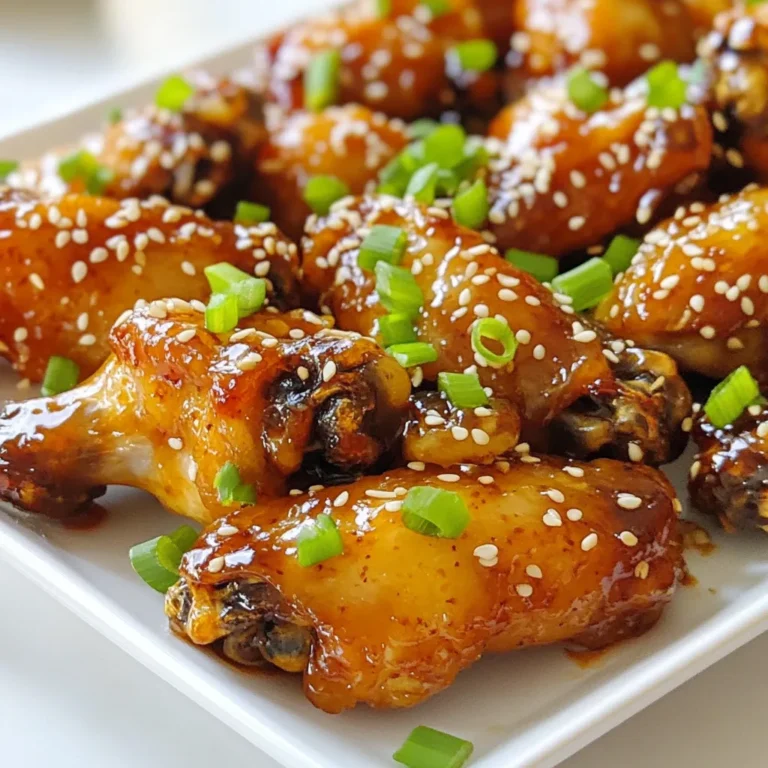
Sweet Soy Garlic Wings Irresistibly Delicious Recipe

- 2 boneless, skinless chicken breasts, cut into bite-sized pieces - 2 medium sweet potatoes, peeled and diced - 1 red bell pepper, chopped - 1 small red onion, diced - 3 cloves garlic, minced For the chicken, I always go for boneless and skinless breasts. They cook quickly and stay juicy. Cut them into bite-sized pieces to help them cook evenly and absorb flavors. Sweet potatoes are a must for this dish. Peel them and dice them into small cubes. This helps them cook fast and mix well with other ingredients. Don’t forget the veggies! I like to add a red bell pepper for sweetness and color. A small red onion adds a nice bite. Finally, garlic brings all the flavors together. - ½ cup BBQ sauce (your choice) - 2 tablespoons olive oil - 1 teaspoon paprika - 1 teaspoon cumin - Salt and pepper, to taste For the sauce, you can use your favorite BBQ sauce. I like to use a smoky flavor for depth. The spices are simple but effective. Paprika adds a slight smokiness, while cumin gives warmth. Season with salt and pepper to taste. The olive oil is key for sautéing. It helps cook the sweet potatoes and veggies perfectly, adding richness to the dish. - Fresh cilantro, for garnish A sprinkle of fresh cilantro makes a big difference. It adds freshness and brightens the dish. Just chop it up and sprinkle it on top before serving. Enjoy the burst of flavor it brings! {{ingredient_image_1}} Start by heating 2 tablespoons of olive oil in a large skillet over medium heat. When the oil is hot, add the diced sweet potatoes. Sprinkle a pinch of salt over them. Sauté the sweet potatoes for about 10 to 12 minutes. Stir them occasionally. You want them to become tender and slightly caramelized. This step brings out their natural sweetness and adds depth to your dish. After the sweet potatoes soften, it’s time to add more flavor. Toss in the chopped red onion and red bell pepper. Cook these for another 5 minutes. This allows the veggies to soften and blend with the sweet potatoes. Stir them well for even cooking. You want every bite to have that great taste. Now, we create space for the chicken. Push the sweet potato mixture to the side of the skillet. Add the diced chicken pieces to the center. Season the chicken with salt and pepper. Cook the chicken for about 7 to 8 minutes. You want it to brown and cook through. Stir everything together after the chicken is ready. This is when the BBQ sauce comes in. Pour it over the mixture and stir well. Let it simmer for 2 to 3 minutes. This helps all the flavors meld together beautifully. Choosing the right BBQ sauce is key. It sets the tone for your dish. I like a sauce that is both sweet and tangy. This balance makes the chicken pop. Don't be afraid to try different brands or homemade options. Each sauce brings its own flair. Next, spice it right. I use paprika and cumin for warmth. These spices add depth to the sweet potatoes and chicken. A little salt and pepper also go a long way. Taste as you cook to find your perfect mix. For even cooking, I prefer a heavy skillet, like cast iron. It holds heat well and gives a nice sear to the chicken. When cooking, keep the heat medium. This helps everything cook at the same time. Stirring is important too. Mix the ingredients gently to keep the sweet potatoes intact. This way, you enjoy their texture. When adding the chicken, create a spot in the center of the skillet. Let it brown without crowding the pan. Prep ahead to save time. I often chop the sweet potatoes and veggies in advance. Store them in the fridge for easy access. This way, you cut down on cooking time during the week. If you’re short on time, consider pre-cooked chicken. It cuts your cooking time in half. Just add it in the last few minutes to heat through. This keeps dinner quick and easy while still being tasty. Pro Tips Use Starchy Sweet Potatoes: For the best texture, opt for starchy sweet potatoes like the orange-fleshed varieties, which caramelize beautifully and add a natural sweetness to the dish. Customize Your BBQ Sauce: Feel free to experiment with different BBQ sauces to find your preferred flavor profile. Smoky, spicy, or sweet varieties can all complement the chicken and sweet potatoes differently. Pre-Cook the Sweet Potatoes: If you’re short on time, you can microwave the sweet potatoes for a few minutes before adding them to the skillet. This will speed up the cooking process significantly. Add Extra Veggies: Enhance the nutritional value by adding more vegetables to the skillet. Spinach, zucchini, or corn can work well and add vibrant color and flavor to the dish. {{image_2}} You can swap ingredients in this BBQ Chicken Sweet Potato Skillet. Here are some ideas: - Alternative vegetables: Try adding zucchini, broccoli, or carrots. They will add color and nutrition. - Different proteins: Use shrimp or tofu instead of chicken. Both cook quickly and soak up flavors well. You can change the flavor by adjusting your seasonings. Here are some ways to add a twist: - Different spice blends: Try using chili powder or taco seasoning for a kick. You can also use Italian herbs for a fresh taste. - Unique BBQ sauce alternatives: Experiment with honey BBQ or spicy chipotle sauce. Each brings a new flavor profile to the dish. Think about how you present your dish. Here are some ideas to enhance your meal: - Side dishes: Serve with a simple salad, cornbread, or roasted veggies. These pair well with the sweet and smoky flavors. - Serving styles: You can serve the skillet directly on the table for a casual style. Alternatively, plate it in bowls for a more formal look. To keep your BBQ chicken sweet potato skillet fresh, store leftovers in an airtight container. This helps lock in flavor and moisture. Place the skillet in the fridge within two hours of cooking. Your dish will stay good for about 3 to 4 days. If you want to save some for later, you can freeze this dish. First, let it cool completely. Then, transfer it to a freezer-safe container or bag. Try to remove as much air as you can. This helps prevent freezer burn. It will last for about 2 to 3 months in the freezer. When ready to eat, thaw it overnight in the fridge. To reheat, use the stovetop for the best results. Heat it in a skillet over medium heat. Stir it gently to keep it moist. You can also use the microwave. Just cover it with a damp paper towel to avoid drying out. Heat it in short bursts, stirring in between. This keeps the chicken and sweet potatoes tender. Can I use skin-on chicken? Yes, you can use skin-on chicken. The skin adds flavor and moisture. Just make sure to adjust the cooking time. Skin-on chicken may take longer to cook than skinless. What can I substitute for BBQ sauce? You can use teriyaki sauce for a sweet twist. Another option is honey mustard for a tangy flavor. You can also make a simple sauce with ketchup and vinegar. Is this recipe gluten-free? Yes, this recipe is gluten-free. Just check the BBQ sauce label to ensure it has no gluten ingredients. Most sauces are safe, but it’s good to verify. Can it be made dairy-free? Absolutely! This recipe is naturally dairy-free. No dairy ingredients are used, so it fits well for a dairy-free diet. How do I know when the chicken is fully cooked? Check the chicken's internal temperature. It should reach 165°F (75°C). The chicken should also be white, with no pink inside. Can I prepare this dish in advance? Yes, you can prep this dish ahead. Chop your veggies and chicken the night before. Store them in the fridge until you’re ready to cook. This blog post detailed a delicious recipe that's both easy and flexible. You learned about key ingredients, like chicken and sweet potatoes, and how to prepare them. I shared tips for seasoning and cooking techniques to boost flavor. You also saw adaptations for variations based on your taste and dietary needs. Remember, cooking is about having fun and experimenting. With these tips, you can create a meal that's tasty and satisfying. Enjoy your cooking journey and don’t hesitate to get creative!

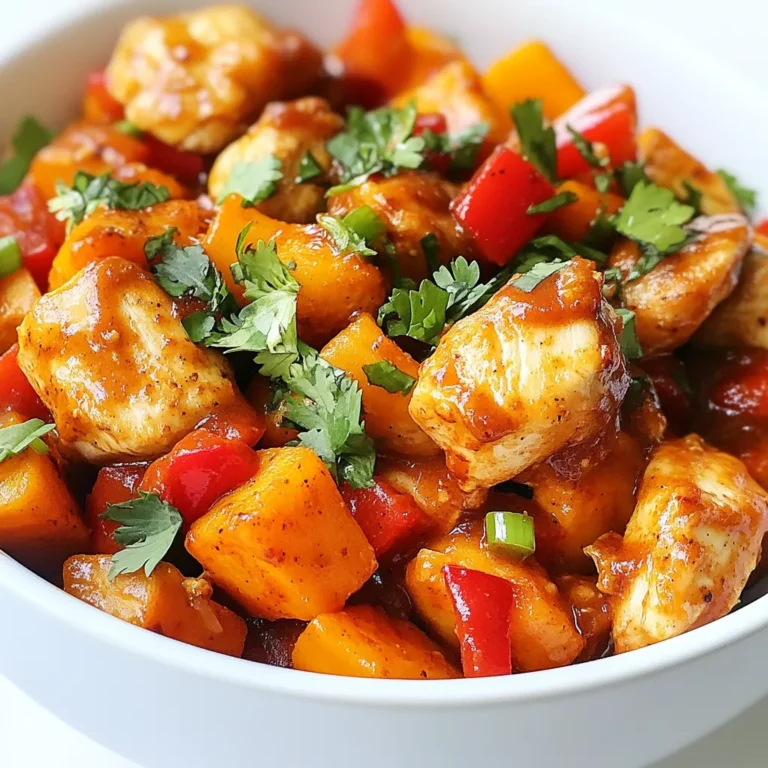
BBQ Chicken Sweet Potato Skillet Easy Weeknight Meal

- 500g fresh button mushrooms, cleaned and trimmed - 4 tablespoons unsalted butter - 5 garlic cloves, minced - 2 tablespoons fresh parsley, chopped - 1 teaspoon lemon juice - 1/2 teaspoon red pepper flakes (optional) - Salt and pepper to taste Using fresh ingredients makes a big difference in flavor. Fresh button mushrooms have a nice, mild taste that works well with garlic and butter. The unsalted butter adds richness. Minced garlic brings strong flavor that makes the dish shine. I like to use parsley for color and freshness. The lemon juice adds a bright kick that balances the butter. For those who enjoy heat, red pepper flakes add a nice touch. Finally, salt and pepper enhance all the flavors. Gather all these ingredients before you start cooking. This will help you stay organized and make the dish easier to prepare. When you have everything ready, you can enjoy the cooking process without rushing. {{ingredient_image_1}} - Melting the Butter Start by placing a large skillet on medium heat. Add 4 tablespoons of unsalted butter. Watch it carefully as it melts. You want it to foam a bit but not turn brown. - Adding and Sautéing Garlic Once the butter is melted, add 5 minced garlic cloves. Stir them in and let them cook for 1-2 minutes. The aim is to release a nice aroma. Do not let the garlic burn; this can ruin your dish. - Coating with Garlic Butter Now, it's time to add 500g of cleaned button mushrooms. Stir them well in the garlic butter. Make sure each mushroom is coated evenly. - Cooking Time and Techniques Cook the mushrooms for about 5-7 minutes. Stir them occasionally so they cook evenly. You will notice the mushrooms becoming tender and releasing their juices. - Seasoning and Adding Lemon Juice After cooking, season the mushrooms with salt, pepper, and red pepper flakes if you want some heat. Let them cook for another 2-3 minutes. Then, remove the skillet from the heat. Drizzle 1 teaspoon of lemon juice over the mushrooms. - Incorporating Fresh Parsley Finally, add 2 tablespoons of chopped fresh parsley. Give everything a good stir to mix all the flavors. Your garlic butter mushrooms are ready to serve! - Avoiding Overcooking To keep mushrooms firm, cook them for just 5-7 minutes. Stir gently to let them soak up the butter and garlic. This helps preserve their rich taste and texture. If you cook them too long, they can turn mushy and lose their flavor. - Achieving Maximum Flavor Start by melting butter on medium heat. Add minced garlic right after. This brings out the garlic's sweet notes. Make sure not to burn the garlic; it should just soften. The goal is to let the mushrooms soak in the garlic butter for a deep, savory taste. Adding lemon juice at the end brightens the dish and enhances the flavor. - Best Practices for Leftovers After cooking, let the mushrooms cool completely. Store them in an airtight container in the fridge. They will stay fresh for up to 3 days. Avoid leaving them at room temperature for too long. This helps keep them safe to eat. - Reheating Instructions When you want to enjoy leftovers, reheat them in a skillet over low heat. Add a little butter to keep them moist. Stir gently so they warm evenly. You can also microwave them for a quick option, but the skillet gives better texture. - Presentation Ideas Serve garlic butter mushrooms in a rustic wooden bowl. This adds charm to your meal. You can also use a white dish for a clean, modern look. Sprinkle extra chopped parsley on top for a fresh touch. - Pairing with Other Dishes These mushrooms go well with grilled meats or pasta. They also make a great topping for toast. Try adding them to a salad for an extra layer of flavor. Each bite will be a delightful experience. Pro Tips Choose Fresh Mushrooms: Always opt for fresh button mushrooms that are firm and plump. Check for any dark spots or sliminess, as these are signs of spoilage. Perfect Garlic Sauté: To avoid burning the garlic, keep the heat at medium and stir frequently. This will enhance the flavors without creating a bitter taste. Enhance the Flavor: For an extra layer of flavor, consider adding a splash of white wine after the mushrooms have cooked for a few minutes. Let it reduce before adding the seasonings. Serving Suggestions: These garlic butter mushrooms pair wonderfully with grilled meats or can be served over pasta or rice for a hearty meal. Don't forget to sprinkle some extra parsley on top for presentation! {{image_2}} Adding Different Herbs You can change the taste of garlic butter mushrooms by using different herbs. Try thyme, rosemary, or basil for a unique twist. Each herb adds a new layer of flavor. Just chop the herbs finely and add them when you mix in the parsley. Introducing Protein Options You can also add protein to make this dish heartier. Shrimp or chicken works well with garlic butter. Cook the shrimp or chicken in the skillet first, then add the mushrooms and garlic. This way, you get a full meal with tasty flavors. Vegan Alternatives To make this dish vegan, replace butter with olive oil or vegan butter. Use the same amount of oil as butter. The flavor will still be rich and satisfying. You can also add nutritional yeast for a cheesy taste. Gluten-Free Modifications This recipe is naturally gluten-free. Just make sure any added ingredients, like sauces, are gluten-free. The mushrooms and butter keep the dish creamy without any gluten. Enjoy it with your favorite gluten-free bread or on its own! Nutritional Aspects of Mushrooms Mushrooms are low in calories and high in nutrients. They provide vitamins like B and D. They also contain minerals such as selenium and potassium. These nutrients support your immune system and heart health. Plus, the fiber in mushrooms aids digestion. This makes them a great addition to any diet. Benefits of Garlic and Butter Garlic offers many health perks. It may help lower blood pressure and improve heart health. Garlic also has antioxidants that fight free radicals. On the other hand, butter provides a rich flavor. It contains fat-soluble vitamins A, D, E, and K. Use unsalted butter for better control of salt in your dish. The combination of garlic and butter enhances the taste of mushrooms, making them irresistible. Information per Serving This recipe serves four people. Each serving has about 140 calories. It includes healthy fats and lots of flavor. This makes it a tasty side dish or appetizer. Adjustments for Different Diets If you want fewer calories, use less butter. You can also try olive oil for a lighter option. For a vegan dish, replace butter with a plant-based alternative. This keeps the flavor while meeting dietary needs. Adjusting these ingredients can help fit your meal plan. I recommend using fresh button mushrooms. They are mild and soak up flavors well. You can also try cremini or shiitake mushrooms for a deeper taste. These mushrooms add a nice texture and flavor to your dish. You can use garlic powder, but fresh garlic has a better taste. Fresh garlic gives a strong, bright flavor that makes the dish shine. If you use garlic powder, use less. About 1/4 teaspoon of garlic powder equals one clove of fresh garlic. To keep mushrooms firm, use high heat when cooking. Start with a dry skillet and avoid crowding the pan. Cook them in batches if needed. Stir them gently to let moisture escape. This helps them brown nicely without getting soggy. Yes, garlic butter mushrooms are healthy in moderation. Mushrooms are low in calories and high in nutrients. They provide vitamins like B and D. Garlic has health benefits too, like boosting the immune system. Just watch the butter and salt for a balanced diet. This blog post covered making delicious garlic butter mushrooms. We discussed the ingredients, including fresh mushrooms, garlic, and parsley. I shared step-by-step instructions for preparation and cooking. Key tips help you avoid overcooking and ensure great flavor. We explored variations to suit your taste, including dietary adjustments. Lastly, we looked at the health benefits of the main ingredients. Enjoy creating this simple dish that enhances any meal and brings joy to your table.

Garlic Butter Mushrooms Savory and Simple Recipe

- 2 cups cooked chicken breast, shredded - 1 cup plain Greek yogurt - 1/2 cup celery, finely chopped - 1/2 cup red grapes, halved - 1/4 cup almonds, sliced - 2 tablespoons fresh dill, chopped - 1 tablespoon honey - 1 tablespoon lemon juice - Salt and pepper to taste - Cooked chicken breast: This is a great source of protein. It helps build and repair muscles. - Plain Greek yogurt: This yogurt is rich in protein and probiotics. It aids in digestion and keeps you full. - Celery: Low in calories, celery adds fiber and crunch. It helps keep you hydrated. - Red grapes: These grapes are high in vitamins and antioxidants. They support heart health. - Almonds: Almonds provide healthy fats and protein. They are good for your heart and skin. - Fresh dill: Dill adds flavor and is full of vitamins. It can help with digestion. - Honey: This natural sweetener gives a touch of sweetness. It has antioxidants and can boost energy. - Lemon juice: Lemon juice adds brightness and flavor. It is high in vitamin C and supports the immune system. - Salt and pepper: These enhance the dish's flavor. Use them to taste. - Cooked chicken: You can use turkey or rotisserie chicken. - Greek yogurt: Substitute with regular yogurt for a lighter option. - Celery: Chopped cucumber can add crunch as a swap. - Red grapes: Use diced apples or dried cranberries for sweetness. - Almonds: Walnuts or sunflower seeds work well if you want a different nut. - Fresh dill: Use dried dill or parsley if fresh is not available. - Honey: Maple syrup can be a good alternative for sweetness. - Lemon juice: Lime juice can replace lemon for a different zing. These choices help you customize the salad while keeping it tasty and healthy. {{ingredient_image_1}} 1. Start by shredding the cooked chicken breast. You want about two cups of it. 2. In a large mixing bowl, add the shredded chicken and one cup of plain Greek yogurt. Mix them well until the chicken is fully coated. 3. Next, chop half a cup of celery into small pieces. Add this to your bowl. 4. Take half a cup of red grapes and cut them in half. Add these to the mix. 5. Slice a quarter cup of almonds and toss them in. 6. Chop two tablespoons of fresh dill and add it to the mixture. 7. In a small bowl, mix one tablespoon of honey and one tablespoon of lemon juice. Pour this over your salad. 8. Gently fold everything together. Be careful not to break the grapes. 9. Season with salt and pepper to taste. Mix it one last time. 10. Cover the bowl and chill the salad in the fridge for at least thirty minutes. Mixing gently is key. You want to keep the grapes whole for a nice bite. Use a spatula to fold the salad. This keeps everything intact and tasty. If you find it too thick, you can add a bit more yogurt. It helps to balance the flavors. Make sure each ingredient gets some love during mixing. You can serve this chicken salad in many ways. Try it on whole-grain bread for a hearty sandwich. You can also put it in lettuce wraps for a fresh touch. If you prefer, serve it on a bed of mixed greens. This adds more color and crunch. Pair it with some fresh fruit or veggie sticks for a complete meal. To make your Greek yogurt chicken salad even creamier, you can add more yogurt. I suggest adding a little extra Greek yogurt. This will give the salad a rich taste. You can also mix in a bit of mayo for added creaminess. Just remember, a little goes a long way! Store your chicken salad in a tight container. This keeps it fresh and safe to eat. Make sure to chill it in the fridge right away. Leftovers taste best within three days. If you wait too long, the flavors may fade. For shredding chicken, I love using two forks. Hold one fork steady with your non-dominant hand. Use the other fork to pull the meat apart. It's fast and easy! If you have a stand mixer, you can use it too. Just place the cooked chicken in the bowl and mix on low. It shreds the chicken in seconds! Pro Tips Use Rotisserie Chicken: For a quicker preparation, consider using store-bought rotisserie chicken. It saves time and adds a wonderful flavor. Add More Crunch: Feel free to mix in other crunchy veggies like bell peppers or cucumbers to enhance the texture of the salad. Grape Substitutes: If you prefer a different fruit, diced apples or dried cranberries can be great alternatives to grapes. Make It Ahead: This chicken salad can be made a day in advance. Just keep it stored in an airtight container in the refrigerator to maintain freshness. {{image_2}} You can switch up the protein in this salad. Turkey is a great choice. It adds a nice flavor and is leaner than chicken. Just shred cooked turkey breast and use it the same way. If you want a plant-based option, try tofu. Press and cube firm tofu, then sauté it lightly. Mix it with Greek yogurt for a creamy texture. Adding spices and herbs can enhance this dish. Try a pinch of paprika or cayenne for heat. Fresh herbs like cilantro or basil can add freshness. You can also use garlic powder for a savory twist. Mixing in a teaspoon of Dijon mustard adds a nice tang. Experiment with flavors to find your favorite blend. If you follow a low-carb or keto diet, you can make this salad fit. Use shredded rotisserie chicken for a quick base. Swap the grapes for diced cucumbers or bell peppers. This keeps the crunch without the carbs. You can also ditch the honey or use a low-carb sweetener. This way, you keep the taste while sticking to your meal plan. To keep your Greek yogurt chicken salad fresh, store it in an airtight container. This helps prevent the salad from drying out or absorbing other odors from the fridge. If you plan to eat it later, avoid adding any crunchy toppings, like almonds, until you're ready to serve. Greek yogurt chicken salad lasts about 3 to 4 days in the fridge. After that, the flavors may fade, and the texture might change. Always check for any strange smells or changes in color before eating. If it looks or smells off, it's best to toss it. You can freeze Greek yogurt chicken salad, but it may change in texture. To freeze, place it in a freezer-safe container. Leave space for expansion as it freezes. It can last up to 2 months in the freezer. When ready to eat, thaw it in the fridge overnight. After thawing, stir it well and check the texture before serving. Yes, you can use regular yogurt. However, Greek yogurt is thicker. It gives a creamier texture. This makes the chicken salad rich and satisfying. Regular yogurt may make it runny. If you use regular yogurt, you might need less. This chicken salad lasts about 3 to 4 days in the fridge. Store it in an airtight container. Make sure to keep it cool. The longer it sits, the flavors blend more. But be mindful of freshness. If it smells off, discard it. There are many great side dishes to pair with chicken salad. You can serve it with: - Fresh fruit salad - Veggie sticks with hummus - Whole-grain crackers - Quinoa salad - Leafy green salad These sides add more color and nutrition to your meal. They balance the creaminess of the chicken salad. Enjoy experimenting with different combinations! This blog post covers everything you need to make delicious Greek yogurt chicken salad. You learned about the key ingredients and their health benefits. We discussed step-by-step instructions for preparation and serving. I shared tips to make your salad creamier and how to store leftovers. You also discovered variations to fit your taste. Lastly, I answered common questions to help you choose the best options. With this guide, you can create a tasty and healthy meal for any occasion. Enjoy your cooking and savor every bite!

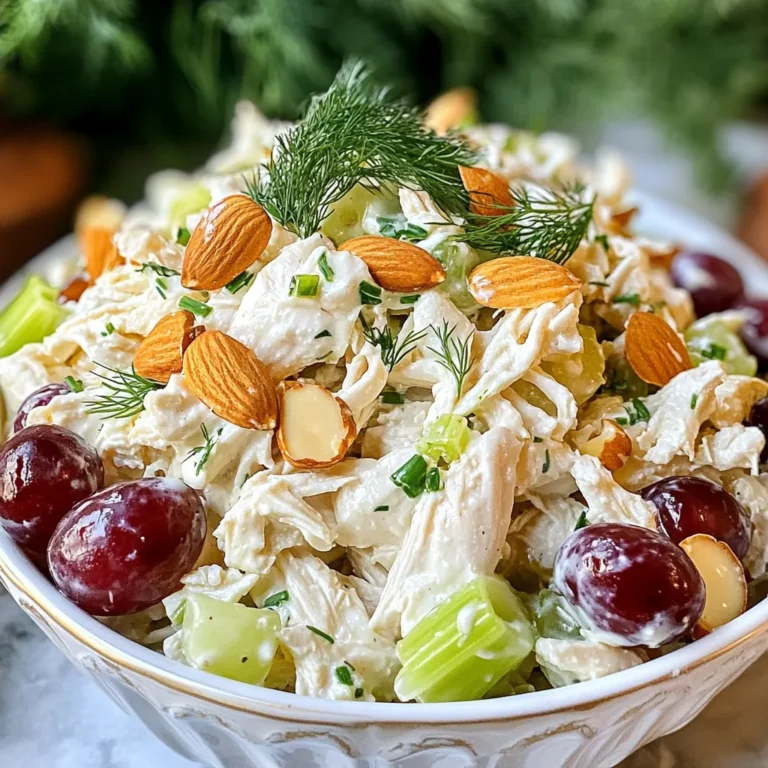
Greek Yogurt Chicken Salad Fresh and Healthy Meal

- 1 cup orzo pasta - 2 cups vegetable broth - 1 cup cherry tomatoes, halved - 1/2 cucumber, diced - 1/3 cup red onion, finely chopped - 1/2 cup grated Parmesan cheese - 1/4 cup fresh parsley, chopped - 1/4 cup olive oil - 2 tablespoons lemon juice - Zest of 1 lemon - Salt and pepper to taste The base of this salad starts with orzo pasta. It cooks quickly and gives a nice texture. I use vegetable broth instead of water for richer flavor. The cherry tomatoes add sweetness, while cucumber brings crunch. Red onion gives a little bite. Parmesan cheese is key. It adds creaminess and umami. Fresh parsley brightens the dish with color and flavor. Olive oil acts as the dressing base, while lemon juice and zest provide a zesty kick. You can adjust salt and pepper to your taste. It's all about balance. This salad is fresh, light, and perfect for any meal. Enjoy mixing these simple, bright ingredients! - Additional parsley - Extra Parmesan cheese Adding extra parsley or cheese on top makes the dish pop. It looks nice and adds more flavor. Plus, it makes a great presentation. {{ingredient_image_1}} To start, you need to boil the vegetable broth. Pour two cups of broth into a medium pot. Bring it to a rolling boil over medium heat. Once it boils, add one cup of orzo pasta. Cook the orzo according to the package instructions. I usually aim for it to be al dente, which takes about 8 to 10 minutes. After cooking, drain the orzo and set it aside to cool. Make sure it cools down completely before mixing it with other ingredients. In a large mixing bowl, combine the cooled orzo with colorful veggies. Add one cup of halved cherry tomatoes, half a diced cucumber, one-third cup of finely chopped red onion, and one-quarter cup of chopped fresh parsley. Stir gently to mix everything well. Next, you’ll prepare the dressing. In a small bowl, whisk together a quarter cup of olive oil, two tablespoons of lemon juice, the zest of one lemon, and salt and pepper to taste. Pour the dressing over the salad and toss gently to coat all the ingredients. For the best flavor, let the salad sit in the refrigerator for at least 30 minutes before serving. This helps all the flavors blend nicely. When serving, I recommend using a large bowl or individual plates. Garnish with extra parsley and a sprinkle of grated Parmesan for a nice touch. Serve it cool or at room temperature for a refreshing experience. To make sure your orzo is al dente, follow the package instructions. Usually, it takes about 8-10 minutes. Test it a minute or two before the time is up. It should be firm but not hard. Once cooked, drain it quickly. Cooling the orzo is key. Rinse it under cold water. This stops the cooking and keeps it from getting mushy. You can boost flavor by adding spices or fresh herbs. Try basil, dill, or even a pinch of red pepper flakes. They add depth and make the dish pop. For more zing, adjust the lemon. If you want it tart, add a little more lemon juice. Taste as you go, and make it yours. To serve the orzo salad nicely, use a large bowl or individual plates. A big bowl lets everyone scoop their own. If you use plates, it looks fancy. Garnish with extra parsley and a sprinkle of Parmesan cheese. This adds color and makes the dish more inviting. Enjoy your beautiful creation! Pro Tips Use Fresh Ingredients: For the best flavor, opt for fresh cherry tomatoes and parsley. They enhance the salad's overall taste and appearance. Chill Before Serving: Allowing the salad to sit in the refrigerator for at least 30 minutes lets the flavors meld together, making it even more delicious. Experiment with Add-ins: Feel free to customize your salad by adding ingredients like olives, bell peppers, or even grilled chicken for added protein and flavor. Adjust the Dressing: If you prefer a tangier taste, increase the lemon juice slightly. Always taste and adjust seasoning to suit your palate. {{image_2}} You can make this salad even better by adding protein. Grilled chicken or shrimp pairs well with the fresh flavors. Simply slice the cooked chicken or shrimp and mix it in. If you want a vegetarian option, use chickpeas. They add protein and a nice texture without meat. You can use one cup of chickpeas for a hearty meal. Feel free to switch up the veggies in this salad. Seasonal vegetables like bell peppers, zucchini, or spinach can add color and flavor. Adjust the amount of each veggie to suit your taste. If you love cucumbers, add more! The key is to create a mix that you enjoy. To change the flavor, try adding different herbs like basil or dill. Fresh herbs can really brighten the dish. You can also substitute vinegar for lemon juice. A splash of balsamic vinegar gives a sweet touch. Experiment to find what you love best! To store your Lemon Parmesan Orzo Salad, place it in an airtight container. This helps keep it fresh and tasty. If you store it well, it will last about three to four days in the fridge. Before serving, give it a good stir. The flavors blend nicely after resting. If it seems dry, add a little olive oil or lemon juice to freshen it up. Can you freeze orzo salad? Yes, but it may change texture. To freeze, place the salad in a freezer-safe container. Leave space at the top since it expands when frozen. It’s best to eat it within one month for the best taste. When you’re ready to eat, thaw it in the fridge overnight. Once thawed, stir it well and taste. You may need to add more lemon juice or olive oil to revive the flavors. Lemon Parmesan Orzo Salad stays fresh for about three to five days in the fridge. To keep it tasty, store it in an airtight container. Make sure to check for any signs of spoilage, like an off smell or discoloration. If you notice any changes, it’s best to toss it. Yes, you can make this salad ahead of time! I often prepare it a day in advance. This allows the flavors to blend nicely. If you choose to do this, cover it and chill it in the fridge. Just remember to add the cheese right before serving for the best texture. If you can’t find orzo, other grains work well. Try using quinoa or couscous for a different texture. You can also use small pasta shapes like ditalini or acini di pepe. These options keep the salad light and fresh, just like the orzo. This blog post covered a delightful Lemon Parmesan Orzo Salad. We explored essential ingredients, instructions, tips, variations, and storage information. You can enjoy this salad fresh or adjust it to your taste. Remember to keep it colorful and flavorful with your chosen veggies. Don’t hesitate to experiment with different proteins or dressings. This dish is not just a meal; it’s versatile and easy. Enjoy trying these tips and making your orzo salad shine in every bite.

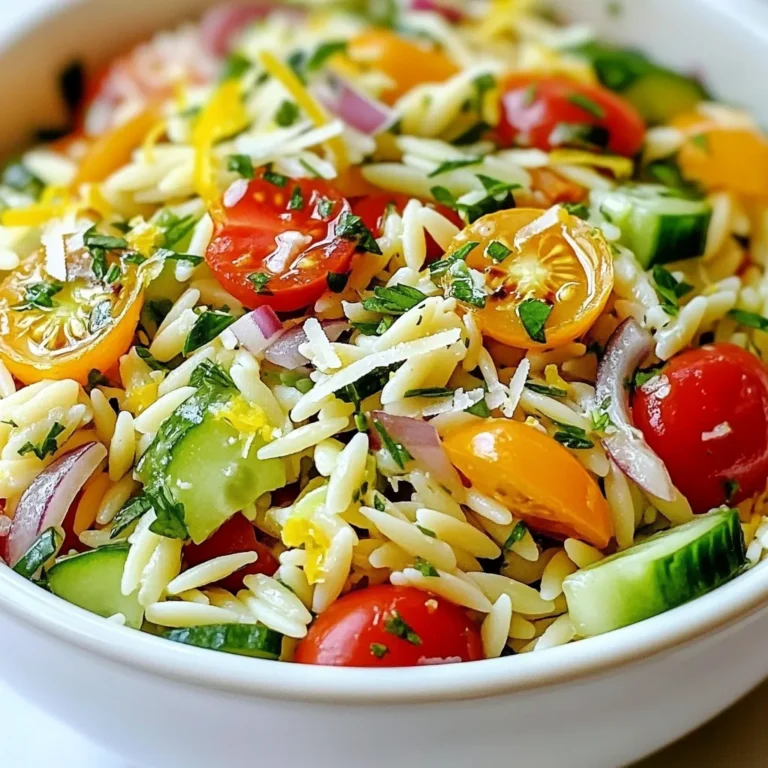
Lemon Parmesan Orzo Salad Refreshing and Light Dish

- 4 boneless, skinless chicken breasts - 1/2 cup balsamic vinegar - 1/4 cup honey - 2 tablespoons olive oil - 3 cloves garlic, minced - 1 teaspoon dried oregano - Salt and pepper to taste - Fresh basil leaves for garnish - 1 cup cherry tomatoes, halved - 1 tablespoon grated Parmesan cheese To create a delicious balsamic glazed chicken, you need simple, fresh ingredients. The chicken is the star. Use four boneless, skinless chicken breasts. They cook evenly and stay juicy. Next, the balsamic vinegar adds a rich tang. You only need half a cup. Honey brings sweetness to balance the vinegar; a quarter cup works well. Olive oil, two tablespoons, helps the marinade stick to the chicken. Garlic adds great flavor. Use three cloves, minced. Dried oregano brings an earthy taste to the mix. Don’t forget salt and pepper to taste. For garnishes, fresh basil leaves brighten the dish. A cup of halved cherry tomatoes adds color and flavor. Finally, sprinkle one tablespoon of grated Parmesan cheese for a salty finish. These ingredients come together to make a grilled delight you will love to serve! {{ingredient_image_1}} First, grab a medium bowl. Whisk together these ingredients: - 1/2 cup balsamic vinegar - 1/4 cup honey - 2 tablespoons olive oil - 3 cloves garlic, minced - 1 teaspoon dried oregano - Salt and pepper to taste Make sure everything blends well. This mix is your marinade. Next, take your chicken breasts. Place them in a large resealable bag. Pour the marinade over the chicken. Seal the bag tightly. Gently massage the marinade into the chicken. This helps the flavor soak in. Let it marinate in the fridge for at least 30 minutes. For the best taste, two hours is even better. Now, it’s time to cook. Preheat your grill or grill pan on medium-high heat. After that, take the chicken out of the marinade. Discard the leftover marinade. Grill the chicken for about 6-7 minutes on each side. You want it to reach a safe internal temperature. Look for nice grill marks. If you want more flavor, brush the chicken with some reserved marinade while it cooks. While the chicken grills, you can start the tomatoes. In a small saucepan, drizzle some olive oil. Add a pinch of salt. Add the halved cherry tomatoes. Sauté them over medium heat for about 5 minutes. They should start to soften and get juicy. After grilling, let the chicken rest for 5 minutes. This keeps it juicy. Now, slice the chicken breasts. Arrange the slices on a platter. Spoon the sautéed tomatoes over the chicken. Sprinkle with grated Parmesan cheese. Finally, add fresh basil leaves for color and flavor. Enjoy your beautiful dish! To get the best flavor, marinate the chicken for at least 30 minutes. For even more taste, try to marinate it for up to 2 hours. This gives the chicken time to soak up the balsamic mix. To massage the marinade into the chicken, place the chicken in a resealable bag first. Pour the marinade over the chicken, then seal the bag. Gently squeeze and move the chicken around in the bag. This helps the flavors get into the meat. You can cook the chicken in different ways. If you don't have a grill, bake it in the oven or use a stovetop pan. Baking at 375°F for about 25-30 minutes works well. To check if the chicken is done, use a meat thermometer. The internal temperature should be 165°F. This ensures the chicken is safe to eat and juicy. Pair balsamic glazed chicken with tasty side dishes. Some great options include roasted vegetables, mashed potatoes, or a fresh salad. For a stunning presentation, slice the chicken and arrange it on a platter. Spoon the sautéed cherry tomatoes over the top, sprinkle with grated Parmesan cheese, and add fresh basil leaves for color. This makes the dish look as good as it tastes! Pro Tips Marination Time: Allowing the chicken to marinate for at least 2 hours will enhance the flavor significantly. For best results, marinate overnight. Grilling Temperature: Make sure your grill is preheated properly. A hot grill will give nice sear marks and keep the chicken juicy. Use of Fresh Herbs: Incorporating fresh herbs like thyme or rosemary can elevate the dish's aroma and flavor profile. Add them during the marination process. Resting Time: Letting the chicken rest for about 5 minutes after grilling allows the juices to redistribute, ensuring a moist and tender bite. {{image_2}} You can easily swap out honey for maple syrup or agave nectar. Both add a nice sweetness. If you want a sugar-free option, consider using stevia or erythritol. These alternatives work well with the balsamic vinegar. You can also change the herbs and spices. For a different flavor, try thyme or rosemary instead of oregano. You can mix in a bit of paprika for a smoky kick. Don’t be afraid to experiment with your favorite seasonings. If grilling is not an option, you can bake the chicken. Preheat your oven to 375°F (190°C). Place the marinated chicken on a baking sheet. Bake for 25-30 minutes or until the chicken is cooked through. This method keeps the chicken juicy. You can also use an air fryer for a quick meal. Preheat the air fryer to 375°F (190°C). Cook the chicken for about 15-18 minutes. Check for doneness, and enjoy a crispy outside with a moist inside. To make your dish even better, add seasonal vegetables. Roasted zucchini, bell peppers, or asparagus make great choices. They add color and nutrition to your plate. You can also serve the chicken over grains like quinoa or rice. A fresh salad works well, too. Just toss some greens with a light dressing. This adds crunch and freshness to your meal. To keep your balsamic glazed chicken fresh, store leftovers in an airtight container. Refrigerate them within two hours of cooking. This helps prevent bacteria growth. For best taste, eat the chicken within three days. If you want to keep it longer, freeze it. Wrap the chicken tightly in plastic wrap or foil before placing it in a freezer bag. It will stay fresh for up to three months. To maintain flavor and texture, let the chicken cool before freezing. This prevents ice crystals from forming. When you are ready to eat, thaw it in the fridge overnight. This method helps keep moisture. When reheating chicken, the best method is to use an oven. Preheat it to 350°F (175°C). Place the chicken in a baking dish and cover it with foil. This keeps the chicken moist while it heats. Bake for about 20 minutes or until it reaches 165°F (74°C) inside. You can also use a microwave. Place the chicken on a plate and cover it with a damp paper towel. Heat it in short intervals of one minute, checking often. This way, you avoid drying it out. Always check the temperature before serving to ensure it’s hot and safe to eat. How long should I marinate the chicken? You should marinate the chicken for at least 30 minutes. For the best flavor, aim for 2 hours. The longer it sits, the more tasty the chicken becomes. Can I use bone-in chicken for this recipe? Yes, you can use bone-in chicken. Just remember, it will take longer to cook. You should check the internal temperature to ensure it is safe to eat. Is balsamic glazed chicken healthy? Yes, balsamic glazed chicken can be a healthy choice. It is packed with protein from the chicken and has a good mix of flavors from the marinade. Using fresh ingredients adds nutrition too. Caloric breakdown per serving Each serving of balsamic glazed chicken has about 300 calories. This includes the chicken, sauce, and tomatoes. Adjust the serving size if you want to manage your calorie intake. What to do if the chicken is dry? If your chicken is dry, try cooking it for less time next time. You can also baste the chicken with some reserved marinade while cooking. This adds moisture and flavor. How to adjust flavors if it’s too sweet or tart? If the dish is too sweet, add a little more salt. A squeeze of lemon juice can balance the sweetness. If it’s too tart, add a touch of honey to mellow the taste. This blog shared a delicious recipe for balsamic glazed chicken. You learned about key ingredients and helpful tips for marinating and grilling. We also discussed storage and reheating methods to keep your dish fresh. You can customize the recipe with variations and serve it with sides to enhance flavors. Enjoy making this meal and impress your guests with a tasty dish they will love. Happy cooking!

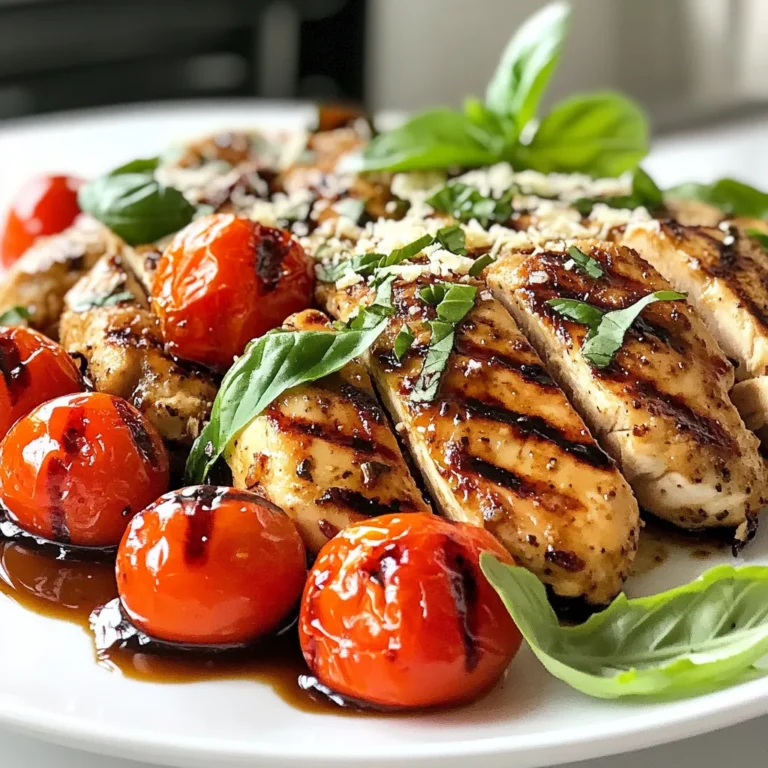
Balsamic Glazed Chicken Flavorful Grilled Delight

To make a yummy Chocolate Chip Banana Snack Cake, you need simple ingredients that blend perfectly. Here’s what you will need: - 2 ripe bananas, mashed - 1/3 cup unsalted butter, melted - 1 cup granulated sugar - 1 large egg - 1 teaspoon vanilla extract - 1 teaspoon baking soda - 1/4 teaspoon salt - 1 cup all-purpose flour - 1/2 cup semi-sweet chocolate chips - 1/4 cup walnuts or pecans, chopped (optional) Ripe bananas give the cake a sweet taste and moist texture. The unsalted butter makes it rich, while the sugar adds sweetness. You will need one large egg to bind everything together. Vanilla extract brings a lovely aroma. Baking soda helps the cake rise, while salt balances the sweet flavors. All-purpose flour forms the base of the cake. Semi-sweet chocolate chips add that classic chocolatey goodness. If you like, you can add nuts for a nice crunch. This mix of ingredients leads you to a delightful treat. {{ingredient_image_1}} - Preheat your oven to 350°F (175°C). Grease an 8-inch square baking pan or line it with parchment paper. - In a mixing bowl, add 1/3 cup of melted unsalted butter and 2 ripe bananas that you mashed. Stir until they mix well. - Next, mix in 1 cup of granulated sugar, 1 large egg, and 1 teaspoon of vanilla extract. Stir until the mixture is smooth. - In another bowl, whisk together 1 cup of all-purpose flour, 1 teaspoon of baking soda, and 1/4 teaspoon of salt. - Slowly add this dry mix to your wet mixture. Stir gently. Be careful not to overmix; you want it just combined. - Now, fold in 1/2 cup of semi-sweet chocolate chips. If you like, add 1/4 cup of chopped walnuts or pecans. - Pour the batter into your prepared baking pan. Use a spatula to spread it evenly. To achieve a moist texture, use very ripe bananas. They add natural sweetness and moisture. Mash them well to blend evenly in the batter. Also, melted butter helps keep the cake soft and rich. Avoiding overmixing is key. When you mix the dry and wet ingredients, stir gently. Stop as soon as you see no dry flour. Overmixing can make the cake tough. For ideal pairings, serve the cake warm. A scoop of vanilla ice cream on top adds creaminess. Drizzle chocolate syrup over the ice cream for a sweet touch. For presentation, slice the cake into squares. Arrange the squares on a plate. Add a few nuts or chocolate chips on top for a nice look. This makes your dessert not just tasty but also pretty! Pro Tips Use Ripe Bananas: The riper the bananas, the sweeter and more flavorful your cake will be. Look for bananas with brown spots for the best results. Don’t Overmix the Batter: To ensure a light and fluffy cake, mix the dry ingredients into the wet ingredients just until combined. Overmixing can lead to a dense texture. Check for Doneness: Oven temperatures can vary, so start checking for doneness a few minutes before the minimum baking time to avoid overbaking. Serving Suggestions: For an extra indulgent treat, serve slices warm with vanilla ice cream or whipped cream and a drizzle of chocolate syrup. {{image_2}} You can make your cake even better by adding spices. Try mixing in a teaspoon of cinnamon or nutmeg for a warm taste. Both spices pair well with bananas and chocolate. You can also switch up the chocolate. Use milk chocolate for a sweeter flavor or dark chocolate for a bolder taste. Each type of chocolate offers a new twist, making your cake unique. If you want a dairy-free cake, swap the butter for coconut oil or a dairy-free butter. This keeps the cake moist and tasty. For a gluten-free option, use almond flour or a gluten-free baking mix instead of all-purpose flour. These swaps let everyone enjoy this treat, no matter their diet. To keep your chocolate chip banana snack cake fresh, store it in an airtight container. This will protect it from air and moisture. Place the cake at room temperature for up to three days. If you want to keep it longer, consider freezing it. Here’s how: - Wrap individual slices in plastic wrap. - Place the wrapped slices in a freezer bag or container. - Label the container with the date. You can freeze the cake for up to three months. When you're ready to enjoy it, just thaw it overnight in the fridge. To reheat your chocolate chip banana snack cake, follow these easy steps: - Preheat your oven to 350°F (175°C). - Place the slice on a baking sheet. - Heat for about 10 minutes, or until warm. You can also use a microwave: - Heat a slice for about 15-20 seconds. - Check to see if it's warm enough. For serving, enjoy it warm with a scoop of vanilla ice cream on top. Drizzle with chocolate syrup for a treat that feels special. Can I use frozen bananas? Yes, you can use frozen bananas. Just thaw them first and mash them well. They add great moisture and sweetness to the cake. How do I know when the cake is done? The cake is done when a toothpick inserted in the center comes out clean. It should also spring back slightly when you touch the top. Can I substitute the egg in the recipe? Yes, you can substitute the egg. Use 1/4 cup of applesauce or a flax egg made with 1 tablespoon of ground flaxseed and 2.5 tablespoons of water. Why did my cake sink in the middle? A cake can sink if it has too much liquid or if it's underbaked. Make sure to follow the recipe closely and check for doneness. What to do if the cake is too dry? If the cake is dry, it may have been overbaked. Try adding a bit more banana next time or reduce the baking time for a moister cake. This blog post covered how to make a tasty chocolate chip banana snack cake. We looked at the ingredients, preparation steps, and even tips to make it perfect. You learned about dough tips, tasty variations, and storage methods too. Baking can be fun and rewarding. Enjoy every bite of your cake, and don’t be afraid to try new twists!

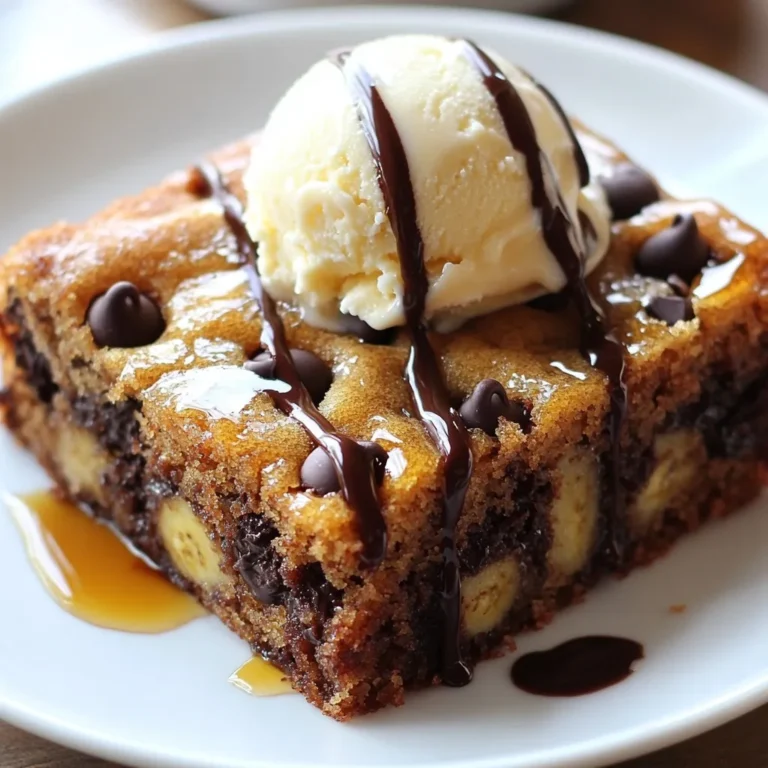
Chocolate Chip Banana Snack Cake Simple and Tasty Treat

- 1 lb ground chicken or turkey - 1/2 cup breadcrumbs - 1/4 cup green onions, finely chopped - 2 cloves garlic, minced - 1 teaspoon ginger, grated - 1 tablespoon sesame oil - 1/4 cup teriyaki sauce (plus extra for serving) - Salt and pepper to taste - 2 cups cooked jasmine rice - 1 cup broccoli florets - 1 red bell pepper, sliced - 1 carrot, julienned For these teriyaki meatball rice bowls, I love using ground chicken or turkey. They keep the meatballs light and tasty. Breadcrumbs help bind the meatballs and add a great texture. Chopped green onions, garlic, and ginger pack in flavor, making each bite a delight. Sesame oil adds a nutty note that ties everything together. The star of this dish, teriyaki sauce, gives the meatballs their sweet and savory taste. Jasmine rice is perfect as a base. It’s soft and fragrant, making every bowl feel special. For veggies, I like using broccoli, bell pepper, and carrot. They add color, crunch, and nutrition to the meal. - Sesame seeds - Additional green onions I often finish my bowls with sesame seeds and more green onions. These garnishes add a nice crunch and extra flavor. - Alternative meats: You can use ground beef or pork if you prefer. - Gluten-free options: Use gluten-free breadcrumbs and tamari instead of teriyaki sauce. Feel free to swap out the meat for your favorite type. Making these bowls gluten-free is simple too. Just choose the right ingredients, and you’ll enjoy the same great taste! {{ingredient_image_1}} 1. Preheating the oven: Start by preheating your oven to 400°F (200°C). This step is key. The right heat makes all the difference in cooking. 2. Mixing the meatball ingredients: In a large bowl, combine these ingredients: - 1 lb ground chicken or turkey - 1/2 cup breadcrumbs - 1/4 cup green onions, finely chopped - 2 cloves garlic, minced - 1 teaspoon ginger, grated - 1 tablespoon sesame oil - 1/4 cup teriyaki sauce - Salt and pepper to taste Mix everything well. This step ensures that every meatball is packed with flavor. 1. Shaping and baking the meatballs: Form the mixture into small meatballs, about one inch wide. Place them on a lined baking sheet. Bake the meatballs for 18-20 minutes. They should turn golden brown and be fully cooked. 2. Stir-frying the vegetables: While the meatballs bake, heat a tablespoon of oil in a pan. Add the following: - 1 cup broccoli florets - 1 red bell pepper, sliced - 1 carrot, julienned Stir-fry for about 5-7 minutes. The veggies should be bright and tender yet still crisp. Drizzle a tablespoon of teriyaki sauce over them and toss to coat. Remove from heat to keep them fresh. 1. Assembling the bowls: In each serving bowl, place a scoop of cooked jasmine rice. Top the rice with the stir-fried vegetables and the baked meatballs. 2. Garnishing and serving options: Drizzle extra teriyaki sauce over the meatballs and rice. For the final touch, sprinkle with sesame seeds and the remaining green onions. This makes your dish look and taste great! To keep your meatballs moist, use ground chicken or turkey. These meats have less fat but stay juicy. Mixing in breadcrumbs helps absorb moisture. Form small meatballs, about one inch wide. This size cooks evenly and stays tender. For browning, preheat your oven to 400°F (200°C). Line your baking sheet with parchment paper. This helps meatballs cook without sticking. Bake them for 18-20 minutes. Look for a golden brown color. This shows they are cooked through. To boost flavor, try adding spices like onion powder or black pepper. These add warmth without overpowering the dish. You can also add a dash of chili flakes for a hint of heat. Making homemade teriyaki sauce is easy! Combine soy sauce, honey, garlic, and ginger. Simmer these together until thick. This gives your dish a fresh taste and lets you control sweetness. You can cook your meatballs in different ways. An air fryer cooks them quickly and keeps them crispy. Set it to 375°F (190°C) for about 10-12 minutes. If you prefer the stovetop, brown the meatballs in a pan first. Then, add a bit of water and cover to steam them through. Using a slow cooker is another option. Cook on low for 4-6 hours. This method makes the meatballs very tender and allows flavors to meld. Pro Tips Use Fresh Ingredients: Fresh vegetables and herbs elevate the flavor of your teriyaki meatballs and stir-fried veggies. Opt for seasonal produce whenever possible. Adjust the Sauce: If you prefer a sweeter teriyaki flavor, add a touch of honey or brown sugar to the sauce. For a spicier kick, incorporate some red pepper flakes. Cook Rice Perfectly: Rinse jasmine rice under cold water before cooking to remove excess starch. This ensures fluffy rice that won’t clump together. Make Ahead: Prepare the meatballs in advance and store them in the refrigerator or freezer. They can be reheated and served with rice and vegetables for a quick meal. {{image_2}} You can change the protein in your meatballs. Ground beef or pork works great. For a lighter option, use ground turkey. If you want to go meatless, try using lentils or chickpeas. These options still taste amazing with teriyaki sauce. Each protein gives a unique flavor and texture. Jasmine rice is popular, but you can switch it up. Quinoa is a healthy choice and adds protein. Cauliflower rice is great if you want fewer carbs. Brown rice adds a nutty flavor and extra fiber. Each option will still pair well with your meatballs and veggies. Feel free to mix in seasonal veggies. Snap peas, zucchini, or asparagus can add crunch. Bell peppers and carrots are classic, but try spinach for a pop of color. Use what you have on hand. Fresh vegetables will brighten your bowl and add nutrients. To store your Teriyaki Meatball Rice Bowls, first let them cool. Place them in airtight containers. This keeps them fresh in the fridge. You can store the leftovers for about three to four days. If you want to keep them longer, freezing is a great option. - Refrigeration tips: Use airtight containers. Label them with the date. Store in the fridge for up to four days. - Freezing instructions: Portion the meatballs and rice. Keep veggies separate if possible. Use freezer-safe containers. These can last for up to three months. When you're ready to enjoy your leftovers, reheating is key. You want the meatballs warm and the rice fluffy. - Best ways to reheat rice bowls: Use a microwave for quick reheating. Warm in a covered bowl for about 2-3 minutes. Stir halfway through. For best results, use a skillet on medium heat. Add a splash of water to help steam the rice. - Avoiding sogginess in meatballs: Reheat meatballs in the oven at 350°F for about 10 minutes. This keeps them from getting soggy. You can also use the skillet method. Just be sure to keep the heat low. How long can you keep these delicious rice bowls? - How long can you keep the dish? In the fridge, enjoy them within four days. If frozen, use them within three months for best taste. Always check for any signs of spoilage before eating. You can use soy sauce as a base. Add honey for sweetness. Mix in garlic and ginger for flavor. Another option is to create a quick homemade teriyaki sauce. Combine soy sauce, honey, rice vinegar, and cornstarch. This mix gives a nice balance of sweet and salty. Yes, you can prepare Teriyaki Meatball Rice Bowls ahead of time. Make the meatballs and cook the rice. Store them in separate containers in the fridge. You can also stir-fry the vegetables ahead. Assemble your bowls just before serving for the best taste. To ensure tender meatballs, do not overmix the meat. Use breadcrumbs to add moisture. Adding grated ginger helps too. Baking at the right temperature keeps them juicy. Avoid cooking them too long, as it can dry them out. This blog post guides you through making Teriyaki Meatball Rice Bowls. We covered main ingredients like ground turkey, ginger, and sesame oil, plus some optional garnishes. You learned how to prep, cook, and assemble the dish, while also exploring tips for perfecting meatballs and trying variations. Remember, feel free to customize with different proteins or veggies. Enjoy your cooking and make this flavorful meal your own!

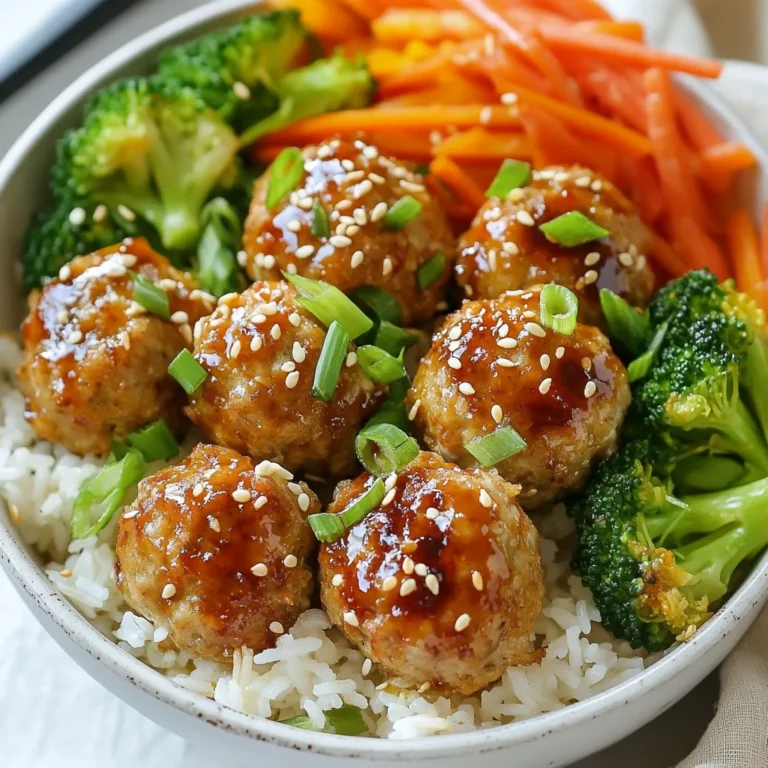
Teriyaki Meatball Rice Bowls Flavorful and Simple Meal

PREV 1 … 54 55 56 57 NEXT
quick dish kitchen

explore

DessertsDinnerAppetizersDrinks

Our Policies

  • Cookie Policy
  • Copyright Policy
  • Disclaimer
  • GDPR Policy
  • Terms Of Use
Back to Top
  • About
  • Contact Us
  • Privacy Policy
© 2025 quick dish kitchen