FREE DINNER EBOOK! Get your copy!
  • Cookie Policy
  • GDPR Policy
  • Disclaimer
  • Terms Of Use
  • Visit my other site: Fun Cookie Recipes
quick dish kitchen
  • Home
  • Dinner
  • Desserts
  • Drinks
  • Appetizers
  • Contact
  • About
  • Privacy Policy
  • Home
  • Dinner
  • Desserts
  • Drinks
  • Appetizers
  • Contact
  • About
  • Privacy Policy
  • Cookie Policy
  • GDPR Policy
  • Disclaimer
  • Terms Of Use
Visit my other site: Fun Cookie Recipes

HOME / CATEGORIES /

Latest

- 4 medium sweet potatoes, peeled and cubed - 3 tablespoons olive oil - 2 tablespoons pure maple syrup - 1 tablespoon Dijon mustard - 1 teaspoon garlic powder - 1 teaspoon smoked paprika - Salt and pepper to taste - Fresh parsley, chopped (for garnish) Gather these ingredients before you start. The sweet potatoes are the star here. Their natural sweetness pairs perfectly with the tangy Dijon mustard and the rich maple syrup. Olive oil helps to ensure that they roast nicely. Garlic powder and smoked paprika add depth and flavor. Don’t forget the salt and pepper; they help balance everything. Finally, fresh parsley brings a bright touch to your dish. Each item plays a key role in making your Maple Dijon Roasted Sweet Potatoes easy and flavorful. {{ingredient_image_1}} First, preheat your oven to 425°F (220°C). This high heat helps the sweet potatoes caramelize well. Next, grab a large baking sheet and line it with parchment paper. This makes cleanup easy and keeps the sweet potatoes from sticking. Now, peel the sweet potatoes. You will need four medium sweet potatoes. After peeling, cube them into bite-sized pieces. Aim for uniform sizes to ensure even cooking. In a big mixing bowl, combine the cubed sweet potatoes with three tablespoons of olive oil. Then, add two tablespoons of pure maple syrup and one tablespoon of Dijon mustard. Sprinkle in one teaspoon each of garlic powder and smoked paprika, plus a pinch of salt and pepper. Now, toss everything together. Make sure each piece of sweet potato gets a nice coat of the maple-Dijon mixture. This step is key to infusing great flavor into every bite. Spread the coated sweet potatoes evenly on your baking sheet. Make sure they lie flat in a single layer; this helps them cook and caramelize nicely. Place the baking sheet in your preheated oven. Roast for 25 to 30 minutes. At the halfway mark, flip the sweet potatoes to ensure they cook evenly. Once they are tender and golden brown, take them out of the oven. Let them cool slightly before serving. Garnish with fresh chopped parsley for a splash of color and flavor. Enjoy your tasty Maple Dijon Roasted Sweet Potatoes! To get the best caramelization, use high heat. Set your oven to 425°F (220°C). The heat helps the sugars in sweet potatoes brown nicely. Make sure to spread them in a single layer on the baking sheet. This keeps them from steaming and ensures they turn crispy. Uniform cubing is key for even cooking. Aim for 1-inch cubes. If some pieces are large, they will cook slower. This can lead to uneven texture. All cubes should cook at the same time for the best results. For a great presentation, serve sweet potatoes in a colorful bowl. Sprinkle fresh parsley on top for a pop of color. This makes the dish look fresh and inviting. You can also drizzle a little extra maple syrup on top. This adds more sweetness and makes them even tastier. Try adding spices or herbs to mix things up. A pinch of cayenne can add heat. Rosemary or thyme can give a fresh touch. You can also mix in other veggies like bell peppers or carrots for variety. Pair these sweet potatoes with grilled chicken or fish. They go well with a fresh salad or roasted vegetables too. This makes a well-rounded meal that is both filling and flavorful. Pro Tips Choose the Right Sweet Potatoes: Look for firm sweet potatoes with smooth skin. Avoid any with blemishes or soft spots for the best texture and flavor. Adjust the Sweetness: If you prefer a sweeter dish, feel free to add an extra tablespoon of maple syrup. Adjust to taste to suit your preferences! Even Cooking: Make sure to cut your sweet potatoes into uniform cubes for even roasting. This ensures that all pieces cook at the same rate and achieve that perfect caramelization. Storage Tips: Leftover roasted sweet potatoes can be stored in an airtight container in the fridge for up to 3 days. Reheat in the oven or microwave before serving. {{image_2}} You can change the mustard base for a new taste. Try whole grain mustard for a crunch. You can also use spicy mustard to add a kick. This change gives the dish a fun twist. For sweeteners, pure maple syrup shines, but other options work too. Honey gives a nice floral note. Brown sugar adds a deep, rich flavor. Experimenting with these choices can surprise your taste buds. If you want a vegan version, you can easily swap the honey for agave syrup. This keeps the sweetness without any animal products. For a gluten-free option, check your mustard brand. Most Dijon mustards are gluten-free, but it’s good to read labels. Adding vegetables boosts nutrition. Try bell peppers or Brussels sprouts. They roast well and add color. You can toss in some red onions for sweetness too. If you want texture, adding cheese or nuts makes a great option. Feta cheese gives a salty contrast. Chopped pecans or walnuts add a nice crunch. These extras make your dish even more delightful. To keep your Maple Dijon Roasted Sweet Potatoes fresh, use a sealed container. Place them in the fridge. It helps to cool them first. Store in a single layer if possible. This method prevents them from getting mushy. Leftovers can last about three to five days in the fridge. For the best texture when reheating, use an oven. Preheat it to 375°F (190°C). Spread the sweet potatoes on a baking sheet. Heat for about 10 to 15 minutes. This will help them crisp up again. If you're in a hurry, you can use a microwave. But be careful! Microwaving can make them soggy. To avoid this, use a lower power setting and cover with a paper towel. This keeps some moisture in but allows steam to escape. Yes, you can prepare these sweet potatoes ahead. You can peel and cube them a day early. Store the cubed sweet potatoes in water to keep them fresh. For the best flavor, mix the maple-Dijon sauce just before cooking. If you make them ahead, reheat in the oven. This keeps them crispy. Bake at 350°F for about 10 to 15 minutes. You can also microwave them, but they might get soft. Maple Dijon roasted sweet potatoes pair well with many dishes. Serve them with grilled chicken or fish for a balanced meal. They also complement salads, especially those with nuts or cheese. You can add them to grain bowls with quinoa or farro. They make a great side for holiday meals too. Try them with turkey or ham for a tasty twist. Yes, you can use other potatoes. Regular potatoes will work, but adjust the cooking time. Use red or yellow potatoes for a similar texture. White potatoes are less sweet, so you might want to add more maple syrup. If you try fingerling potatoes, keep them whole and roast them longer. Each type can give a new flavor to this dish. In this article, we explored how to make Maple Dijon Roasted Sweet Potatoes. We discussed the key ingredients, including sweet potatoes, olive oil, and maple syrup. I shared a step-by-step guide for prepping, mixing, and roasting. We also covered tips for finding the best flavors and variations to suit your taste. These sweet potatoes can be a tasty side or a main dish. Don’t hesitate to try the variations or share your own ideas. Enjoy your cooking!

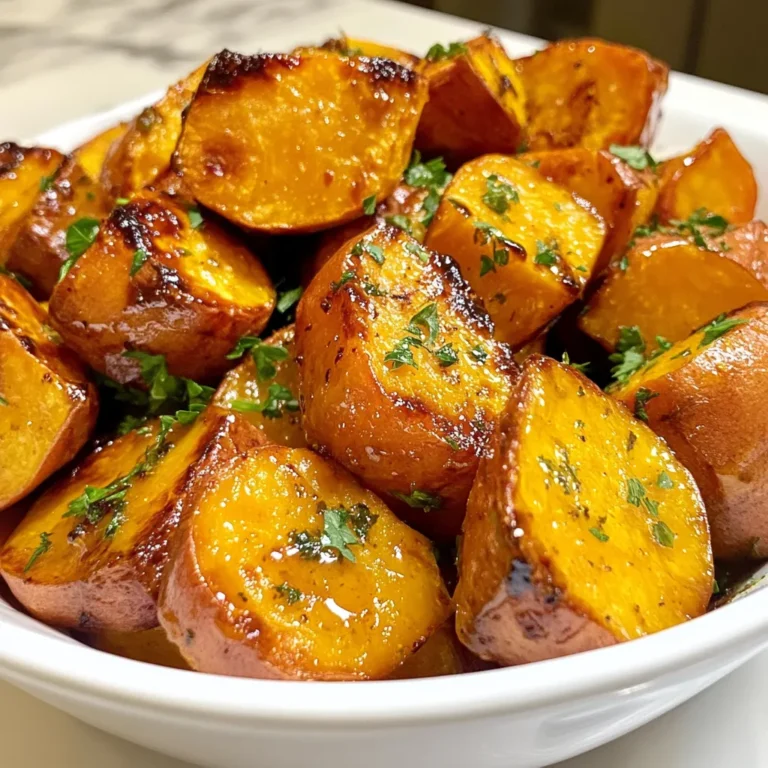
Maple Dijon Roasted Sweet Potatoes Easy and Flavorful

- 2 cups all-purpose flour - 1/3 cup granulated sugar - 1 tablespoon baking powder - 1/2 teaspoon salt - 1/2 cup cold unsalted butter, cubed - 1 cup fresh blueberries (or frozen, if out of season) - Zest of 1 lemon - 1/4 cup heavy cream - 1 large egg - 1 teaspoon vanilla extract - 1 tablespoon lemon juice - Extra sugar for sprinkling on top These ingredients bring bright flavor and texture to the scones. The all-purpose flour provides a sturdy base, while the sugar adds sweetness. Baking powder helps them rise, and salt boosts flavor. Cold butter creates a flaky texture when mixed in. Fresh blueberries offer juicy bursts, and lemon zest gives a zesty kick. Cream, egg, and vanilla bind the dough and add richness. Lastly, lemon juice brightens the flavor. You can use several substitutes if you lack an ingredient. For flour, consider whole wheat flour for a nuttier taste. Coconut sugar can replace granulated sugar for a hint of caramel flavor. Baking soda can work instead of baking powder, just add an acid like vinegar too. If you don’t have unsalted butter, any butter can work, but reduce added salt. Frozen blueberries are fine, but fresh ones shine best. You can swap heavy cream with milk or a plant-based option for a lighter scone. Each scone serves as a delightful treat. They contain about 220 calories, with 9 grams of fat and 30 grams of carbs. Each scone also has around 1 gram of fiber and 3 grams of protein. This makes them a tasty snack, but enjoy in moderation. If you want to make them healthier, use less sugar or substitute some butter with applesauce. {{ingredient_image_1}} Making lemon blueberry scones is simple and fun. You will need just a few ingredients and about 40 minutes. Gather everything before you start. Preheat your oven to 375°F (190°C). Line a baking sheet with parchment paper. This keeps the scones from sticking. 1. In a big bowl, whisk together: - 2 cups all-purpose flour - 1/3 cup granulated sugar - 1 tablespoon baking powder - 1/2 teaspoon salt 2. Next, add 1/2 cup cold, cubed unsalted butter. Use your fingers or a pastry cutter to mix until it looks like coarse crumbs. 3. Gently fold in 1 cup fresh blueberries and the zest of 1 lemon. Be careful not to squish the berries. 4. In another bowl, mix: - 1/4 cup heavy cream - 1 large egg - 1 teaspoon vanilla extract - 1 tablespoon lemon juice 5. Pour the wet mix into the dry mix. Stir gently until just combined. It’s okay if the dough is a little sticky. 6. Turn the dough onto a floured surface. Knead it a couple of times, then shape it into a circle about 1-inch thick. 7. Cut the dough into wedges like a pizza. Place them on the baking sheet. 8. Brush the tops with a bit of cream and sprinkle extra sugar on top for a crunchy finish. 9. Bake for 20-25 minutes until golden brown. 10. Let the scones cool on the sheet for a few minutes. Then, move them to a wire rack. - Use cold butter. This helps create flaky scones. - Don’t overmix the dough. A few lumps are okay. - If using frozen blueberries, do not thaw them. This keeps the dough from turning blue. - For a fun twist, serve warm with a drizzle of lemon glaze made from powdered sugar and lemon juice. These tips will help you make tasty lemon blueberry scones every time! To bake perfect lemon blueberry scones, follow these key steps: - Use cold butter: Cold butter makes the scones flaky. Cube it and keep it cold until mixing. - Do not overmix: Mix just until combined to keep the scones light and airy. - Chill the dough: If you have time, chill the dough for 30 minutes. This helps the flavors blend. You can elevate your scones with these flavor tips: - Add herbs: Try adding fresh rosemary or thyme for a savory twist. - Use lemon glaze: Drizzle a lemon glaze for extra sweetness and zing. Mix powdered sugar with lemon juice for this. - Mix in nuts: Chopped pecans or almonds add crunch and depth to the flavor. Watch out for these common errors: - Using stale ingredients: Always check the freshness of baking powder and flour. Old ingredients can ruin your scones. - Skipping the sugar on top: Sprinkling sugar on top gives a nice crunch. Don’t forget this step! - Not checking the oven temperature: An oven thermometer helps ensure accurate baking. A too-hot oven can burn the scones. By keeping these tips in mind, you can create delightful lemon blueberry scones that everyone will love! Pro Tips Use Cold Butter: Ensure your butter is very cold to create flaky scones. You can even freeze it for a few minutes before using. Don't Overmix: Mix the dough just until combined. Overmixing can lead to tough scones, so it's okay if some dry flour remains. Chill the Dough: For extra fluffy scones, chill the shaped dough in the fridge for 15-30 minutes before baking. Experiment with Add-ins: Feel free to add other ingredients like nuts, different berries, or even a touch of almond extract for variety. {{image_2}} You can make lemon blueberry scones even more exciting. Try adding chopped nuts, like pecans or walnuts, for a crunchy texture. If you love chocolate, fold in some dark chocolate chips. For more flavor, add a pinch of cinnamon or nutmeg. You can also replace blueberries with raspberries or strawberries for a fruity twist. Each change adds a unique taste to your scones. If you need a gluten-free choice, use a gluten-free flour blend. Make sure it has a binding agent, like xanthan gum, to help your scones hold together. You can also add a bit more baking powder to give them a nice rise. The taste will still be yummy, and you won't miss the gluten. Seasonal flavors can change the whole vibe of your scones. In spring, try adding fresh strawberries and mint for a refreshing taste. In fall, use pumpkin spice and cranberries for a cozy feel. For winter, mix in orange zest and dried fruits for a warm, festive treat. These variations keep your scones fun and fitting for any time of year! After enjoying your lemon blueberry scones, store any leftovers in an airtight container. Keep them at room temperature for up to two days. If you want to keep them fresh longer, you should place them in the fridge. They can last up to a week that way. Just remember to let them cool completely before sealing them in the container. To enjoy your leftover scones warm, preheat your oven to 350°F (175°C). Place the scones on a baking sheet. Heat them for about 5 to 10 minutes. This method makes them warm and fresh again. You can also use a microwave. Place a scone on a microwave-safe plate. Heat it for 10 to 15 seconds. This works well but may make them a bit soft. If you want to save your scones for later, freezing is a great option. First, let the scones cool fully. Then, wrap each scone in plastic wrap. Place the wrapped scones in a freezer bag or container. They can stay fresh in the freezer for up to three months. When you want one, just take it out and reheat it directly from the freezer. You can tell scones are done by their color and texture. They should be golden brown on top. When you tap the bottom, it should sound hollow. The edges will feel firm to the touch. If they are soft and pale, they need more time. Typically, they bake for 20 to 25 minutes. Keep an eye on them to avoid overbaking. Yes, you can use frozen blueberries! They work well in this recipe. Just be sure to add them straight from the freezer. Do not thaw them first. This helps keep the scones from turning blue. Frozen blueberries can add a nice burst of flavor too. They make this recipe easy any time of year. Serve lemon blueberry scones warm for the best taste. Drizzle a lemon glaze on top for extra sweetness. To make the glaze, mix powdered sugar with lemon juice. You can also add a slice of lemon on the side. This adds zest and looks great on the plate. Enjoy them with tea or coffee for a delightful treat! In this post, I shared a complete guide to making scones. We explored key ingredients and helpful substitutions. You learned the steps to prepare, bake, and perfect your scones. We covered tips to enhance flavor and avoid common mistakes. Plus, I provided variations for every season and storage tips for leftovers. Embrace these tips, and enjoy baking delicious scones your friends and family will love. Happy baking!

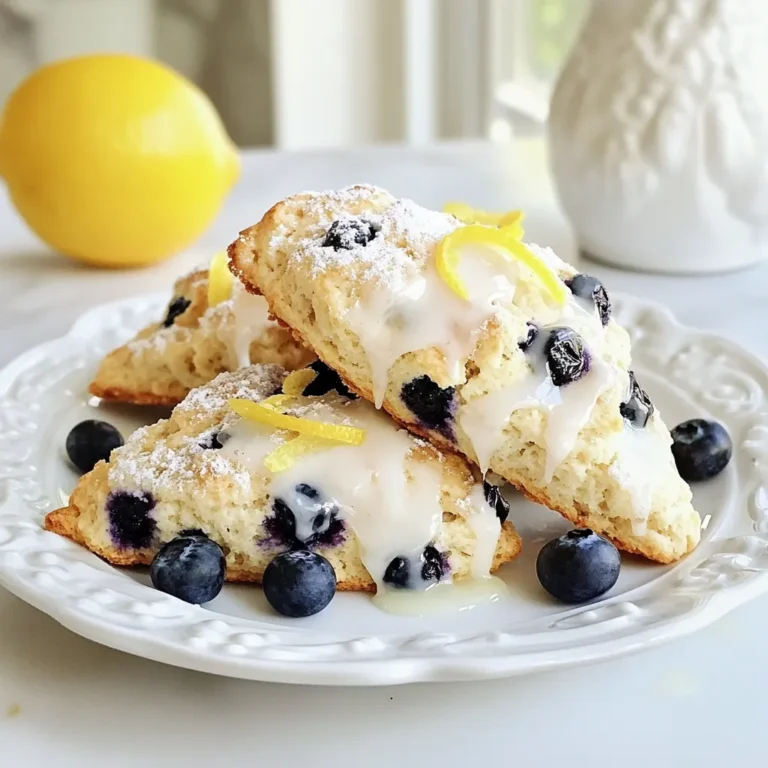
Lemon Blueberry Scones Tasty and Easy Delight

- 1 pound ground turkey - 1/2 cup breadcrumbs - 1/4 cup green onions, finely chopped - 2 cloves garlic, minced - 1 tablespoon ginger, minced - 1 large egg The main ingredients are simple yet flavorful. Ground turkey serves as the base. It is lean and perfect for meatballs. Breadcrumbs add texture and help bind the meatballs. Green onions give a fresh taste. Garlic and ginger bring a nice zing. Finally, the egg helps hold everything together. - 1/4 cup low-sodium soy sauce - 1/4 cup teriyaki sauce - 1 tablespoon sesame oil - 1 tablespoon honey - 1 teaspoon red pepper flakes (optional) For the sauce, soy sauce and teriyaki sauce work in harmony. They add depth and sweetness. Sesame oil gives a rich, nutty flavor. Honey adds a touch of sweetness, balancing the saltiness. If you like heat, add red pepper flakes for a kick. - Sesame seeds - Additional green onions Garnishes brighten the dish and make it look pretty. Sesame seeds add crunch and enhance the nutty flavor. Extra green onions on top provide freshness. These small touches make a big difference in presentation and taste. {{ingredient_image_1}} - Preheat oven to 400°F (200°C). - Prepare a baking sheet with parchment paper. - In a large bowl, combine ground turkey, breadcrumbs, green onions, garlic, ginger, and egg. - Season with salt, pepper, and red pepper flakes. - Form the mixture into meatballs, about the size of a golf ball. - Place them on the prepared baking sheet. - In a small bowl, whisk together soy sauce, teriyaki sauce, sesame oil, and honey. - Brush half of the sauce over the meatballs to coat them lightly. - Bake for 20-25 minutes until they are cooked through. - Remove the meatballs from the oven. - Drizzle the remaining sauce over the top. - Garnish with sesame seeds and chopped green onions before serving. To get the best meatballs, ensure even cooking. Use a baking sheet lined with parchment. This helps with browning and makes clean-up easy. Bake your meatballs at 400°F (200°C) for 20 to 25 minutes. The meatballs should reach an internal temperature of 165°F (74°C). A meat thermometer is a great tool for this. Fresh ingredients always add more flavor than dried ones. Use fresh garlic and ginger to enhance taste. If you like heat, add red pepper flakes. Start with a small amount and adjust to your liking. This method lets you control the spice level perfectly. Serve your teriyaki turkey meatballs with steamed rice and fresh vegetables. This makes a complete meal that everyone will love. For a fun presentation, arrange the meatballs on a platter with toothpicks. It makes them easy to grab and enjoy at gatherings. Adding sesame seeds and extra green onions on top adds a nice touch. Pro Tips Use Fresh Ingredients: Fresh garlic and ginger will enhance the flavor of your meatballs significantly. Opt for minced fresh ginger instead of powdered for a zesty kick. Consistent Size: Make sure your meatballs are uniform in size so they cook evenly. A cookie scoop can help achieve this. Let Them Rest: After baking, let the meatballs rest for a few minutes before serving. This allows the juices to redistribute, ensuring they remain moist. Experiment with Sauces: Feel free to mix up the teriyaki sauce with other flavors like sriracha or pineapple juice for a unique twist on the traditional taste. {{image_2}} If you want to change things up, try these options: - Ground chicken: This is a great swap. It has a similar texture and flavor. - Ground beef: Use this for a richer taste. Adjust the seasoning for best results. - Gluten-free breadcrumbs: Use crushed rice cereal or gluten-free bread. They work well in the mix. Adding new flavors can make your meatballs shine: - Pineapple: This adds a sweet, tropical touch. Mix in crushed pineapple to the meatball mix. - Different sauces: Try teriyaki BBQ for a smoky taste. It pairs nicely with the turkey. There are different ways to cook your meatballs: - Air frying: This method cooks them quickly and makes them crispy. Set the air fryer to 375°F (190°C) and cook for about 15 minutes. - Stovetop: Cooking on the stovetop gives a nice sear. Use a non-stick pan and add a bit of oil for best results. Cook over medium heat until browned. To store leftovers, let the meatballs cool first. Place them in an airtight container. Make sure to keep them in the fridge. They stay fresh for about 3 to 4 days. Use glass or plastic containers for easy storage. You can freeze both uncooked and cooked meatballs. To freeze uncooked meatballs, place them on a baking sheet. Freeze them for 1 hour, then transfer to a freezer bag. For cooked meatballs, let them cool before bagging. They last about 3 months in the freezer. When thawing, place the meatballs in the fridge overnight. You can also thaw them in the microwave if you’re in a hurry. Just be careful not to cook them while thawing. The best way to reheat meatballs is in the oven. Preheat the oven to 350°F (175°C). Place meatballs on a baking sheet and heat for about 10-15 minutes. You can also use the microwave. Heat them in 30-second bursts. To keep the meatballs moist, add a splash of water or sauce. This helps them stay juicy and tasty. Enjoy your teriyaki turkey meatballs warm and full of flavor! To check if meatballs are done, use a meat thermometer. Insert it into the middle of a meatball. It should read 165°F (74°C). If you don't have a thermometer, cut one open. The meat should be no longer pink. Yes, you can make these meatballs ahead of time. Prepare them and place them in the fridge for up to 24 hours. To reheat, bake them at 350°F (175°C) for about 15 minutes. You can also freeze them. Just cook them first, then freeze. Thaw in the fridge overnight before reheating. These meatballs go great with steamed rice or quinoa. You can add veggies like broccoli or snap peas for color and crunch. A side salad adds freshness. Drizzle extra teriyaki sauce on the rice for added flavor. Serve with toothpicks for easy snacking! In this blog post, we explored how to make delicious teriyaki turkey meatballs. We covered the main ingredients, sauce components, and preparation steps. You learned tips for cooking, flavoring, and serving your meatballs. I also shared variations, storage advice, and answers to common questions. These meatballs are easy to prepare and packed with flavor. Enjoy trying this recipe and making it your own!

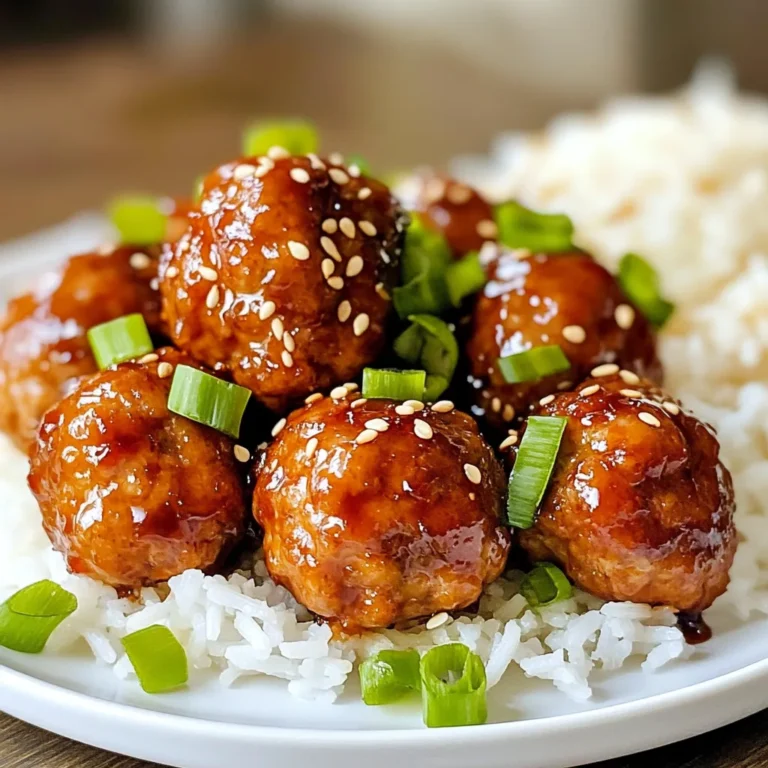
Teriyaki Turkey Meatballs Tasty and Simple Meal

To make a rich and flavorful roasted tomato basil soup, you'll need the following ingredients: - 2 lbs ripe tomatoes, halved - 1 medium onion, quartered - 4 cloves garlic, unpeeled - 3 tablespoons olive oil - Salt and pepper to taste - 2 cups vegetable broth - 1 cup fresh basil leaves, packed - 1 teaspoon balsamic vinegar - ½ teaspoon sugar (optional) - Fresh cream for drizzling (optional) Each ingredient plays a key role in building the flavor of this soup. The ripe tomatoes give a sweet and tangy base. The onion adds depth, while the garlic brings warmth. Olive oil helps with roasting and adds richness. Salt and pepper enhance all the flavors. Vegetable broth rounds out the soup, making it hearty. Fresh basil adds a burst of freshness, and balsamic vinegar provides a hint of acidity. If you like a touch of sweetness, the sugar can balance the flavors. Finally, a drizzle of fresh cream gives a lovely finish. Using fresh, high-quality ingredients makes all the difference in taste. Always opt for ripe tomatoes when you can. They will ensure your soup shines with flavor. {{ingredient_image_1}} - Preheat your oven to 400°F (200°C). - Take a large baking sheet and arrange the halved tomatoes, quartered onion, and unpeeled garlic. - Drizzle everything with olive oil and sprinkle salt and pepper on top. - Roast the vegetables in the oven for 30-35 minutes, until the tomatoes are caramelized and tender. - Once done, let the mixture cool slightly before peeling the garlic cloves. - In a large pot, combine the roasted vegetables with 2 cups of vegetable broth. - Add in the fresh basil leaves and a teaspoon of balsamic vinegar. - For a sweeter taste, you can add the optional sugar here. - Use an immersion blender to puree the soup until smooth, or transfer it to a regular blender and blend until smooth. - Return the soup to the pot if you used a regular blender. - Taste the soup and adjust the seasoning as needed. Heat through for another 5 minutes before serving. How to choose the ripest tomatoes. Look for tomatoes that are bright and firm. Ripe tomatoes should feel heavy in your hand. Their skin should have a slight shine. Smell the stem end; a sweet aroma means they are fresh and flavorful. Importance of caramelization for flavor. Caramelization happens when the sugars in tomatoes cook down. This process creates a rich taste that enhances the soup. Roast your tomatoes until they get deep brown edges. This adds depth and sweetness to your dish. Using an immersion blender vs. a countertop blender. An immersion blender is great for pureeing soup directly in the pot. It’s quick and less messy. A countertop blender can create a super-smooth texture. Just remember to let the soup cool a bit first. Tips for safe blending. When using a countertop blender, never fill it too full. Hot liquids can expand and spill out. Blend in batches if needed. Always cover the lid with a towel to avoid burns. Adjusting sweetness with sugar. If your soup tastes a bit too acidic, add sugar to balance it out. Start with a half teaspoon. Taste as you go until it’s just right. Additional herbs or spices to consider. Experiment with herbs like thyme or oregano for added flavor. A pinch of crushed red pepper can add warmth. You can also toss in a bay leaf during cooking for depth. This soup is flexible, so let your taste guide you! Pro Tips Use Ripe Tomatoes: The flavor of your soup will significantly improve with ripe, in-season tomatoes. Look for tomatoes that are fragrant and slightly soft to the touch. Roast for Extra Flavor: Allowing the tomatoes, onions, and garlic to caramelize in the oven enhances their natural sweetness and adds depth to the soup. Adjusting Consistency: If you prefer a thicker soup, reduce the amount of vegetable broth. For a thinner soup, add more broth gradually until desired consistency is reached. Fresh Basil for Brightness: Always add fresh basil leaves towards the end of cooking to retain their vibrant flavor and color, making the soup more aromatic. {{image_2}} To make this soup vegan, you can easily swap out the cream. Use coconut cream instead. If you want a lighter soup, you can leave out the cream entirely. The flavor stays rich and satisfying without it. If you need a gluten-free soup, just check your vegetable broth. Make sure it is gluten-free. Most brands offer safe options. This way, everyone can enjoy this comforting dish. You can boost the taste by adding roasted red peppers. They bring a sweet, smoky flavor. Carrots also work well. They add a nice sweetness and depth. For those who love spice, try adding crushed red pepper flakes. Just a pinch can make your soup pop. These little tweaks can turn your soup into a unique delight. To store your leftover soup, let it cool first. You can transfer the soup to a pot and let it sit for about 30 minutes. Once cool, pour the soup into airtight containers. The best containers are glass or BPA-free plastic. These keep your soup fresh and let you see what’s inside. To freeze the soup, first cool it completely. Then, pour it into freezer-safe bags or containers. Leave some space at the top for the soup to expand. Seal tightly and label with the date. Your soup will last up to three months in the freezer. When you want to eat it, take it out and thaw in the fridge overnight. The best way to reheat the soup is on the stove. Pour it into a pot and heat over medium heat. Stir often to prevent sticking. If you want to use a microwave, place the soup in a microwave-safe bowl. Heat in short bursts, stirring in between. This keeps the flavor and texture just right. Yes, you can use canned tomatoes. They are often ripe and packed with flavor. Canned tomatoes save time. Choose whole or diced tomatoes in juice. Drain excess liquid if needed. You can use them directly in the soup. Just add them to the pot with broth. This method makes your soup quick and easy. To spice up your soup, add crushed red pepper flakes. Start with a pinch and taste as you go. You can also use fresh jalapeños for heat. Chop them finely and sauté with the onions. For a smoky kick, add smoked paprika. These simple changes will elevate the flavor. This soup pairs well with grilled cheese sandwiches. The crunch of the bread complements the soup's smoothness. You can also serve it with a fresh salad. A light arugula salad with lemon dressing works great. For a hearty option, try crusty bread or garlic bread. These sides will make your meal satisfying and complete. This blog post explores how to make a delicious roasted tomato basil soup. We discussed key ingredients, step-by-step prep, and helpful tips for roasting and pureeing. You learned variations for vegan and gluten-free options and how to store and reheat leftovers effectively. Soup can warm your heart and satisfy your taste buds. With this recipe, you can enjoy a tasty dish that fits your needs. Try it out and share it with friends and family.

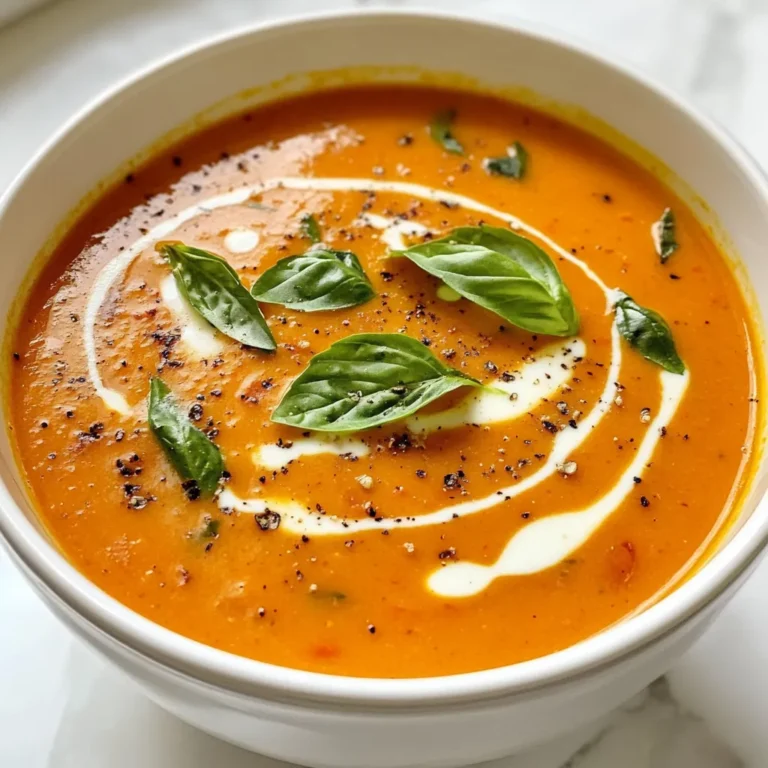
Roasted Tomato Basil Soup Rich and Flavorful Delight

- 4 medium-sized russet potatoes - 3 tablespoons olive oil - 4 cloves garlic, minced - 1 teaspoon garlic powder - 1 teaspoon onion powder - ½ teaspoon smoked paprika - Salt and pepper to taste - ½ cup grated Parmesan cheese - Fresh parsley, chopped (for garnish) In this recipe for Garlic Parmesan Air Fryer Fries, the ingredients shine. The russet potatoes give a fluffy inside and crispy outside. Olive oil adds richness and helps the spices stick. Minced garlic gives a strong, fresh flavor. The seasonings elevate the fries. Garlic powder enhances the garlic taste. Onion powder adds depth. Smoked paprika brings a hint of sweetness. Salt and pepper balance everything. Finally, Parmesan cheese adds a salty, nutty finish that makes these fries irresistible. Don’t forget the garnish! Fresh chopped parsley adds color and a bright taste. It makes the fries look and taste great. Use these ingredients to create a snack that everyone will love. {{ingredient_image_1}} - Wash and peel russet potatoes. - Cut potatoes into uniform fries, about 1/4 inch thick. This helps them cook evenly. - Soak fries in cold water for at least 30 minutes. This removes extra starch. Soaking makes your fries crispier. - Preheat air fryer to 400°F (200°C) for about 5 minutes. - Dry the fries with a clean towel. - Place the fries in a large bowl. - Drizzle 3 tablespoons of olive oil over them. - Add 4 minced garlic cloves, 1 teaspoon garlic powder, 1 teaspoon onion powder, ½ teaspoon smoked paprika, salt, and pepper. - Toss until fries are well-coated. - Arrange fries in a single layer in the air fryer basket. Cook in batches if needed. - Cook fries for 15-20 minutes, shaking the basket halfway for even cooking. - In the last 3 minutes, sprinkle ½ cup grated Parmesan cheese over the fries. - Cook until the cheese melts and turns golden. - Carefully remove fries from the air fryer. - Transfer them to a plate, sprinkle with fresh parsley, and serve hot. Soaking the fries is a key step. It removes excess starch and helps them crisp up. Aim to soak the fries for at least 30 minutes in cold water. After soaking, it’s important to dry the fries well. Use a clean kitchen towel to pat them dry. This step helps the oil and seasonings stick better. Cooking in batches may be necessary if you have a lot of fries. Overcrowding the air fryer can lead to uneven cooking. Spread fries out in a single layer for best results. Shaking the basket halfway through cooking ensures even crispiness. This simple action helps all sides cook nicely. While the garlic and Parmesan shine, you can add more flavors. Consider using Italian herbs like oregano or basil. A sprinkle of cayenne pepper can give a nice kick. Experiment with smoked paprika or even a dash of lemon zest for a fresh twist. These additions can elevate your fries to a whole new level! Pro Tips Cut Evenly: Make sure to cut the fries into even pieces to ensure they cook at the same rate, resulting in uniformly crispy fries. Soaking is Key: Soaking the cut fries in cold water removes excess starch, which helps achieve that desired crispy texture when air-fried. Don't Overcrowd: Air fry in batches if necessary, as overcrowding the basket can lead to uneven cooking and soggy fries. Fresh Herbs for Garnish: Garnishing with fresh parsley not only adds a pop of color but also enhances the flavor of the fries. {{image_2}} You can switch up the cheese for different flavors. Instead of Parmesan, try Pecorino Romano. It has a strong taste that adds a nice kick. You can also mix cheeses. Combining cheddar and mozzarella gives a gooey, melty texture. Experimenting with cheese can change the whole dish. Herbs and spices can take these fries to another level. Try adding fresh rosemary or thyme for a fragrant touch. You can also sprinkle in cayenne pepper for heat. If you want a smoky flavor, use chipotle powder instead. You can even add a dash of lemon zest for brightness. These small tweaks can make a big difference. If you want a healthier option, swap russet potatoes for sweet potatoes. Sweet potatoes add natural sweetness and extra nutrients. You can also bake the fries instead of air frying them. Toss them with olive oil and spices, then spread them on a baking sheet. Bake at 425°F (220°C) for 25-30 minutes. This method still gives tasty fries but with less oil. To store leftover Garlic Parmesan Air Fryer Fries, place them in an airtight container. Make sure they cool first. You can keep them in the fridge for up to three days. For the best taste, eat them soon after making. To reheat and keep your fries crispy, use the air fryer again. Set it to 350°F (175°C). Reheat for about 5 to 7 minutes. This method helps regain their crunch. You can also use an oven if you don't have an air fryer. Bake at 375°F (190°C) for 10-15 minutes. Yes, you can freeze these fries! Lay them flat on a baking sheet to freeze them first. Once frozen, transfer them to a freezer bag. They can last up to three months. When ready to eat, cook them directly from frozen in the air fryer. To cook Garlic Parmesan Air Fryer Fries, set your air fryer to 400°F (200°C). Cook the fries for 15 to 20 minutes. Be sure to shake the basket halfway through cooking. This helps them cook evenly and stay crispy. Yes, you can use other types of potatoes! While russet potatoes are great for fries, you can try Yukon Gold or sweet potatoes. Each type will give a different flavor and texture. Just remember that cooking times may vary slightly. Here are some tips to keep your fries crispy: - Soak the fries in cold water for at least 30 minutes. This removes extra starch. - Dry the fries well before seasoning. Moisture can make them soggy. - Don’t overcrowd the air fryer basket. Cook in batches if needed. - Shake the basket halfway through cooking. This promotes even cooking and crispiness. These steps will help you create the perfect Garlic Parmesan Air Fryer Fries every time! This blog post details how to make delicious Garlic Parmesan Air Fryer Fries. You learned about essential ingredients, easy steps for preparation and cooking, and useful tips for getting crispy fries. Remember to soak your potatoes and dry them well for optimal results. Don't hesitate to explore cheese variations or healthier options, like sweet potatoes. With the right methods, your fries can be a tasty hit. Enjoy experimenting and savor your perfect batch of homemade fries!

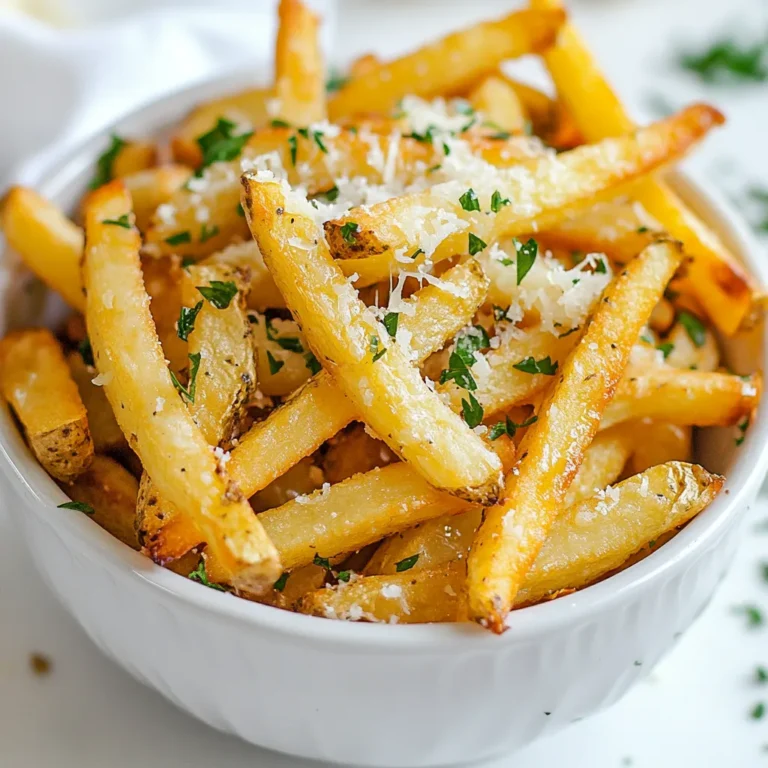
Garlic Parmesan Air Fryer Fries Crunchy and Tasty

To make loaded veggie nachos, gather these key ingredients: - 1 bag of tortilla chips - 1 cup shredded cheddar cheese - 1 cup black beans, rinsed and drained - 1 cup corn kernels, fresh or canned - 1 medium bell pepper, diced (any color) - 1 jalapeño, sliced (seeds removed for less heat) - 1 ripe avocado, diced - 1/2 cup sour cream or Greek yogurt - 1/4 cup fresh cilantro, chopped - 1 tablespoon olive oil - 1 teaspoon ground cumin - 1 teaspoon chili powder - Salt and pepper to taste These ingredients create a colorful and tasty dish. The cheese melts and binds everything together. The black beans and corn add protein and fiber. Fresh veggies bring crunch and flavor. You can add extra toppings for more flavor. Here are some ideas: - Sliced black olives - Diced tomatoes - Chopped green onions - Sliced radishes - Hot sauce or salsa These toppings let you make each bite unique. Feel free to mix and match for your taste. You will need some simple tools to make these nachos: - Large mixing bowl - Baking sheet - Oven - Knife and cutting board - Spoon for mixing Having the right equipment makes the cooking process easy and fun. Enjoy your cooking! {{ingredient_image_1}} 1. First, preheat your oven to 350°F (175°C). This helps the cheese melt nicely. 2. In a large bowl, mix together black beans, corn, and diced bell pepper. 3. Add jalapeño slices and olive oil to the bowl. Toss it well. 4. Sprinkle in ground cumin, chili powder, salt, and pepper. Stir again until mixed. 5. Spread tortilla chips on a large baking sheet in an even layer. 6. Evenly sprinkle half of the shredded cheddar cheese over the chips. 7. Top the chips with your veggie mixture, spreading it out well. 1. Now, sprinkle the remaining cheddar cheese on top of the veggie layer. 2. Place the baking sheet in the oven. Bake for 10-12 minutes. 3. Keep an eye on it until the cheese is melted and bubbly. 4. Carefully take the nachos out of the oven. Let them cool for a few minutes. 1. Just before serving, add diced avocado on top of the nachos. 2. Spoon sour cream or Greek yogurt over the nachos for creaminess. 3. Finish with a sprinkle of fresh cilantro for a burst of flavor. 4. Serve hot and enjoy with friends or family! You can make your nachos unique. Add any veggies you like. Try black olives, mushrooms, or green onions. You can also switch cheeses. Pepper jack adds a spicy kick. If you love it hot, add more jalapeños. For a sweet touch, try diced pineapple. The options are endless! If you're looking for healthier nachos, swap the chips. Use baked tortilla chips or veggie chips. You can also use whole grain options. Instead of sour cream, use Greek yogurt for a protein boost. Consider adding extra veggies for more nutrients. Spinach or zucchini make tasty choices. To melt cheese perfectly, use shredded cheese instead of slices. Shredded cheese melts better and faster. Spread it evenly over the nachos for great coverage. If you want extra gooeyness, mix cheeses. A blend of cheddar and mozzarella works well. Bake the nachos until the cheese is bubbly, around 10-12 minutes. This will help create that delicious, cheesy layer you crave! Pro Tips Use Fresh Ingredients: Fresh vegetables and ripe avocados will enhance the flavor of your nachos, making them more vibrant and delicious. Layer Wisely: To prevent soggy chips, layer your toppings strategically. Start with cheese, then add the veggie mixture, followed by another layer of cheese. Customize the Heat: Adjust the spiciness to your liking by leaving the seeds in the jalapeño or adding more spicy toppings like diced chili peppers. Make Ahead: You can prepare the veggie mixture in advance and store it in the refrigerator. Assemble and bake the nachos just before serving for a fresh taste. {{image_2}} You can easily change the flavor of your Loaded Veggie Nachos. Try adding some roasted red peppers or olives for a Mediterranean touch. For a sweet twist, add pineapple chunks. You can use different types of cheese, like pepper jack for spice or mozzarella for a milder taste. Want a vegan version? Skip the cheese and sour cream. Instead, use cashew cream or a store-bought vegan cheese. Nutritional yeast adds a cheesy flavor without dairy. You can also swap the sour cream for mashed avocado or a dairy-free yogurt. Adjust the heat to fit your taste. If you love spice, keep the jalapeño seeds in. You can add sliced fresh chili peppers or a spicy salsa. For a milder dish, use bell peppers only. You can also remove the jalapeño altogether for a friendly flavor. To store leftover loaded veggie nachos, place them in an airtight container. Make sure they are cool before sealing. Store them in the fridge. They will keep well for about 2-3 days. If you want to keep the toppings fresh, store them separately. To reheat your nachos, preheat the oven to 350°F (175°C). Spread the nachos on a baking sheet. Bake for about 5-7 minutes. This will help the cheese melt again and make them crispy. You can also use a microwave, but they may get soft. Heat them for 30 seconds to 1 minute. Check often to avoid overcooking. Freezing nachos is not the best option. The chips can get soggy when thawed. If you want to freeze, store the veggie mix and chips separately. Place each in a freezer-safe bag. Use them within a month for the best taste. When ready, thaw the veggie mix and bake fresh chips for a crispy meal. Yes, you can prep the veggie mix ahead. Combine black beans, corn, bell pepper, and jalapeño. Store it in the fridge for up to one day. Keep the chips and cheese separate until you bake. This way, they stay crisp and the cheese melts perfectly. If you want a different cheese, try Monterey Jack or mozzarella. Both melt well. You can also use vegan cheese for a dairy-free option. Nutritional yeast gives a cheesy flavor without dairy. Use gluten-free tortilla chips. Most brands offer these chips. Always check the label for gluten-free certification. This ensures everyone can enjoy your nachos without worry. Absolutely! You can add zucchini, mushrooms, or olives. Even diced tomatoes work well. Feel free to mix your favorite veggies for extra flavor and color. Start with a base of tortilla chips. Sprinkle half the cheese first. Next, add the veggie mix evenly. Finish with the rest of the cheese on top. This layering helps all the flavors blend well and keeps each bite delicious. This post covered all the details to make delicious loaded nachos. We discussed key ingredients, optional toppings, and the gear you need. I shared easy steps for prep, baking, and serving suggestions. You learned tips for customizing flavors and healthier choices, plus how to store and reheat leftovers. Remember, nachos are fun to make any way you like. Enjoy trying out these ideas and impressing your friends with tasty nachos!

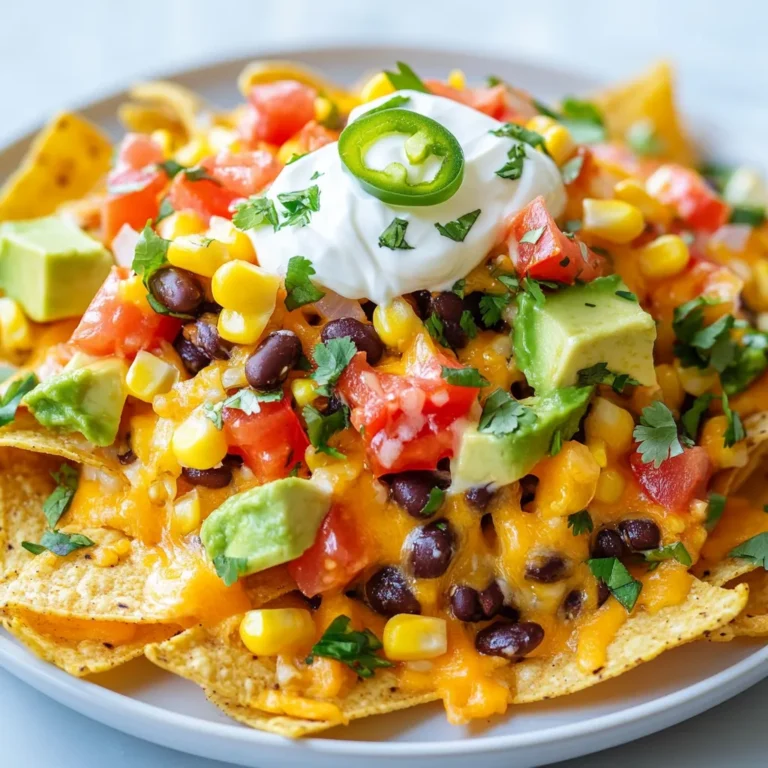
Loaded Veggie Nachos Flavorful and Easy Delight

- 1 lb flank steak, thinly sliced against the grain - 2 tablespoons olive oil - 1 red bell pepper, sliced - 1 green bell pepper, sliced - 1 medium onion, sliced - Tortillas, for serving - 2 tablespoons lime juice - 1 tablespoon chili powder - 1 teaspoon cumin - 1 teaspoon garlic powder - 1 teaspoon onion powder - 1 teaspoon smoked paprika - Salt and pepper to taste - Fresh cilantro - Lime wedges Gather these ingredients to create a fresh and tasty meal. Flank steak offers great flavor when cooked right. Olive oil adds richness to the dish. The bell peppers and onion bring color and crunch. The marinade is the key to flavor. Lime juice adds zing. Chili powder gives a warm kick. Cumin adds a nice depth. Garlic powder and onion powder provide savory notes. Smoked paprika gives a hint of smokiness. Season with salt and pepper for balance. For a lovely finish, cilantro and lime wedges make perfect garnishes. They add freshness and brightness. Enjoy the vibrant flavors of this quick recipe. {{ingredient_image_1}} To start, gather your marinade ingredients. You’ll need olive oil, lime juice, chili powder, cumin, garlic powder, onion powder, smoked paprika, salt, and pepper. 1. In a bowl, mix together these ingredients. This blend creates a zesty and spicy marinade. 2. Next, add your thinly sliced flank steak to the bowl. Toss it well to coat every piece. Marinating is very important. Let the steak sit for at least 30 minutes. For deeper flavor, you can marinate it for up to 2 hours in the fridge. This time allows the flavors to soak in. Heat a large skillet or grill pan over medium-high heat. You want it hot before adding the steak. 1. Once hot, add the marinated steak in a single layer. 2. Cook for about 3-4 minutes on each side. This gives you a nice brown crust and tender meat. Check your steak for doneness. Use a meat thermometer if you want perfect results. For medium-rare, aim for 130°F. Now it's time to sauté the vegetables. You’ll use sliced bell peppers and onion. 1. In the same skillet, add the sliced vegetables. 2. Sauté them for about 5-7 minutes. Stir occasionally until they are tender and slightly charred. This gives the veggies a nice texture. Once they are ready, return the cooked steak to the skillet. Toss everything together for about a minute. This allows the flavors to mix. Now, you are ready to serve the steak and vegetables in warm tortillas. Enjoy the vibrant flavors! To get the best flavor, marinate the flank steak for at least 30 minutes. You can go up to 2 hours if you have time. This longer marinating time helps the meat soak up all the tasty spices. You can change the marinade by adding more lime juice or spices like paprika for a unique twist. Use a large skillet or grill pan over medium-high heat. This setting gives the steak a nice sear. To avoid overcooking, keep an eye on the steak. Cook it for about 3-4 minutes on each side. Check the doneness with a meat thermometer. Aim for 130°F for medium-rare. For sides, think about rice, beans, or a fresh salad. These pair well with the fajitas. For presentation, use warm tortillas and pile on the steak and veggies. Add fresh cilantro and lime wedges on the side. This makes your dish colorful and fun! Pro Tips Marinate Longer for Flavor: For the best flavor, let the steak marinate for at least 2 hours. This allows the spices to penetrate the meat thoroughly. High Heat is Key: Make sure your skillet or grill pan is hot before adding the steak. This will help achieve a nice sear and lock in the juices. Rest Your Meat: After cooking, let the steak rest for 5-10 minutes before slicing. This ensures the juices redistribute and keeps the meat tender. Customize Your Veggies: Feel free to add other vegetables like zucchini or mushrooms for more flavor and texture in your fajitas. {{image_2}} You can switch the steak for chicken or shrimp. Both work great in fajitas. Just marinate them like you do with the steak. For chicken, use thin slices of breast or thighs. For shrimp, choose medium to large ones, and adjust cooking time. If you want a plant-based option, try bell peppers, zucchini, or mushrooms. These veggies can soak up the marinade and taste amazing. To make your fajitas spicier, add jalapeños or a dash of hot sauce. You can slice jalapeños and cook them with the veggies. If you prefer sweet over heat, try adding a splash of honey or agave syrup to the marinade. This gives a nice balance to the spice. You can change the herbs and spices for different flavors. Try adding oregano or cilantro to the marinade for a fresh twist. If you want to switch up the citrus, use orange or lemon juice instead of lime. These changes can create a whole new flavor experience. Experiment to find your favorite combination! - Store steak fajitas in an airtight container. - Place in the fridge within two hours of cooking. - They last up to three days in the fridge. - For longer storage, freeze in a freezer bag. - Remove as much air as possible before sealing. - Fajitas can last up to three months in the freezer. - The best method is to use a skillet. - Heat the skillet over medium heat. - Add a splash of water to keep it moist. - Stir often to prevent sticking. - You can use the microwave, but it may dry out the meat. - If using a microwave, cover with a damp paper towel. - In the fridge, fajitas last about three days. - Signs of spoilage include a sour smell and discoloration. - If the meat feels slimy or sticky, throw it away. - Always trust your senses. If unsure, it’s safer to discard. To enhance the flavor of your chili lime steak fajitas, start with the marinade. Here are some tips: - Use fresh lime juice for a bright, zesty taste. - Add minced garlic or fresh herbs like cilantro for depth. - Experiment with spices like smoked paprika or cayenne for heat. - Marinate longer for at least one hour, or overnight if you can. This allows the meat to absorb more flavor, ensuring each bite is delicious. Yes, you can prepare this recipe in advance. Here’s how: - Marinate the steak the night before. This will save time on cooking day. - Slice the vegetables and store them in the fridge. They will stay fresh. - Cook the steak and veggies just before serving for the best taste. This makes meal prep easy and fun. Enjoy your time cooking! Chili lime steak fajitas pair well with many sides. Here are some tasty ideas: - Mexican rice adds a flavorful touch. - Black beans provide protein and complement the meal. - Guacamole or salsa can add creaminess and spice. - Corn on the cob is a sweet and crunchy side. These options will make your meal more exciting and satisfying! You learned how to make chili lime steak fajitas with simple steps. We covered key ingredients, marinade tips, and cooking techniques. Each part adds to the taste and fun of the dish. You can add your own twist by changing proteins or spice levels. This recipe is also easy to store and reheat for later. I hope you enjoy making and sharing these fajitas with friends and family. Happy cooking!

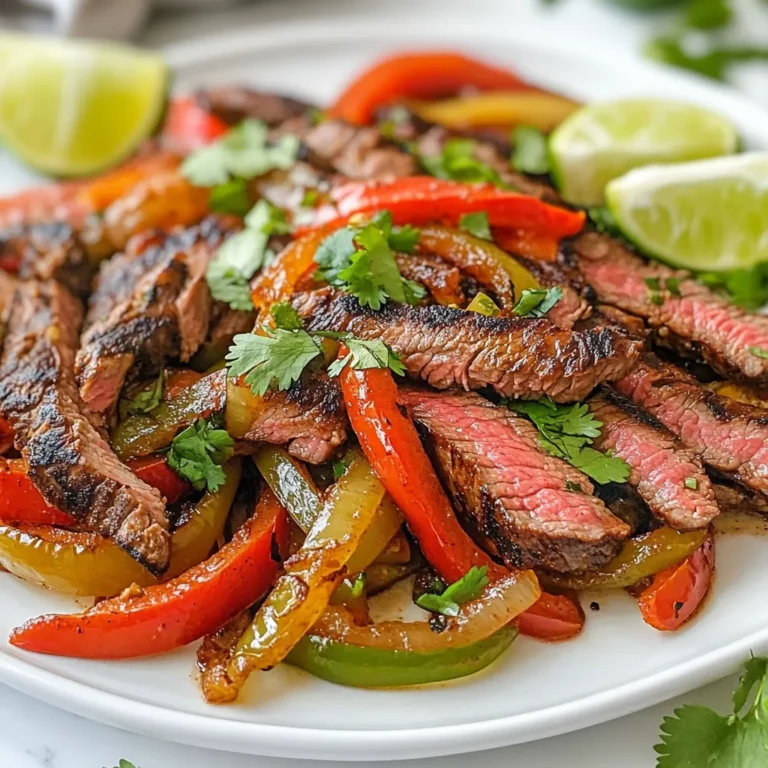
Chili Lime Steak Fajitas Flavorful and Quick Recipe

To make Apple Pie Overnight Oats, gather these simple items: - 1 cup rolled oats - 1 ½ cups unsweetened almond milk (or any milk of choice) - 1 medium apple, peeled and diced - 1 tablespoon apple cider vinegar - 2 tablespoons maple syrup (or honey) - 1 teaspoon ground cinnamon - ½ teaspoon vanilla extract - 1 tablespoon chia seeds - 1 handful of walnuts, chopped (optional) - Pinch of salt If you don’t have almond milk, use any milk you like. Cow's milk works well too. You can swap maple syrup for honey if you prefer. For a nut-free option, skip the walnuts or choose seeds like pumpkin seeds. If you want a different flavor, try adding nutmeg instead of cinnamon. Each serving of Apple Pie Overnight Oats is nutritious and filling. Here’s a rough idea of what you get per serving: - Calories: 300 - Protein: 8 grams - Fat: 10 grams - Carbohydrates: 45 grams - Fiber: 8 grams - Sugar: 10 grams (natural sugars from the apple and syrup) This meal is rich in fiber and healthy fats. It gives you energy for the day ahead. Enjoying a balanced breakfast helps keep you full and satisfied! {{ingredient_image_1}} Start by grabbing a large mixing bowl. Add 1 cup of rolled oats. Pour in 1 ½ cups of almond milk. You can use any milk you like. Then, add 1 tablespoon of apple cider vinegar. Drizzle in 2 tablespoons of maple syrup. Next, sprinkle in 1 teaspoon of ground cinnamon. Add ½ teaspoon of vanilla extract and 1 tablespoon of chia seeds. Finally, add a pinch of salt. Stir everything well until combined. This will be your creamy base. Now it’s time to bring in the apples. Take 1 medium apple, peel it, and dice it into small pieces. Fold the diced apples into your oat mixture. Make sure the apples mix in evenly. If you want some crunch, chop a handful of walnuts and add them too. Stir gently to combine all the flavors together. Once your mixture is ready, it’s time for storage. Divide the oat mix into two jars or bowls. Seal them tightly with lids. Place the jars in the refrigerator. Let them chill overnight, or at least for 4 hours. This allows the oats and chia seeds to soak up the milk and soften. In the morning, stir the oats again. If you like it creamier, add a splash more milk. Enjoy your delicious Apple Pie Overnight Oats! To get the best texture, use rolled oats. They soak up the milk well. Mixing in chia seeds helps too. They swell and create a creamy feel. After soaking overnight, check the consistency. If it seems too thick, add a splash of milk. Stir well to combine. This tip ensures a smooth and enjoyable dish. Taste is key when it comes to sweetness. Start with two tablespoons of maple syrup. If you want it sweeter, try adding more. You can also use honey instead. Each sweetener gives a different flavor. Adjust it to your liking. Don’t forget the apples add natural sweetness too! Serving is all about the look. Use clear jars to show off the layers. The oats, apples, and walnuts create a nice view. Add a sprig of mint on top for color. A few extra apple slices can make it pop. This makes your dish not just tasty, but also pretty! Pro Tips Use Old-Fashioned Rolled Oats: For the best texture, opt for old-fashioned rolled oats instead of instant oats, as they hold their shape better when soaked. Choose the Right Apple: Select a sweet and crisp variety of apple, like Honeycrisp or Fuji, to enhance the flavor of your overnight oats. Customize Your Sweetness: Adjust the amount of maple syrup or honey according to your taste preference, or substitute with a sugar-free sweetener if desired. Add a Protein Boost: For an extra source of protein, consider adding Greek yogurt or a scoop of protein powder to the mixture before refrigerating. {{image_2}} You can make Apple Pie Overnight Oats more fun by adding other fruits. Try diced pears or peaches for a sweet twist. Blueberries add a nice burst of flavor too. Mix and match your favorites to keep breakfast exciting. Just remember to adjust the amount of sweetener based on the fruit's natural sugar. Switching the milk can change the taste and texture of your oats. Almond milk works well, but you can use oat milk, soy milk, or coconut milk. Each type brings its own flavor. If you want creaminess, go for whole milk or any nut milk. The choice is yours! Maple syrup is my go-to for a touch of sweetness. However, you can use honey, agave, or even stevia. Each sweetener has a different flavor profile. If you love a richer taste, brown sugar is a great option. Adjust the amount based on your taste buds. To store your Apple Pie Overnight Oats, use airtight jars or bowls. This keeps them fresh. Make sure to seal them tight. If you're using glass jars, they look nice too. Apple Pie Overnight Oats last about 3 to 5 days in the fridge. The oats soak up liquid and can get soft. If you notice a change in texture, it might be time to toss them. You can eat these oats cold right from the fridge. If you prefer them warm, heat them in the microwave. Add a splash of milk to keep them creamy. Heat for 30 seconds, stir, and check the temperature. Repeat if needed. No, steel-cut oats do not work well for this recipe. They need longer cooking time. Rolled oats soak up liquid quickly, making them perfect for overnight oats. Steel-cut oats stay too firm and chewy. Stick with rolled oats for a smooth texture. Apple Pie Overnight Oats can last up to five days in the fridge. After that, they may lose texture and taste. Always keep them in airtight jars to keep them fresh. Check for any off smells or changes in color before eating. Yes, you can easily make it vegan! Just use unsweetened almond milk or any plant-based milk. Replace honey with maple syrup for sweetness. All other ingredients are already vegan-friendly. Enjoy this tasty dish while sticking to a plant-based diet! Great toppings can take your overnight oats to the next level! Here are a few ideas: - Extra diced apples - Chopped walnuts or pecans - A sprinkle of cinnamon - A drizzle of maple syrup or honey - A spoonful of nut butter Feel free to mix and match your favorites to create your perfect bowl! This blog post covered how to make delicious Apple Pie Overnight Oats. We discussed key ingredients, substitutions, and nutrition facts. I shared step-by-step instructions to prepare the oat mix, apples, and walnuts. You learned tips for texture, sweetness, and presentation. We explored fun variations with different fruits and milk options. Lastly, I explained storage tips to keep your oats fresh. Enjoy making this easy and tasty recipe. It’s perfect for breakfast or snacks!

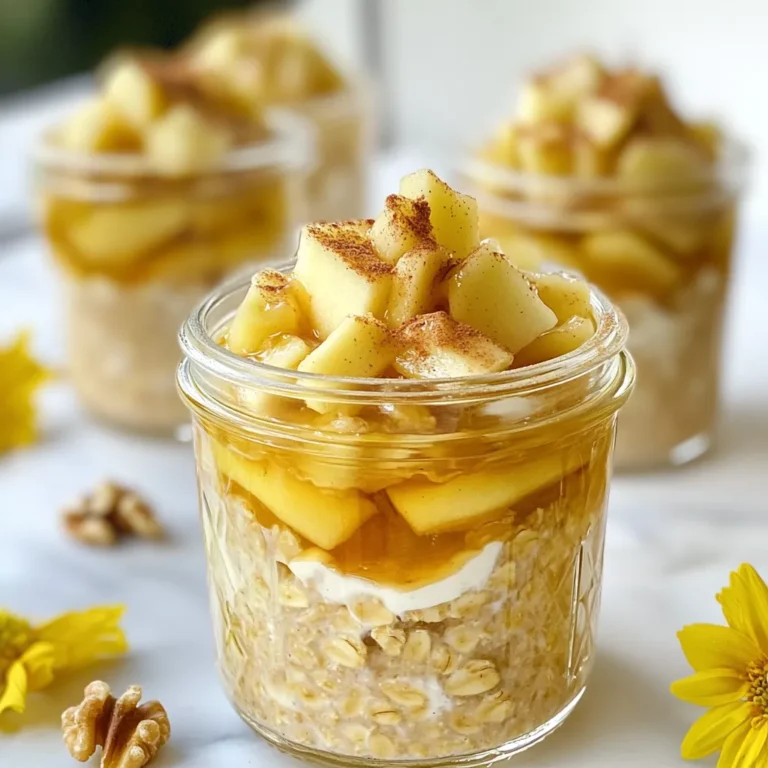
Apple Pie Overnight Oats Delightful and Simple Recipe

- 2 cups fresh strawberries, hulled and sliced - 1 cup heavy whipping cream - 1/2 cup powdered sugar - 1 teaspoon vanilla extract - 1 cup shortcake cookies, crushed - 1/2 cup Greek yogurt - Mint leaves for garnish Gathering the right ingredients is key to a great Strawberry Shortcake Icebox Cake. Start with fresh strawberries. Their bright flavor is what makes this dessert shine. Look for ripe berries that smell sweet and have a vibrant color. Next, heavy whipping cream is a must. It adds richness and a light texture. Powdered sugar sweetens the cream without graininess. Vanilla extract brings warmth and depth to the flavor. For the base, choose shortcake cookies. You can buy them or make your own. Either way, they provide the perfect crunch. Greek yogurt adds creaminess and helps balance the sweetness. Finally, don’t forget mint leaves. They bring a fresh touch and look great on top. With these ingredients, you are ready to create a dessert that is both simple and delicious. {{ingredient_image_1}} To prepare the strawberries, start by hulking and slicing them. Use 2 cups of fresh strawberries for the best flavor. Place the sliced strawberries in a medium bowl. Add 2 tablespoons of powdered sugar and toss them gently. Let them sit for about 10 minutes. This time allows the strawberries to macerate, making them sweeter. The sugar draws out juice and creates a syrupy consistency. You will love how juicy and sweet they become! Next, grab a mixing bowl and pour in 1 cup of heavy whipping cream. Add the remaining 1/2 cup of powdered sugar and 1 teaspoon of vanilla extract. Whip this mixture until you see soft peaks forming. This usually takes about 2 to 3 minutes. Now, gently fold in 1/2 cup of Greek yogurt. This step adds creaminess and a slight tang to the whipped cream. Your whipped cream mixture should look smooth and fluffy. For the first layer, take a 9x9 inch baking dish. Line the bottom with half of the crushed shortcake cookies. Spread them evenly to cover the base. Next, add half of your whipped cream mixture over the cookie crumbs. Smooth it out with a spatula. Now, spoon half of the macerated strawberries on top of the whipped cream layer. Distribute them evenly so every bite has strawberries. Repeat the layers by adding the remaining crushed cookies. Then, top with the rest of the whipped cream mixture and finish with the remaining strawberries. Cover the dish with plastic wrap and place it in the fridge. Chill it for at least 4 hours, or better yet, overnight. This waiting time allows all the flavors to come together beautifully. Before serving, garnish with fresh mint leaves for a nice touch! To make the best whipped cream, start with cold cream. Cold cream whips better and faster. Whip the cream until it forms soft peaks. This means it holds shape but still looks fluffy. Be careful not to overwhip it. If you whip too long, it turns into butter. Stop when the cream looks smooth and airy. When choosing strawberries, look for bright red ones. They should feel firm and have a sweet smell. Avoid berries with green or mushy spots. You can also use frozen strawberries if fresh ones are not available. Just thaw them and drain excess juice before using. Garnish your cake with fresh mint leaves. This adds color and a fresh taste. Use a sharp knife to cut neat slices. Serve it chilled for the best flavor. You can also add extra strawberries on top for a beautiful look. Pro Tips Use ripe strawberries: Choose bright red, ripe strawberries for the best flavor and sweetness. The riper the berry, the more delicious your icebox cake will be! Chill the bowl: For better whipped cream, chill your mixing bowl and beaters in the freezer for about 10 minutes before whipping the cream. This helps achieve fluffy peaks. Experiment with flavors: Feel free to mix in other fruits like blueberries or raspberries for a twist! You can also add a splash of lemon juice to the strawberries for extra zing. Make it ahead: This dessert is perfect for making ahead of time. It actually tastes better the next day, as the flavors meld and the cookies soften beautifully. {{image_2}} You can change the taste of your cake easily. For a different flavor, try using vanilla or almond extract instead of just vanilla. Almond gives a nice nutty touch. You can also add citrus zest, like lemon or orange, to brighten the cake. This adds a fun twist and makes it more refreshing. If you need gluten-free options, there are many choices. You can use gluten-free shortcake cookies. They work just as well. For those who want a dairy-free treat, swap heavy cream with coconut cream. You can also replace Greek yogurt with a dairy-free yogurt. These swaps let everyone enjoy this cake. Feel free to mix in other fruits. In summer, peaches or blueberries are great. In fall, try apples or pears for a cozy taste. You can also make holiday-themed adaptations. For example, add cranberries for a festive look. Each season brings new flavors to explore in your icebox cake. To keep your Strawberry Shortcake Icebox Cake fresh, store it in the fridge. Use plastic wrap to cover the dish tightly. This helps keep the cake moist and prevents it from absorbing other smells. The cake stays good for about 3 days in the fridge. After that, the cookies might get too soft. You can freeze this cake for longer storage. First, cut it into slices. Wrap each slice in plastic wrap, then place them in an airtight container. This protects them from freezer burn. The cake can last up to 2 months in the freezer. When you want to eat it, take out a slice and place it in the fridge overnight to thaw. When ready to serve, take the cake out of the fridge. Let it sit for about 10 minutes at room temperature. This helps bring back some of its original texture. Garnish with fresh mint leaves for a nice touch. For the best taste, serve it chilled. Enjoy the flavors of fresh strawberries and creamy goodness! Strawberry Shortcake Icebox Cake can last up to three days in the fridge. After that, the cookies may get too soggy. Keep it covered with plastic wrap to keep it fresh longer. Yes, you can make this dessert ahead of time. In fact, I recommend making it a day before. This way, the flavors blend well, and the cookies soften nicely. Just remember to cover it well in the fridge. To slice and serve, use a sharp knife. Dip the knife in warm water for easy cutting. This helps create clean lines and neat slices. Use a spatula to lift the slices onto plates. You can use frozen strawberries, but fresh ones taste better. If you use frozen, let them thaw and drain excess liquid. This prevents the cake from getting too soggy. Yes, you can easily make a smaller portion. Just use a smaller dish and cut the ingredient amounts in half. This way, you still enjoy the cake without making too much. This blog post showed you how to make a delicious Strawberry Shortcake Icebox Cake. You learned the essential ingredients, like fresh strawberries and whipped cream. We explored step-by-step instructions for preparation and layering. Tips for perfecting your whipped cream and selecting ripe strawberries helped you along the way. Lastly, we shared ways to store and adapt your cake. Enjoy creating this refreshing dessert, and remember, your personal touch makes it even better!

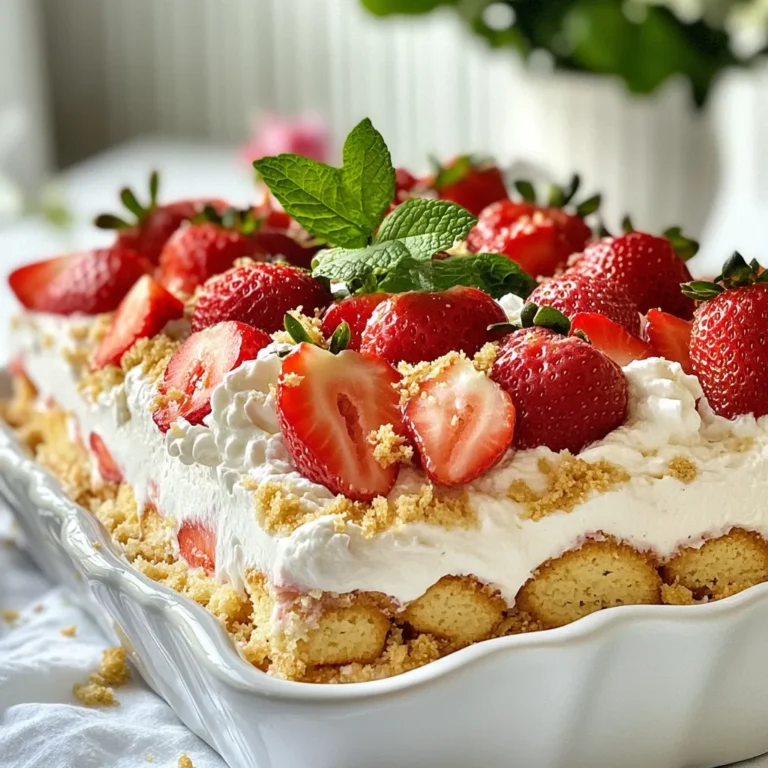
Irresistible Strawberry Shortcake Icebox Cake Recipe

- 200g fresh ramen noodles Using fresh ramen noodles makes a big difference. They cook quickly and taste great. Look for them in the refrigerated section of your grocery store. If you can't find fresh ones, dry noodles work too, but adjust the cooking time. - 1 cup bok choy, chopped - 1 carrot, julienned - 4 cloves garlic, minced - 1 teaspoon ginger, grated - 1 red chili pepper, finely sliced (adjust to taste) Bok choy adds crunch and nutrition. Carrots bring sweetness and color. Garlic and ginger give a strong base flavor. The red chili pepper adds the spice. You can adjust the amount based on your heat preference. - 2 tablespoons vegetable oil - 2 cups vegetable broth - 2 tablespoons soy sauce - 1 tablespoon miso paste - 1 teaspoon sesame oil - 2 green onions, sliced (for garnish) - 1 tablespoon sesame seeds (for garnish) Vegetable oil helps sauté the garlic. The broth adds depth to your dish. Soy sauce and miso paste boost the umami taste, while sesame oil gives a nutty hint. Green onions and sesame seeds make perfect garnishes. They add flavor and look nice in the bowl. {{ingredient_image_1}} To start, boil a pot of water. Once it bubbles, add 200g of fresh ramen noodles. Cook them for 3-4 minutes. After cooking, drain the noodles and set them aside. This step gives you the perfect base for your dish. In a large saucepan, heat 2 tablespoons of vegetable oil over medium heat. Then, add 4 cloves of minced garlic, 1 teaspoon of grated ginger, and 1 finely sliced red chili pepper. Sauté these for about 2 minutes. You want the garlic to turn golden and fragrant. This forms the heart of your flavor. Next, pour in 2 cups of vegetable broth. Add 2 tablespoons of soy sauce and 1 tablespoon of miso paste. Stir well to mix everything together. Bring this mixture to a light boil. This broth is what makes your ramen rich and tasty. Now it’s time for the veggies! Toss in 1 cup of chopped bok choy and 1 julienned carrot. Let them cook for 3-4 minutes. You want them tender but still bright. They add color and crunch to your ramen. Lower the heat and gently add the cooked ramen noodles to the broth. Drizzle in 1 teaspoon of sesame oil. Stir carefully to coat the noodles in the spicy broth. Serve the ramen in deep bowls, garnished with sliced green onions and a sprinkle of sesame seeds. This makes the dish look and taste amazing! Start with good broth. Use vegetable broth for a rich base. Heat it gently with soy sauce and miso paste. This mix adds depth and umami. For more flavor, let the broth simmer longer. This brings out all the tastes. You can add a splash of sesame oil for extra aroma. It makes the broth shine. Want it spicier? Add more red chili pepper. You can use fresh slices or chili flakes. If you prefer less heat, use fewer chili slices. Removing seeds from the chili also helps. Another tip is to add a dash of sugar. It balances the heat and gives a nice flavor twist. Serving is key to a great meal. Use deep bowls to show off your ramen. Make sure to layer the colorful vegetables on top. This makes it look appealing. A sprinkle of green onions adds a fresh touch. Finish with sesame seeds for crunch. A drizzle of sesame oil on top enhances the aroma. Enjoy your beautiful bowl! Pro Tips Adjust Spice Level: Feel free to modify the amount of red chili pepper based on your heat preference. Start with less and add more if desired! Fresh Ingredients: Using fresh garlic and ginger will greatly enhance the flavor of your broth. Avoid powdered versions for the best results. Vegetable Variations: You can substitute bok choy and carrots with other vegetables like bell peppers or snap peas for a different flavor profile. Make it a Meal: Add protein such as tofu, chicken, or shrimp to make this dish more filling and nutritious. {{image_2}} You can easily boost your spicy garlic ramen with protein. Chicken, shrimp, or tofu work well. For chicken, use cooked, shredded pieces. For shrimp, add them when the broth is hot. Tofu adds a nice texture. Just cube it and sauté it with garlic. Each choice gives a different flavor and texture. Feel free to change the veggies in your ramen. Instead of bok choy, try spinach or kale. Both are tasty and cook quickly. You can also add mushrooms for an earthy touch. Bell peppers or snap peas add sweetness and crunch. Mix and match based on your taste or what you have. To make this dish vegan, skip the miso paste. Use a vegan broth and soy sauce. For gluten-free ramen, look for rice noodles or gluten-free pasta. These options keep the dish light and tasty. Always check labels to ensure your ingredients fit your needs. To keep your spicy garlic ramen fresh, let it cool first. Transfer it to an airtight container. You can store it in the fridge for 3 to 4 days. If you want to keep it longer, consider freezing it. When you're ready to eat, you can reheat the ramen on the stove. Pour the ramen and broth into a pot. Heat it over medium heat until it's hot. Stir occasionally to make sure it warms evenly. You can also use a microwave. Place the ramen in a microwave-safe bowl. Heat it in short bursts, stirring in between, until hot. If you want to freeze your ramen, separate the noodles and broth. The broth freezes well, but the noodles can get mushy. Store the broth in a freezer-safe container for up to 3 months. For noodles, you can freeze them for about a month. When you're ready to eat, thaw the broth overnight in the fridge. Reheat it, then add freshly cooked noodles for the best taste! It takes about 20 minutes to make spicy garlic ramen noodles. You spend 10 minutes prepping and 10 minutes cooking. The fresh ramen noodles cook fast, usually in 3-4 minutes. You can enjoy a delicious meal in no time. Yes, you can use instant ramen noodles. They work well if you are short on time. Just cook them according to the package instructions. Instant noodles will absorb flavors from the broth, making them tasty. You can use tahini or soy sauce as a substitute for miso paste. Tahini adds creaminess, while soy sauce brings saltiness. Both options can help you keep the dish flavorful. Adjust the amount to match your taste. To make the dish less spicy, you can reduce the amount of red chili pepper. You can also remove the seeds from the chili for less heat. Adding a bit of sugar or honey can balance the heat, too. In this article, we explored how to make great ramen. We covered fresh noodles, flavorful ingredients, and step-by-step cooking. You learned tips for perfecting your broth and options for personal flair. Don't forget to try variations with proteins and veggies, along with proper storage for leftovers. Ramen can be fun and easy to make. With these tools, you can create your own delicious bowl. Enjoy every sip and slurp!

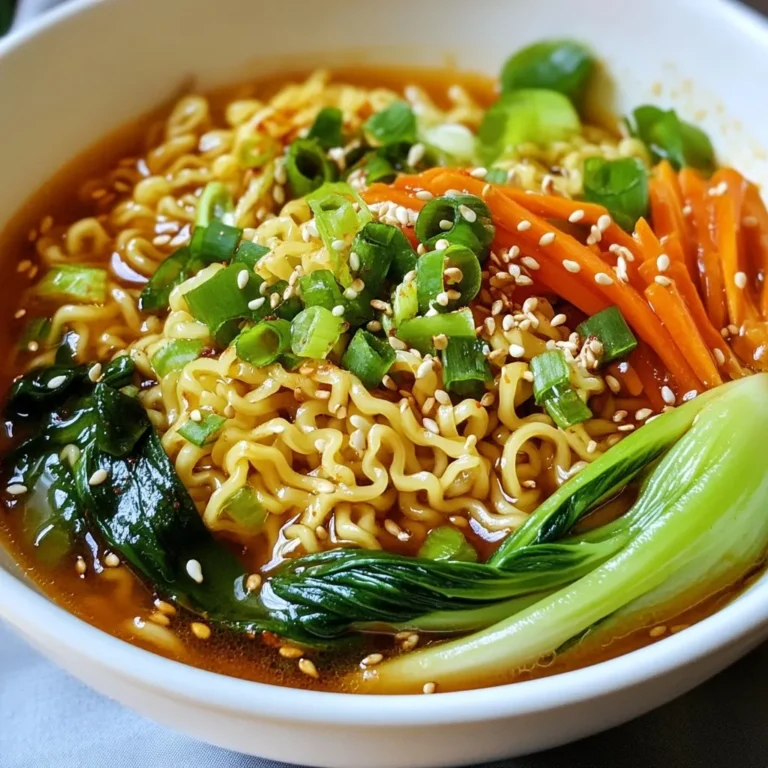
Spicy Garlic Ramen Noodles Quick and Flavorful Dish

PREV 1 … 52 53 54 … 57 NEXT
quick dish kitchen

explore

DessertsDinnerAppetizersDrinks

Our Policies

  • Cookie Policy
  • Copyright Policy
  • Disclaimer
  • GDPR Policy
  • Terms Of Use
Back to Top
  • About
  • Contact Us
  • Privacy Policy
© 2025 quick dish kitchen