FREE DINNER EBOOK! Get your copy!
  • Cookie Policy
  • GDPR Policy
  • Disclaimer
  • Terms Of Use
  • Visit my other site: Fun Cookie Recipes
quick dish kitchen
  • Home
  • Dinner
  • Desserts
  • Drinks
  • Appetizers
  • Contact
  • About
  • Privacy Policy
  • Home
  • Dinner
  • Desserts
  • Drinks
  • Appetizers
  • Contact
  • About
  • Privacy Policy
  • Cookie Policy
  • GDPR Policy
  • Disclaimer
  • Terms Of Use
Visit my other site: Fun Cookie Recipes

HOME / CATEGORIES /

Latest

To make Nutella Stuffed French Toast, gather these simple ingredients: - 4 slices thick bread (brioche or challah) - 4 tablespoons Nutella - 2 large eggs - 1/2 cup milk - 1 teaspoon vanilla extract - 1/2 teaspoon ground cinnamon - 1 tablespoon butter (for cooking) - Powdered sugar (for dusting) - Fresh berries (for garnish, optional) - Maple syrup (for serving, optional) Using thick bread like brioche or challah gives the best texture. Nutella adds rich flavor and creamy goodness. Eggs and milk create a custard base, while vanilla and cinnamon enhance the taste. Butter helps achieve a golden crust when cooking. You can dust with powdered sugar for a sweet touch. Fresh berries and maple syrup are great for serving. Each ingredient plays a role in making this dish a delight. {{ingredient_image_1}} - Take two slices of thick bread. - Spread 2 tablespoons of Nutella on each slice. - Top with the remaining bread slices to form two Nutella sandwiches. - In a mixing bowl, whisk together 2 large eggs. - Add 1/2 cup of milk, 1 teaspoon of vanilla extract, and 1/2 teaspoon of ground cinnamon. - Mix until fully combined and smooth. - Place a non-stick skillet on medium heat. - Melt 1 tablespoon of butter in the skillet. - Ensure the butter coats the bottom evenly. - Carefully dip each Nutella sandwich into the egg mixture. - Make sure each side is well-coated but not too soggy. - Place the soaked sandwiches into the heated skillet. - Cook for about 3-4 minutes on each side. - Look for a golden brown color and slight crispiness on the outside. - Once cooked, remove the sandwiches from the skillet. - Let them rest on a cutting board for a moment. - Dust with powdered sugar and slice them diagonally for a nice look. - Serve warm, and add fresh berries or maple syrup if you like. To make Nutella stuffed French toast, spread Nutella evenly. Use two tablespoons on each slice. This ensures every bite is rich and chocolaty. Press the slices together gently to seal. This helps keep the Nutella inside during cooking. Cook on medium heat for the best texture. If the heat is too high, the outside burns before the inside cooks. Aim for 3-4 minutes per side. Look for a golden brown color. This means it is crispy outside and soft inside. Presentation matters! After cooking, dust with powdered sugar. This adds a nice touch. Cut the toast diagonally for a beautiful look. Serve with fresh berries on the side. Drizzle with maple syrup for extra sweetness. It makes the dish inviting and fun! Pro Tips Choose the Right Bread: Using thick, airy bread like brioche or challah will give your French toast a fluffy texture and absorb the egg mixture without becoming soggy. Perfect Egg Mixture: Make sure to whisk the eggs and milk thoroughly to create a smooth batter, ensuring each bite is rich and flavorful. Controlled Cooking Temperature: Cooking on medium heat allows the toast to get golden brown without burning. Adjust the heat as needed while cooking. Serving Suggestions: For an elegant presentation, slice the French toast diagonally and serve with a side of fresh berries and a drizzle of maple syrup. {{image_2}} You can make Nutella stuffed French toast even better by adding fruits or nuts. Fresh berries, like strawberries or blueberries, add a burst of flavor. You can also slice bananas and place them inside with the Nutella. If you love crunch, toss in some chopped nuts, like walnuts or hazelnuts. They give a great contrast to the creamy Nutella. Try using flavored breads to change the taste. Cinnamon raisin or chocolate bread can give your toast a new twist. Adding a drop of almond or hazelnut extract to the egg mixture can also enhance the flavor. These small changes can turn a simple dish into something special. If you need gluten-free options, use gluten-free bread. Many brands offer tasty choices. For a vegan version, swap the eggs and milk with almond milk and flaxseed meal. This way, you can enjoy this treat while sticking to your dietary needs. Store leftover Nutella stuffed French toast in an airtight container. Place a piece of parchment paper between layers to keep them from sticking. You can keep them in the fridge for up to three days. This helps maintain their taste and texture. For the best results, reheat French toast in a skillet. Heat the pan over medium-low heat. Add a little butter and place the toast in the pan. Cook for about two to three minutes on each side until warm. You can also use a microwave, but this may make them a bit soggy. To freeze, wrap each piece of French toast tightly in plastic wrap. Place them in a freezer bag. They will stay fresh for up to two months. When ready to eat, thaw in the fridge overnight. Then, reheat in a skillet or toaster for that fresh taste. Yes, you can use regular bread. However, thick bread helps hold the filling better. Thin bread may become soggy when soaked. You might lose some of the rich flavors, too. If you use regular bread, try to toast it first. This will add some crispness to each bite. You can make small changes for a healthier dish. Use whole grain bread for more fiber. You can also swap Nutella for a nut butter with less sugar. Use almond milk instead of regular milk for a lighter option. Lastly, skip the powdered sugar or use less maple syrup. Yes, this recipe can be easily doubled. Just use eight slices of thick bread and adjust the Nutella. You will need more eggs and milk, too. Keep the same ratios for a delicious result. Make sure your skillet is big enough to cook all the sandwiches at once. Nutella-stuffed French toast is a fun and tasty treat. We covered the ingredients you need and step-by-step instructions for making it. You learned tips for perfecting your French toast and ideas for variations. Plus, we looked at storage tips to keep leftovers fresh. Give this recipe a try in your kitchen. Enjoy each sweet bite!

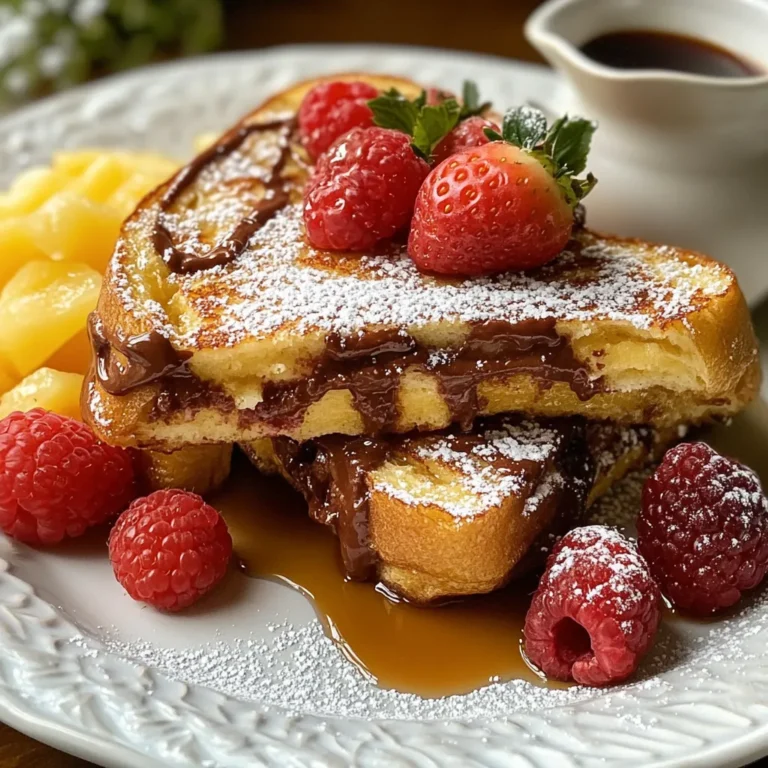
Nutella Stuffed French Toast Decadent Breakfast Treat

- 1 cup quinoa, rinsed - 2 cups vegetable broth or water - 1 cup cherry tomatoes, halved - 1 cucumber, diced - 1 bell pepper (any color), diced - 1/2 red onion, finely chopped - 1 cup chickpeas, rinsed and drained - 1/2 cup Kalamata olives, pitted and halved - 1/4 cup fresh parsley, chopped - 1/4 cup feta cheese, crumbled (optional) - 3 tablespoons olive oil - 2 tablespoons lemon juice - 1 teaspoon dried oregano - Salt and pepper to taste I love gathering fresh ingredients for my Mediterranean quinoa salad. Each item brings vibrant colors and flavors. First, I use quinoa as a base. It's a super grain that gives a nice texture. I rinse it to remove any bitterness. Next, I choose a vegetable broth or water for cooking the quinoa. The broth adds flavor. For the veggies, I grab cherry tomatoes, cucumbers, and bell peppers. These add crunch and juiciness. I also include finely chopped red onion for a bit of zest. Chickpeas are a must. They offer protein and make the salad filling. Kalamata olives add a briny taste that I really enjoy. Fresh herbs brighten the dish. I love using parsley, but you can also try mint or basil. If you like cheese, crumbled feta is a great addition. Finally, I prepare a simple dressing. I mix olive oil, lemon juice, and dried oregano. A pinch of salt and pepper ties everything together perfectly. With this list, you're ready to create a fresh and tasty Mediterranean quinoa salad! {{ingredient_image_1}} To start, rinse 1 cup of quinoa in cold water. This step removes bitter flavors. Next, add the rinsed quinoa to a medium pot with 2 cups of vegetable broth or water. Bring it to a boil over medium-high heat. Once boiling, reduce the heat to low. Cover the pot and let it simmer for about 15 minutes. The quinoa will absorb the liquid and become fluffy. After cooking, remove it from heat and let it cool. While the quinoa cools, chop your vegetables. Dice 1 cucumber and 1 bell pepper. Halve 1 cup of cherry tomatoes. Finely chop 1/2 of a red onion. Rinse and drain 1 cup of chickpeas. Halve 1/2 cup of Kalamata olives. Place all these ingredients in a large mixing bowl. This colorful mix adds great taste and texture. In a small bowl, mix 3 tablespoons of olive oil, 2 tablespoons of lemon juice, and 1 teaspoon of dried oregano. Use a whisk to blend these ingredients. Whisk until they are well combined. This dressing brings a bright flavor to your salad. Once your quinoa has cooled, fluff it with a fork. Add the quinoa to the bowl of vegetables. Pour the dressing over the quinoa salad. Toss everything gently to coat all the ingredients. If you like, fold in 1/4 cup of chopped parsley and 1/4 cup of crumbled feta cheese. Adjust the seasoning with salt and pepper to taste. For the best flavor, chill the salad in the refrigerator for at least 30 minutes before serving. To cook fluffy quinoa, always rinse it first. Rinsing removes the saponins, which can make it taste bitter. Use two cups of vegetable broth or water for each cup of quinoa. Bring it to a boil, then reduce the heat. Cover it and let it simmer for about 15 minutes. When the quinoa absorbs the liquid, it’s ready. Fluff it gently with a fork after cooking. Common mistakes to avoid: - Not rinsing quinoa can lead to a bitter taste. - Using too much or too little liquid affects the texture. - Overcooking makes quinoa mushy. Stick to the 15-minute mark. For extra flavor, consider fresh herbs like basil or mint. Dried spices also work well. Oregano is a great choice. You can swap it with thyme or dill for a twist. Using different dressings: - Try a balsamic vinaigrette for a sweet touch. - A yogurt dressing adds creaminess and tang. - Experiment with a spicy harissa for heat. Serve the salad in a large bowl or individual plates for a classy look. Chill it before serving to enhance the flavors. Garnishing ideas: - Add extra parsley on top for color. - Place lemon wedges on the side for a fresh touch. - Sprinkle some extra feta if you like. These tips will make your Mediterranean quinoa salad shine! Pro Tips Rinse Your Quinoa: Always rinse quinoa before cooking to remove its natural coating, called saponin, which can taste bitter. Let It Chill: Allow the salad to chill for at least 30 minutes before serving; this enhances the flavors and makes for a refreshing dish. Experiment with Veggies: Feel free to add or substitute your favorite vegetables, such as bell peppers, zucchini, or even avocados for added flavor and nutrition. Use Fresh Herbs: Incorporating fresh herbs like mint or basil can elevate the flavor profile of your salad significantly. {{image_2}} You can change grains in this salad. Try using farro or barley. You can also swap chickpeas for black beans or white beans. Seasonal vegetables add freshness too. Use zucchini in summer or roasted root veggies in fall. Each swap brings a new twist. This salad is easy to make vegan. Just leave out the feta cheese. For a gluten-free option, stick with quinoa; it is naturally gluten-free. This way, everyone can enjoy this tasty dish. Mediterranean flavors shine in this salad. Consider adding ingredients from different cultures. Try adding avocado for a creamy texture. You can also include sun-dried tomatoes for a richer taste. Each addition brings a unique flavor burst. To keep your Mediterranean quinoa salad fresh, store it in the fridge. Use an airtight container for best results. This helps keep moisture in and prevents odors from other foods. If possible, divide the salad into smaller portions. This makes it easier to grab and go. Your salad will last about 3 to 5 days in the fridge. Check for signs of spoilage before eating. Look for any off smells, discoloration, or slimy texture. If you see these signs, it's best to throw the salad away. Yes, you can freeze quinoa salad! However, some ingredients may not freeze well. Avoid freezing fresh veggies like cucumber and tomatoes. They may turn mushy. To freeze, portion the salad into freezer-safe bags. Remove as much air as possible before sealing. When ready to eat, thaw it in the fridge overnight. Quinoa is a tiny seed packed with nutrients. It has protein, fiber, and many vitamins. One cup of cooked quinoa has about 8 grams of protein and 5 grams of fiber. It contains all nine essential amino acids, making it a complete protein. Choosing quinoa is smart for several reasons. It is gluten-free, so many people can enjoy it. It also helps keep you full, which is great for weight control. Plus, quinoa is high in antioxidants, which help fight free radicals in your body. Yes, you can make this salad ahead of time. In fact, it tastes even better after chilling. Prepare the salad and let it sit in the fridge for at least 30 minutes. This time allows the flavors to blend well together. To improve flavor, try adding the dressing just before serving. If you mix it too soon, the salad may become soggy. You can also add fresh herbs right before serving for a burst of flavor. You can serve this salad in many ways. It pairs well with grilled meats, fish, or pita bread. It also works great as a side dish for a barbecue or picnic. For meal prep, pack it in individual containers for lunch. This salad keeps well in the fridge, making it a quick grab-and-go option. Enjoy it cold or at room temperature! In this blog post, we covered how to make a delicious Mediterranean quinoa salad. We discussed the key ingredients, from quinoa and fresh veggies to tasty dressings. I shared step-by-step instructions for cooking quinoa and preparing vegetables. You learned tips for perfecting your salad, from cooking techniques to great presentation ideas. Remember, you can customize this salad with different ingredients to fit your taste. Enjoy creating your salad and finding the perfect mix of flavors!

Mediterranean Quinoa Salad Fresh and Flavorful Delight

- 1 ½ cups graham cracker crumbs - ½ cup unsalted butter, melted - 2 tablespoons sugar - 16 oz cream cheese, softened - 1 cup sugar - 2 large eggs - 1 teaspoon vanilla extract - Zest of 1 lemon - ⅓ cup lemon juice (freshly squeezed) - 1 cup fresh blueberries These key ingredients bring flavor and texture to your lemon blueberry cheesecake bars. Graham cracker crumbs make a solid base. Cream cheese gives a rich and creamy filling. Fresh blueberries add sweetness and a burst of juice. - Zest of 1 lemon - 1 tablespoon flour (to toss with blueberries) Adding lemon zest brightens the flavor. It gives a nice zing that pairs well with cream cheese. Tossing blueberries with flour helps them stay suspended in the filling. This step makes sure every bite has blueberries. - Alternative sweeteners - Gluten-free options for crust If you want to lower sugar, try alternative sweeteners like honey or agave. For a gluten-free version, use gluten-free graham crackers. This way, everyone can enjoy the bars. {{ingredient_image_1}} 1. Preheat your oven to 325°F (163°C). 2. Line an 8x8-inch baking pan with parchment paper. Leave some paper hanging over the sides. This helps you lift the bars out later. 3. In a mixing bowl, combine 1 ½ cups of graham cracker crumbs, ½ cup of melted unsalted butter, and 2 tablespoons of sugar. 4. Stir until all the crumbs feel moist. 5. Press the crumb mixture firmly into the bottom of the prepared pan. 6. Bake it in the oven for about 10 minutes. Remove it and let it cool slightly. 1. In a large bowl, beat 16 oz of softened cream cheese with an electric mixer. Mix until the cream cheese is smooth. 2. Add 1 cup of sugar and beat until it is well combined. 3. Add 2 large eggs one at a time. Mix well after each egg. 4. Next, add 1 teaspoon of vanilla extract, the zest of 1 lemon, and ⅓ cup of freshly squeezed lemon juice. 5. Beat until the mixture is creamy and smooth. 1. In a small bowl, toss 1 cup of fresh blueberries with 1 tablespoon of flour. This helps keep the blueberries from sinking. 2. Gently fold the blueberries into the cheesecake mixture. 3. Pour the cheesecake batter over the cooled crust. Spread it evenly. 4. Bake in the oven for 25-30 minutes. The edges should be set, and the center should have a slight jiggle. 5. Remove from the oven and let it cool to room temperature. 6. Refrigerate for at least 4 hours or until set. 7. Once set, lift the bars out using the parchment paper. Cut into squares and serve. - To ensure a smooth filling, mix the cream cheese well. Start with softened cream cheese for best results. Beat it until it’s creamy and lump-free. - Testing doneness is key. Look for set edges and a slight jiggle in the center. This means they are done but still moist. - For presentation, serve the cheesecake bars on a nice platter. Add fresh blueberries on top for color. A sprinkle of lemon zest adds a lovely touch. - Consider pairing with a drizzle of lemon sauce or a dollop of whipped cream. These toppings enhance the flavor and look of your dessert. - Avoid overmixing the batter. This can lead to cracks in your bars. Mix just until combined to keep them smooth. - Not chilling the bars is a big mistake. They need at least four hours in the fridge to set properly. This makes them firm and easy to cut. Pro Tips Chill the Bars: Make sure to refrigerate the cheesecake bars for at least 4 hours to ensure they are fully set and easier to cut. Fresh Blueberries: Use fresh blueberries for the best flavor and texture. Frozen blueberries may release too much moisture. Prevent Sinking: Tossing the blueberries in flour helps them stay suspended in the batter instead of sinking to the bottom. Garnish Right Before Serving: For the best presentation, add fresh blueberries and lemon zest just before serving to keep them looking vibrant. {{image_2}} You can switch up the berries in this recipe. Raspberries and strawberries work great. They add their own unique taste. You can mix and match for fun flavors. Adding citrus zest also brightens up the dish. Try lime or orange zest for a twist. Citrus flavors blend well with cheesecake. The result is a refreshing dessert. If you want vegan cheesecake bars, use plant-based cream cheese. You can also replace eggs with applesauce. This makes the bars still creamy. For a low-carb version, swap sugar for a sugar substitute. Almond flour can replace graham cracker crumbs for the crust. These changes still keep the taste amazing. Consider serving individual portions for a fun touch. Use small cups or jars for a lovely presentation. No-bake versions are also an option. You can skip the oven and chill the mixture instead. This makes for an easier dessert, especially on hot days. Each method gives a new way to enjoy your cheesecake bars. To keep your Lemon Blueberry Cheesecake Bars fresh, refrigerate them right after they cool. - Place the bars in an airtight container. - If you don't have one, cover them tightly with plastic wrap. - They will stay fresh for up to five days in the fridge. This helps maintain their creamy texture and keeps the flavors vibrant. If you want to save some bars for later, freezing is a great option. - First, cut the bars into squares. - Wrap each square in plastic wrap. - Place the wrapped bars in a freezer-safe bag. This method keeps them fresh for up to three months. When you’re ready to enjoy them, thaw them in the fridge overnight. These cheesecake bars can last quite a while when stored properly. - In the refrigerator, they last up to five days. - In the freezer, they can last up to three months. Always check for any signs of spoilage before eating, like changes in texture or smell. Enjoy these bars for a refreshing dessert anytime! Yes, you can use frozen blueberries! Just make sure to thaw and drain them first. This helps prevent excess moisture in your batter. Toss the thawed berries with a little flour before adding them to the cheesecake mix. This trick keeps the blueberries from sinking and helps them stay evenly distributed. Look for the edges to be set and the center to have a slight jiggle. The jiggle means it's still creamy but not liquid. The bars will continue to set as they cool. If the edges start to brown, they may be overcooked. Keep an eye on them during the last few minutes of baking. Absolutely! These cheesecake bars are great for make-ahead meals. Store them in the fridge for up to five days. For longer storage, wrap them tightly and freeze them. They can last up to three months in the freezer. Just thaw them in the fridge before serving for the best taste and texture. This guide showed you how to make tasty blueberry cheesecake bars. We covered key ingredients, step-by-step instructions, and helpful tips. Remember to try different flavors and variations to suit your taste. Avoid common mistakes like overmixing and ensure proper chilling for the best results. Store leftovers well in the fridge or freezer to enjoy later. Happy baking! You’ll impress everyone with these delicious bars.

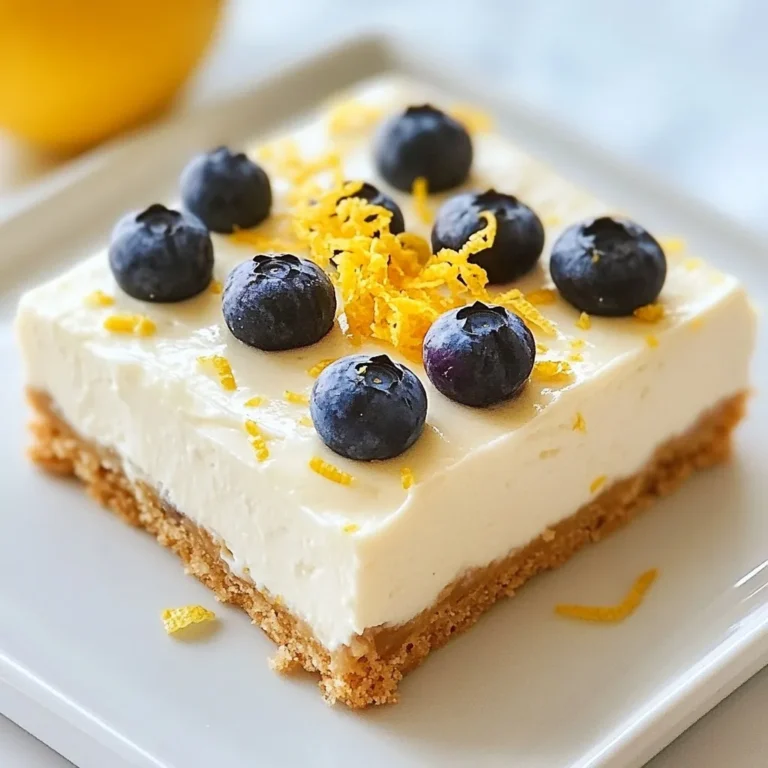
Lemon Blueberry Cheesecake Bars Delightful Dessert Treat

- 2 ripe bananas, mashed - 1 cup brown sugar - 1/2 cup unsalted butter, melted - 1 large egg - 1 teaspoon vanilla extract - 1 cup all-purpose flour - 1/2 teaspoon baking soda - 1/4 teaspoon salt - 1 cup chocolate chips - 1/2 cup chopped walnuts (optional) You can swap brown sugar for coconut sugar to cut down on refined sugar. For a dairy-free option, use coconut oil instead of butter. You can also use almond or oat milk for the egg. For the best flavor, use very ripe bananas. Look for bananas with brown spots. This means they are sweeter and softer. When choosing chocolate chips, opt for high-quality brands. They make a big difference in taste. {{ingredient_image_1}} Start by preheating your oven to 350°F (175°C). This step helps the blondies bake evenly. While the oven warms up, grab a 9x9 inch baking dish and grease it. Use butter or cooking spray so the blondies won’t stick. In a large bowl, mash the two ripe bananas until smooth. Next, pour in the melted butter. Mix these two together well. Then, add one cup of brown sugar and stir until combined. Beat in one large egg and one teaspoon of vanilla extract. Mix until everything is well blended. In another bowl, whisk together one cup of all-purpose flour, half a teaspoon of baking soda, and a quarter teaspoon of salt. This helps to ensure that the baking soda is evenly distributed. Gradually add this dry mixture to the wet ingredients, stirring just until combined. Be careful not to overmix; a few lumps are okay. Now, it’s time for the fun part! Fold in one cup of chocolate chips and half a cup of chopped walnuts if you like. Gently mix them into your batter until they are evenly spread. Pour the batter into your greased baking dish. Use a spatula to spread it out evenly. Place the dish in your preheated oven and bake for 25 to 30 minutes. To check if they are done, insert a toothpick in the center. If it comes out clean, they are ready. Once baked, cool the blondies in the pan for about 10 minutes before transferring them to a wire rack to cool completely. Now, cut them into squares and enjoy your tasty treat! To make your blondies great, avoid overmixing. When you mix the wet and dry ingredients, do it gently. Stir just until you see no dry flour. Overmixing can lead to tough blondies, which we don't want. Ensure even baking by spreading the batter smoothly in the dish. Use a spatula to level it out. If the batter is uneven, some parts may bake faster than others. Keep an eye on the baking time too. Pair your blondies with a scoop of ice cream. Vanilla or chocolate ice cream works best. The cold ice cream and warm blondies create a great mix of flavors. You can serve them warm or cold. Warm blondies are soft and gooey, while cold ones are chewy and dense. Try both to see which you like better! One common mistake is overcooking. Keep an eye on the timer. Check for doneness with a toothpick. If it comes out clean, they are done. Another mistake is measuring ingredients incorrectly. Use proper measuring cups for dry and wet ingredients. This helps your blondies turn out perfect every time. Pro Tips Use Overripe Bananas: The riper the bananas, the sweeter and more flavorful your blondies will be. Look for bananas with lots of brown spots for the best taste. Don't Overmix: When combining the dry and wet ingredients, mix just until combined. Overmixing can lead to dense blondies instead of the desired soft texture. Let Them Cool: Allow the blondies to cool in the pan before transferring them to a wire rack. This helps them set properly and makes cutting easier. Experiment with Add-ins: Feel free to customize your blondies by adding different mix-ins like peanut butter chips, dried fruit, or shredded coconut for extra flavor and texture. {{image_2}} You can have fun with the flavors in your blondies. Adding peanut butter or any nut butter makes them rich and creamy. Just swirl it in before baking. If you want a twist, try swapping chocolate chips for white chocolate or butterscotch. Both options add a sweet touch and change the whole taste. If you need gluten-free options, use almond flour or a gluten-free blend. These still taste great but fit your diet. For vegan-friendly adaptations, replace the egg with a flax egg. Use melted coconut oil instead of butter. You can still enjoy these blondies without any animal products. Seasonal fruits can brighten up your blondies. In the fall, add spices like cinnamon or nutmeg. These spices give a warm flavor. You can also mix in chopped apples or pears for a fruity twist. In summer, use fresh berries for a burst of color and flavor. You can store your blondies at room temperature or in the fridge. If you choose room temperature, place them in an airtight container. This keeps them soft for about four days. If you prefer them chilled, the fridge works too. They will last about a week when stored there. Just remember, the cold can change their texture a bit. To freeze blondies, first, let them cool completely. Then, cut them into squares. Wrap each square tightly in plastic wrap. Place them in a freezer-safe bag or container. They can stay in the freezer for up to three months. When you're ready to enjoy, just thaw them at room temperature for a few hours or microwave them for a few seconds. When stored properly, blondies can last quite a while. At room temperature, they last about four days. In the fridge, they extend to a week. If you freeze them, they maintain their taste and quality for three months. Always check for any signs of spoilage before eating. Enjoy your chocolate chip banana bread blondies fresh! Yes, you can use frozen bananas. Frozen bananas work well because they become soft when thawed. This makes them easy to mash. Just make sure to thaw and drain excess water before using. The texture may be a bit different, but they will still taste great. If you don’t have brown sugar, you have options! You can use white sugar instead, but the flavor will change a little. To mimic the taste of brown sugar, mix one cup of white sugar with one tablespoon of molasses. This will give you a similar depth of flavor. Yes, you can make blondies without eggs! You can use applesauce or mashed bananas as a replacement. Use 1/4 cup of applesauce or 1/4 cup of mashed banana for each egg. This keeps the blondies moist and tasty. To check if the blondies are done, use a toothpick. Insert it into the center. If it comes out clean or with a few crumbs, they are done. If it has wet batter, they need more time. Keep an eye on them to avoid overbaking! This blog post covers making delicious blondies with simple ingredients and easy steps. You learned how to choose ripe bananas and quality chocolate. We shared tips to avoid common mistakes, like overcooking. You can also explore fun variations, from flavors to dietary options. In conclusion, baking blondies is a fun way to create something sweet. Enjoy experimenting and sharing these treats with others! Happy baking!

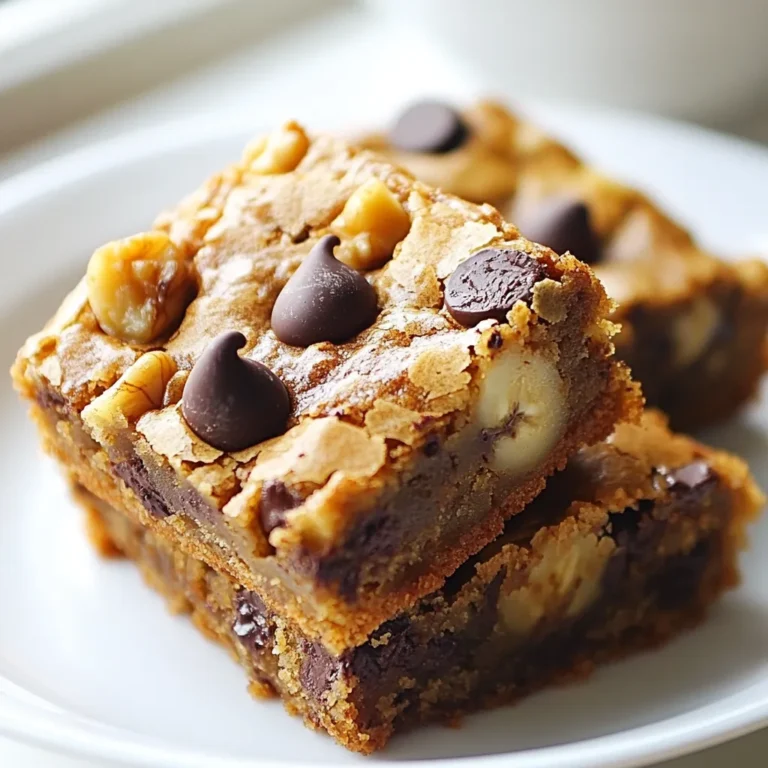
Chocolate Chip Banana Bread Blondies Tasty and Simple

To make Coconut Curry Ramen, you need these key ingredients: - 4 cups vegetable broth - 1 can (14 oz) coconut milk - 2 tablespoons red curry paste - 1 tablespoon soy sauce - 1 tablespoon maple syrup - 200g ramen noodles - 1 cup broccoli florets - 1 cup snap peas - 1 red bell pepper, sliced - 2 green onions, chopped - Fresh cilantro for garnish - Lime wedges for serving - Salt and pepper to taste These ingredients create a rich and creamy broth. The coconut milk adds sweetness. The red curry paste brings heat and depth. Together, they make a flavorful base. You can enhance your ramen with these tasty toppings: - Sliced jalapeños for extra spice - Soft-boiled eggs for a creamy texture - Crushed peanuts for a crunch - Sesame seeds for added flavor These toppings give your dish a personal touch. Feel free to mix and match based on your taste. If you cannot find some ingredients, here are some swaps: - Use chicken broth instead of vegetable broth for a meaty flavor. - Substitute red curry paste with green curry paste if you like. - Swap maple syrup with honey for sweetness. - Use zucchini or bok choy instead of broccoli. These substitutions work well without changing the dish’s essence. They help you make Coconut Curry Ramen with what you have at home. {{ingredient_image_1}} Start by taking a large pot. Pour in 4 cups of vegetable broth. Heat it over medium heat until it simmers. This step wakes up the flavors. Next, you will whisk in one can of coconut milk. Add 2 tablespoons of red curry paste for spice. Then, mix in 1 tablespoon of soy sauce. Finally, add 1 tablespoon of maple syrup for a hint of sweetness. Let this mixture simmer for about 5 minutes. It helps the flavors blend well together. Now, it’s time for the ramen noodles. Add the 200 grams of noodles into the pot. Follow the package instructions for cooking time. Usually, this takes about 3 to 4 minutes. Stir the noodles gently. This helps them cook evenly. During the last minute of cooking, it’s time to add veggies. Toss in 1 cup of broccoli florets and 1 cup of snap peas. Next, add the sliced red bell pepper. These colorful veggies bring life to your ramen. Taste the broth and add salt and pepper to your liking. Once everything is tender, remove the pot from heat. Ladle the ramen into bowls. Top each bowl with chopped green onions and fresh cilantro. Serve immediately and add lime wedges on the side for a fresh squeeze. Enjoy your delicious coconut curry ramen! To get the best coconut curry flavor, use fresh ingredients. Start with a good vegetable broth. This builds a tasty base. The red curry paste adds heat and depth. Whisk it well with coconut milk. The sweetness from maple syrup balances the spice. Taste as you go. Adjust salt and pepper as needed. This helps you find your perfect mix. Cooking the noodles just right is key. Follow the package instructions closely. Ramen noodles usually cook for about 3-4 minutes. Add them to the broth and stir gently. This keeps them from clumping together. Don’t overcook! You want them tender but not mushy. A good noodle texture makes your ramen fun to eat. Serve your coconut curry ramen hot. Use deep bowls to show off those colorful veggies. Top each bowl with green onions and fresh cilantro. These add a nice crunch and flavor. Don't forget lime wedges on the side! A splash of lime juice brightens the dish. Enjoy your meal with a smile! Pro Tips Fresh Ingredients: Use fresh vegetables for the best flavor and texture. This will enhance the vibrancy of your dish. Adjust Spice Level: If you prefer a spicier ramen, add more red curry paste or a dash of chili flakes to the broth. Garnish Wisely: Fresh herbs like cilantro and green onions not only add flavor but also a beautiful presentation. Don’t skip them! Leftover Broth: Store any leftover broth in an airtight container in the fridge. It can be used for soups or stews later. {{image_2}} You can easily make this ramen vegetarian or vegan. The base of vegetable broth and coconut milk is already plant-based. For more flavor, use a rich vegetable broth. You can add mushrooms for a meaty texture or extra greens like spinach. Swap the maple syrup for agave syrup if you prefer. If you want to add protein, tofu works great. Cut it into cubes and pan-fry until golden. Chicken is another tasty option. Cook the chicken before adding it to the broth. For shrimp lovers, add peeled shrimp during the last few minutes of cooking. This way, they stay juicy and tender. You can control the spice in your ramen by adjusting the red curry paste. If you like it mild, use less paste. For more heat, add chili flakes or fresh sliced chili. You can also enhance flavors with lime juice or more soy sauce. Tasting as you go helps you find the perfect balance. To store leftover coconut curry ramen, let it cool first. Use an airtight container to keep it fresh. Place the ramen in the fridge. It will stay good for about 3 days. If you plan to eat it later, store the broth and noodles separately. This keeps the noodles from getting soggy. When reheating, use a pot on medium heat. Add a splash of water or broth to keep it moist. Stir gently to combine. Heat until warm, about 5 minutes. You can also use the microwave. Place the ramen in a bowl and cover it. Heat in 30-second intervals, stirring each time, until hot. You can freeze coconut curry ramen, but keep the noodles out. The noodles can become mushy when frozen. Instead, freeze the broth and veggies together. Use a freezer-safe container, leaving some space for expansion. It can last for up to 2 months. When ready to eat, thaw it overnight in the fridge. Cook fresh noodles separately and combine them when serving. Coconut curry ramen is a warm and rich noodle soup. It uses coconut milk and red curry paste for flavor. This dish blends Asian and Thai tastes. You enjoy a creamy broth with fresh veggies and noodles. It’s easy to make and very satisfying. To make this dish gluten-free, use gluten-free ramen noodles. You can find these in many stores. Also, swap soy sauce with tamari, which is gluten-free. This way, you keep the great taste without gluten. Yes, you can use many types of broth. Vegetable broth works well and keeps it light. Chicken broth adds more depth to the flavor. Just choose a broth that matches your taste. You can even use homemade broth for a personal touch. Coconut curry ramen is a simple and tasty dish. We covered the main ingredients, step-by-step cooking, and helpful tips. You learned how to customize it with different toppings and spice levels. Storage tips ensure your leftovers stay fresh and flavorful. Enjoy your cooking journey and have fun with this recipe. Creating your coconut curry ramen lets you explore flavors and makes meal time exciting. Dive into flavors and let your creativity shine in the kitchen!

Coconut Curry Ramen Flavorful and Simple Recipe

To make a tasty Spicy Garlic Udon Stir Fry, you need a few key ingredients. Here’s what you’ll need: - 300g udon noodles - 2 tablespoons vegetable oil - 4 cloves garlic, minced - 1 teaspoon fresh ginger, grated - 1 red bell pepper, sliced - 1 cup snap peas, trimmed - 1 carrot, julienned - 3 green onions, chopped - 2 tablespoons soy sauce - 1 tablespoon chili paste (adjust for spice level) - 1 tablespoon sesame oil - 1 tablespoon sesame seeds (for garnish) - Fresh cilantro, for garnish (optional) Each ingredient plays an important role in flavor and texture. The udon noodles give a delightful chewy base. The garlic and ginger add warmth and aroma, making each bite special. The vegetables bring crunch and color, while the sauces tie it all together. When you gather these ingredients, think about freshness. Fresh produce makes a big difference in taste. Choose bright bell peppers and crisp snap peas. This will enhance your dish and make it more enjoyable to eat. Feel free to adjust the chili paste based on your spice preference. More paste means more heat! With these ingredients, you are ready to create a simple yet flavorful meal. {{ingredient_image_1}} First, cook the udon noodles. Follow the package instructions for best results. Once they are cooked, drain them. Toss the noodles with a little oil to keep them from sticking together. Next, grab a large skillet or wok. Heat the vegetable oil over medium heat. Add the minced garlic and grated ginger. Sauté these for about one minute. You want to smell the wonderful aroma. Now it's time for the veggies. Toss in the sliced red bell pepper, snap peas, and julienned carrot. Stir-fry these for three to four minutes. Cook until they are tender-crisp. This keeps them fresh and bright. Add the cooked udon noodles to the skillet or wok. Pour in the soy sauce, chili paste, and sesame oil. Mix everything well. Ensure the noodles are evenly coated with the sauces. This step is key for flavor. Finally, stir-fry everything for another two to three minutes. This ensures all the ingredients heat through. Once done, remove from heat. Sprinkle with chopped green onions and sesame seeds. Add fresh cilantro if you like. This adds a nice touch before serving. - Choosing the right noodles: Use fresh or frozen udon noodles. They have a soft, chewy texture. Dried udon works too but may need longer cooking time. Always follow package instructions for best results. - Adjusting spice levels with chili paste: Start with a small amount of chili paste. You can always add more later. For less heat, use less chili paste. For a spicier dish, add more to your liking. - Using fresh ingredients for maximum taste: Fresh garlic, ginger, and vegetables make a big difference. They add bright, bold flavors to your dish. Avoid canned or frozen ingredients if you can. - Suggestions for additional seasonings: Try adding a splash of rice vinegar or a pinch of sugar. Both can balance the heat and enhance the overall flavor. Experimenting with sesame oil adds a nutty taste. - Serving ideas: Serve the stir fry in a large bowl. This creates a beautiful, inviting dish. You can also plate it individually for guests. - Creative garnishing options: Top with sesame seeds and chopped green onions. Fresh cilantro adds color and taste. You can also add thinly sliced chili for extra flair. Pro Tips Use Fresh Ingredients: For the best flavor, always opt for fresh vegetables and herbs. They not only enhance the taste but also add vibrant colors to your dish. Adjust Spice Levels: Feel free to modify the amount of chili paste according to your heat preference. Start with a small amount and gradually increase to find your perfect spice level. Don’t Overcook the Vegetables: To maintain their crunch and vibrant color, stir-fry the vegetables until they are just tender. This will provide a delightful texture contrast with the noodles. Garnish for Extra Flavor: Adding fresh cilantro and sesame seeds as a garnish can elevate the dish, providing additional flavor and a beautiful presentation. {{image_2}} You can easily add protein to your Spicy Garlic Udon Stir Fry. Tofu is a great choice. It soaks up flavors well. Just cut it into cubes, and sauté it in your oil before the garlic. Chicken is another good option. Use diced chicken breast for a quick cook. Add it after the garlic and ginger. If you want a twist, try seafood. Shrimp or scallops work nicely. Cook them until they turn pink and firm. This adds a rich taste to your dish. Feel free to change up the veggies. You can use broccoli or bok choy. Both add crunch and color. Spinach is also a great choice. It wilts down and adds nutrients. Use seasonal vegetables for the best taste. Carrots in spring are sweet, while squash is great in fall. If you need gluten-free options, try gluten-free udon. They are available at many stores. You can also use rice noodles or even zucchini noodles. For a low-carb version, use shirataki noodles. They have fewer carbs and calories. Just rinse them well before cooking. This way, you enjoy a tasty meal without gluten. To keep your Spicy Garlic Udon Stir Fry fresh, place leftovers in an airtight container. This helps prevent moisture loss and keeps the dish tasty. Store it in the fridge for up to three days. When reheating, I recommend using a skillet over medium heat. This method warms the noodles evenly and keeps their texture. Add a splash of water or soy sauce to help maintain moisture. Stir gently until everything is hot. For long-term storage, you can freeze your stir fry. Use a freezer-safe container or a heavy-duty freezer bag. Remove as much air as possible before sealing. This helps avoid freezer burn. When ready to eat, thaw it in the fridge overnight. Reheat it in a skillet as mentioned above for the best results. Yes, you can make this dish ahead of time. To store it, let the stir fry cool down. Place it in a sealed container. It stays fresh in the fridge for up to three days. When you are ready to eat, just reheat it on the stove. You can add a splash of water to help it steam and stay moist. If you need an alternative, try using tamari. It is gluten-free and rich in flavor. You can also use coconut aminos for a sweeter taste. Both options work well and keep the umami flavor of your dish. To make it milder, reduce the amount of chili paste. You can start with half a tablespoon. For more heat, add more chili paste or some sliced fresh chili. Adjust it to fit your taste. Always taste as you go to find the right balance. Yes, this recipe is both vegetarian and vegan. It uses only plant-based ingredients. You can enjoy it without any worry. It’s a great option for anyone looking for a tasty meat-free meal. This blog post guided you through making a tasty Spicy Garlic Udon Stir Fry. We covered the key ingredients, steps for cooking, and tips for perfecting your dish. You learned about flavor, texture, and how to customize for your needs. Making this dish can be fun and rewarding. Experiment with different veggies, spices, or protein to suit your taste. Don’t forget to store leftovers properly! Enjoy your cooking journey with udon noodles!

Spicy Garlic Udon Stir Fry Flavorful and Easy Meal

To make a tasty coconut shrimp curry, gather these items: - 1 pound large shrimp, peeled and deveined - 1 tablespoon coconut oil - 1 medium onion, chopped - 3 cloves garlic, minced - 1 tablespoon fresh ginger, grated - 1 tablespoon red curry paste - 1 can (14 oz) coconut milk - 1 cup vegetable broth - 1 tablespoon fish sauce (or soy sauce for a vegetarian option) - 1 tablespoon brown sugar - 1 cup bell peppers (red, yellow, green), sliced - 1 cup baby spinach - Fresh cilantro for garnish - Lime wedges for serving - Salt to taste You can switch some ingredients if you need to. For example, use chicken or tofu instead of shrimp. If you want a milder curry, skip the red curry paste. You can replace fish sauce with soy sauce for a vegetarian dish. For the broth, vegetable broth works well, but chicken broth is an option too. If you do not have fresh ginger, use ground ginger. It won’t taste the same, but it still adds flavor. Using fresh ingredients gives the best flavor. Fresh shrimp tastes better than frozen. Fresh ginger has a nice zing compared to dried. Canned coconut milk is easy and quick, so it’s a great choice if you’re short on time. Canned bell peppers don’t work as well as fresh ones. They lose their crunch and bright color. In this recipe, fresh herbs like cilantro make a big impact. Don't skip these. They add flavor and visual appeal. Always try to use fresh for the best results! {{ingredient_image_1}} 1. Heat 1 tablespoon of coconut oil in a large skillet over medium heat. 2. Add the chopped onion. Sauté until it’s soft, about 5 minutes. 3. Add 3 cloves of minced garlic and 1 tablespoon of grated ginger. Cook for 1-2 minutes. 4. Mix in 1 tablespoon of red curry paste. Stir for about 1 minute to boost the flavor. 5. Pour in 1 can of coconut milk and 1 cup of vegetable broth. Stir well to mix. 6. Add 1 tablespoon of fish sauce and 1 tablespoon of brown sugar. Bring to a gentle simmer. 7. Turn the heat to low. Let the curry simmer for about 10 minutes to let the flavors blend. 8. Add 1 cup of sliced bell peppers. Cook for 5 minutes until they are tender but still crisp. 9. Finally, stir in 1 pound of shrimp and 1 cup of baby spinach. Cook until the shrimp is pink, about 4-5 minutes. 10. Taste and add salt if needed. Remove from heat. - Step 1: 2 minutes - Step 2: 5 minutes - Step 3: 2 minutes - Step 4: 1 minute - Step 5: 2 minutes - Step 6: 1 minute - Step 7: 10 minutes - Step 8: 5 minutes - Step 9: 5 minutes - Step 10: 1 minute You can visualize each step to make cooking easier: 1. Picture the oil melting in the skillet. 2. See the onions turning from white to a soft golden color. 3. Imagine the aroma of garlic and ginger filling your kitchen. 4. Watch the vibrant red curry paste blend with the onions. 5. Visualize the creamy texture of coconut milk mixing with broth. 6. Picture the bubbling curry as it simmers. 7. See the bright colors of the peppers as they cook. 8. Imagine the shrimp turning pink and curling as they cook. Each step builds flavor and color. Enjoy the process! When making coconut shrimp curry, some common mistakes can ruin your dish. First, don't overcook the shrimp. They should turn pink and opaque in just 4-5 minutes. If you cook them longer, they can become tough. Second, avoid using too much salt at once. Taste as you go to find the right balance. Lastly, don’t skip the ginger and garlic. These add a lot of flavor, so always use fresh when possible. To boost the flavor of your curry, try these tips. Add a squeeze of lime juice right before serving. This brightens the dish. You can also mix in some fresh herbs like basil or mint for an extra layer of taste. If you want more heat, add sliced fresh chili peppers. A dash of coconut sugar can also enhance sweetness and balance the dish. For a complete meal, serve your coconut shrimp curry with steamed jasmine rice. The rice soaks up the rich sauce nicely. You can also add a side of naan bread for dipping. Garnish your dish with fresh cilantro and lime wedges. This adds color and freshness to the plate. Don’t forget to serve it in a nice bowl to show off those beautiful colors! Pro Tips Fresh Ingredients: Use fresh shrimp for the best flavor and texture in your coconut shrimp curry. Adjust Spice Level: Customize the heat by adding more or less red curry paste according to your preference. Vegetable Variations: Feel free to add other vegetables like zucchini or snap peas for added color and nutrition. Leftovers Delight: This dish tastes even better the next day, making it perfect for meal prep or leftovers! {{image_2}} You can easily make coconut shrimp curry vegetarian or vegan. Simply replace shrimp with tofu or chickpeas. Use vegetable broth and soy sauce for a rich flavor. The coconut milk keeps it creamy and delicious. You can also add more veggies, like zucchini or carrots. This makes the dish colorful and healthy. Spices can change the taste of your curry. Try adding cumin or coriander for a warm flavor. For heat, use chili powder or red pepper flakes. If you want a fresh taste, add lime juice or zest. You can also mix in fresh herbs like basil or mint. These small changes make a big difference. You can switch shrimp for other proteins too. Chicken or fish works well in this dish. If you prefer seafood, try scallops or crab. Each option brings its own flavor. Just cook them until they are tender. This way, you can enjoy coconut curry in many tasty forms. To store leftovers, let the curry cool down first. Place it in an airtight container. You can keep it in the fridge for up to three days. Make sure to label the container with the date. This way, you can track how fresh it is. When you are ready to eat, take the curry out of the fridge. You can reheat it on the stove or in the microwave. If using the stove, warm it over low heat. Stir it often to prevent sticking. If using the microwave, heat it in short bursts. Check every minute and stir. This helps it heat evenly. If you want to freeze the curry, use a freezer-safe container. Leave some space at the top, as liquids expand when frozen. The curry can last up to three months in the freezer. To thaw, place it in the fridge overnight. Reheat it as mentioned before. Enjoy your tasty coconut shrimp curry later! Coconut shrimp curry is a rich and creamy dish. It features shrimp cooked in coconut milk. The dish has bold flavors from garlic, ginger, and red curry paste. You can add vegetables like bell peppers and spinach for color and nutrition. This curry is both comforting and vibrant, making it a favorite in many homes. Yes, you can make coconut shrimp curry ahead of time. Cook the curry and let it cool. Store it in an airtight container in the fridge. It will stay fresh for up to three days. When ready to eat, reheat on the stove. Just be careful not to overcook the shrimp again. Coconut shrimp curry pairs well with steamed jasmine rice. The rice soaks up the sauce nicely. You can also serve it with naan bread for a fun twist. A fresh salad or steamed veggies can add lightness to your meal. Don't forget to garnish with cilantro and lime for extra flavor! We explored coconut shrimp curry, covering ingredients, cooking steps, and storage tips. You learned about ingredient swaps and techniques to boost flavor. I shared common mistakes to avoid for the best results. Enjoy experimenting with variations like vegetarian options and different spices. Remember, storing and reheating properly keeps your dish tasting great. With these tips, you're ready to make a mouth-watering meal everyone will love. Enjoy your cooking journey!

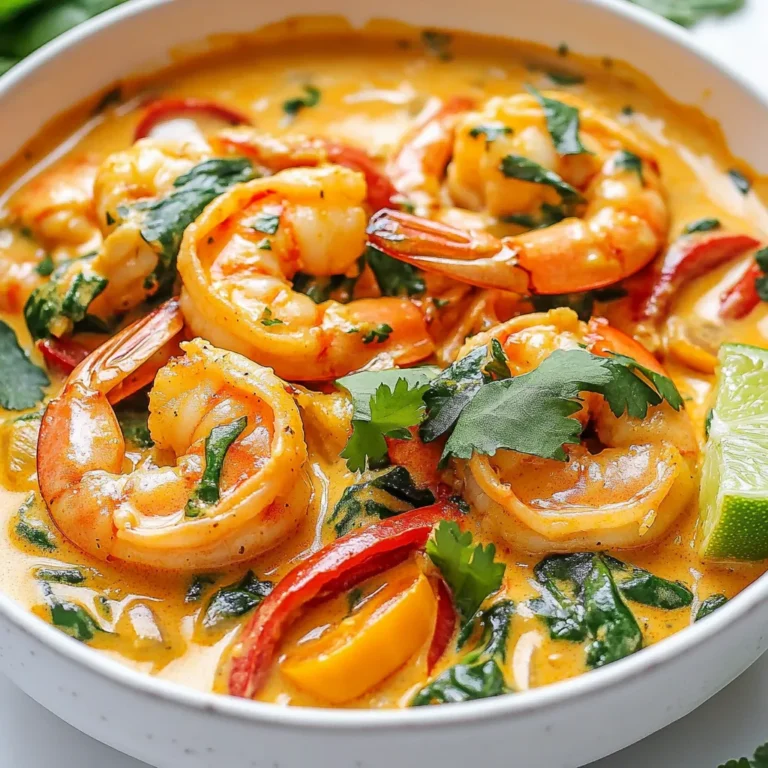
Coconut Shrimp Curry Flavorful and Simple Recipe

- 1 can (15 oz) chickpeas, drained and rinsed - 1 cup cherry tomatoes, halved - 1 cucumber, diced - 1/2 red onion, finely chopped - 1/2 bell pepper (any color), diced - 1/4 cup Kalamata olives, pitted and sliced - 1/4 cup feta cheese, crumbled - 2 tablespoons fresh parsley, chopped These fresh ingredients make this salad bright and colorful. Chickpeas are the base. They give protein and fiber. Cherry tomatoes add sweetness. Cucumbers bring a crisp bite. Red onion adds crunch and flavor. Bell peppers give color and more taste. Kalamata olives bring a briny touch. Feta cheese adds a creamy, salty flavor. Fresh parsley ties everything together with its green freshness. - 3 tablespoons olive oil - 2 tablespoons lemon juice - 1 teaspoon dried oregano - Salt and pepper to taste These pantry staples are key to the dressing. Olive oil adds richness. Lemon juice gives a bright, tangy taste. Dried oregano adds an earthy flavor. Salt and pepper enhance all the tastes. You can adjust these to your liking. - Avocado, diced - Artichoke hearts, chopped - Roasted red peppers, sliced - Capers, rinsed These add-ins can elevate your salad. Avocado makes it creamy and rich. Artichoke hearts add a unique taste. Roasted red peppers give a sweet and smoky flavor. Capers add a salty burst. Feel free to mix and match based on what you enjoy! {{ingredient_image_1}} Start by gathering all your fresh ingredients. You need: - 1 can (15 oz) chickpeas, drained and rinsed - 1 cup cherry tomatoes, halved - 1 cucumber, diced - 1/2 red onion, finely chopped - 1/2 bell pepper, diced - 1/4 cup Kalamata olives, pitted and sliced - 1/4 cup feta cheese, crumbled - 2 tablespoons fresh parsley, chopped In a large mixing bowl, add the chickpeas, cherry tomatoes, cucumber, red onion, bell pepper, and olives. Mix them gently. Make sure everything is well combined. This mix adds many colors and textures to your salad. Next, you’ll make the dressing. You need: - 3 tablespoons olive oil - 2 tablespoons lemon juice - 1 teaspoon dried oregano - Salt and pepper to taste In a small bowl, whisk together the olive oil, lemon juice, dried oregano, salt, and pepper. This dressing brings a bright flavor to your salad. Taste it and adjust the salt and pepper if needed. Now, pour the dressing over the salad ingredients in the large bowl. Toss everything together gently. You want to coat all the ingredients evenly with the dressing. This step ensures each bite bursts with flavor. For the best taste, let the salad rest in the fridge for at least 15 minutes. This waiting time allows the flavors to blend well. When ready, serve in a large bowl or on individual plates. Don’t forget to garnish with extra parsley and feta for a lovely finish. Enjoy your fresh and flavorful Mediterranean Chickpea Salad! To keep your Mediterranean chickpea salad fresh, use ripe ingredients. Choose firm tomatoes and crisp cucumbers. Rinse the chickpeas well to remove extra salt. Store the salad in an airtight container. This helps maintain the bright flavors and crunchy textures. Herbs and spices make this salad pop. Fresh parsley brightens the dish. You can also add fresh mint for a refreshing twist. A pinch of cumin brings warmth. Experiment with different herbs to find your favorite blend. This adds depth and character to every bite. Serve this salad chilled for the best taste. Use a large bowl or individual plates for a nice touch. Garnish with extra parsley or feta for color. Drizzling more olive oil just before serving enhances the flavor. Pair it with pita bread or grilled chicken for a complete meal. Enjoy the bright, fresh taste! Pro Tips Chickpea Quality: Use high-quality canned chickpeas or cook your own from dry for the best texture and flavor. Freshness Matters: Choose the freshest vegetables available, as they enhance the overall taste and presentation of the salad. Marinate for Flavor: Allow the salad to marinate in the fridge for at least 30 minutes to let the flavors meld together beautifully. Customization: Feel free to add or substitute ingredients like avocados, artichokes, or a different type of cheese for a unique twist. {{image_2}} You can easily add protein to your Mediterranean chickpea salad. Chickpeas are great, but you can boost the dish more. Here are some ideas: - Grilled chicken: Dice some grilled chicken and mix it in. - Tuna: Drain a can of tuna and fold it into the salad. - Quinoa: Cooked quinoa adds texture and protein. - Hard-boiled eggs: Chop and sprinkle them on top for extra protein. Choosing any of these options makes the salad filling. You can enjoy it as a main dish. If you want a vegan version, swap out some ingredients. Here are my favorite ideas: - Cashew cream: Blend soaked cashews with lemon juice for a creamy dressing. - Nutritional yeast: This adds a cheesy flavor without using dairy. - Avocado: Mash it and mix it in for creaminess and healthy fats. These swaps keep the flavor high while ensuring it’s plant-based. You won't miss the dairy! Seasonal ingredients can change your salad game. Here are some fun ideas based on the time of year: - Spring: Add peas and fresh herbs like mint for a bright touch. - Summer: Toss in diced watermelon or strawberries for sweetness. - Fall: Mix in roasted sweet potatoes or butternut squash for warmth. - Winter: Use kale or Brussels sprouts for a crunchy texture. These seasonal changes keep your salad fresh and exciting. You can enjoy new flavors every time! To store your Mediterranean chickpea salad, place it in an airtight container. This keeps the salad fresh and safe. Make sure to press out any air before sealing. If you have dressing leftover, store it separately. This helps prevent the salad from getting soggy. I suggest using glass containers for storage. They are safe and do not absorb odors. You can also use plastic containers that seal tightly. Choose containers that fit your salad size. Smaller portions are great for quick snacks. When stored properly, this salad lasts 3 to 5 days in the fridge. After that, the veggies may lose their crunch. If you notice any off smells or changes in color, it’s best to toss it. Always check before you eat leftovers. Yes, you can make this salad ahead of time. The flavors get better as they sit. I suggest making it a few hours before serving. Just cover it and chill in the fridge. This way, the salad stays fresh and tasty. If you need a feta substitute, try using goat cheese or tofu. Goat cheese gives a nice tangy flavor. Tofu works well if you're looking for a vegan option. Just crumble it into small pieces to mimic feta. Yes, Mediterranean Chickpea Salad is gluten-free. All the main ingredients are naturally gluten-free. Chickpeas, veggies, and olive oil are safe for those avoiding gluten. Enjoy this dish worry-free! Mediterranean Chickpea Salad is easy and fun to make. We covered the main ingredients, pantry staples, and tasty add-ins for extra flavor. I shared step-by-step instructions to prepare the salad, make the dressing, and toss everything together. Also, I offered tips for keeping it fresh and enhancing the taste. You can even try variations with proteins and vegan options. In the end, this salad is not just healthy; it’s also delicious and versatile. Enjoy experimenting with it in your kitchen!

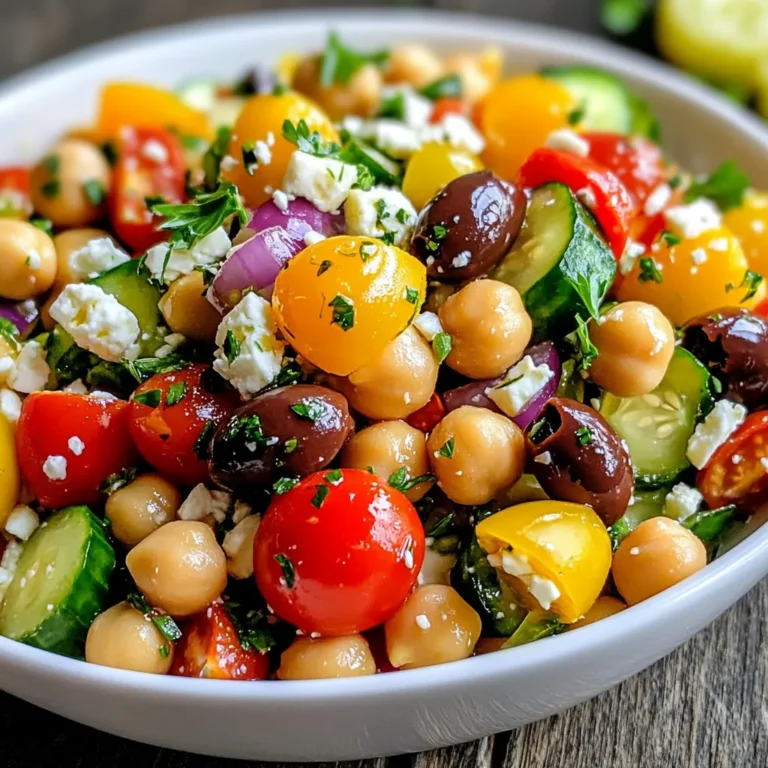
Mediterranean Chickpea Salad Fresh and Flavorful Dish

- 4 salmon fillets - 1 tablespoon olive oil - Salt and pepper to taste - 1 cup heavy cream - Zest of 1 lemon - 2 tablespoons fresh lemon juice - 1 cup grated Parmesan cheese - 2 cloves garlic, minced - 1 teaspoon dried dill (or 1 tablespoon fresh dill, chopped) - Fresh parsley for garnish To make creamy lemon Parmesan salmon, you need a few key ingredients. Start with 4 salmon fillets. Fresh salmon works best, but frozen can also work. You will also need 1 tablespoon of olive oil for cooking. You cannot forget the seasonings. Salt and pepper will elevate the flavors of the dish. For the creamy sauce, use 1 cup of heavy cream. It gives the dish its rich and smooth texture. Next, the star flavors come from lemon. You will need the zest of 1 lemon and 2 tablespoons of fresh lemon juice. These add brightness to the dish. To make the sauce cheesy and delicious, use 1 cup of grated Parmesan cheese. The cheese melts into the cream, creating a lovely sauce. Two cloves of minced garlic add depth to the flavor. For an herby note, use 1 teaspoon of dried dill or 1 tablespoon of fresh dill. Finally, fresh parsley will make a great garnish. It adds color and freshness to your plate. With these ingredients, you can create a meal that is simple, tasty, and truly satisfying! {{ingredient_image_1}} 1. Preheat your oven to 400°F (200°C). This helps cook the salmon evenly. 2. Sear the salmon fillets in a large oven-safe skillet. Heat 1 tablespoon of olive oil over medium-high heat. Season the salmon with salt and pepper. Place the fillets skin-side down. Sear for 3-4 minutes. The skin should be crispy and golden. 3. Flip the salmon fillets carefully. Cook for another 2-3 minutes. Then, remove the salmon from the skillet and set it aside. 4. Prepare the creamy sauce in the same skillet. Lower the heat to medium. Add 2 cloves of minced garlic and sauté for about 30 seconds. The garlic should be fragrant but not brown. 5. Pour in 1 cup of heavy cream, stirring well. Add the zest of 1 lemon, 2 tablespoons of lemon juice, and 1 teaspoon of dill. Simmer this mixture for 2-3 minutes. 6. Gradually add 1 cup of grated Parmesan cheese. Stir until the cheese melts and the sauce becomes smooth. Taste the sauce and add salt and pepper if needed. 7. Return the salmon fillets to the skillet. Spoon the creamy sauce over the salmon. 8. Transfer the skillet to the preheated oven. Bake for 8-10 minutes. The salmon should cook through and flake easily when done. 9. Remove from the oven and garnish with fresh parsley. This adds a pop of color and flavor. Each step builds on the last, making this dish easy and fun to prepare. Enjoy the cooking process as you create this creamy lemon Parmesan salmon! - How to achieve the perfect crispy skin on salmon Start by heating the olive oil in the skillet. Place the salmon skin-side down. Leave it alone for 3-4 minutes. This lets the skin get nice and crispy. Don’t rush this step! - Recommended cooking time for optimal doneness After searing, flip the salmon and cook for 2-3 more minutes. Then, bake it in the oven for 8-10 minutes. The salmon should flake easily with a fork when done. - Tips for preventing overcooking Keep an eye on the time. Salmon cooks quickly! Use a meat thermometer if you have one. The internal temperature should reach 145°F (63°C). - Best sides to serve with creamy lemon Parmesan salmon Pair your salmon with steamed asparagus. A light salad also works well. Both sides complement the rich sauce nicely. - Presentation ideas for the dish Serve the salmon fillets on individual plates. Drizzle the creamy lemon Parmesan sauce over the top. Add a sprinkle of fresh parsley for color. This makes the dish look fancy and inviting! Pro Tips Adjust the Creaminess: If you prefer a lighter sauce, you can substitute half of the heavy cream with chicken broth or milk to reduce calories while maintaining flavor. Perfectly Cooked Salmon: Use a meat thermometer to check for doneness; salmon should reach an internal temperature of 145°F (63°C) for optimal texture and flavor. Enhance the Flavor: For an extra flavor boost, add a splash of white wine to the sauce after sautéing the garlic and let it reduce before adding the cream. Garnishing Options: Experiment with different herbs like chives or tarragon for garnishing to add a unique twist to the dish. {{image_2}} You can switch up the fish. Try using cod, trout, or shrimp instead of salmon. Each option brings a unique flavor. If you're looking for dairy-free choices, use coconut cream instead of heavy cream. Nutritional yeast can replace Parmesan cheese for a cheesy taste. You can also play with flavors by adding herbs or spices. Fresh basil or thyme works well. For extra veggies, consider adding spinach or cherry tomatoes to the creamy sauce. They add color and nutrients. There are different ways to cook this dish. You can grill the salmon for a smoky flavor. Simply brush the fillets with oil and grill for about 5-6 minutes on each side. This method gives the fish a nice char. If you want to skip the oven, you can cook it on the stovetop. After searing the salmon, lower the heat and cover the skillet. Let it cook for about 8-10 minutes until the fish is flaky. This method keeps the dish simple and fast. To store leftovers of creamy lemon Parmesan salmon, first, let it cool. Place the salmon and sauce in an airtight container. This keeps the flavors fresh. You can store it in the fridge for up to three days. Make sure to keep it sealed to prevent drying out. When you're ready to enjoy leftovers, reheating is key. Preheat your oven to 350°F (175°C). Place the salmon in an oven-safe dish. Cover it with foil to keep it moist. Heat for about 10-15 minutes or until warm. If you want to use a microwave, place the salmon on a microwave-safe plate. Cover it with a damp paper towel and heat in short bursts of 30 seconds. This helps retain the sauce's creaminess. Can I use frozen salmon fillets for this recipe? Yes, you can use frozen salmon. Just remember to thaw it first. Place the frozen fillets in the fridge overnight. If you need it fast, run it under cold water for about 30 minutes. This will help your salmon cook evenly. How do I know when the salmon is fully cooked? The salmon is done when it flakes easily with a fork. It should also be opaque in the center. The ideal internal temperature is 145°F (63°C). You can use a meat thermometer to check this. What can I substitute for heavy cream? You can use half-and-half or whole milk mixed with a bit of butter. For a lighter option, try Greek yogurt or coconut cream. These substitutes still give a creamy texture without the extra fat. Can I make this dish ahead of time? You can prepare the sauce in advance. Just store it in the fridge. Cook the salmon fresh when you're ready to eat. This keeps it tender and juicy. Is this recipe suitable for meal prepping? Yes, this recipe works well for meal prep. Cook the salmon and sauce, then store them in separate containers. Reheat the salmon in the oven for best results. This way, you’ll enjoy a tasty meal all week. You learned how to make creamy lemon Parmesan salmon. We covered the ingredients, prep steps, and cooking tips. I shared ways to serve and store this dish. We also explored fun variations and answered common questions. This recipe is easy and delicious. Try it out and impress your guests! Remember to play with flavors and ingredients to suit your taste. Enjoy your cooking adventure!

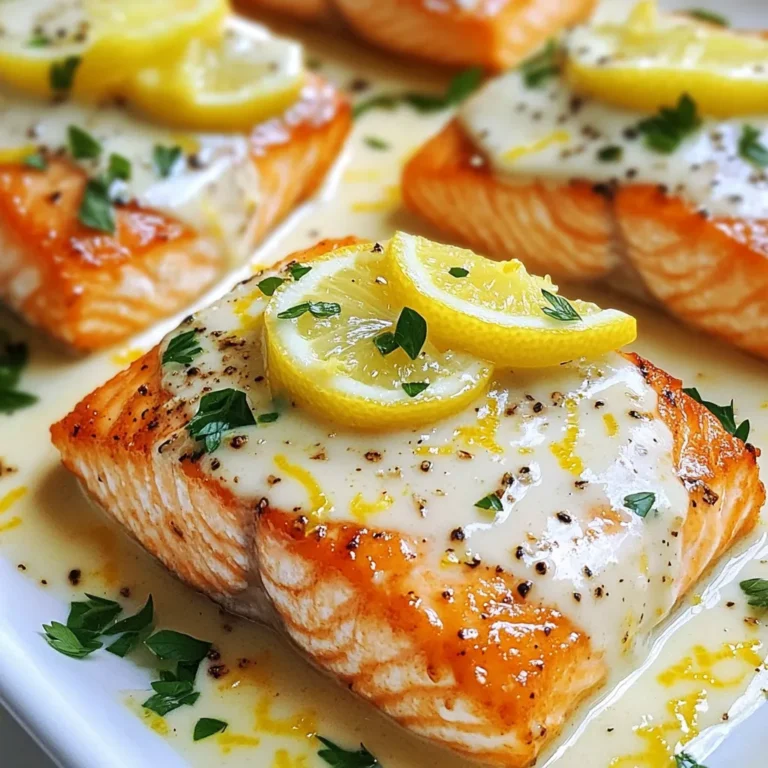
Creamy Lemon Parmesan Salmon Simple and Tasty Meal

To make this cozy soup, you will need: - 1 lb boneless, skinless chicken thighs, cut into bite-sized pieces - 1 cup wild rice blend - 1 medium onion, diced - 2 cloves garlic, minced - 2 carrots, diced - 2 celery stalks, diced - 4 cups low-sodium chicken broth - 1 cup unsweetened cranberry juice - 1 teaspoon dried thyme - 1 teaspoon dried rosemary - 1 bay leaf - 1 cup fresh or frozen cranberries - ½ cup heavy cream (optional for creaminess) - Salt and pepper to taste - 2 tablespoons olive oil - Fresh parsley for garnish Want to change things up? Here are some optional ingredients: - Add 1 cup of spinach or kale for extra greens. - Use 1 teaspoon of smoked paprika for a smoky kick. - Toss in some chopped nuts for crunch and flavor. - Try a splash of lemon juice for brightness. If you have dietary needs, here are some helpful swaps: - Chicken thighs can be replaced with chicken breasts for a leaner option. - Heavy cream can be swapped for coconut milk for a dairy-free version. - For a gluten-free meal, ensure your wild rice blend is certified gluten-free. - Cranberry juice can be substituted with apple juice for a sweeter taste. {{ingredient_image_1}} First, I turn the Instant Pot to the sauté function. I add two tablespoons of olive oil and let it heat. Once hot, I add one medium diced onion, two diced carrots, and two diced celery stalks. I sauté these for about five minutes until they soften. Then, I stir in two cloves of minced garlic for one more minute. This adds a great aroma to the pot. Next, I add one pound of boneless, skinless chicken thighs, cut into bite-sized pieces. I cook them for about three to four minutes until they are slightly browned. After that, I stir in one cup of wild rice blend, one teaspoon of dried thyme, one teaspoon of dried rosemary, and one bay leaf. This is where the flavors start to build. Now, I pour in four cups of low-sodium chicken broth and one cup of unsweetened cranberry juice. I also add one cup of fresh or frozen cranberries. I stir to mix all the ingredients well. After mixing, I close the lid, making sure the valve is set to sealing. I cook on high pressure for twenty-five minutes. Once the cooking is done, I let it sit for ten minutes for a natural release. Then, I quick release any remaining pressure. If I want a creamy soup, I now stir in half a cup of heavy cream. Next, I season the soup with salt and pepper to taste. Finally, I serve it hot, garnished with fresh parsley. This soup is warm, hearty, and full of flavor! To make your soup shine, focus on fresh ingredients. Use high-quality chicken and rich broth. I love low-sodium chicken broth for better control of salt. Sauté the veggies until they are soft. This step builds the flavor base. Don't skip the herbs! Thyme and rosemary add depth. Adding cranberries brings a nice tartness. Always taste and adjust the seasoning last. For a creamy soup, heavy cream is great. Add it after cooking for a rich finish. If you want a lighter option, use milk or a plant-based milk. Blend a portion of the soup for a thicker texture. This keeps it creamy without too much fat. You can also add a dollop of sour cream when serving. Avoid overcooking the chicken. It can become dry and tough. Always check the cooking time. If you skip the natural release step, the soup may splatter. Make sure to seal the pot correctly before cooking. Lastly, pay attention to the liquid ratio. Too little liquid can lead to burning. Always follow the recipe for best results. Pro Tips Use Fresh Ingredients: Fresh vegetables and herbs can significantly enhance the flavors of your soup, making it more vibrant and delicious. Cook Time Adjustment: If you prefer your wild rice to have more bite, reduce the high pressure cooking time by a few minutes, allowing for a firmer texture. Season Gradually: Start with a little salt and pepper, then taste and adjust before serving. This helps prevent oversalting. Garnish Wisely: Fresh parsley not only adds color but also a fresh flavor that brightens up the dish. Consider adding a squeeze of lemon for extra zest. {{image_2}} You can easily make this soup vegetarian. Replace chicken with firm tofu or chickpeas. Use vegetable broth instead of chicken broth. This keeps the soup hearty and rich. You can also add more veggies like mushrooms or bell peppers. They add great flavor and texture. If you want to try different grains, there are many options. Quinoa works well for a nutty taste. Brown rice is another good choice. Just adjust the cooking time if you switch grains. Some grains may need more liquid or time to cook properly. Feel free to mix in extra flavors. Add a splash of lemon juice for brightness. A dash of hot sauce can give it a nice kick. Fresh herbs like basil or cilantro can also add depth. You might even try adding a little maple syrup for sweetness. Each of these options can change the taste and make it your own. To store your chicken cranberry wild rice soup, let it cool first. Once cooled, transfer the soup to an airtight container. You can keep it in the fridge for up to three days. If you want to keep it longer, consider freezing it. When you are ready to eat, reheat your soup on the stove. Pour the soup into a pot and heat it over medium heat. Stir often to prevent sticking. You can also use a microwave. Place the soup in a microwave-safe bowl. Heat for 2 to 3 minutes, stirring halfway through. If you want to freeze your soup, use freezer-safe containers. Leave some space at the top for expansion. You can freeze it for up to three months. To thaw, move it to the fridge overnight. Then, reheat it as mentioned above. Enjoy your tasty soup anytime! Yes, you can use chicken breasts. They will cook well in the soup. The flavor may be a bit different, but it will still taste great. Just cut them into bite-sized pieces, as you would with thighs. Keep in mind that chicken breasts can cook faster, so check for doneness before the end of cooking time. To make this soup gluten-free, use gluten-free chicken broth. Many brands offer gluten-free options. Also, check your wild rice blend. Most wild rice is gluten-free, but always read the label to be sure. This ensures everyone can enjoy the soup without worry. You can substitute wild rice with brown rice or quinoa. Both grains will work well, but they have different cooking times. If using brown rice, you may need to adjust the cooking time. Quinoa cooks faster, so add it later in the process. Each option will give the soup a unique twist. This blog post provided a full guide on making delicious soup in your Instant Pot. We covered the essential ingredients, cooking steps, and helpful tips to boost flavor. I also shared ideas for variations and storage methods, plus answers to common questions. In summary, you'll enjoy a warm meal that's easy to make and customize. Try different flavors and ingredients to make it your own. Enjoy your cooking!

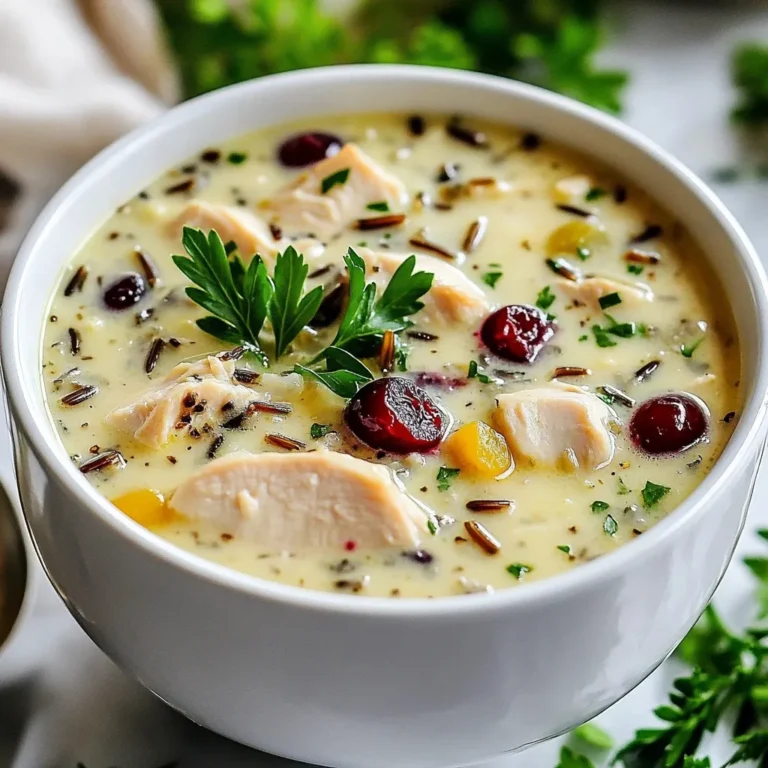
Instant Pot Chicken Cranberry Wild Rice Soup Recipe

PREV 1 … 47 48 49 … 57 NEXT
quick dish kitchen

explore

DessertsDinnerAppetizersDrinks

Our Policies

  • Cookie Policy
  • Copyright Policy
  • Disclaimer
  • GDPR Policy
  • Terms Of Use
Back to Top
  • About
  • Contact Us
  • Privacy Policy
© 2025 quick dish kitchen