FREE DINNER EBOOK! Get your copy!
  • Cookie Policy
  • GDPR Policy
  • Disclaimer
  • Terms Of Use
  • Visit my other site: Fun Cookie Recipes
quick dish kitchen
  • Home
  • Dinner
  • Desserts
  • Drinks
  • Appetizers
  • Contact
  • About
  • Privacy Policy
  • Home
  • Dinner
  • Desserts
  • Drinks
  • Appetizers
  • Contact
  • About
  • Privacy Policy
  • Cookie Policy
  • GDPR Policy
  • Disclaimer
  • Terms Of Use
Visit my other site: Fun Cookie Recipes

HOME / CATEGORIES /

Latest

For a tasty Green Goddess Pasta Salad, gather these fresh ingredients: - 8 ounces pasta (fusilli or penne works well) - 1 cup cherry tomatoes, halved - 1 bell pepper, diced - 1 cucumber, diced - 1/4 cup red onion, finely chopped - 1 cup fresh spinach - 1 avocado, diced - 1/2 cup green goddess dressing (store-bought or homemade) - 2 tablespoons fresh basil, chopped - Salt and pepper to taste Each ingredient adds flavor and color. The pasta gives a nice base. The veggies bring crunch and freshness. The dressing ties it all together. I suggest using fusilli or penne pasta for this salad. Fusilli holds the dressing well due to its twists. Penne has smooth tubes that let flavors mix nicely. You can also try farfalle for a fun shape. Just remember to cook until al dente for the best texture. Want to make your salad even better? Here are some fun add-ins: - Grilled chicken for protein - Chickpeas for a hearty touch - Olives for a salty kick - Feta cheese for creaminess - Nuts or seeds for extra crunch Feel free to mix and match based on what you have. These options let you customize your salad to fit your taste. {{ingredient_image_1}} Start by boiling water in a pot. Add salt to the water to flavor the pasta. Add 8 ounces of pasta, like fusilli or penne, to the pot. Cook it until it is al dente, which means it should still have a bite. This usually takes about 8 to 10 minutes. Once done, drain the pasta in a colander. Rinse it under cold water to stop the cooking process and cool it down. While the pasta cools, wash and chop your veggies. Take 1 cup of cherry tomatoes and slice them in half. Dice 1 bell pepper and 1 cucumber into small pieces. Finely chop 1/4 cup of red onion. Wash 1 cup of fresh spinach and pat it dry. Combine all these veggies in a large mixing bowl. Once the pasta is cool, add it to the bowl with the veggies. Gently fold in 1 diced avocado. Be careful not to mash it as you mix. Pour 1/2 cup of green goddess dressing over the salad and toss everything together. Season with salt and pepper to taste. If you like more dressing, feel free to add it. Finally, sprinkle 2 tablespoons of chopped fresh basil on top for a pop of flavor. Enjoy your fresh and vibrant Green Goddess Pasta Salad! To cook pasta well, start by boiling water. Use a big pot and add salt. This helps the pasta taste better. Once the water boils, add your 8 ounces of pasta. Stir it so it doesn't stick. Cook until it is al dente, which means firm but not hard. This usually takes around 8 to 10 minutes. Drain the pasta and rinse it with cold water. This stops the cooking and cools it down fast. For the dressing, you can use store-bought green goddess dressing or make your own. If you choose to make it, blend fresh herbs like basil, parsley, and chives with olive oil, lemon juice, and yogurt. This mix gives your salad a fresh taste. When mixing the salad, pour the dressing over the ingredients right before serving. This keeps the pasta and veggies crisp. Toss gently to coat everything evenly. To store avocado, keep it whole until you are ready to use it. If you cut it, sprinkle lemon juice on the flesh to prevent browning. Wrap it tightly in plastic wrap or place it in an airtight container. This helps it stay fresh for a longer time. Use any leftover avocado within a day or two for the best taste. Pro Tips Cook Pasta Al Dente: Ensure the pasta is cooked al dente for the best texture, as it will absorb flavors and maintain a pleasant bite in the salad. Use Fresh Ingredients: Opt for fresh, high-quality vegetables and herbs to enhance the flavor and nutrition of your pasta salad. Customize Your Dressing: Feel free to adjust the green goddess dressing according to your taste; add more herbs or a squeeze of lemon for extra zing. Chill Before Serving: Allow the salad to chill in the fridge for at least 30 minutes before serving to let the flavors meld together beautifully. {{image_2}} You can boost the protein in your Green Goddess Pasta Salad easily. Consider adding grilled chicken or shrimp. Both options add flavor and keep the salad filling. For a vegetarian twist, try chickpeas or black beans. They give a nice texture and extra protein. You can also use diced hard-boiled eggs. They add richness and make the salad even more satisfying. Making your pasta salad vegetarian or vegan is simple. To keep it vegan, skip the eggs and any dairy. Use a plant-based green goddess dressing. Many brands offer tasty vegan dressings. You can also make your own with avocado, herbs, and lemon juice. Adding extra vegetables, like roasted zucchini or sweet corn, will keep the dish fresh and fun. Seasonal ingredients can make your salad shine. In spring, add peas or asparagus for a crisp bite. In summer, consider ripe peaches or fresh corn. In fall, swap in roasted butternut squash or apples for sweetness. Winter calls for hearty ingredients like Brussels sprouts or kale. Each season gives you a chance to change flavors and keep things exciting. To store your Green Goddess Pasta Salad, place it in an airtight container. Make sure to keep it in the fridge. The cool temperature helps maintain freshness. If you have leftovers, try to finish them within three days. This keeps the salad tasty and safe to eat. I do not recommend freezing this pasta salad. The veggies and avocado may get mushy when thawed. Freezing can change the texture of the salad. If you want to save some, store only the pasta without the dressing and fresh veggies. You can then add fresh ingredients later. When stored properly, the pasta salad lasts about three days in the fridge. After that, it may lose its freshness. Always check for any signs of spoilage before eating. If it smells off or looks funny, it’s best to throw it away. This way, you can enjoy your meal safely! Green Goddess dressing is a creamy sauce made with herbs. It often includes parsley, chives, and tarragon. This dressing has a fresh and vibrant flavor. It pairs perfectly with salads, like our pasta salad. The dressing gives a rich, green color and adds taste. You can buy it or make your own! Yes, you can make this salad ahead of time. It stays fresh for a day or two. Just store it in the fridge in a covered bowl. If you make it early, keep the avocado separate. Add it just before serving to keep it green and fresh. To make homemade Green Goddess dressing, you need simple ingredients. Here’s a quick recipe: - 1/2 cup mayonnaise - 1/4 cup sour cream - 1/4 cup buttermilk - 1 tablespoon lemon juice - 1 tablespoon white wine vinegar - 1/4 cup fresh herbs (like parsley and chives) - Salt and pepper to taste 1. Mix all the ingredients in a bowl. 2. Blend until smooth and creamy. 3. Taste and adjust salt and pepper as needed. This dressing is easy and delicious! This blog post covered all the steps to make a great pasta salad. We discussed the right ingredients and cooking methods. I shared tips to cook pasta and store your salad well. You can try different proteins or swap in seasonal veggies for fun flavors. Remember, cooking should be enjoyable and simple. With these ideas, you can create a tasty dish that's perfect for any occasion. Your kitchen adventures await!

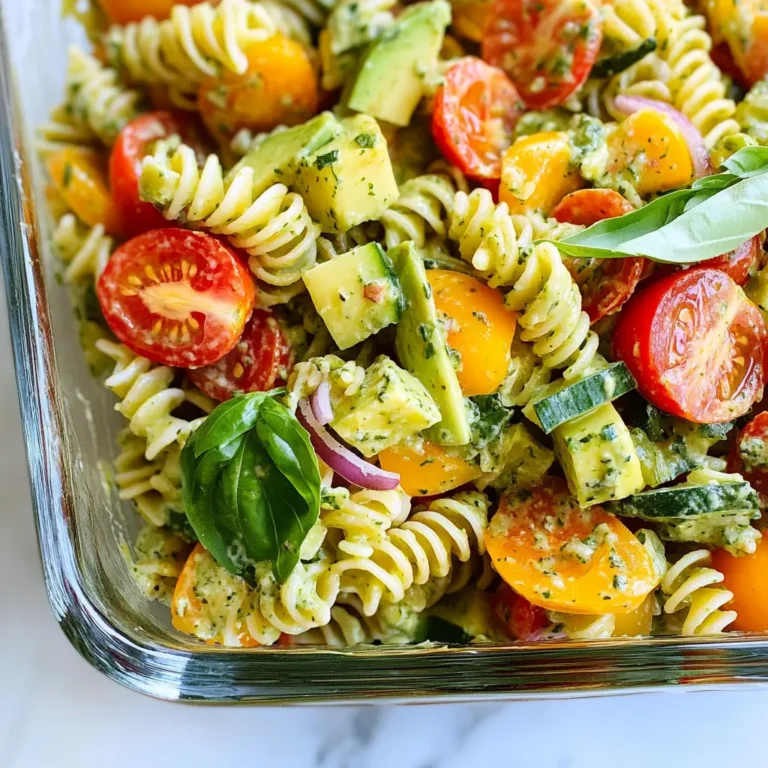
Green Goddess Pasta Salad Wholesome and Fresh Dish

- 1 lb flank steak, trimmed - 1 cup cooked quinoa (or rice) - 1 cup cherry tomatoes, halved - 1 cup cucumber, diced - 1 avocado, sliced - 2 tablespoons olive oil - 1 teaspoon salt - 1 teaspoon black pepper - 2 garlic cloves, minced - 1/2 teaspoon red pepper flakes - 1/4 cup red wine vinegar (use apple cider vinegar) - 1/4 cup chopped fresh cilantro - 1/4 cup chopped fresh parsley - 2 garlic cloves, minced - 1/2 teaspoon red pepper flakes - Salt and pepper to taste - 1/4 cup red wine vinegar (substitute with apple cider vinegar) In this dish, the flank steak is the star. The marinade gives it a bold flavor. You coat the steak with olive oil, salt, pepper, garlic, red pepper flakes, and vinegar. Let it sit for at least 30 minutes. This helps the flavors soak in. Next, the chimichurri sauce brings freshness. It mixes cilantro, parsley, garlic, red pepper flakes, salt, and vinegar. This sauce adds a bright taste. You drizzle it over the bowl right before serving. The bowl itself is colorful and healthy. It uses cooked quinoa or rice as a base. Then, you add juicy cherry tomatoes, crunchy cucumber, and creamy avocado. Together, these ingredients create a delightful meal. These fresh flavors and simple steps make Chimichurri Steak Bowls a must-try. Enjoy crafting this dish! {{ingredient_image_1}} To start, you need to marinate the flank steak. In a bowl, mix together 2 tablespoons of olive oil, 1 teaspoon of salt, 1 teaspoon of black pepper, and 2 minced garlic cloves. Add 1/2 teaspoon of red pepper flakes and 1/4 cup of apple cider vinegar to the mix. Coat the steak well in this marinade. Let it sit for at least 30 minutes. If you have time, letting it sit overnight gives it more flavor. While the steak marinates, you can make the chimichurri sauce. In a separate bowl, combine 1/4 cup of chopped fresh cilantro, 1/4 cup of chopped fresh parsley, 2 minced garlic cloves, and 1/2 teaspoon of red pepper flakes. Add 1/4 cup of apple cider vinegar and a pinch of salt and pepper to taste. Mix well, and set this aside. This sauce packs a lot of flavor. Next, it’s time to cook the steak. Heat a grill pan over medium-high heat. Remove the steak from the marinade, allowing any excess to drip off. Cook the steak for about 5-7 minutes on each side for medium-rare. Adjust the time based on how you like your steak. After cooking, let it rest for 5 minutes. This helps keep it juicy. Cut the steak against the grain into thin slices. Now, you can build your bowl. Start with 1 cup of cooked quinoa or rice as the base. Add the sliced steak on top. Then, layer in 1 cup of halved cherry tomatoes, 1 cup of diced cucumber, and 1 sliced avocado. This creates a colorful and fresh look. To finish, drizzle the chimichurri sauce generously over the bowl. Squeeze fresh lime juice on top for a zesty kick. This adds brightness to the dish. Enjoy your Chimichurri Steak Bowl while it is still warm! Each bite combines the flavors perfectly. To cook your steak just right, start with a good marinade. I mix olive oil, salt, pepper, garlic, and red pepper flakes to add depth. Let it marinate for at least 30 minutes. For best results, let it sit overnight. This allows the flavors to soak in. When cooking, use a grill pan over medium-high heat. Make sure to let the steak rest after cooking. This helps keep it juicy. Slice the steak against the grain for tender bites. Chimichurri sauce is so versatile! You can adjust the herbs to fit your taste. If you prefer a stronger flavor, add more garlic or red pepper flakes. Like it fresh? Toss in more cilantro or parsley. Don’t forget the vinegar! This adds a nice tang. If you want a fruitier flavor, try using lime juice instead of vinegar. Experiment and find your perfect mix! Meal prepping with Chimichurri Steak Bowls is easy. Cook a large batch of quinoa or rice at the start of your week. Store it in the fridge. You can marinate the steak ahead of time too. Just keep it sealed tight in the fridge. When you’re ready to eat, cook the steak fresh. This keeps your meal flavorful. Chop your veggies early. Store them in airtight containers. This saves time when you’re hungry. Enjoy your bowls fresh and vibrant each day! Pro Tips Rest the Steak: Allowing the steak to rest after cooking helps retain its juices, making it more tender and flavorful when sliced. Customize the Chimichurri: Feel free to add other herbs like oregano or mint for a unique twist on the classic chimichurri sauce. Quinoa Cooking Tip: Rinse quinoa before cooking to remove any bitterness and enhance its nutty flavor. Perfect Avocado: To pick a ripe avocado, gently squeeze it; it should yield slightly to pressure. Avoid avocados with dark spots or mushy texture. {{image_2}} If you want to change the base of your bowl, you have many options. You can use cauliflower rice for a low-carb choice. Brown rice is a hearty substitute that adds fiber. Couscous can work too, giving a light texture. Each option brings a unique taste and can change the meal's feel. Try them out to find your favorite! Adding more veggies can boost flavor and nutrition. Try bell peppers for a sweet crunch. Zucchini adds moisture and a mild taste. Roasted corn brings a nice sweetness and color. You can also use shredded carrots for a bit of crunch. Mix and match to create your ideal bowl! Not everyone loves flank steak, and that’s okay! Chicken breast is a great swap if you want a lighter protein. Grilled shrimp works well too, adding a seafood twist. For a plant-based option, try chickpeas or grilled tofu. Each protein brings a new flavor and texture to your bowl. Store your Chimichurri Steak Bowls in an airtight container. Keep them in the fridge. They stay fresh for up to three days. If you want to keep it longer, separate the components. Store the steak, veggies, and sauce in different containers. This way, they stay fresh longer. To reheat your steak bowl, use the microwave. Heat it on medium power for one to two minutes. Stir the bowl halfway to make sure it warms evenly. You can also reheat on the stove. Just add a little oil to a pan and warm it over low heat. This keeps the steak juicy and the veggies crisp. You can freeze chimichurri sauce for up to three months. Pour the sauce into ice cube trays. Once frozen, pop them out and store in a freezer bag. When you need chimichurri, just grab a cube. Let it thaw in the fridge or use it straight from the freezer in your dish. Chimichurri sauce is a fresh sauce from Argentina. It is made with herbs, garlic, vinegar, and oil. You can use it on grilled meats, especially steak. The bright green color comes from parsley and cilantro. This sauce adds a zesty flavor to dishes, making them taste vibrant and fresh. Yes, you can use other cuts of steak. Sirloin, ribeye, or skirt steak work well. Choose a cut that is tender. Each cut will give a different flavor and texture. Adjust cooking time based on the thickness of the steak. Just remember to marinate it well for the best taste. To change the spice level, add or reduce red pepper flakes. For a milder taste, use less or none at all. If you like it hot, add more. You can also try adding chopped jalapeños for heat. Taste as you go to find your perfect balance. Chimichurri Steak Bowls go well with many sides. Here are some great options: - Grilled vegetables like zucchini or bell peppers - A fresh green salad with light dressing - Roasted potatoes or sweet potatoes - Garlic bread for a tasty touch These sides enhance the meal and bring out the flavors of the chimichurri sauce. You learned how to make delicious Chimichurri Steak Bowls. We covered all the key ingredients. You saw how to marinate the steak and prepare the sauce. Cooking tips help you get the perfect steak. I shared ways to customize your bowl and store leftovers. Enjoy creating your own tasty meals. This recipe brings great flavors to your table. Try it and share your results!

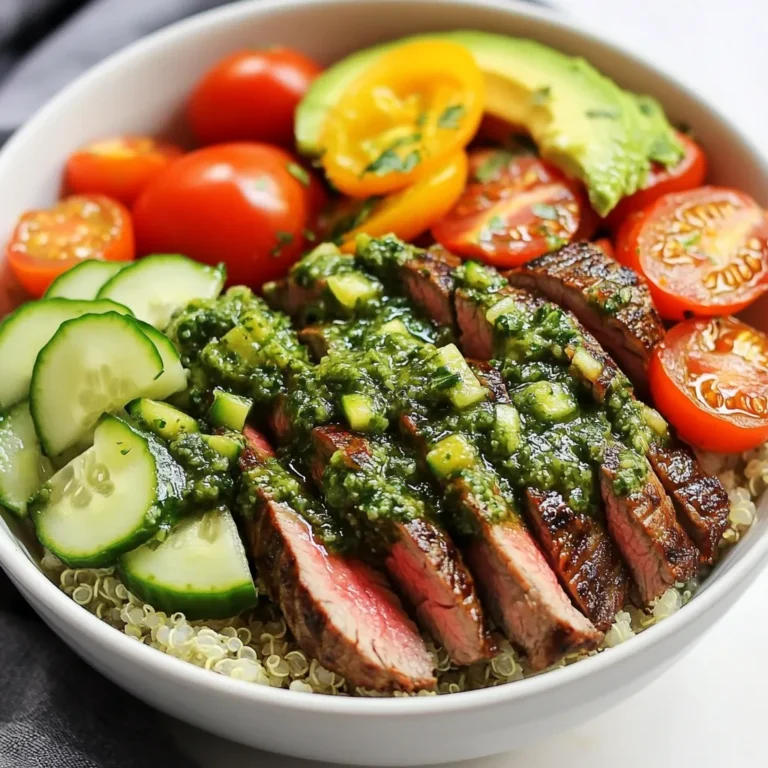
Chimichurri Steak Bowls Flavorful and Fresh Meal

To make a tasty pineapple coconut smoothie bowl, you need a few key items: - 1 cup frozen pineapple chunks - 1 ripe banana - 1/2 cup coconut milk (or almond milk) You can make your smoothie bowl creamier and sweeter with these extras: - 1/4 cup Greek yogurt (for creaminess) - 1 tablespoon honey or maple syrup (for sweetness) To make your bowl look great and taste even better, try these toppings: - Sliced fresh fruit (kiwi, banana) - Granola - Chia seeds - Mint leaves - Shredded coconut {{ingredient_image_1}} To make the smoothie base, gather your ingredients first. You will need: - 1 cup frozen pineapple chunks - 1 ripe banana - 1/2 cup coconut milk (or almond milk) - 1/4 cup Greek yogurt (optional for creaminess) Start by adding the frozen pineapple chunks and ripe banana to your blender. If you want a creamier texture, add the Greek yogurt. Pour in the coconut milk. This will help blend everything smoothly. Blend the mixture until it is smooth and creamy. If it seems too thick, don't worry! Just add a bit more coconut milk. Blend again until you reach your desired consistency. Taste the mixture. If you like it sweeter, add a tablespoon of honey or maple syrup. Blend once more to mix in the sweetness. Now comes the fun part! Pour your smoothie mixture into a bowl. Use the back of a spoon to smooth out the surface. This creates a nice base for your toppings. For the toppings, you can get creative. Start with sliced fresh fruit like kiwi or banana. Sprinkle some granola and chia seeds over the top. Finish with shredded coconut and a few mint leaves. This gives your smoothie bowl a beautiful look and a tasty crunch. Serve it right away for the best flavor! When picking a ripe pineapple, look for a sweet smell. The skin should be gold or yellow. Also, the leaves should be green and healthy. For bananas, choose ones that are yellow with a few brown spots. These spots show they are sweet and ready to eat. To get the right thickness, start with frozen fruit. This keeps the smoothie cold and thick. If it is too thick, add a splash of coconut milk. Blend slowly. You can always add more milk, but you can’t take it out. Aim for a creamy texture that holds your toppings well. To make your smoothie bowl even better, try adding spices. A pinch of cinnamon or a splash of vanilla can boost flavor. You can swap coconut milk for almond or oat milk if you want a lighter taste. If you need more sweetness, maple syrup works great too! Pro Tips Use Frozen Fruits: Frozen pineapple and banana not only ensure your smoothie bowl is icy and refreshing but also help thicken the mixture without needing ice, which can dilute the flavor. Experiment with Milk Alternatives: While coconut milk gives a tropical flavor, trying other plant-based milks like almond or oat can provide different textures and tastes, catering to personal preferences. Layer Your Toppings: For an appealing presentation, layer your toppings in a way that showcases the vibrant colors of the fruits and the crunchiness of granola, making each bite visually enticing. Adjust Sweetness to Taste: Before serving, taste your smoothie mixture and adjust the sweetness with honey or maple syrup, ensuring it suits your personal preference for a perfect balance. {{image_2}} You can change the milk in your smoothie bowl. Almond milk adds a nutty taste. Oat milk makes it creamier and richer. Coconut milk keeps the tropical vibe. Each option gives your bowl a unique twist. Choose what you like best! Mix different fruits for a fun flavor adventure. You can use mango for a sweet touch. Berries add a pop of color and tang. Avocado brings creaminess without changing the taste much. Add-ins like spinach or kale can boost nutrition. They blend well without strong flavors. Fresh fruit changes with the seasons. In summer, ripe peaches or berries shine. In fall, try apples or pears for a cozy taste. Winter brings citrus fruits like oranges or grapefruits. Use what’s fresh and local to make your bowl special. It makes the smoothie taste even better! If you have leftover smoothie bowl, store it in a sealed container. Use glass or plastic containers that close tightly. Keep it in the fridge for up to two days. The smoothie may separate, so stir it before eating. You can freeze leftover smoothie bowl. Pour it into an ice cube tray or freezer-safe bags. Freeze for up to three months. When ready to enjoy, blend the frozen mix with a bit of coconut milk. This gives you a quick and tasty treat. To keep your smoothie bowl fresh, avoid adding toppings before storing. Toppings can get soggy. Instead, store them separately. When serving, add fresh toppings like fruit or granola. This keeps the flavor bright and the texture perfect. Yes, you can make this smoothie bowl ahead of time. Just blend the ingredients as usual. Store the smoothie in a sealed container in the fridge. It is best to eat it within 24 hours for freshness. If you plan to top it later, keep the toppings separate. This way, your bowl stays fresh and tasty. If you don’t have Greek yogurt, don’t worry. You can skip it or use another yogurt. Regular yogurt or a dairy-free option works well too. The bowl may be a bit less creamy, but it will still taste great. You can also add a bit more banana or some avocado to boost creaminess. To make this smoothie bowl vegan, simply skip the Greek yogurt. Use almond milk or any other plant-based milk. For sweetness, use maple syrup instead of honey. With these small changes, you can enjoy a delicious vegan smoothie bowl without losing any flavor. In this post, we explored how to make a delicious smoothie bowl. We covered key ingredients, from the base to garnishes. We shared tips for blending and serving, ensuring a perfect thickness. You learned about flavor enhancements and variations for every season. Storing leftovers was also discussed to keep your smoothie fresh. Overall, this smoothie bowl is easy to customize and fun to make. Whether vegan or packed with toppings, enjoy every spoonful!

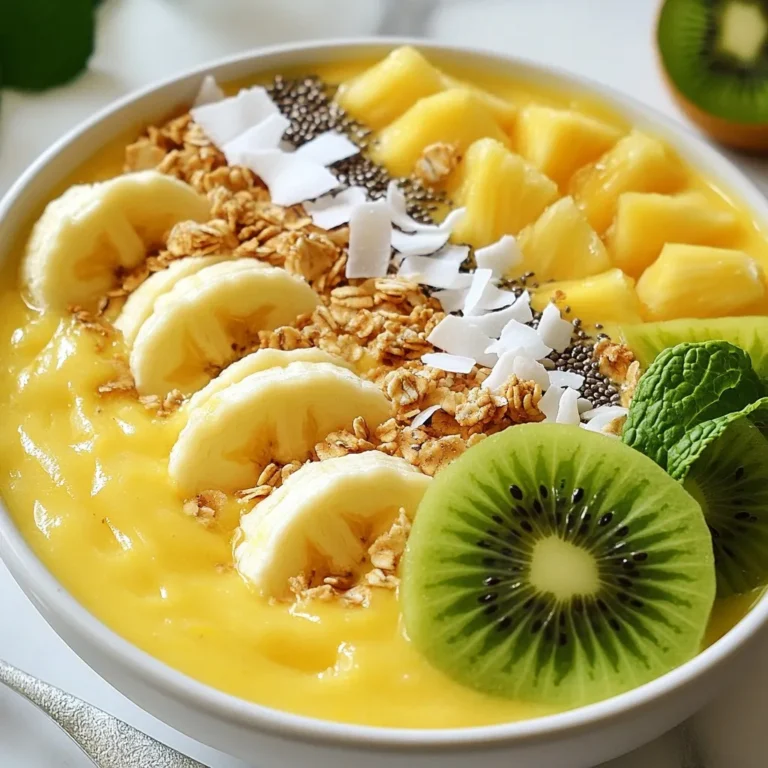
Pineapple Coconut Smoothie Bowl Tasty and Refreshing

To make creamy tomato basil tortellini soup, gather these items: - 2 cups vegetable broth - 1 can (15 oz) diced tomatoes - 1 cup heavy cream - 1 package (9 oz) refrigerated cheese tortellini - 1 small onion, diced - 2 cloves garlic, minced - 1 teaspoon dried basil - 1 tablespoon olive oil - Salt and pepper to taste - Fresh basil leaves for garnish - Grated Parmesan cheese for serving You can swap some ingredients if needed. Use chicken broth instead of vegetable broth for a meaty flavor. For a lighter option, try half-and-half in place of heavy cream. If you don’t have tortellini, any small pasta works well. Use fresh basil instead of dried for a fresher taste. If you want it dairy-free, coconut cream can be a good choice. When selecting ingredients, look for vibrant colors. Choose a can of tomatoes that is not dented. The broth should be low-sodium for better flavor control. For the onion, pick one that feels firm and heavy. Fresh garlic should be plump and not sprouting. Look for tortellini with a short shelf life for the best taste. Fresh basil should have bright green leaves and no brown spots. {{ingredient_image_1}} 1. Start by heating the olive oil in a large pot over medium heat. 2. Add the diced onion. Sauté for about 3-4 minutes until it softens. 3. Next, stir in the minced garlic and dried basil. Cook for one more minute. 4. Pour in the canned diced tomatoes along with their juice. Add the vegetable broth. 5. Stir everything together and bring the mixture to a simmer. 6. Add the heavy cream to the pot. Stir well and let it simmer for 5-7 minutes. 7. Gently add the tortellini to the pot. Cook them according to the package instructions. 8. Season the soup with salt and pepper to taste. 9. Serve the soup in bowls, garnished with fresh basil leaves and grated Parmesan cheese. - Use pre-diced onions and minced garlic to cut prep time. - Choose fresh tortellini from the store for quicker cooking. - Make a double batch and freeze half for later. - Large pot for cooking the soup. - Wooden spoon for stirring. - Measuring cups for broth and cream. - Ladle for serving the soup. - Bowls for serving. - Grater for the Parmesan cheese. This easy recipe will have you enjoying creamy tomato basil tortellini soup in no time! To boost the flavor of your soup, use fresh herbs. Fresh basil adds a bright taste. You can also try thyme or oregano for a twist. A splash of balsamic vinegar can add depth. I like to sprinkle in some red pepper flakes for a hint of heat. If you want a thicker soup, add more cream. You can blend part of the soup for a smooth texture. If you prefer it lighter, cut back on the cream and use more broth. For a dairy-free option, try coconut milk. It gives a rich flavor without the cream. Serve your soup in deep bowls. Top each bowl with fresh basil leaves and grated Parmesan cheese. For added fun, offer crusty bread on the side. You can also pair it with a simple salad. This makes a great lunch or dinner, perfect for sharing with friends. Pro Tips Use Fresh Basil: Fresh basil elevates the flavor of the soup significantly compared to dried basil. Add it at the end for the best aroma and taste. Customize Creaminess: For a lighter version, substitute half of the heavy cream with milk or a non-dairy alternative, while maintaining richness. Experiment with Cheese: Try adding different cheeses like mozzarella or fontina for a unique flavor profile that complements the tortellini. Chill and Store: This soup tastes even better the next day! Store leftovers in an airtight container and reheat gently on the stove. {{image_2}} You can make this soup even more veggie-friendly. Swap the heavy cream with coconut milk for a dairy-free choice. Use vegetable broth instead of chicken broth. Add more vegetables like carrots, spinach, or bell peppers for added texture and flavor. These changes keep the soup rich while making it suitable for all diets. To boost protein in your soup, try adding cooked chicken or sausage. You can also use beans like cannellini or chickpeas. These additions make the soup heartier and more filling. Just add them when you simmer the soup to warm them up. You can also use tofu for a plant-based option. If you like heat, add red pepper flakes or diced jalapeños. Start with a small amount and taste as you go. You can always add more spice, but it’s hard to take it out! A splash of hot sauce can also kick things up a notch. For a milder taste, skip the spice altogether or use only a pinch. To store leftovers, let the soup cool first. Then, pour it into an airtight container. Seal it well to keep the flavors fresh. Store the container in the fridge. This soup stays good for up to three days. Make sure to label it with a date for easy tracking. Want to save some for later? You can freeze this soup too! Pour the cooled soup into freezer-safe bags or containers. Leave some space at the top for expansion. Seal tightly and label with the date. It keeps well in the freezer for about three months. When you’re ready to eat, just thaw it in the fridge overnight. When it’s time to enjoy your soup again, reheat it gently. Pour the soup into a pot over low heat. Stir it often to avoid burning. It may thicken a bit, so feel free to add a splash of broth or cream. Heat it until it's hot throughout. You can also use the microwave if you’re in a hurry. Just use a microwave-safe bowl and cover it loosely. Heat in short bursts, stirring in between. Enjoy your warm, creamy delight! Yes, you can use frozen tortellini. Just add them straight to the soup. Cook them according to the package instructions, usually about 5-7 minutes. Frozen tortellini will work well in this creamy soup. If you don’t have heavy cream, use whole milk or a mix of milk and sour cream. Coconut milk can also add creaminess with a hint of sweetness. Each option changes the flavor slightly, but the soup will still taste great. This soup lasts about 3-4 days in the fridge. Store it in an airtight container. For the best taste, eat it within the first few days. If you see any changes in color or smell, it’s best to throw it away. We looked at the key ingredients, cooking steps, and helpful tips to make your dish shine. You learned how to choose fresh items, save time, and enhance flavor. We explored tasty variations and effective storage methods. Keep these insights in mind as you prepare your meal. With the right ingredients and tips, you'll create something delicious that everyone will enjoy. Happy cooking!

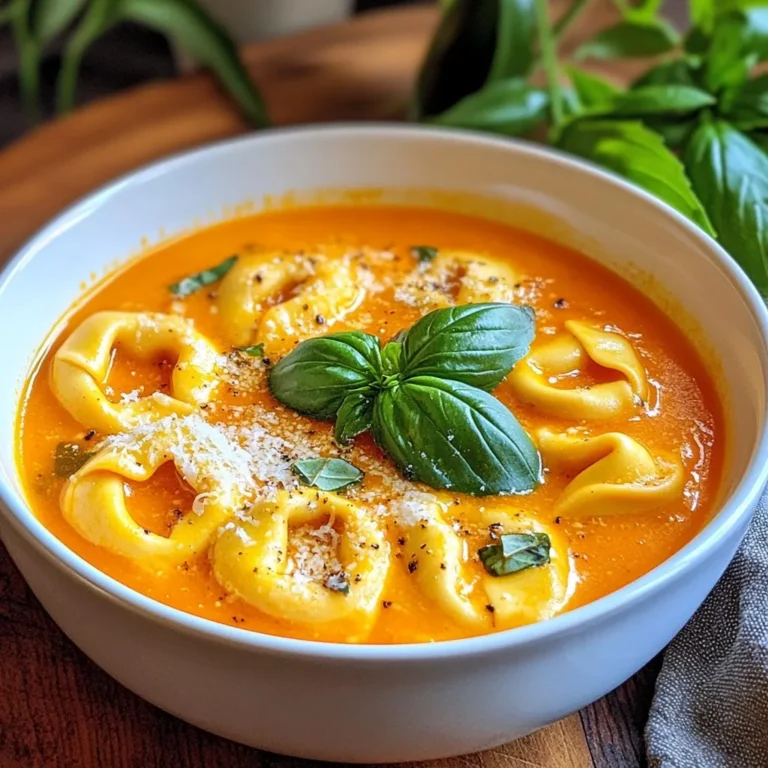
Creamy Tomato Basil Tortellini Soup Tasty Delight

- 1 lb fresh salmon fillet, skin removed - 1 cup breadcrumbs (preferably panko) - 1/4 cup fresh dill, finely chopped - 1/4 cup green onions, finely sliced The main ingredients form the heart of our lemon dill salmon cakes. Fresh salmon fillet provides a rich taste and a tender texture. I prefer using panko breadcrumbs for their light and crispy finish. Fresh dill and green onions add bright flavors that make the cakes pop. - 2 cloves garlic, minced - Zest of 1 lemon - Juice of 1 lemon - 2 tablespoons mayonnaise - 2 tablespoons Dijon mustard Flavor enhancers truly elevate these cakes. Garlic brings warmth, while lemon zest and juice add zing. Mayonnaise keeps the cakes moist, and Dijon mustard introduces a subtle tang that complements the salmon perfectly. - Salt and pepper to taste - 2 tablespoons olive oil (for frying) Seasoning is key to a great taste. Salt and pepper round out the flavors of the cakes. I recommend using olive oil for frying, as it gives a lovely golden crisp and a hint of fruitiness. {{ingredient_image_1}} To start, we need to poach the salmon fillet. Add a splash of water to a large skillet and bring it to a simmer. Place the salmon fillet in the skillet and cover it. Cook for about 8 to 10 minutes until the salmon is cooked through. Once done, take it out and let it cool. Use a fork to flake the salmon into smaller pieces. This step makes it easier to mix later. Now, grab a large mixing bowl. Combine the flaked salmon with breadcrumbs, chopped dill, green onions, and minced garlic. Add the lightly beaten egg, mayonnaise, Dijon mustard, lemon zest, and lemon juice. Mix everything well. Don't forget to season with salt and pepper to taste. This mixture is where all the flavors come together. With the mixture ready, use your hands to shape it into small patties. Aim for about 3 inches in diameter. Place these patties on a plate. Chilling is next! Refrigerate the formed salmon cakes for at least 30 minutes. This step is key. Chilling helps the cakes hold together better while frying. For cooking, heat olive oil in a large skillet over medium heat. Once the oil is hot, carefully add the salmon cakes in batches. Make sure not to overcrowd the pan. Fry each cake for about 4 to 5 minutes on each side. You want them golden brown and crispy. After cooking, transfer the salmon cakes to a plate lined with paper towels. This helps drain any excess oil. For a nice presentation, serve the lemon dill salmon cakes hot with a wedge of lemon. You can also add a dollop of extra mayonnaise or a yogurt dill sauce on the side. Enjoy your tasty creation! To make your salmon cakes hold together, you need the right balance. Use fresh ingredients and the right amount of breadcrumbs. If the mixture feels too wet, add more breadcrumbs. Chilling the cakes is key. When you chill them for at least 30 minutes, they firm up. This makes them easier to fry without falling apart. If you don't have fresh dill, try using dried dill. You can also use parsley or tarragon for a different taste. For extra flavor, add spices like paprika or cumin. These can give your cakes a nice kick. A dash of cayenne can also add some heat if you like it spicy. You can bake or grill your salmon cakes instead of frying. Baking at 375°F for 15-20 minutes gives a nice crisp. Just brush them with olive oil first. If grilling, make sure to keep the heat medium to avoid burning. For even cooking, turn the cakes gently and check that they brown on all sides. Pro Tips Use Fresh Salmon: For the best flavor and texture, use fresh salmon fillets instead of canned or frozen salmon. Chill Before Cooking: Chilling the formed salmon cakes in the refrigerator for at least 30 minutes helps them hold their shape during frying. Don’t Overcrowd the Pan: Cook the salmon cakes in batches to ensure even cooking and to achieve that perfect crispiness. Experiment with Herbs: Feel free to add other herbs such as parsley or cilantro for a different flavor profile. {{image_2}} You can change some ingredients in this recipe. Using canned salmon works well. It saves time and is easy to find. Just make sure to drain it well. For herbs, you can swap dill with parsley or chives. These will add a fresh taste too. If you want a spicy kick, add some red pepper flakes. When serving lemon dill salmon cakes, dips make a great addition. Try a creamy yogurt dill sauce or a zesty lemon aioli. Both add flavor and moisture. For sides, consider a fresh salad or roasted vegetables. These pair nicely and keep the meal light. If you're gluten-free, you can use gluten-free breadcrumbs. Many brands offer great options. For a lower-fat version, replace mayonnaise with yogurt. Greek yogurt works best. It adds creaminess without the extra calories. These swaps help everyone enjoy the dish. Lemon dill salmon cakes stay fresh in the fridge for up to three days. To keep them tasty, store them in an airtight container. This will help prevent them from drying out or absorbing other flavors in your fridge. Always let the cakes cool before sealing them in the container. You can freeze both cooked and uncooked salmon cakes. For the best results, freeze them uncooked. Shape the patties, then place them on a baking sheet. Freeze until solid, then transfer to a freezer bag. This method keeps them from sticking together. Cooked cakes can also freeze, but they may lose some crispness. When you’re ready to eat, it’s easy to reheat. If frozen uncooked, cook them straight from the freezer, adding a few extra minutes to the cooking time. If reheating cooked cakes, bake them in the oven until heated through. This helps keep them crispy. You can tell salmon cakes are done by their color and texture. They should be golden brown on both sides. When you press them lightly, they should feel firm. You can also check the inside. It should be hot throughout and flake easily with a fork. If you see any raw salmon, give them more time in the pan. Yes, you can prepare salmon cakes in advance. Mix the ingredients and shape the patties. Then, cover them and refrigerate for up to 24 hours. This helps the flavors blend. If you want to freeze them, place the uncooked cakes on a baking sheet. Freeze them until firm, then transfer to a bag. They can be frozen for up to three months. When you’re ready, cook them from frozen, adding a few extra minutes to the cooking time. Lemon dill salmon cakes taste great with many dips. A classic choice is a creamy dill sauce. You can mix yogurt, lemon juice, and fresh dill for a simple dip. Another option is a tangy tartar sauce, which adds zest. If you prefer something lighter, try a lemon wedge on the side. It brightens the flavor and adds freshness. You can also serve with a spicy aioli for a kick! We've covered how to make tasty lemon dill salmon cakes from start to finish. You learned about key ingredients, cooking steps, and variations to suit your taste. Remember to chill the patties for the best texture. Also, consider using different herbs or cooking methods for variety. These cakes are versatile and can be made ahead of time or frozen for later. Enjoy experimenting with flavors and find your favorite ways to serve them!

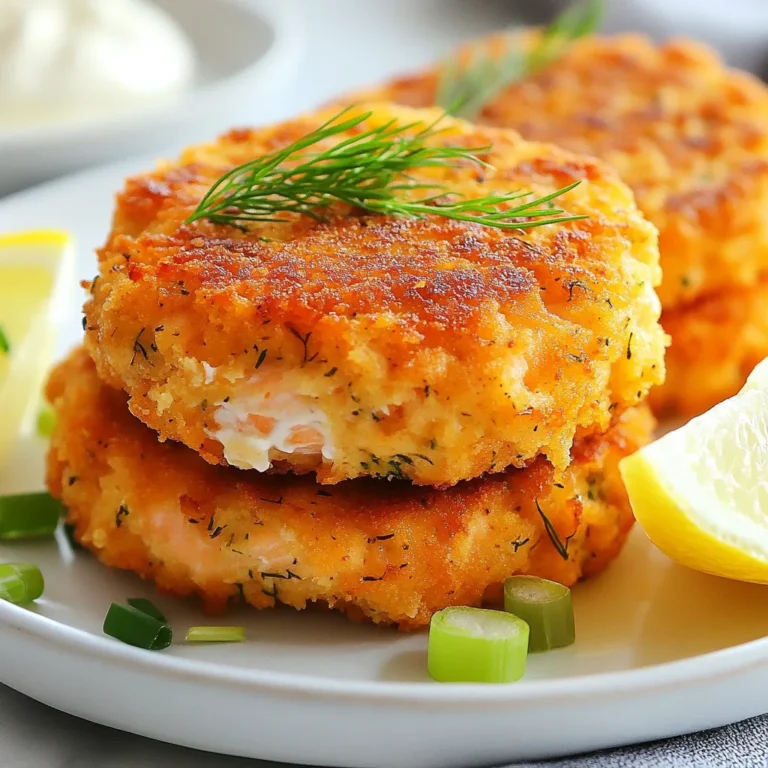
Lemon Dill Salmon Cakes Tasty and Simple Recipe

- 1 large cucumber - 1 cup cream cheese, softened - 1 tablespoon sour cream - 1 tablespoon fresh dill, chopped - 1 tablespoon chopped chives - 1 teaspoon garlic powder - 1 tablespoon everything bagel seasoning - Cherry tomatoes, halved (for garnish) When you set out to make Everything Bagel Cucumber Bites, it starts with fresh ingredients. First, pick a large cucumber. The crunchiness of the cucumber is key to this snack. Next, grab a cup of softened cream cheese. It should be soft for easy mixing. A tablespoon of sour cream adds creaminess and tang. For the herbs, fresh dill and chives bring in a bright flavor. You will need one tablespoon of each. Garlic powder adds a savory touch. Finally, the star of the dish is everything bagel seasoning. It combines sesame seeds, poppy seeds, onion, and garlic. This seasoning ties all the flavors together, so use a full tablespoon. If you want to add a pop of color, cherry tomatoes are perfect. Halve them and set them aside for garnish. Now you have all the ingredients to create a fresh and flavorful snack that is sure to impress! {{ingredient_image_1}} First, wash the cucumber well under cold water. This step helps remove any dirt. Next, slice it into ½ inch thick rounds. Try to make them even for a pretty look. In a medium bowl, combine 1 cup of softened cream cheese and 1 tablespoon of sour cream. Then, add 1 tablespoon of chopped dill and 1 tablespoon of chopped chives. Sprinkle in 1 teaspoon of garlic powder and half of the everything bagel seasoning. Mix everything until smooth. This mixture should be creamy and full of flavor. Now it’s time to assemble! Use a piping bag or a ziplock bag with a corner cut off. Spread or pipe a good amount of the cream cheese mixture onto each cucumber slice. Make sure to cover the surface well. After that, sprinkle the remaining everything bagel seasoning on top. This adds a nice crunch and flavor. For the final touch, place a halved cherry tomato on each bite. This adds a pop of color and taste. Arrange the cucumber bites on a platter. Chill them in the refrigerator for about 10-15 minutes. This helps the flavors blend and makes them refreshing when served. Select firm, unblemished cucumbers for the best texture. Look for cucumbers that feel heavy for their size. Smooth skin indicates freshness. Avoid any cucumbers with soft spots or wrinkles. These signs often mean the cucumber is past its peak. A fresh cucumber will provide the perfect crunch in each bite. Make sure your cream cheese is softened for easy spreading. Leave it out at room temperature for about 30 minutes before mixing. This will help you blend it smoothly with sour cream and herbs. The mix should be creamy and easy to pipe or spread on the cucumber slices. If you rush this step, your bites may not hold together well. Use color contrast and fresh herbs for visually appealing plating. Place your cucumber bites on a bright platter. Add halved cherry tomatoes for a pop of red. You can sprinkle extra chopped herbs around the bites. This adds a nice touch and makes the dish look fresh. A well-presented dish makes it even more inviting for guests. Pro Tips Use a Firm Cucumber: Choose a firm cucumber to ensure that your bites hold their shape and provide a satisfying crunch. Customize Your Cream Cheese: Feel free to add other herbs or spices to your cream cheese mixture for a unique twist, such as smoked paprika or fresh parsley. Prep in Advance: You can prepare the cream cheese mixture a day ahead and store it in the refrigerator, making assembly quick and easy on the day of serving. Chill for Best Flavor: Allow the assembled cucumber bites to chill for at least 10-15 minutes before serving to enhance the flavors and provide a refreshing experience. {{image_2}} You can switch up the spread on your cucumber bites. Greek yogurt is a great choice. It adds a tangy flavor and extra creaminess. Flavored cream cheeses work well too. Look for options like chive or garlic. They bring a new taste to each bite. Toppings can also change the vibe of your bites. Smoked salmon is a classic option. It adds richness and protein. Try olives for a salty twist. Red onion slices give a crunchy bite and sharp flavor. Each topping creates a unique experience on your palate. Don’t forget to play with seasonal herbs. Fresh basil or parsley can brighten the dish. In the fall, add roasted pumpkin seeds for a nutty crunch. In summer, fresh dill shines bright. These simple changes keep the recipe exciting and fresh all year round. To keep your Everything Bagel Cucumber Bites fresh, place them in an airtight container. Store the container in the refrigerator. This will help maintain their crunch and flavor. For the best taste and texture, consume the cucumber bites within 2-3 days. After this time, they may lose their freshness. The cream cheese can spoil, so eating them sooner is best. Freezing cucumber bites is not recommended. The cucumber will become watery when thawed. Instead, enjoy them fresh! If you have extra cream cheese mixture, you can freeze that. Just store it in a sealed container, and it will last for up to a month. Thaw it in the fridge before using it again. Yes, you can make these bites ahead of time. I often prepare the cream cheese mixture a day in advance. Just store it in the fridge in an airtight container. When you are ready to serve, slice the cucumber and assemble the bites. This way, you save time and still enjoy fresh flavors! If you want a dairy-free option, try using hummus or mashed avocado. Both options work great in this recipe. Hummus adds a nice creamy texture, while avocado brings a fresh taste. You can even mix in some herbs for added flavor! This recipe makes about 4-6 servings. It’s perfect for sharing! Whether it’s a party or a family dinner, these cucumber bites are a fun and tasty appetizer. Plus, they are light and refreshing, making them a great choice for any gathering. These Everything Bagel Cucumber Bites are easy to make and fun to eat. You start with fresh cucumbers and blend them with a creamy mix of cheese and herbs. With many options for toppings and variations, you can customize each bite to your taste. Store leftovers well to keep them fresh. Serve these bites at your next gathering for a tasty treat that everyone will love. Enjoy making them and share your favorite twists!

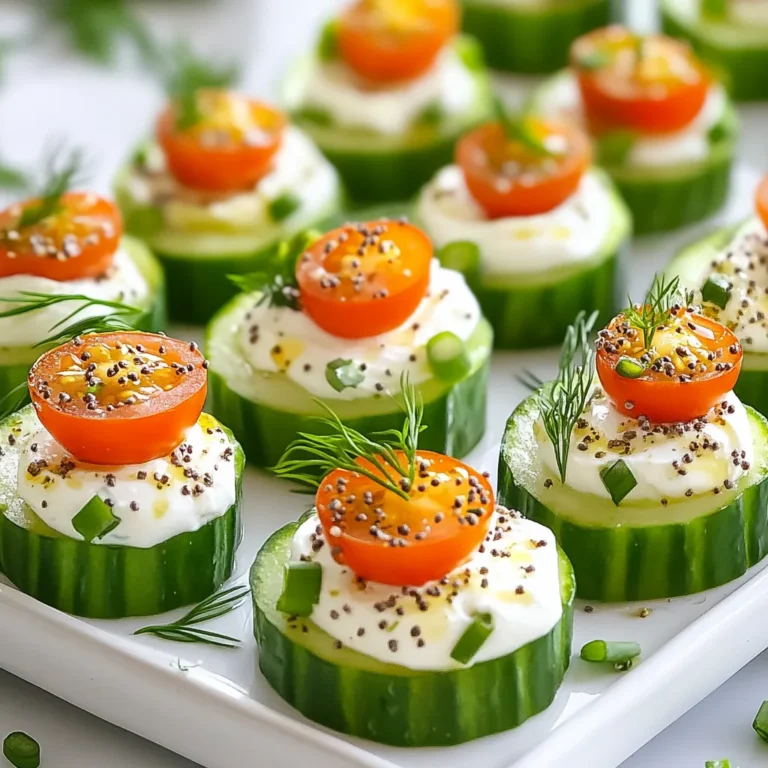
Everything Bagel Cucumber Bites Fresh and Flavorful Snack

To make honey lime chicken tenders, gather these items: - 1.5 lbs chicken tenders - 1 cup breadcrumbs (panko for extra crunch) - 2 tablespoons olive oil - Salt and pepper to taste Next, you need these for the marinade: - 1/4 cup honey - 2 tablespoons lime juice (freshly squeezed) - Zest of 1 lime - 1 teaspoon garlic powder - 1 teaspoon onion powder - 1/2 teaspoon smoked paprika For a nice touch, consider these garnishes: - Fresh cilantro or parsley for garnish These ingredients create a sweet and tangy flavor. The honey adds sweetness, while the lime gives a zesty kick. The spices enhance the taste, making the chicken tender and juicy. Using panko breadcrumbs ensures a delightful crunch. Enjoy your cooking! {{ingredient_image_1}} To make the marinade, gather your ingredients. You need honey, lime juice, lime zest, garlic powder, onion powder, smoked paprika, salt, and pepper. In a medium bowl, whisk together the honey and lime juice. Add the lime zest, garlic powder, onion powder, smoked paprika, salt, and pepper. Mix until smooth. This marinade will give your chicken a fresh and zesty flavor. Now, take your chicken tenders and place them in a large resealable bag or a shallow dish. Pour the marinade over the chicken. Make sure all tenders are well coated. Seal the bag or cover the dish. Refrigerate for at least 30 minutes. For more flavor, you can marinate for up to 4 hours. This step is key for juicy and tasty chicken. After marinating, preheat your oven to 400°F (200°C). Line a baking sheet with parchment paper. In a shallow bowl, add your breadcrumbs. Take each chicken tender out of the marinade, letting the excess drip off. Coat each tender in the breadcrumbs. Place the coated tenders on the prepared baking sheet. Drizzle olive oil over them to help crisp up the coating. Bake for 15-20 minutes. The chicken should be cooked through and the coating golden brown. Let them rest for a couple of minutes. Garnish with fresh cilantro or parsley before serving. Enjoy your delicious honey lime chicken tenders! For the best flavor, marinate your chicken tenders for at least 30 minutes. If you can, aim for four hours. The longer they soak, the more flavor they absorb. Use a resealable bag or a shallow dish. This makes it easy to coat the chicken well. Remember to turn the bag or stir the chicken occasionally. This ensures every piece gets that tasty honey lime mix. To get a nice, crispy coating, use panko breadcrumbs. They add extra crunch compared to regular breadcrumbs. After marinating, let the excess marinade drip off. This helps the breadcrumbs stick better. Coat each chicken tender fully in the breadcrumbs. Make sure no bare spots show. Drizzling olive oil on top before baking helps a lot. It promotes browning and crispiness. You’ll need a few basic tools for this recipe. A baking sheet lined with parchment paper is key. This keeps the chicken from sticking and makes cleanup easy. A medium bowl is great for mixing your marinade. Use a shallow bowl for the breadcrumbs. A whisk or fork helps combine the marinade well. Finally, a resealable bag is useful for marinating. These simple tools make the process smooth and fun. Pro Tips Marinate Longer for More Flavor: For the best flavor, marinate the chicken tenders for at least 2 hours, or even overnight. This allows the flavors to penetrate the meat more deeply. Use Fresh Ingredients: Fresh lime juice and zest will give your dish a vibrant flavor compared to bottled alternatives. Always opt for fresh whenever possible. Try Different Breadcrumbs: Experiment with different types of breadcrumbs such as crushed cornflakes or seasoned breadcrumbs for a unique twist on the texture and flavor of the coating. Don’t Skip the Olive Oil: Drizzling olive oil over the tenders before baking helps achieve a crispy texture. It also enhances the flavor and richness of the dish. {{image_2}} You can change the taste of your honey lime chicken tenders by adding new flavors. Try adding soy sauce for a savory kick. If you love heat, add some chili powder or red pepper flakes. For a sweet twist, mix in orange juice or mango puree. You can also swap lime juice for lemon juice for a different citrus flavor. Each of these additions will create a unique taste that you can enjoy. You don't have to bake your chicken tenders. Grilling them gives a nice smoky flavor. Preheat your grill and cook them for about 6-8 minutes per side. Keep an eye on them to avoid burning. If you have an air fryer, this is another great option. Set it to 400°F and cook for about 10-12 minutes, flipping halfway through. Both methods will give you crispy and juicy chicken tenders. Pair your honey lime chicken tenders with various sauces for added flavor. A tangy barbecue sauce works well for a sweet and smoky taste. For a lighter option, try a yogurt-based dip with herbs. You can also serve them with ranch or a spicy sriracha mayo. Each sauce will change the meal and give you new tastes to explore. To store leftover chicken tenders, let them cool first. Place them in an airtight container. You can keep them in the fridge for up to three days. Make sure to label the container with the date. This way, you won’t forget when you made them. When you're ready to eat leftovers, reheat them for the best taste. Preheat your oven to 350°F (175°C). Place the tenders on a baking sheet. Heat them for about 10 to 15 minutes. This keeps them crispy. You can also use a microwave, but they may get soggy. If you use the microwave, heat them in short bursts to avoid overcooking. If you want to save chicken tenders for later, freezing is a great option. First, let them cool completely. Wrap each tender in plastic wrap, then place them in a freezer bag. Remove as much air as possible. You can freeze them for up to three months. When you’re ready to eat, thaw them in the fridge overnight before reheating. This keeps them flavorful and safe to eat. Yes, you can use chicken breasts. Cut them into strips. This makes them easier to cook and eat. The cooking time may change. Cook them for about 20-25 minutes. Always check if they are fully cooked. The inside should reach 165°F. Marinate the chicken for at least 30 minutes. For the best taste, marinate for up to 4 hours. This helps the chicken soak up all the honey and lime flavor. If you are short on time, even 30 minutes makes a difference. Some great sides are: - Rice or quinoa for a filling meal. - Fresh salad for some crunch. - Steamed broccoli or green beans for color. - Sweet potato fries for a tasty twist. These sides add balance to the meal and enhance the flavors of the chicken. Enjoy mixing and matching! We covered the key steps to make chicken tenders tasty and fun. First, we listed the main ingredients and some extras for flavor. Next, we walked through marinating, coating, and baking. I shared tips for crispiness and great tools to use. You learned how to add your twist with flavors and cooking methods. Lastly, we discussed storage options to keep chicken tenders fresh. Enjoy creating your own delicious chicken tenders, and don’t forget to share them with friends!

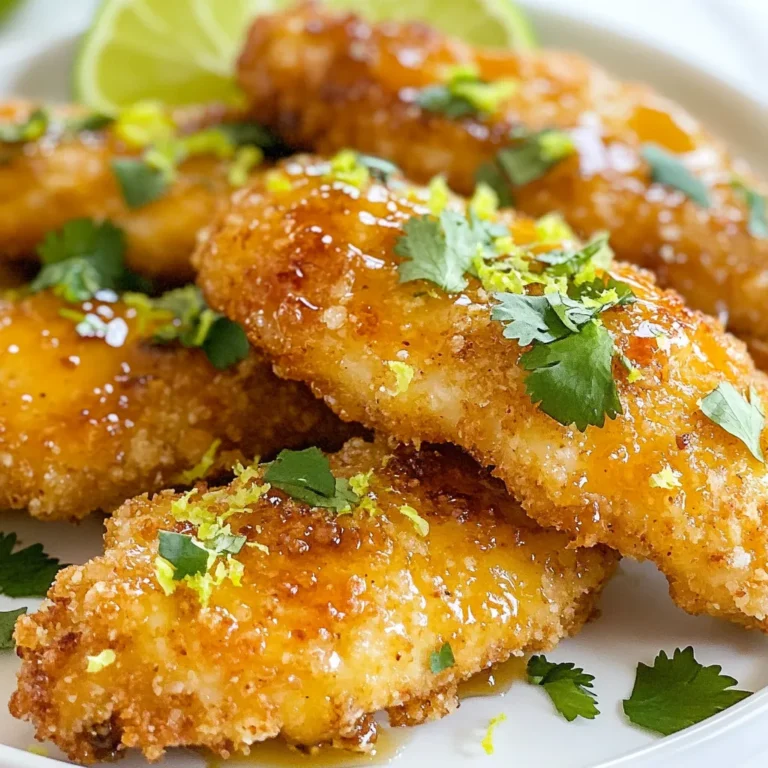
Honey Lime Chicken Tenders Flavorful Easy Recipe

- 8 oz soba noodles - 2 tablespoons sesame oil - 1 tablespoon multi-colored sesame seeds (black and white) - 1 red bell pepper, thinly sliced - 1 cup snap peas, trimmed - 2 green onions, chopped - 2 cloves garlic, minced - 1 tablespoon grated ginger - 2 tablespoons soy sauce (or tamari for gluten-free) - 1 tablespoon sriracha (adjust to taste) - 1 tablespoon rice vinegar - Fresh cilantro, for garnish - Lime wedges, for serving To make Spicy Sesame Soba Noodles, gather these fresh ingredients. First, you need 8 oz of soba noodles. These noodles are made from buckwheat and have a unique flavor. They cook quickly and are great for this dish. Next, get 2 tablespoons of sesame oil. This oil adds rich taste and a lovely aroma. You will also need 1 tablespoon of multi-colored sesame seeds for texture and crunch. Fresh vegetables bring color and nutrients. Use 1 red bell pepper, sliced thin. Add 1 cup of snap peas trimmed for crispness. You also need 2 green onions, chopped for a fresh bite. For the sauce, gather 2 cloves of garlic, minced, and 1 tablespoon of grated ginger. These ingredients give the dish a warm, spicy kick. Combine them with 2 tablespoons of soy sauce and 1 tablespoon of sriracha to add heat. Don't forget 1 tablespoon of rice vinegar for a tangy balance. Finally, garnish your dish with fresh cilantro and serve with lime wedges for a zesty finish. Each ingredient plays a role in making this dish flavorful and fun to eat. {{ingredient_image_1}} To start, boil water in a large pot. Add 8 oz of soba noodles. Cook them according to the package instructions until they are al dente. This usually takes about 4 to 6 minutes. Once done, drain the noodles. Rinse them under cold water to stop cooking. This helps keep them firm. Set the noodles aside while you prepare the other ingredients. Next, grab your fresh veggies. You need 1 red bell pepper, snap peas, green onions, garlic, and ginger. Thinly slice the red bell pepper. Trim the snap peas and chop the green onions. Mince 2 cloves of garlic and grate 1 tablespoon of ginger. This mix will add bright flavors to your dish. In a small bowl, whisk together the sauce. Combine 2 tablespoons of soy sauce, 1 tablespoon of sriracha, and 1 tablespoon of rice vinegar. Adjust the sriracha to match your spice level. This sauce packs a punch and ties everything together. Heat 2 tablespoons of sesame oil in a large skillet over medium heat. Add the minced garlic and grated ginger. Sauté them for about a minute until fragrant. Then, mix in the sliced bell pepper and snap peas. Cook for 3 to 4 minutes until they are tender but still crisp. Pour in your sauce and stir well. Finally, add the cooked soba noodles. Toss everything together until the noodles are well-coated in the sauce. Once combined, stir in the chopped green onions and sesame seeds. Reserve a little sesame seeds for garnish. Remove the skillet from heat. Serve warm, topped with fresh cilantro. Add lime wedges on the side for a zesty touch. Enjoy your spicy sesame soba noodles, a quick and tasty meal! To get your soba noodles just right, follow these steps. First, use plenty of water to cook them. This keeps the noodles from sticking. Cook them until they are al dente. This means they will have a slight bite. Drain them right away and rinse under cold water. This stops the cooking and keeps them firm. To boost the flavor, consider these tips. Add more garlic or ginger for a stronger taste. You can also mix in other veggies like carrots or mushrooms. If you love heat, add more sriracha or chili oil. Fresh herbs like basil or mint can add a nice touch too. For a nutty flavor, use toasted sesame oil instead of regular sesame oil. Avoid overcooking the soba noodles. This can make them mushy. Also, don't skip rinsing them after cooking. If you forget this step, the noodles may stick together. Be careful with the sauce. Too much soy sauce may make the dish salty. Start with less and adjust to your taste. Lastly, remember to mix everything well in the skillet. This ensures that every bite is flavorful. Pro Tips Cook Noodles Al Dente: For the best texture, cook the soba noodles until they are al dente. This ensures they hold up well when tossed with the sauce and vegetables. Adjust Spice Level: Feel free to adjust the amount of sriracha based on your spice tolerance. Start with less and add more to suit your taste. Use Fresh Ingredients: Fresh vegetables not only enhance flavor but also provide a vibrant color contrast on your plate. Opt for seasonal produce when possible. Garnish for Flavor: Don’t skip the fresh cilantro and lime wedges! They add a burst of freshness that elevates the dish to the next level. {{image_2}} You can easily add protein to your Spicy Sesame Soba Noodles. Chicken, shrimp, or tofu work great. For chicken, use cooked, shredded meat for quick prep. For shrimp, sauté them with garlic and ginger until pink. If you prefer tofu, pan-fry it until golden. These proteins add flavor and make the meal filling. This dish is perfect for vegetarians and vegans. Replace any meat with veggies or tofu. You can add mushrooms, carrots, or zucchini for more texture. Use tamari instead of soy sauce to keep it vegan. This way, you enjoy the same spicy taste while sticking to your diet. To make this dish gluten-free, use rice noodles instead of soba. Rice noodles have a similar texture and absorb flavors well. Always check the soy sauce label to ensure it’s gluten-free. Tamari is a great option here. These small changes help everyone enjoy this tasty meal without worry. To keep your Spicy Sesame Soba Noodles fresh, place them in an airtight container. Store the noodles in the fridge for up to three days. Make sure to let them cool before sealing. This helps prevent sogginess. When reheating, use a skillet for best results. Add a splash of water or sesame oil to help steam the noodles. Heat over medium for about five minutes, stirring often. This will keep the noodles from drying out. You can also use a microwave. Heat in short bursts, stirring in between. You can freeze the soba noodles if you plan ahead. Place them in a freezer-safe bag. Squeeze out as much air as possible. They can last up to two months in the freezer. When ready to eat, thaw in the fridge overnight before reheating. Note that fresh veggies may lose their crunch after freezing. You can use several types of noodles. Some great alternatives include: - Udon noodles - Rice noodles - Whole wheat spaghetti - Buckwheat noodles These options change the taste and texture a bit, but they work well. Just cook them according to their package directions. Yes, you can! This dish is great for meal prep. Just store the cooked noodles and sauce separately. Keep the vegetables in a container, too. When ready to eat, reheat everything and mix them. To change the spice level, simply adjust the sriracha. Add less for a milder dish. You can also add more for extra heat. If you want a different flavor, try a bit of chili garlic sauce. These noodles pair well with many dishes. Here are some ideas: - Grilled chicken or tofu - Steamed dumplings - A fresh salad - Stir-fried vegetables These sides balance the flavors and make it a complete meal. Soba noodles offer several health benefits: - High in protein - Rich in fiber - Low in fat - Contains essential minerals These noodles are a great choice for a healthy meal. They provide energy and nourishment, making them a smart addition to your diet. This post covered everything about making tasty Spicy Sesame Soba Noodles. We started with the key ingredients, then moved through each cooking step. I shared tips for the best flavor and common mistakes to avoid. We also looked at ways to mix it up with proteins and special diets. Lastly, I provided storage methods to keep your leftovers fresh. Enjoy making this dish, and remember, tasty cooking is just a noodle away!

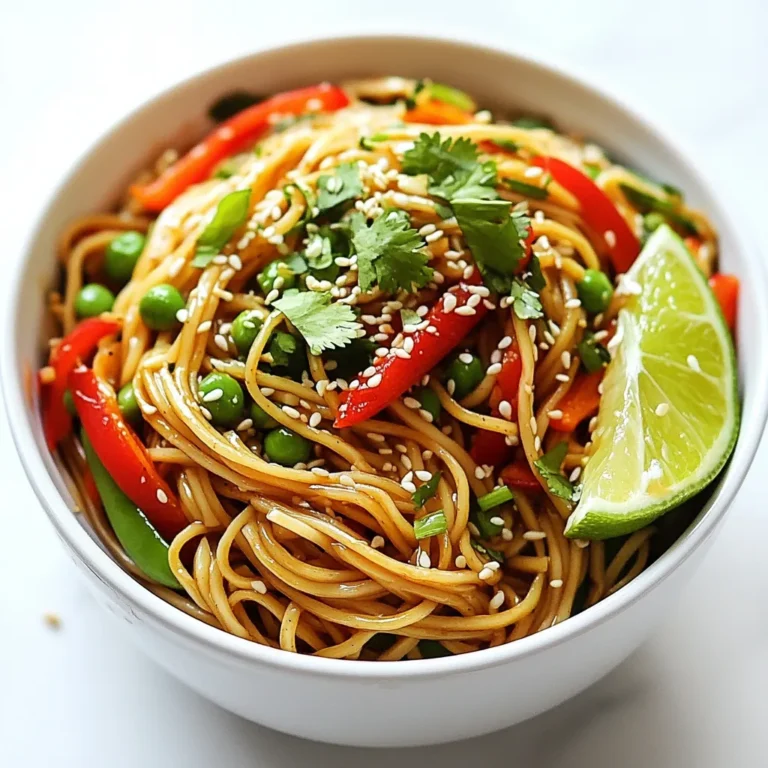
Spicy Sesame Soba Noodles Flavorful and Quick Meal

To make maple glazed salmon, you need a few key items. Here’s what you’ll use: - 4 salmon fillets - 1/4 cup pure maple syrup - 2 tablespoons soy sauce (or coconut aminos for gluten-free) - 1 tablespoon Dijon mustard - 2 cloves garlic, minced - 1 tablespoon fresh ginger, grated - Salt and pepper to taste - 1 tablespoon olive oil These ingredients blend well. The maple syrup adds sweetness. The soy sauce gives a savory touch. Garlic and ginger bring warmth and depth. You can add some extras for flavor and color. Here are good choices: - Fresh parsley, chopped (for garnish) - Lemon wedges (for serving) Garnishing with parsley brightens the dish. Lemon wedges add a fresh zing. Both make the meal more appealing. Having the right tools makes cooking easier. Here’s what you’ll need: - A whisk for mixing the marinade - A shallow dish or resealable bag for marinating - A baking sheet lined with parchment paper - An oven preheated to 400°F (200°C) These tools help ensure your salmon turns out perfectly. A whisk mixes flavors well, while parchment paper helps with easy cleanup. {{ingredient_image_1}} Start by making the marinade. In a small bowl, whisk together: - 1/4 cup pure maple syrup - 2 tablespoons soy sauce (or coconut aminos) - 1 tablespoon Dijon mustard - 2 cloves garlic, minced - 1 tablespoon fresh ginger, grated Mix these ingredients until they combine well. This mixture brings sweet and savory flavors to the salmon. Next, grab your salmon fillets. Place them in a shallow dish or a resealable plastic bag. Pour the marinade over the salmon. Make sure each piece is coated well. This step is key for flavor. You should let it sit for at least 30 minutes. If you have time, marinate for up to 2 hours in the fridge. This adds great depth to the taste. Preheat your oven to 400°F (200°C). While it heats, line a baking sheet with parchment paper. Lightly brush it with olive oil to stop the salmon from sticking. Remove the salmon from the marinade and let the excess drip off. Place the fillets on the baking sheet and throw away the leftover marinade. Season with salt and pepper. Bake for 12-15 minutes. The salmon should flake easily with a fork. If you want a nice finish, turn on the broiler for the last 2-3 minutes. Watch closely to avoid burning. After baking, let the salmon rest for a few minutes. Garnish with chopped parsley and serve with lemon wedges. Enjoy your meal! To find the best salmon, look for vibrant color. Fresh salmon should have a bright pink or orange hue. The flesh should feel firm and spring back when pressed. Smell it; fresh salmon should smell clean, like the ocean. Avoid fish with a strong or fishy odor. If buying fillets, check for even thickness. This helps it cook evenly. Wild-caught salmon often has a better taste than farmed, but both can be great. You can change the marinade to suit your taste. If you like it sweeter, add more maple syrup. Want a tangy kick? Try adding a bit more Dijon mustard. For spice, include red pepper flakes or fresh herbs. You can also swap soy sauce for coconut aminos to keep it gluten-free. Taste the marinade before using it. This helps you find the right balance for your palate. To know when salmon is done, check the color. It should be opaque and flake easily with a fork. The ideal cooking time is about 12-15 minutes at 400°F. If you prefer it slightly rare, aim for a light pink center. Using a meat thermometer helps too; 145°F is the safe internal temperature. If you want a crispy top, broil it for a few minutes at the end. Let the salmon rest for a few minutes before serving. This keeps it juicy and flavorful. Pro Tips Marinate Longer for Flavor: For the best flavor, marinate the salmon for up to 2 hours. This allows the ingredients to deeply penetrate the fish. Check for Freshness: Always choose fresh, high-quality salmon. Look for bright, moist fillets with a clean smell. Adjust Cooking Time: Salmon thickness can vary; adjust the baking time accordingly. Thicker fillets may need a few extra minutes. Experiment with Add-Ins: Feel free to add additional spices or herbs to the marinade, such as chili flakes for heat or fresh dill for a different flavor profile. {{image_2}} You can switch up the sauce for fun flavors. Try a teriyaki sauce for a sweet and savory twist. A spicy sriracha mix can add heat. If you love citrus, use orange juice with maple syrup. Each sauce gives the salmon a unique taste! Both grilling and baking work well for maple glazed salmon. Baking is easy and gives you even cooking. Preheating the oven to 400°F ensures your salmon cooks just right. Grilling adds a smoky flavor. For grilling, heat your grill to medium-high. Cook the salmon for about 6-8 minutes on each side. You can adjust the recipe to fit your needs. Use coconut aminos instead of soy sauce for a gluten-free option. For a lower-sugar dish, try agave syrup instead of maple syrup. If you need a dairy-free option, skip the butter and use olive oil. Enjoy the dish while meeting your dietary goals! To store leftover maple glazed salmon, first let it cool. Place the salmon in an airtight container. You can keep it in the fridge for up to three days. If you want to keep it longer, consider freezing it. Always label the container with the date. When reheating leftover salmon, I suggest using the oven for best results. Preheat your oven to 300°F (150°C). Place the salmon on a baking sheet and cover it with foil. Heat for about 10-15 minutes or until warmed through. This keeps it moist and tasty. You can also use the microwave, but be careful. Heat in short bursts to avoid overcooking. To freeze maple glazed salmon, wrap each piece tightly in plastic wrap. Then place it in a freezer bag. Remove as much air as possible to prevent freezer burn. You can freeze it for up to three months. When ready to eat, thaw it in the fridge overnight. Then reheat as mentioned above. This will help preserve its flavor and texture. Yes, you can use honey or agave syrup instead of maple syrup. Both have a sweet taste and will still complement the salmon well. However, keep in mind that each sweetener adds a slight flavor twist. Honey is sweeter, while agave is milder. Adjust the amount to your taste. I recommend marinating the salmon for at least 30 minutes. This allows the flavors to soak in. If you have more time, marinate for up to 2 hours in the fridge. More time means more flavor. Just be careful not to marinate too long, or the fish may become too salty or mushy. A few great side dishes pair nicely with the salmon. Here are some ideas: - Steamed asparagus - Garlic mashed potatoes - Quinoa salad - Roasted Brussels sprouts - Brown rice with herbs These sides balance the sweetness of the salmon. Each adds texture and flavor to your meal. Yes, salmon is very healthy! It is a great source of protein and healthy fats. Salmon is high in omega-3 fatty acids. These fats are good for your heart and brain. Eating salmon may also support skin health and help reduce inflammation in the body. It contains many vitamins and minerals, such as vitamin D and selenium. Enjoying salmon regularly can keep you feeling strong and healthy! This blog covered how to make maple glazed salmon from start to finish. You learned about key ingredients, step-by-step instructions, and tips for the best results. We also explored variations and storage tips to keep your meal fresh. Cooking salmon is easy and fun, and it’s healthy too. I encourage you to try different flavors and sides. Enjoy your cooking and impress your friends with this tasty dish!

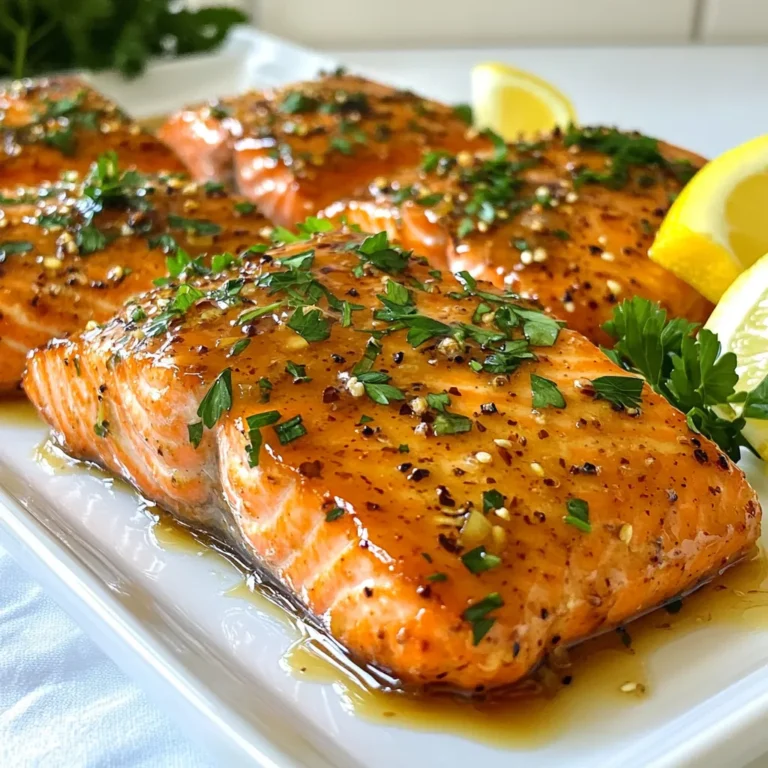
Maple Glazed Salmon Flavorful and Easy Recipe Guide

- 1 cup brewed coffee, cooled - 3 tablespoons cocoa powder - 1 teaspoon vanilla extract - 2 cups heavy whipping cream - 1 cup powdered sugar - 1 box (14 oz) chocolate wafer cookies - 2 tablespoons coffee granules (optional, for extra flavor) - Chocolate shavings or cocoa powder, for garnish To create a delicious mocha icebox cake, you need simple ingredients that pack a punch. Start with brewed coffee. Make sure it cools down. This adds rich flavor. Cocoa powder gives a deep chocolate taste. Vanilla extract brightens the mix. Next, we need heavy whipping cream. This will make our cake fluffy and smooth. Powdered sugar adds sweetness. It blends well with the cream. Chocolate wafer cookies are key for that classic texture. If you want a stronger coffee taste, add coffee granules. Lastly, think about your garnish. Chocolate shavings or a sprinkle of cocoa powder make it look fancy. With these ingredients, you are set to make a dessert that impresses! {{ingredient_image_1}} 1. In a medium bowl, whisk together: - 1 cup brewed coffee, cooled - 3 tablespoons cocoa powder - 1 teaspoon vanilla extract This mix should be smooth and well combined. If you want a bolder taste, add: - 2 tablespoons coffee granules (optional) 1. In a large bowl, pour in 2 cups heavy whipping cream. 2. Use an electric mixer on medium speed. Whip the cream until it starts to thicken. 3. Slowly add in 1 cup powdered sugar while whipping. 4. Stop when you see soft peaks forming. Be careful not to overwhip the cream. You want it light and fluffy. 1. Take a chocolate wafer cookie and dip it quickly into the coffee mixture. Make sure it soaks but does not get soggy. 2. Lay the dipped cookie on the bottom of a 9x9 inch baking dish. 3. Repeat this step, layering cookies side by side until the bottom is fully covered. 4. Spread a layer of whipped cream over the cookies. Smooth it out evenly. 5. Keep alternating layers of dipped cookies and whipped cream until you reach the top. 6. Finish with a big layer of whipped cream on top. 7. Cover the dish with plastic wrap. Refrigerate for at least 4 hours or overnight for the best flavor. 8. Before serving, add a garnish of chocolate shavings or a dusting of cocoa powder for a nice finish. To get a great texture in your mocha icebox cake, avoid overwhipping the cream. When you whip the cream, stop once you see soft peaks. Overwhipping makes the cream too stiff and less creamy. Soft peaks hold their shape but still feel light. For the cookies, dip them quickly into the coffee mixture. This helps them soak up flavor without getting too soggy. You want them soft, not mushy. To amp up the flavor, try adding a bit of cinnamon or nutmeg to the coffee mix. A touch of almond extract also works well. If you love coffee, stir in extra coffee granules. For those who don’t drink coffee, swap the coffee with milk or a nut milk. This keeps the dessert rich and tasty without the coffee flavor. Serve the cake on chilled plates for a cool touch. Chill the plates in your fridge before serving. This keeps the cake nice and cold. For a fun look, use chocolate shavings or a light dusting of cocoa powder on top as garnish. You could also add fresh berries for a bright pop of color. Pro Tips Chill Your Tools: For an even fluffier whipped cream, chill your mixing bowl and beaters in the refrigerator for about 15 minutes before whipping. Layering Technique: Ensure each cookie is dipped quickly in the coffee mixture to avoid sogginess, maintaining a perfect texture in each layer. Flavor Boost: For a richer mocha flavor, consider adding a splash of coffee liqueur or espresso powder to the coffee mixture. Presentation Perfection: Use a sharp knife to cut the icebox cake and wipe it clean between cuts for neat, beautiful slices. {{image_2}} You can change the flavor of your mocha icebox cake easily. Try adding mint extract for a fresh twist. Just use a few drops in the coffee mixture. Hazelnut flavor is also great! Use hazelnut coffee instead of brewed coffee. You can also mix in some chocolate hazelnut spread for extra creaminess. Switching cookies can change the cake's taste too. Use vanilla wafers or even ginger snaps. Each cookie type offers a new experience. Experiment to find your favorite! If you need a gluten-free version, use gluten-free cookies. Many brands offer chocolate wafers that fit this need. For a dairy-free option, use coconut cream instead of heavy whipping cream. It whips up nicely and adds a tropical touch. For those watching sugar intake, consider using stevia or monk fruit sweetener. These substitutes can keep the sweetness without the calories. Just adjust the amount to taste. Making a holiday-themed mocha icebox cake can be fun! For Halloween, add orange food coloring to the whipped cream. You can also use spooky sprinkles on top. For Christmas, sprinkle crushed candy canes on the whipped cream. This adds color and a minty flavor. In the fall, pumpkin spice can be a great addition. Just mix a teaspoon into the coffee mixture for a warm touch. To store your mocha icebox cake, cover it tightly with plastic wrap. This keeps it fresh. Place it in the fridge right after serving. The cake lasts about 3 to 4 days in the fridge. If you see any leftovers, be sure to store them quickly. You can freeze slices or the whole cake. Wrap each slice in plastic wrap. Then, put them in a freezer bag. For the whole cake, wrap it well and place it in a freezer-safe dish. It stays good for up to 3 months in the freezer. When you are ready to eat it, take it out and thaw it in the fridge overnight. This keeps the texture nice. Check for signs of spoilage before eating. If the cake smells sour or has a weird texture, do not eat it. If you see any mold on the whipped cream or cookies, throw it away. Always trust your senses; if it seems off, it's best to skip it. Mocha icebox cake needs to chill for at least 4 hours. For the best taste, chill it overnight. This time allows the cookies to soak and soften. It also helps the flavors blend well together. Yes, you can use different types of cookies. Some people like to use graham crackers or shortbread. These options change the flavor and texture. Chocolate cookies add richness, while vanilla cookies give a milder taste. Just ensure they are firm enough to hold layers. Mocha icebox cake can fit special diets with some tweaks. For gluten-free, use gluten-free cookies. Vegan options are possible by swapping cream for coconut cream. You can also find vegan cookies. For keto, opt for low-carb cookies and a sugar substitute for the whipped cream. Adjustments make it easier for everyone to enjoy this treat! This blog post guides you through making a mocha icebox cake. We covered the must-have ingredients, step-by-step instructions, helpful tips, and creative variations. You now have the tools to craft a delicious dessert that suits everyone's tastes. Remember to store your cake properly for the best flavor and freshness. Get creative with flavors and toppings. Enjoy sharing this treat with friends and family. Your dessert will surely impress!

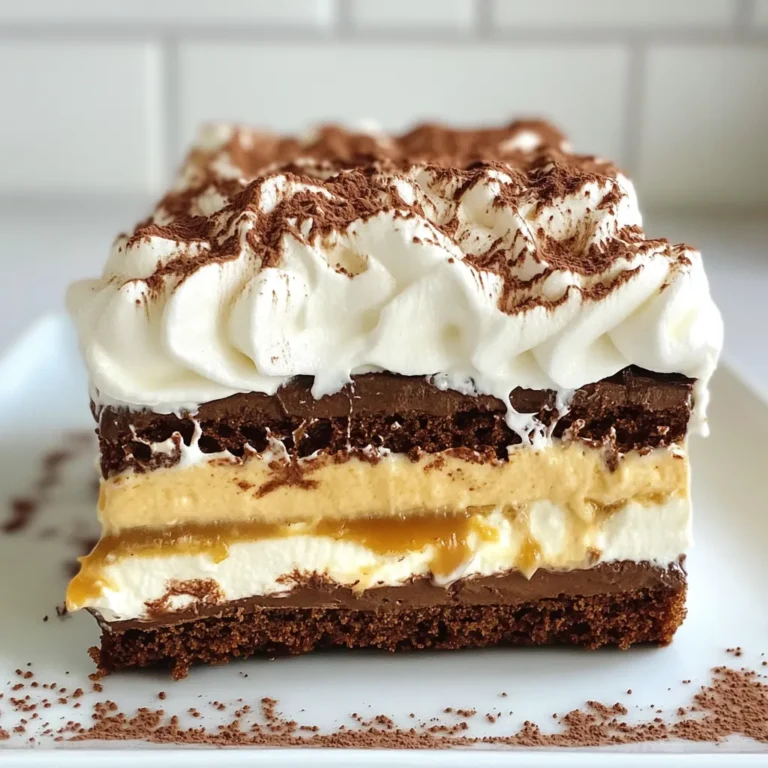
Mocha Icebox Cake Delight Quick and Easy Recipe

PREV 1 … 44 45 46 … 57 NEXT
quick dish kitchen

explore

DessertsDinnerAppetizersDrinks

Our Policies

  • Cookie Policy
  • Copyright Policy
  • Disclaimer
  • GDPR Policy
  • Terms Of Use
Back to Top
  • About
  • Contact Us
  • Privacy Policy
© 2025 quick dish kitchen