FREE DINNER EBOOK! Get your copy!
  • Cookie Policy
  • GDPR Policy
  • Disclaimer
  • Terms Of Use
  • Visit my other site: Fun Cookie Recipes
quick dish kitchen
  • Home
  • Dinner
  • Desserts
  • Drinks
  • Appetizers
  • Contact
  • About
  • Privacy Policy
  • Home
  • Dinner
  • Desserts
  • Drinks
  • Appetizers
  • Contact
  • About
  • Privacy Policy
  • Cookie Policy
  • GDPR Policy
  • Disclaimer
  • Terms Of Use
Visit my other site: Fun Cookie Recipes

HOME / CATEGORIES /

Latest

- 1 pound large shrimp, peeled and deveined - 1 cup orzo pasta - 3 tablespoons olive oil - 4 cloves garlic, minced - Zest and juice of 1 lemon - 1 cup cherry tomatoes, halved - 2 cups fresh spinach - ¼ cup fresh parsley, chopped - Salt and pepper to taste - 1 teaspoon red pepper flakes - Grated Parmesan cheese for serving - Large pot for boiling orzo - Large skillet for cooking shrimp - Measuring cups and spoons - Knife and cutting board - Colander for draining orzo {{ingredient_image_1}} First, fill a large pot with water and add salt. Bring it to a boil over high heat. Then, add 1 cup of orzo pasta. Cook the orzo according to the package instructions until it is al dente. This usually takes about 8 to 10 minutes. Once done, drain the orzo and set it aside. This step is key to making your dish tasty and filling. Next, grab a large skillet and pour in 3 tablespoons of olive oil. Heat the oil over medium heat. Add 4 cloves of minced garlic and, if you like, 1 teaspoon of red pepper flakes. Sauté these for about 1 minute until you smell the garlic. Then, add 1 pound of large shrimp to the skillet. Cook the shrimp for 2 to 3 minutes on each side. They should turn pink and opaque. Season with salt and pepper to taste. This gives the shrimp great flavor. Now it's time to mix everything. Stir in the zest and juice of 1 lemon, along with 1 cup of halved cherry tomatoes and the cooked orzo. Toss all these ingredients together until they are well combined and heated through. After that, add 2 cups of fresh spinach. Stir until the spinach is wilted. Remove the skillet from heat. To finish, garnish with ¼ cup of chopped parsley and more lemon zest if you want. Serve right away and add grated Parmesan cheese if you like. Enjoy your meal! To get the best taste from your Lemon Garlic Shrimp Orzo, use fresh ingredients. Fresh shrimp, garlic, and lemon make a big difference. I love to add lemon zest. It gives a bright, zesty kick. You can also try different herbs like basil or dill for a twist. If you like heat, add more red pepper flakes. Start with a pinch and taste as you go. If you prefer a milder dish, skip the red pepper flakes. You can also add a sprinkle of black pepper for flavor without too much heat. No orzo? Use any small pasta like couscous or quinoa. If you can't find fresh spinach, try kale or arugula. Don't have cherry tomatoes? Diced regular tomatoes work too. You can customize this dish to fit what you have. Just keep the main flavors—lemon, garlic, and shrimp—strong, and you'll be set! Pro Tips Fresh Shrimp is Key: Use the freshest shrimp you can find for the best flavor and texture. If possible, purchase shrimp that is still in the shell for maximum freshness. Perfectly Cooked Orzo: Be careful not to overcook the orzo; it should be al dente to hold its shape and texture when mixed with the shrimp and vegetables. Customize the Heat: Adjust the amount of red pepper flakes to your taste. If you prefer a milder dish, you can omit them entirely. Add More Veggies: Feel free to add other vegetables such as bell peppers or zucchini for added color and nutrition. Just sauté them with the garlic before adding the shrimp. {{image_2}} You can boost the nutrition in this dish. Add vegetables like broccoli, zucchini, or bell peppers. They add color and crunch. You can also toss in some peas for extra sweetness. These veggies mix well with shrimp and orzo. If you want a different protein, try chicken or scallops. Both options work great with the lemon and garlic flavors. For a vegetarian twist, use chickpeas or tofu instead of shrimp. They absorb the sauce well and add a hearty texture. You can easily make this dish gluten-free. Swap the orzo for gluten-free pasta or quinoa. Check the package to make sure it fits your needs. The rest of the ingredients remain the same, keeping the dish just as tasty. Store your Lemon Garlic Shrimp Orzo in an airtight container. It stays fresh for 3 days in the fridge. Let it cool to room temperature before sealing. This helps keep the shrimp tender and the flavors bright. You can freeze Lemon Garlic Shrimp Orzo for up to 2 months. Use a freezer-safe container or bag. Make sure to remove as much air as you can. When ready to eat, thaw it overnight in the fridge before reheating. To reheat, place the orzo in a skillet over medium heat. Add a splash of water or broth to keep it moist. Stir until heated through, about 5-7 minutes. You can also microwave it in short bursts, stirring in between. Enjoy it warm for the best taste! Yes, you can use frozen shrimp. Just thaw them first. Place the shrimp in a bowl of cold water for about 15 minutes. This helps them thaw evenly. After thawing, pat them dry with a paper towel. This step helps prevent excess water in your dish. Lemon garlic shrimp orzo pairs well with many sides. Here are a few ideas: - A fresh green salad - Steamed broccoli or asparagus - Garlic bread for dipping - A light lemon vinaigrette These options will balance the flavors and add more color to your meal. Store any leftovers in an airtight container. Keep them in the fridge for up to three days. When reheating, add a splash of water or broth. This helps keep the orzo moist. You can also heat it in a skillet or microwave. Enjoy your delicious meal again! This blog covered how to make Lemon Garlic Shrimp Orzo. You learned about key ingredients, cooking steps, and tips for great flavor. We explored healthy add-ins and ways to adjust spice levels. I shared how to store leftovers safely and even answered common questions. Remember, cooking is fun and you can make this dish your own. Enjoy creating something delicious!

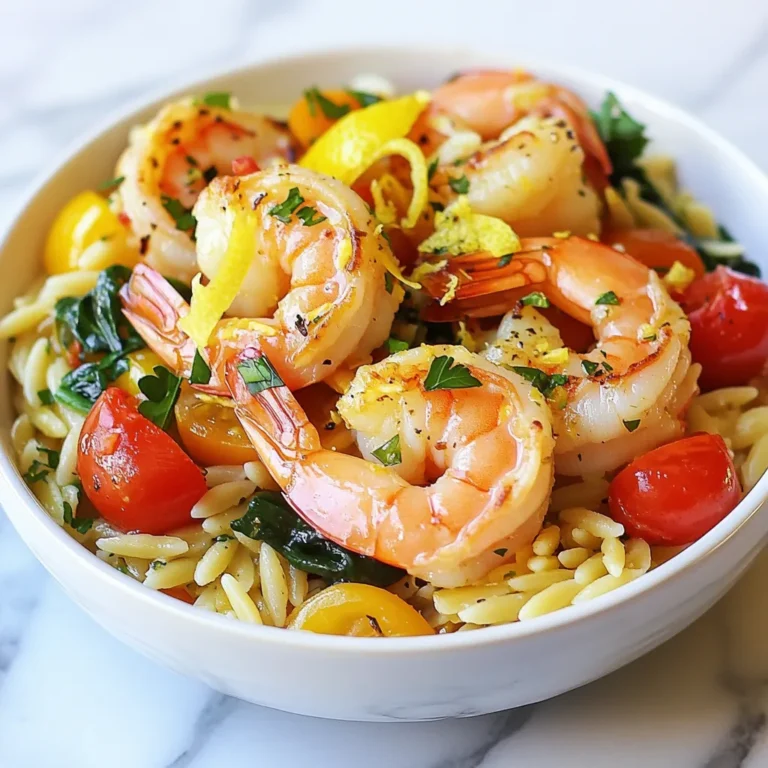
Lemon Garlic Shrimp Orzo Flavorful and Easy Recipe

To make Funfetti Sugar Cookie Bars, you need the following ingredients: - 2 ½ cups all-purpose flour - 1 teaspoon baking soda - ½ teaspoon baking powder - 1 teaspoon salt - 1 cup unsalted butter, softened - 1 cup granulated sugar - ½ cup brown sugar, packed - 2 large eggs - 2 teaspoons vanilla extract - ½ cup rainbow sprinkles (plus more for topping) - 1 cup frosting (store-bought or homemade) Each ingredient plays a key role. The all-purpose flour gives the bars structure. Baking soda and baking powder help them rise. The salt enhances the flavors and balances the sweetness. Softened butter adds richness and moisture. Granulated sugar and brown sugar provide sweetness and a hint of caramel flavor. Eggs bind everything together. Vanilla extract adds a warm aroma. Rainbow sprinkles make these bars fun and festive. Lastly, frosting adds a creamy finish. When you gather these ingredients, you set the stage for a fun baking experience. Make sure to measure them accurately for the best results. {{ingredient_image_1}} Start by preheating your oven to 350°F (175°C). This step is key to baking. Next, grab a 9x13-inch baking pan. Line it with parchment paper. Make sure some paper hangs over the edges. This makes it easy to lift the bars out later. In a medium bowl, whisk together the dry ingredients. Combine 2 ½ cups of all-purpose flour, 1 teaspoon of baking soda, ½ teaspoon of baking powder, and 1 teaspoon of salt. Mixing these well ensures an even rise. Set this bowl aside for now. In a large mixing bowl, add 1 cup of softened unsalted butter. Then, pour in 1 cup of granulated sugar and ½ cup of packed brown sugar. Beat these ingredients together for about 2-3 minutes. The mix should look light and fluffy. This is important for the cookie texture. Now, add in 2 large eggs, one at a time. Mix well after each egg. Next, pour in 2 teaspoons of vanilla extract. Blend until everything is combined. Gradually add the dry mixture to the wet ingredients. Mix on low speed until just combined. Be careful not to overmix. Gently fold in ½ cup of rainbow sprinkles with a spatula. You want them evenly spread without breaking them. Once mixed, spread the cookie dough into your prepared baking pan. Smooth the top with a spatula. It should look even and ready to bake. Place the pan in your preheated oven. Bake for 20-25 minutes. The edges should turn golden brown. To check for doneness, poke a toothpick in the center. If it comes out clean, the bars are ready. Let them cool in the pan for about 15 minutes. After that, lift them out using the parchment paper. Cool completely on a wire rack. To make the best Funfetti sugar cookie bars, follow these steps: - Use softened butter. It blends well with sugars, making your bars light. - Measure flour correctly. Too much flour makes them dry. Use a spoon to scoop flour into a cup, then level it off. - Don't overmix the dough. Mix until just combined to keep the bars soft. - Bake at 350°F for 20-25 minutes. Watch for golden edges and a clean toothpick. Here are some common mistakes that can ruin your cookie bars: - Skipping the parchment paper. It helps with easy removal and prevents sticking. - Using cold eggs or butter. Room temperature ingredients mix better and create a smoother dough. - Overbaking. Keep an eye on the time. Remove them when the center is set. - Not folding in the sprinkles gently. This keeps the colors bright and pretty. Make your cookie bars stand out with these fun ideas: - Spread a thick layer of frosting. Use a spatula for smoothness. - Add extra rainbow sprinkles on top for a festive look. - Cut bars into fun shapes using cookie cutters. - Serve on a colorful plate. It makes the bars more inviting. Pro Tips Chill the Dough: For thicker and chewier bars, chill the cookie dough in the refrigerator for 30 minutes before baking. Use Parchment Paper: Lining the baking pan with parchment paper not only helps with easy removal but also prevents sticking. Don’t Overmix: Mix your ingredients until just combined to keep the cookie bars soft and tender. Customize Your Sprinkles: Feel free to use different colored sprinkles or themed sprinkles for holidays to make the bars festive! {{image_2}} You can use many frostings on Funfetti Sugar Cookie Bars. I love cream cheese frosting. It adds a tangy twist. Vanilla buttercream is another classic choice. It is rich and sweet. You can also try chocolate frosting for a fun contrast. For something lighter, whipped cream works well. You can even mix in some sprinkles into your frosting for added flair! If you want a healthier treat, try these swaps. Use coconut oil instead of butter. It adds a nice flavor and is dairy-free. You can also use less sugar. Replacing half the sugar with applesauce is a great idea. For a gluten-free version, use almond flour or a gluten-free blend. These changes keep the taste but lower the calories. You can easily change the flavor of these bars! Try adding chocolate chips for a sweet surprise. White chocolate chips also work great. Chopped nuts like walnuts or pecans add crunch. For a fruity touch, mix in dried fruit like cranberries. You can even change the sprinkles to match your theme or favorite colors! To keep your Funfetti Sugar Cookie Bars fresh, store them in an airtight container. You can also use plastic wrap to cover them tightly. This helps keep them soft and moist. Avoid placing them in direct sunlight or warm areas. When stored properly, these cookie bars last about a week at room temperature. If you want them to last longer, consider freezing them. They may lose some texture after a week, but they will still taste great. To freeze your Funfetti Sugar Cookie Bars, first let them cool completely. Then, cut them into squares. Wrap each square in plastic wrap and place them in a freezer-safe bag. They can last up to three months in the freezer. When ready to enjoy, simply thaw them at room temperature for about an hour. Yes, you can. Use applesauce or mashed bananas instead of eggs. For each egg, use 1/4 cup of applesauce or 1/2 banana. This will keep your bars moist and sweet. If you want to avoid butter, use coconut oil or margarine. Both options provide a rich flavor. You can also try unsweetened applesauce for a lighter version. To make frosting, mix 1/2 cup of softened butter with 2 cups of powdered sugar. Add 2 tablespoons of milk and 1 teaspoon of vanilla extract. Beat until smooth and creamy. Adjust milk for desired texture. Yes, you can use a gluten-free all-purpose flour blend. Make sure it has xanthan gum to help with texture. This will keep your cookie bars soft and delicious. These cookie bars are perfect for parties, birthdays, and family gatherings. They brighten up any event with their colorful sprinkles. Serve them at bake sales or picnics for a fun treat! You now have all the steps to bake delicious funfetti cookie bars. We covered the key ingredients, detailed instructions for mixing and baking, and ways to decorate. You also learned tips for storage and answers to common questions. I hope these ideas spark your creativity in the kitchen. Enjoy baking and sharing these tasty treats with friends and family!

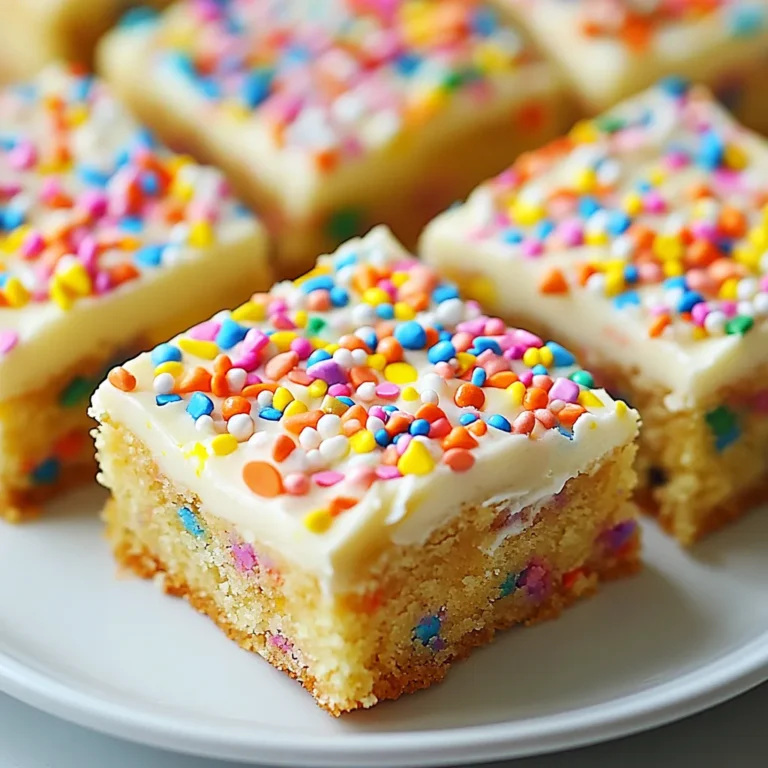
Funfetti Sugar Cookie Bars Irresistible and Sweet Treat

To make creamy spinach gnocchi, gather these key ingredients: - 1 pound store-bought gnocchi - 2 cups fresh spinach, chopped - 1 cup heavy cream - 1 tablespoon olive oil - 1 clove garlic, minced - 1/2 cup grated Parmesan cheese - 1/4 teaspoon nutmeg - Salt and pepper to taste - Freshly cracked black pepper for garnish - Optional: 1/4 cup sun-dried tomatoes, chopped These ingredients combine to create a rich and tasty dish. The gnocchi gives a soft texture while the spinach adds freshness. If you want to mix things up, consider these options: - Use frozen spinach instead of fresh. - Swap heavy cream for half-and-half for a lighter sauce. - Try different cheeses, like mozzarella or feta. - Add sun-dried tomatoes for a tangy twist. These swaps can change the dish's flavor while keeping it delicious. Each serving of creamy spinach gnocchi has about: - Calories: 450 - Protein: 15g - Carbohydrates: 40g - Fat: 25g - Fiber: 2g This dish is rich and filling. It provides a good balance of fats and carbs, making it a satisfying meal. Enjoy your creamy spinach gnocchi with a side salad for extra nutrients! {{ingredient_image_1}} First, fill a large pot with water and add salt. Bring it to a boil. Add the gnocchi to the pot. Cook them according to the package directions, usually for 2 to 3 minutes. You will know they are done when they float to the top. Drain them and set aside. Next, heat olive oil in a large skillet over medium heat. Add minced garlic to the hot oil. Sauté it for about 30 seconds until it smells great. Then, add the chopped spinach. Cook the spinach for 2 to 3 minutes until it wilts. If you want extra flavor, add sun-dried tomatoes at this stage. Stir everything well to mix. Now, lower the heat and pour in the heavy cream. Stir the cream as it heats up. Bring it to a gentle simmer. Add grated Parmesan cheese and nutmeg for a rich flavor. Season with salt and pepper to taste. Keep stirring until the cheese melts and the sauce becomes creamy. Add the cooked gnocchi to the creamy sauce in the skillet. Gently toss them to coat evenly. Heat everything through for another 2 to 3 minutes. This step helps the gnocchi soak up the flavors. To serve, divide the gnocchi among plates. Garnish with freshly cracked black pepper and more Parmesan cheese if you like. For a lovely touch, add fresh herbs like basil or parsley. You can also serve garlic bread on the side for a full meal. Enjoy! To boost the taste of your creamy spinach gnocchi, try these tips: - Use fresh garlic for a stronger flavor. - Add a squeeze of lemon juice for brightness. - Mix in crushed red pepper for a bit of heat. - Consider adding fresh herbs like basil or thyme. - Sun-dried tomatoes add a sweet, tangy kick. These small changes can make your dish even better. Avoid these common errors: - Overcooking the gnocchi makes them mushy. - Not salting the water can lead to bland gnocchi. - Skipping the nutmeg can dull the sauce's flavor. - Forgetting to toss the gnocchi gently can break them. By keeping these tips in mind, you'll have a delicious dish. Use these techniques for perfect gnocchi: - Cook gnocchi in boiling, salted water for 2-3 minutes. - Use a slotted spoon to remove gnocchi when they float. - Sauté garlic for just 30 seconds to avoid burning. - Add cream slowly to prevent splattering. - Toss the gnocchi and sauce carefully to avoid breakage. These techniques ensure your dish looks and tastes great. Pro Tips Fresh Spinach is Best: Use fresh spinach for a vibrant color and flavor. If you're using frozen spinach, make sure to thaw and drain it well to avoid excess water in the sauce. Perfectly Creamy Sauce: To achieve a rich and creamy sauce, add the heavy cream gradually and allow it to simmer gently. This will help prevent it from curdling. Customize with Protein: Consider adding grilled chicken or shrimp for extra protein. This transforms the dish into a hearty meal. Gnocchi Cooking Tip: Gnocchi is done when it floats to the surface of the boiling water. Be sure not to overcook to maintain its delicate texture. {{image_2}} You can make this dish fully plant-based. Replace the heavy cream with coconut cream or cashew cream. Use nutritional yeast instead of Parmesan for a cheesy taste. Add more veggies like mushrooms or bell peppers for extra flavor. For a heartier meal, add proteins like chicken or shrimp. Cook shrimp in the skillet until pink and tender. For chicken, sauté bite-sized pieces until cooked through. Toss the cooked protein with the gnocchi to create a filling dish. If you need a gluten-free version, use gluten-free gnocchi. You can find it in most stores. Make sure to check the labels for any hidden gluten. The rest of the recipe stays the same, so you still get that creamy goodness. After enjoying your creamy spinach gnocchi, store any leftovers in an airtight container. Make sure to let it cool down first. Place the container in your fridge. It will stay fresh for up to three days. For the best taste, eat it within two days. To reheat your gnocchi, you can use the stove or microwave. If using the stove, place the gnocchi in a skillet. Add a splash of cream or water. Heat over low heat, stirring gently. This helps keep the sauce creamy. If you choose the microwave, heat in short bursts. Stir in between to ensure it warms evenly. You can freeze creamy spinach gnocchi for later. To do this, let it cool completely. Then, transfer it to a freezer-safe container. It can last for up to three months. When you're ready to eat it, thaw it overnight in the fridge. Reheat using the instructions above. Yes, you can use frozen gnocchi. Frozen gnocchi cooks quickly and is very easy to use. Just drop them into boiling water. Cook them until they float, usually about 2-3 minutes. Then, follow the same steps in the recipe. It will taste great! Creamy spinach gnocchi pairs well with many sides. Try garlic bread or a fresh salad. A simple green salad adds crunch and freshness. You can also serve it with grilled chicken or shrimp for extra protein. To know if gnocchi is done, watch for them to float. When they rise to the top, they are ready. It usually takes about 2-3 minutes. You want them soft but not mushy. If you don’t have Parmesan, try Pecorino Romano or Grana Padano. Both offer a nice sharp flavor. You can also use mozzarella for creaminess or nutritional yeast for a vegan option. This keeps the dish rich and tasty! This blog post covered how to make creamy spinach gnocchi, including key ingredients, step-by-step instructions, and tips. You learned about optional ingredients and variations to suit your taste. I shared simple ways to store and reheat leftovers. Cooking should be fun and tasty. Experiment with your flavors and enjoy this dish! Remember, the best meals come from trying new things.

Creamy Spinach Gnocchi Quick and Flavorful Dish

To make a delightful Cranberry Orange Breakfast Bread, gather these key items: - 2 cups all-purpose flour - 1 cup fresh cranberries, chopped - 1/2 cup sugar - 1/2 cup unsalted butter, softened - 2 large eggs - 1/2 cup orange juice (freshly squeezed if possible) - Zest of 1 orange - 1 teaspoon baking powder - 1/2 teaspoon baking soda - 1/2 teaspoon salt - 1/2 teaspoon ground cinnamon These ingredients work together to create a loaf that is moist, tangy, and sweet. You can add these extras to boost flavor and texture: - 1/4 teaspoon nutmeg (optional) - 1/2 cup chopped walnuts or pecans (optional) - 1/2 cup powdered sugar (for glaze) - 1-2 tablespoons orange juice (for glaze) The nuts give a nice crunch, while the glaze adds sweetness. If you have allergies or dietary needs, consider these swaps: - Use gluten-free flour for a gluten-free option. - Replace butter with coconut oil or vegan butter for dairy-free. - Substitute eggs with flaxseed meal mixed with water for a vegan option. These adjustments keep the bread tasty and safe for all diets. {{ingredient_image_1}} Start by preheating your oven to 350°F (175°C). This is the perfect temperature for baking. Next, take a 9x5-inch loaf pan and grease it well. This will help your bread release easily after baking. In a large bowl, combine the dry ingredients. Whisk together 2 cups of all-purpose flour, 1 teaspoon of baking powder, 1/2 teaspoon of baking soda, and 1/2 teaspoon of salt. Add in 1/2 teaspoon of ground cinnamon and 1/4 teaspoon of nutmeg if you want a warm flavor. Mix these well to ensure even distribution. In another bowl, cream together 1/2 cup of softened unsalted butter and 1/2 cup of sugar. Use an electric mixer or a whisk for about 3-4 minutes. The mixture should be light and fluffy. This step is key for a soft texture in your bread. Next, add in 2 large eggs, one at a time. Beat well after each addition. Then, mix in 1/2 cup of freshly squeezed orange juice and the zest of 1 orange. This will give your bread a bright, citrusy flavor. Gradually add the dry mixture to the wet mixture. Stir gently until no streaks of flour remain. Be careful not to over-mix. This keeps the bread light and fluffy. Now, gently fold in 1 cup of chopped fresh cranberries and 1/2 cup of chopped walnuts or pecans, if you choose. Make sure they are evenly distributed throughout the batter. This adds a nice texture and flavor to the bread. Pour the batter into the prepared loaf pan. Smooth the top with a spatula. Bake in the preheated oven for 55-65 minutes. Check with a toothpick; it should come out clean when the bread is done. After baking, let it cool in the pan for about 10 minutes. Then transfer it to a wire rack to cool completely. For the glaze, mix 1/2 cup of powdered sugar with 1-2 tablespoons of orange juice. Adjust the juice to get the right drizzling consistency. Once the bread cools, drizzle this sweet glaze over the top. This step adds a beautiful shine and extra flavor. To keep your cranberry orange breakfast bread light and fluffy, follow these tips: - Don’t over-mix: Mix the wet and dry ingredients just until combined. - Use fresh ingredients: Fresh cranberries and orange juice make a big difference. - Room temperature eggs: Let your eggs sit out for a bit. They mix better this way. - Sift your flour: Sifting can help add air to the flour, making it lighter. Adding extra flavors can elevate your bread: - Cinnamon and nutmeg: These spices pair well with the cranberries and orange. - Chopped nuts: Walnuts or pecans add great crunch. - Glazing options: Use a mix of orange juice and powdered sugar for a sweet finish. - Serve with butter: A pat of butter brings out the flavors nicely. Enjoy your bread in several fun ways: - Slice and serve: Present your bread on a colorful platter with orange slices. - Toast it: Lightly toasting the slices adds warmth and depth. - Pair with yogurt: Add a side of yogurt for a creamy balance. - Add fresh fruit: Serve with fresh berries to brighten your plate. Pro Tips Use Fresh Cranberries: Fresh cranberries provide a tartness that complements the sweetness of the bread. If using frozen, do not thaw them to prevent excess moisture. Optimal Mixing: Mix the batter just until combined to ensure a light and fluffy texture. Over-mixing can lead to a dense loaf. Cooling Time: Allow the bread to cool in the pan for a few minutes before transferring it to a wire rack. This helps maintain its shape. Glaze Variations: Experiment with adding orange zest to the glaze for an extra burst of citrus flavor, or substitute lemon juice for a different twist. {{image_2}} You can mix up your cranberry orange breakfast bread by adding other fruits. Dried fruits like raisins or apricots add sweetness. Chopped apples or pears can give a nice crunch. If you want a tropical twist, try adding pineapple or mango. Each fruit brings its own unique taste and texture. This way, you can customize the bread to fit your mood. To make this bread gluten-free, swap all-purpose flour for a gluten-free blend. Ensure the blend has xanthan gum for better texture. For a dairy-free option, replace butter with coconut oil or a dairy-free spread. Use a non-dairy milk instead of orange juice if desired. These changes make the bread suitable for those with dietary needs, without losing flavor. The glaze is a fun part of this recipe. While the orange glaze is sweet, you can try other flavors. A lemon glaze will give a bright twist. For a richer taste, a vanilla glaze works well too. Just mix powdered sugar with your chosen juice or extract. You could even add a splash of bourbon for a unique twist. Each glaze option adds its own charm to the bread. To keep your cranberry orange breakfast bread fresh, wrap it tightly in plastic wrap. You can also place it in an airtight container. This method keeps the bread moist for about three days at room temperature. If you live in a humid area, consider storing it in the fridge to prevent mold. Just remember that the fridge can dry out the bread, so wrap it well. If you want to save some for later, freezing is a great option. First, let the bread cool completely. Then, slice it into pieces. Wrap each slice in plastic wrap. After that, place the wrapped slices in a freezer-safe bag. This way, you can pull out just what you need. The bread can stay in the freezer for up to three months. When you're ready to eat, just thaw it in the fridge or at room temperature. To enjoy your bread warm, preheat your oven to 350°F (175°C). Place the slices on a baking sheet and heat for about 10 minutes. This will help revive the soft texture and flavor. If you're in a hurry, you can also use a microwave. Heat each slice for about 15-20 seconds. Just be careful not to overheat, as it can make the bread tough. Enjoy it warm with a little butter or extra glaze! Yes, you can use frozen cranberries. They work well in this bread. Just do not thaw them before adding. This keeps the bread moist and adds a burst of flavor. Frozen cranberries may make the batter a bit more wet, so you might need to bake it a few extra minutes. You can check if the bread is done by using a toothpick. Insert it into the center of the loaf. If it comes out clean or with a few crumbs, the bread is ready. If it has wet batter on it, bake for a few more minutes. The edges will also look golden brown. There are many uses for leftover orange juice! You can use it in smoothies for a fresh taste. It can also be added to salad dressings for extra flavor. Try using it in marinades for chicken or fish. You can even mix it into yogurt for a tasty treat. You can easily make this bread vegan. Replace the eggs with flaxseed meal or applesauce. Use plant-based butter instead of regular butter. For the orange juice, make sure it's fresh. This way, you still get that lovely flavor without using animal products. The bread will still be delicious! Cranberry orange breakfast bread is a delightful treat. We explored key ingredients, step-by-step instructions, and helpful tips. You can customize the recipe with various fruits and glazes. Remember, proper mixing makes a light bread, and storing it well keeps it fresh. Whether you're serving it at breakfast or enjoying it as a snack, this bread is sure to impress. With a few simple adjustments, you can tailor it to your taste. Enjoy making this tasty and aromatic bread!

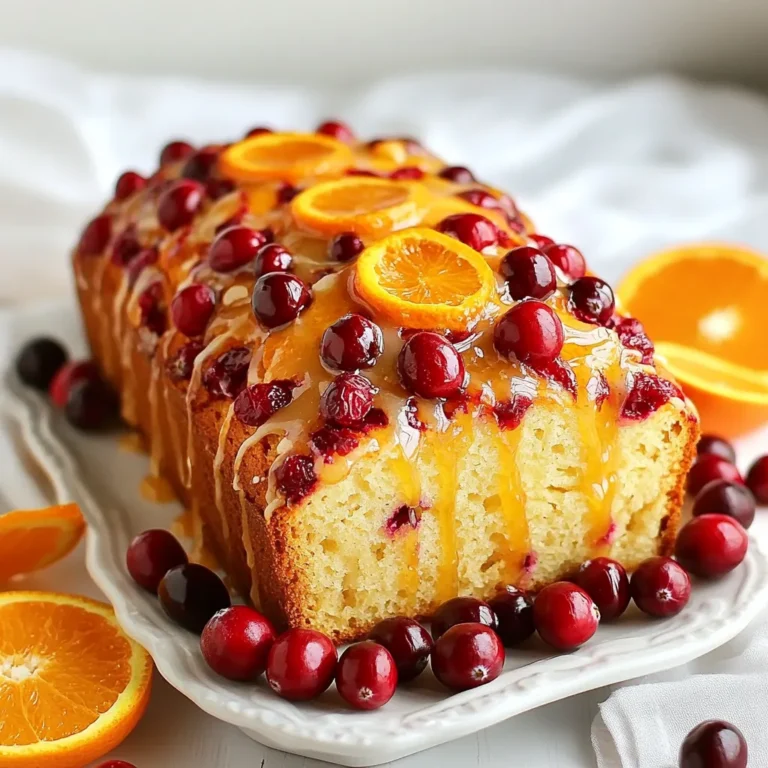
Cranberry Orange Breakfast Bread Flavorful Morning Treat

- 1 cup rolled oats - 1/2 cup almond butter (or peanut butter) - 1/4 cup honey or maple syrup - 1 teaspoon vanilla extract - 1 teaspoon ground cinnamon - 1/2 teaspoon ground ginger - 1/4 teaspoon ground cardamom - 1/4 teaspoon ground cloves - 1/4 teaspoon black pepper - 1/4 cup mini chocolate chips (optional) - 1/4 cup chopped nuts (e.g., almonds or walnuts) - A pinch of salt These ingredients come together to create a delicious and healthy snack. The rolled oats serve as a solid base. They give the bites a chewy texture and provide fiber. Almond butter or peanut butter adds creaminess and healthy fats. Next, honey or maple syrup offers a touch of sweetness. Vanilla extract enhances the flavor, making it rich and inviting. The ground spices are what truly make these bites special. Cinnamon adds warmth, while ginger gives a little zest. Cardamom and cloves add depth, and black pepper provides a hint of heat. You can also include optional mini chocolate chips or chopped nuts for extra crunch and flavor. Don’t forget the pinch of salt! It balances the sweetness and enhances the overall taste. Each ingredient plays a vital role in making these Vanilla Chai Energy Bites a truly delightful snack. {{ingredient_image_1}} First, gather all your ingredients. You will need rolled oats, almond butter, honey or maple syrup, and vanilla extract. In a large mixing bowl, combine these base ingredients. Stir them until you see a thick mixture form. Next, it’s time to add the spices. Grab ground cinnamon, ginger, cardamom, cloves, and black pepper. Add each spice to the bowl and mix well. This step is key for flavor. You want every bite to taste just right. If you want extra texture, fold in optional ingredients. Mini chocolate chips and chopped nuts work great. They add crunch and sweetness. Gently mix these into your mixture until well combined. Now, let’s shape the mixture into balls. Use your hands to form small bites, about one inch in size. If your mixture feels too sticky, dampen your hands with a little water. This helps form the bites without making a mess. Once shaped, place the energy bites on a parchment-lined baking sheet or plate. This makes it easier to move them later. You need to firm up the bites. Refrigerate them for about 30 minutes. This helps them hold their shape. For storage, keep any leftover bites in an airtight container. They last in the fridge for up to a week. If you want to save them longer, freeze them. They store well in the freezer for even more time. Enjoy your healthy snack! To make your Vanilla Chai Energy Bites truly shine, start with sweetness. You can adjust the honey or maple syrup to your taste. If you like sweet, add more. For less sweetness, cut back a bit. Next is spice. The mix of cinnamon, ginger, cardamom, cloves, and black pepper gives these bites their chai flavor. Feel free to tweak the amounts. If you love ginger, add a pinch more. If you want less heat, cut back on the black pepper. Texture is key too. You want your bites to be chewy, not dry. If your mixture feels too dry, add a bit more almond butter. If it’s too sticky, add a few oats. This helps you find the perfect balance. One mistake is overmixing the ingredients. If you mix too much, your bites may not hold together well. Stir just until everything is combined. Another mistake is not chilling the bites long enough. Chilling lets them firm up. If you skip this step, they might fall apart when you eat them. Give them at least 30 minutes in the fridge for the best results. Pro Tips Storage Tip: Keep these energy bites in an airtight container to maintain freshness and texture. Customization Tip: Feel free to experiment with different nut butters or add-ins like dried fruits or seeds for a unique twist. Chilling Tip: Allowing the bites to chill for longer than 30 minutes can help them firm up even more, making them easier to handle. Serving Tip: These bites are perfect for on-the-go snacks or as a pre-workout boost; pack them in your gym bag! {{image_2}} You can easily make Vanilla Chai Energy Bites fit different diets. For vegan options, swap honey with maple syrup. This keeps the bites sweet without using animal products. Instead of almond butter, try sunflower seed butter. It’s nut-free and still creamy. If you need gluten-free bites, use certified gluten-free oats. Most oats are safe, but a few may have cross-contact. Always check the label to be sure. You can change the flavors of your energy bites too. Try adding more spices like nutmeg or allspice for a warm twist. Want a bit of sweetness? Fold in dried fruits like raisins or cranberries. They add a nice chew. Seeds can also boost texture and nutrition. Chia seeds or flaxseeds are great options. They add crunch and healthy fats. You can mix and match these ideas to create your perfect energy bite. To keep your Vanilla Chai Energy Bites fresh, use an airtight container. This will stop air from drying them out. Glass or plastic containers work well. You can also wrap them tightly in plastic wrap before placing them in a container. For long-term storage, freezing is a great option. Just place the bites in a freezer-safe bag, remove as much air as possible, and seal it. They will stay tasty for up to three months in the freezer. In the refrigerator, these energy bites last about one week. After a week, check for any changes in smell or texture. If they feel dry or crumbly, it’s time to toss them. Look for any signs of mold or an off smell, as these indicate spoilage. Enjoy your bites while they are fresh for the best flavor and nutrition! You can use peanut butter instead of almond butter. Sunflower seed butter is also good. Both will give you a nice flavor and texture. If you want a nut-free option, try tahini or soy nut butter. To make these bites vegan, replace honey with maple syrup. Use maple syrup for sweetness, and stick with almond butter or any nut butter. All other ingredients are already vegan-friendly! Yes, you can use rolled oats. They will give your bites a heartier texture. Quick oats are more finely ground and blend in better, but rolled oats work just fine. The spices in these bites are not just tasty; they are also healthy. Cinnamon helps control blood sugar. Ginger can ease digestion. Cardamom adds antioxidants. Cloves and black pepper have anti-inflammatory properties. Each spice adds flavor and health benefits. Yes, you can add protein powder to the mix. Just start with a small amount, about one or two tablespoons. This will boost the protein content without altering the taste too much. You can make tasty and healthy energy bites with easy steps. We covered the key ingredients, mixing techniques, and storage tips. I also shared fun variations to suit your taste. Remember, adjust the sweetness and spice to your liking. Avoid common mistakes for the best results. These bites are great for a snack or quick energy boost. Enjoy experimenting and making them your own! Keep them stored properly for freshness and enjoy their benefits.

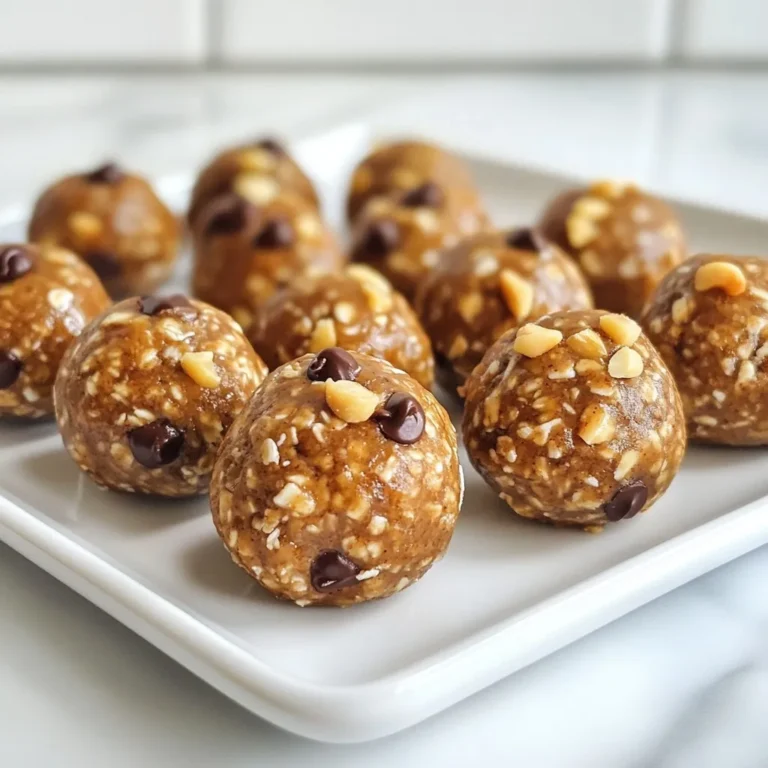
Vanilla Chai Energy Bites Flavorful and Healthy Snack

To create a bright and tasty Lemon Herb Couscous Salad, you will need these simple ingredients: - 1 cup couscous - 1 cup vegetable broth - 1 medium cucumber, diced - 1 cup cherry tomatoes, halved - 1/2 red onion, finely chopped - 1/4 cup freshly chopped parsley - 1/4 cup freshly chopped mint - 1/4 cup feta cheese, crumbled (optional) - 1/4 cup olive oil - 3 tablespoons lemon juice - Zest of 1 lemon - Salt and pepper to taste These ingredients come together to make a fresh salad packed with flavor. The couscous provides a fluffy base. The veggies add crunch, while the herbs offer brightness. Feta cheese adds creaminess and a salty kick, but it’s optional. The lemon juice and zest bring a zesty tang that makes this salad stand out. You can easily adjust the amounts to suit your taste. Enjoy! {{ingredient_image_1}} 1. First, boil 1 cup of vegetable broth in a saucepan. 2. Once boiling, add 1 cup of couscous. Cover the pot and remove it from the heat. Let it sit for about 5 minutes. 3. After the time is up, fluff the couscous with a fork. Allow it to cool slightly before moving on. 1. In a large bowl, combine the diced cucumber, halved cherry tomatoes, finely chopped red onion, chopped parsley, and chopped mint. If you like, add crumbled feta cheese too. 2. In a small bowl, whisk together 1/4 cup of olive oil, 3 tablespoons of lemon juice, the zest of 1 lemon, salt, and pepper to taste. 1. Pour the dressing over the couscous and vegetable mixture. Gently toss everything together until well combined. 2. Taste and adjust seasoning with more salt and pepper if needed. 3. For the best flavor, let the salad sit for at least 15 minutes. This helps the flavors meld together. Serve it chilled or at room temperature. To get the best couscous, fluff it well. After you let it sit, use a fork. This helps separate the grains. Aim for a light and airy texture. Let it cool for about 10 minutes. This cooling time helps the couscous absorb flavors better. You can easily boost the taste of this salad. Try adding spices like cumin or smoked paprika. Fresh herbs like dill or basil also work great. To adjust acidity, use more lemon juice. A little zest can brighten the dish too. This salad shines with many sides. It pairs well with grilled chicken or fish. You can also serve it alongside roasted veggies. For a filling main course, add chickpeas or shrimp. Get creative and enjoy the fresh flavors! Pro Tips Chill for Best Flavor: Allow the salad to sit in the fridge for at least 30 minutes before serving. This chilling time enhances the flavors and gives the salad a refreshing taste. Use Fresh Herbs: Fresh herbs like parsley and mint make a significant difference in flavor. Whenever possible, opt for fresh rather than dried herbs for this salad. Customize Your Veggies: Feel free to add or substitute any vegetables you love, such as bell peppers, radishes, or even avocado, for extra flavor and nutrition. Perfect Couscous Texture: To prevent the couscous from becoming too sticky, make sure to fluff it with a fork after it has absorbed the liquid and before mixing it with other ingredients. {{image_2}} You can switch couscous for quinoa. Quinoa is a great gluten-free grain. It adds a nutty flavor and a unique texture. You can also add roasted vegetables. Roasted bell peppers or zucchini bring sweetness and depth. They add color and flavor to your salad. If you need gluten-free options, use quinoa or rice instead of couscous. Both grains work well here. For vegan substitutions, skip the feta cheese. You can replace it with avocado for creaminess. It also adds healthy fats and a smooth texture. You can include fruits like avocado or berries. Avocado makes the salad rich and creamy. Berries add a sweet touch and a pop of color. If you want some heat, try adding jalapeño. It gives a nice spicy kick that contrasts well with the lemon. Store leftover lemon herb couscous salad in the fridge. Use an airtight container. This keeps the salad fresh and tasty. Cover the container tightly to prevent air from getting in. The salad lasts about three days in the fridge. After that, it can lose flavor and texture. Look for signs of spoilage, like an off smell or slimy vegetables. If you see these signs, it's best to toss the salad. You can serve the salad cold or at room temperature. If you prefer it warm, gently heat it on the stove. Add a splash of olive oil or lemon juice to restore flavor. This helps bring back the fresh taste after storage. To make your couscous salad more filling, add protein. You can include cooked chicken, chickpeas, or beans. Nuts and seeds also boost protein and add crunch. Try adding avocado for creaminess. These additions make the dish hearty and satisfying. Yes, you can prep this salad in advance. Make it a day ahead for best flavor. Store it in the fridge in an airtight container. Letting it sit helps the flavors mix and deepen. Just give it a quick toss before serving. Couscous salad pairs well with many dishes. Serve it next to grilled meats like chicken or fish. It also works great with roasted vegetables. You can add it as a side for a larger meal or picnic. Leftovers can last about 3 to 5 days in the fridge. Store them in an airtight container to keep them fresh. Check for any signs of spoilage, like odd smells or textures, before eating. Yes, this salad is great for meal prep. It stores well and stays fresh for several days. Just make sure to keep any dressing separate if you want the salad crisp. This way, you can enjoy it all week long! This blog post showed you how to make a tasty couscous salad. You learned about the ingredients, preparation steps, and tips to perfect it. Remember, you can adjust flavors and ingredients to suit your taste. Storing it correctly will help keep it fresh. Enjoy making this dish for any meal, and feel free to get creative! Cooking should be fun and simple. Happy salad making!

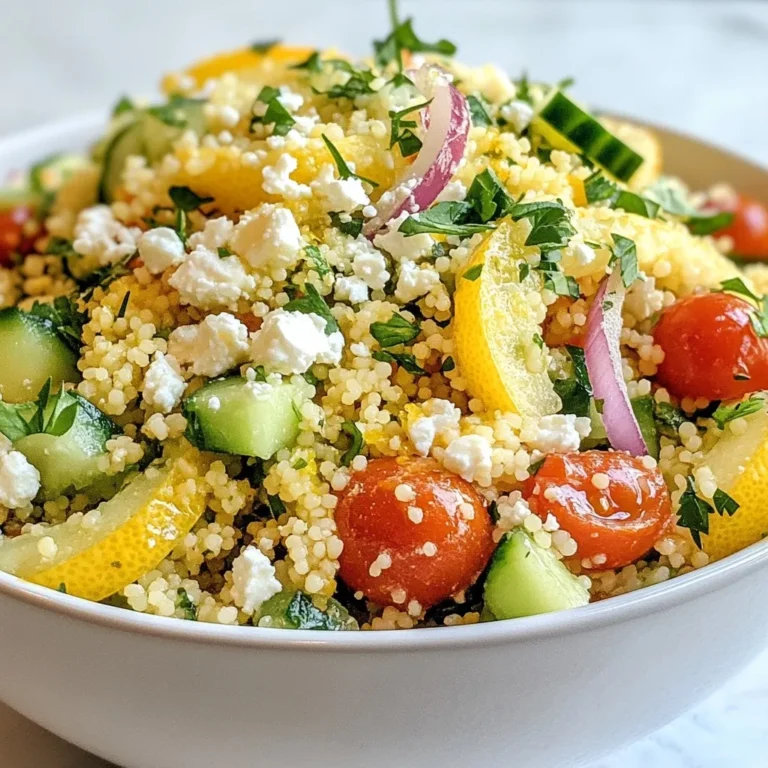
Lemon Herb Couscous Salad Fresh and Flavorful Dish

To make the best Greek lemon rice, you need some key ingredients: - 2 cups long-grain rice (preferably basmati) - 4 cups vegetable broth - 1 medium onion, finely chopped - 3 cloves garlic, minced - 1 cup cherry tomatoes, halved - 1/2 cup green olives, sliced - 1/4 cup fresh dill, chopped - 1/4 cup fresh parsley, chopped - Zest and juice of 2 lemons - 1 teaspoon oregano - 1/2 teaspoon black pepper - Salt, to taste - 3 tablespoons olive oil Each of these ingredients plays a role in creating that bright, zesty flavor. The lemon zest and juice really bring a fresh taste. The olives and herbs add depth and a bit of saltiness. You can also add some optional items to boost the flavor: - Feta cheese for a creamy touch - Capers for a briny kick - Red pepper flakes for heat These add-ons can make your dish more complex. They can take the simple rice to the next level of yum! If you don’t have some ingredients, don’t worry! Here are some swaps you can try: - Use chicken broth instead of vegetable broth for a richer taste. - Swap basmati rice for jasmine rice if that’s what you have. - Fresh herbs can be replaced with dried ones, but use less. These substitutions ensure you can still enjoy this dish, even if you lack some items. Just remember to adjust cooking times based on what you use! {{ingredient_image_1}} Start by gathering your ingredients. You will need: - 2 cups long-grain rice (preferably basmati) - 4 cups vegetable broth - 1 medium onion, finely chopped - 3 cloves garlic, minced - 1 cup cherry tomatoes, halved - 1/2 cup green olives, sliced - 1/4 cup fresh dill, chopped - 1/4 cup fresh parsley, chopped - Zest and juice of 2 lemons - 1 teaspoon oregano - 1/2 teaspoon black pepper - Salt, to taste - 3 tablespoons olive oil Chop the onion and garlic before you start cooking. This makes it easy to add them quickly. Halve the cherry tomatoes and slice the olives. Measure out the herbs and spices. In a large pot, heat the olive oil over medium heat. Add the chopped onion. Sauté it for about 5 minutes until it softens. Then, stir in the minced garlic and cook for another minute until it smells good. Next, add the rice to the pot. Stir well to coat it with the oil. Toast the rice for 2-3 minutes until it looks slightly clear. Pour in the vegetable broth, lemon juice, and lemon zest. Add oregano, black pepper, and salt. Stir everything together. Bring the pot to a boil. Once it starts bubbling, lower the heat and cover the pot. Let it simmer for 15-20 minutes. Check the rice to make sure it absorbs the liquid and is tender. When the rice is ready, use a fork to fluff it gently. Then, fold in the cherry tomatoes, green olives, dill, and parsley. Mix it carefully to keep the rice fluffy. Let the dish sit covered for 5 minutes. This helps the flavors blend well. Serve the rice warm. You can add more herbs or lemon slices for a pretty touch. Enjoy your bright and tasty one-pot Greek lemon rice! I recommend using long-grain rice, like basmati. This rice cooks well and stays fluffy. It absorbs flavors nicely. If you use short-grain rice, it can become sticky. Always rinse the rice before cooking. This helps remove excess starch. It also prevents clumping during cooking. To avoid overcooking, keep an eye on the heat. Once the pot boils, lower the heat. Cover the pot tightly. This traps steam and cooks the rice evenly. Cook for 15-20 minutes without lifting the lid. Checking too early can let steam escape. If the rice seems dry, add a little broth. You can mix in different flavors for fun. Try adding cooked chicken or shrimp for protein. For a twist, add spices like cumin or paprika. Squeeze in more lemon for a zesty kick. You can also add nuts like almonds for crunch. Fresh herbs can change the taste, too. Try basil or mint for a fresh note. Pro Tips Soak the Rice: Soaking the rice for 30 minutes before cooking can help achieve a fluffier texture by allowing the grains to absorb some water and cook more evenly. Enhance the Flavor: For an extra flavor boost, consider adding a bay leaf or a few whole peppercorns to the broth while cooking the rice, then remove them before serving. Use Fresh Herbs: Fresh herbs make a significant difference in flavor. If possible, use fresh dill and parsley instead of dried for a more vibrant taste. Let it Rest: Allow the dish to rest for a few minutes after cooking. This helps the flavors to meld and the rice to firm up, making it easier to serve. {{image_2}} You can easily add protein to make this dish heartier. If you like chicken, cut it into small pieces. Sauté the chicken with the onion until it is cooked through. For shrimp, add them in the last few minutes of cooking. They only need a few minutes to turn pink. If you prefer tofu, use firm tofu. Cube it and sauté with the onion. This will add a nice texture and flavor. The base recipe is already vegetarian. To make it vegan, just skip any dairy. Add more veggies like spinach or bell peppers for flavor. You can also mix in chickpeas for extra protein. They add a nice bite and are very filling. Use vegetable broth to keep it fully plant-based. Seasonal vegetables can boost the flavor. In spring, add peas or asparagus. In summer, try zucchini or bell peppers. In fall, you can use butternut squash or carrots. Chop the veggies and stir them in during the last few minutes of cooking. This will keep them crisp and colorful. Adjust the cooking time based on how soft you like your veggies. To keep your Greek lemon rice fresh, let it cool. Then, place it in an airtight container. Store it in the fridge for up to 4 days. This method keeps the rice soft and tasty. Make sure to seal the container well to prevent drying out. When it’s time to reheat, add a splash of broth or water. This helps the rice regain moisture. Heat it in a pot over low heat, stirring often. You can also use the microwave. Cover the rice with a damp paper towel to keep it moist. Heat it in short bursts until warm. For long-term storage, freezing is a great option. Pack the rice in freezer-safe bags or containers. Remove as much air as possible before sealing. Label the bags with the date. You can freeze the rice for up to 3 months. When ready to eat, thaw it in the fridge overnight before reheating. This keeps the flavor and texture intact. You can make Greek Lemon Rice ahead of time. Cook the rice as usual. Once it cools, store it in an airtight container. Keep it in the fridge for up to three days. When you are ready to eat, just reheat it. You can add a splash of broth or water to keep it moist. Yes, you can use brown rice instead of white rice. Brown rice has more fiber and a nutty taste. Keep in mind, it takes longer to cook. Use the same amount of broth but add 10-15 minutes to the cooking time. Check the rice for doneness before serving. Greek Lemon Rice pairs well with many dishes. Here are some great options: - Grilled chicken or fish - Roasted vegetables - Greek salad - Stuffed peppers - Lamb dishes These options will create a balanced meal. Each dish brings out the bright flavors of the rice. Enjoy mixing and matching! In this post, we explored the key ingredients and simple steps to make Greek Lemon Rice. We discussed how to prep, cook, and serve it, along with helpful tips for perfect texture. You can customize with proteins or seasonal veggies to match your taste. Storing and reheating it is easy for quick meals. With these ideas, you can enjoy Greek Lemon Rice anytime. This dish is fresh, flavorful, and perfect for sharing. Enjoy making it your own!

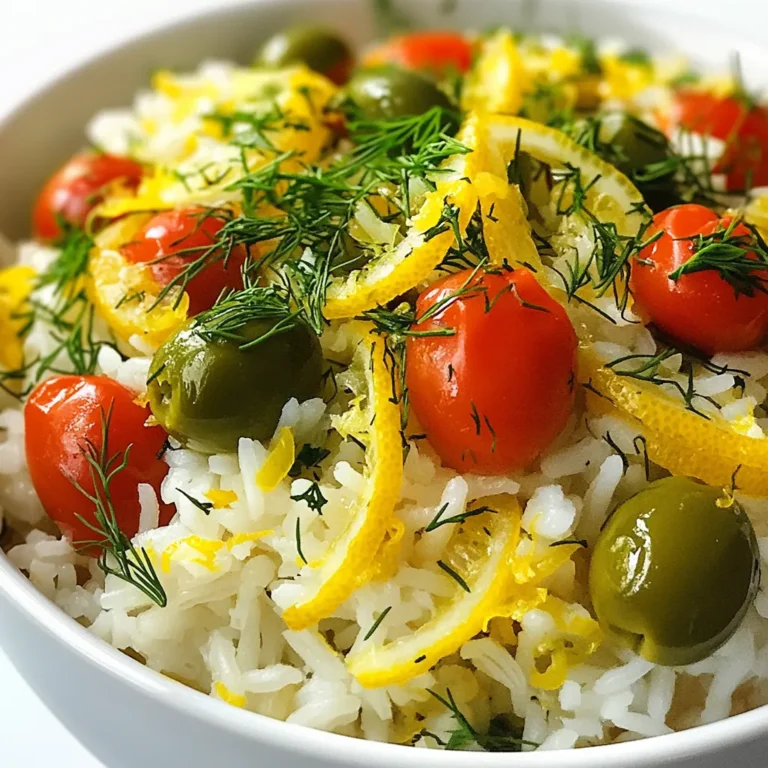
One Pot Greek Lemon Rice Quick and Flavorful Dish

To make creamy avocado pasta, gather these key items: - 12 oz spaghetti or your favorite pasta - 2 ripe avocados, pitted and peeled - 2 cloves garlic, minced - 2 tablespoons lemon juice - 1/4 cup fresh basil leaves - 1/4 cup grated Parmesan cheese (or nutritional yeast for a vegan option) - 1/4 cup olive oil - Salt and pepper to taste These ingredients blend to form a rich, creamy sauce. The avocados give the dish its smooth texture. Basil adds a fresh flavor, while the garlic gives it a lovely kick. You can also mix in these optional ingredients to change the taste: - Crushed red pepper flakes for heat - Spinach or kale for extra greens - Sun-dried tomatoes for a tangy touch - Chicken or shrimp for added protein These options make your creamy avocado pasta more unique. Feel free to play with flavors and textures! To finish your dish, consider these garnishes: - Halved cherry tomatoes for color and sweetness - A sprinkle of crushed red pepper flakes for spice - Extra basil leaves for a fresh touch Garnishes not only enhance the look of your dish but also add more flavor. They make your creamy avocado pasta even more inviting! {{ingredient_image_1}} To start, fill a large pot with water. Add salt and bring it to a boil. Once boiling, add 12 ounces of your favorite pasta, like spaghetti. Cook the pasta according to the package instructions until it is al dente. This usually takes around 8 to 10 minutes. When done, reserve half a cup of the pasta water. Then, drain the pasta and set it aside. Next, grab a food processor. Add 2 ripe avocados, pitted and peeled. Then, toss in 2 minced garlic cloves, 2 tablespoons of lemon juice, and 1/4 cup of fresh basil leaves. Add 1/4 cup of grated Parmesan cheese for flavor. Blend all these ingredients until you have a smooth and creamy sauce. If the sauce is too thick, add a bit of the reserved pasta water. Blend again until you reach your desired consistency. Now, take a large mixing bowl. Add the drained pasta to the bowl. Pour the creamy avocado sauce over the pasta. Toss everything together until the pasta is nicely coated. If it looks dry, add more of the reserved pasta water slowly. Season with salt and pepper to taste. You can also adjust the lemon juice or add more herbs for extra flavor. Finally, plate the pasta and garnish with halved cherry tomatoes and a sprinkle of crushed red pepper flakes if you like some heat. Enjoy your creamy avocado pasta! When picking avocados, look for ripe ones. A ripe avocado feels slightly soft when you press it. Avoid ones that are too mushy or have dark spots. If you can’t find ripe avocados, buy hard ones. Let them ripen at room temperature for a few days. Check them daily for ripeness. To get a creamy texture, blend the avocado well. Use a food processor for the best mix. If your sauce is too thick, add a little reserved pasta water. This helps you reach the perfect creaminess. Mixing in fresh basil gives the sauce a smooth feel. Add more flavor by mixing in herbs or spices. Fresh herbs like parsley or cilantro work well. You can also try a pinch of crushed red pepper for heat. For a zesty kick, add more lemon juice. Finally, try different cheeses like feta or goat cheese for a unique twist. Pro Tips Choose Ripe Avocados: Make sure your avocados are perfectly ripe for the creamiest texture. They should yield slightly to gentle pressure. Adjusting Creaminess: If your avocado sauce is too thick, gradually add the reserved pasta water until you reach the desired creamy consistency. Fresh Herbs Matter: Using fresh basil will elevate the flavor of the dish. Dried herbs can work in a pinch, but fresh is always best! Garnish for Color: Adding cherry tomatoes not only gives a pop of color but also a burst of freshness that complements the richness of the avocado sauce. {{image_2}} You can easily make this dish vegan. Instead of Parmesan cheese, use nutritional yeast. It adds a cheesy flavor while keeping the dish plant-based. Simply replace the cheese in the recipe with 1/4 cup of nutritional yeast. This swap keeps your creamy avocado pasta rich and tasty. Feel free to switch up the pasta. While spaghetti works great, you can use any pasta you like. Try whole wheat, gluten-free, or even zucchini noodles for a lighter option. Just remember to cook them according to the package directions. This way, you can enjoy your creamy avocado pasta in different forms. Boost the nutrition of your creamy avocado pasta by adding proteins or veggies. Cooked chicken, shrimp, or chickpeas pair well. You could also toss in spinach, peas, or bell peppers for color and crunch. Add these extras when you mix the pasta with the sauce. This makes your meal even more filling and delicious. To store leftover creamy avocado pasta, place it in a clean, airtight container. Make sure to cover it well to keep out air. This will help keep the flavors fresh. You can store it in the fridge for up to two days. If you plan to eat it later, try to add a bit more lemon juice. This helps slow down browning. When you reheat your creamy avocado pasta, do it gently. I recommend using a pan on low heat. Add a splash of reserved pasta water to help loosen the sauce. Stir often to keep the creamy texture. You can also microwave it, but do so in short bursts. Check every 30 seconds to avoid overheating. For storing your pasta, use glass or BPA-free plastic containers. They keep food fresh and are easy to clean. Choose a container that seals tightly. This will prevent air from getting in and spoiling your dish. If you want to freeze it, use freezer-safe bags. Make sure to remove as much air as possible before sealing. Yes, you can make the avocado sauce ahead of time. Just blend the sauce as directed. Then, store it in an airtight container. To keep it fresh, add some extra lemon juice on top. This will help slow down browning. When you are ready to eat, just mix it with the cooked pasta. If you want a substitute for Parmesan cheese, try nutritional yeast. It adds a cheesy flavor without dairy. You can also use pecorino cheese for a different taste. If you want a nut-free option, try a bit of ground cashews. This will keep the dish creamy and tasty. To stop avocados from browning, use a bit of lemon juice. This acid slows down the oxidation process. Make sure to cover the sauce tightly when storing it. You can also press plastic wrap directly onto the surface. This will limit air exposure and keep the green color. Making creamy avocado pasta is simple and fun. We covered the best ingredients, from essential items to garnishes. You learned step-by-step how to cook the pasta and make the sauce. Tips on choosing avocados and keeping the dish creamy help you perfect your meal. We also looked at tasty variations and smart storage methods. Finally, I answered your common questions. Enjoy making this dish your own. It's a quick, healthy option for any meal!

Creamy Avocado Pasta Quick and Easy Recipe

To make the Apple Cinnamon Protein Smoothie, you need simple and fresh ingredients. Here’s what you’ll want to gather: - 1 medium apple, cored and diced (recommended varieties: Fuji or Honeycrisp) - 1 ripe banana - 1/2 cup Greek yogurt (plain or vanilla) - 1 scoop vanilla protein powder - 1/2 teaspoon ground cinnamon - 1 cup almond milk (or any milk of choice) - 1 tablespoon honey (optional) - Ice cubes Each ingredient plays an important role in flavor and nutrition. The apple adds a crunchy sweetness. Bananas bring creaminess and natural sweetness. Greek yogurt boosts protein and gives a smooth texture. The vanilla protein powder helps you stay full longer. Ground cinnamon adds warmth and spice, making each sip comforting. Almond milk keeps it light and refreshing. Honey can sweeten it up, but you can skip it if you prefer. Lastly, the ice cubes make it cool and refreshing. Gather these ingredients, and you're ready to blend a tasty start to your day! {{ingredient_image_1}} 1. First, grab your blender. 2. Toss in the diced apple and banana. 3. Add Greek yogurt and protein powder. 4. Sprinkle in the ground cinnamon. 5. Pour in the almond milk. 6. If you like sweetness, add honey. 7. Next, throw in a few ice cubes. 8. Blend on high until smooth and creamy. - After blending, taste your smoothie. - If it needs more sweetness, add honey. - Blend again to mix in the honey. - Pour the smoothie into a tall glass. - For a nice touch, sprinkle cinnamon on top. - Enjoy your smoothie right away for the best taste! For the best apple cinnamon protein smoothie, choose sweet apples. Fuji and Honeycrisp are my favorites. They blend well and add great flavor. Sweet apples enhance the taste, making your smoothie delicious. To avoid chunky smoothies, blend your ingredients well. Start with the softer fruits, like banana. Yogurt adds creaminess, while almond milk thins the mixture. Adjust the amount of almond milk to reach your desired thickness. When picking protein powder, look for quality brands. Whey and plant-based powders both work well. Choose one that tastes good and fits your diet. Brands like Orgain and Optimum Nutrition are great for flavor and nutrition. Pro Tips Choose the Right Apple: For the best flavor, select a sweet variety like Fuji or Honeycrisp, as they will enhance the smoothie’s taste. Banana Ripeness Matters: Use a ripe banana for added creaminess and natural sweetness; the riper the banana, the sweeter the smoothie. Cinnamon Variation: Experiment with different spices like nutmeg or pumpkin spice for a unique twist on the classic apple cinnamon flavor. Protein Powder Choice: Choose a high-quality protein powder that blends well and complements the flavors; vanilla protein works great in this recipe. {{image_2}} If you want to make this smoothie dairy-free or vegan, there are great swaps. For Greek yogurt, try using coconut yogurt or almond yogurt. Both options keep it creamy and tasty. For protein powder, choose a plant-based version. Pea protein or hemp protein works well. These options are high in protein and fit your dietary needs. You can add fun flavors to your smoothie with spices. A pinch of nutmeg gives warmth, while vanilla extract adds sweetness. Want more fruity goodness? Toss in berries like strawberries or blueberries. You can also blend in greens like spinach for extra nutrients without changing the taste. Making this smoothie ahead can save time. Prep the ingredients the night before. Put them in a bag in the fridge. In the morning, just blend and enjoy. For added ease, store smoothie packs in the freezer. This way, you’ll have quick meals ready to go whenever you need a healthy boost. To keep your smoothie fresh, store it in the fridge. Use a sealed jar or container. This keeps the smoothie cool and helps it last longer. I recommend using glass containers. They don’t hold onto smells. You can freeze your smoothie for later use. Pour the smoothie into ice cube trays or freezer bags. This makes it easy to grab a portion when you need one. To thaw, place it in the fridge overnight or use the microwave on low. Blend it again to get a smooth texture before serving. Enjoy it cold for a quick breakfast boost! An apple cinnamon protein smoothie has about 350 calories per serving. Here's the breakdown: - 1 medium apple: 95 calories - 1 ripe banana: 105 calories - 1/2 cup Greek yogurt: 80 calories - 1 scoop vanilla protein powder: 120 calories - 1 tablespoon honey (optional): 64 calories This smoothie is a great choice for breakfast or a snack. It offers protein, fiber, and natural sweetness. Yes, you can use other types of milk. Almond milk is common, but you can try: - Soy milk: Adds protein and creaminess. - Oat milk: Gives a rich, smooth flavor. - Coconut milk: Adds a tropical twist. Each milk changes the taste a little. Experiment to find your favorite! To make your smoothie more filling, consider these options: - Add more Greek yogurt for extra protein. - Toss in a tablespoon of nut butter for healthy fats. - Use rolled oats to boost fiber. These additions will keep you satisfied longer and enhance the smoothie’s taste. In this blog post, we explored how to make a delicious apple cinnamon protein smoothie. We discussed the best ingredients, preparation steps, and tips for achieving the right texture. I shared variations for different diets and meal prep ideas to save time. Remember, feel free to customize your smoothie to fit your taste. With a bit of creativity, you can enjoy a tasty drink anytime. Now, grab your blender and enjoy this healthy treat!

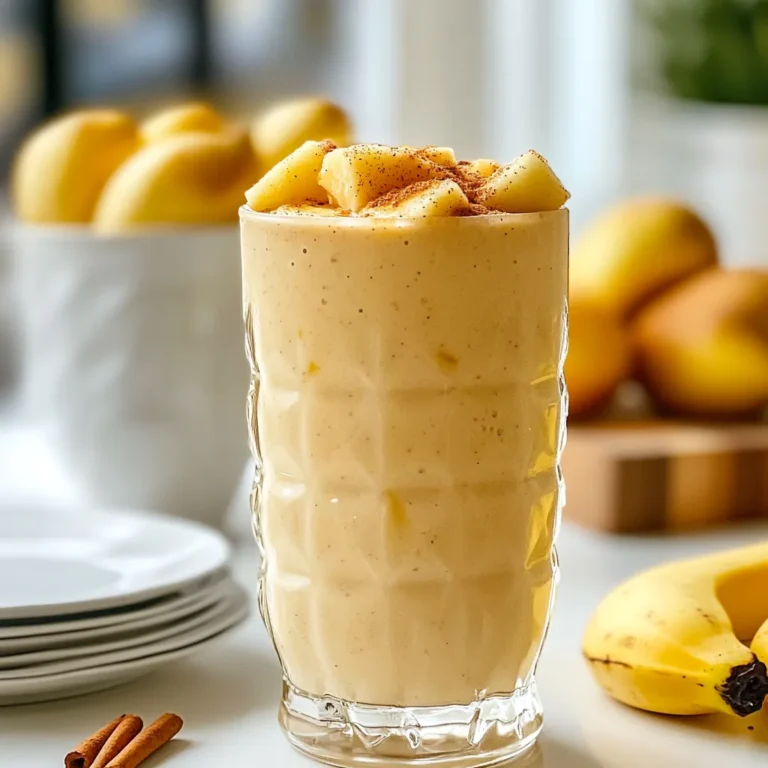
Apple Cinnamon Protein Smoothie Healthy Breakfast Boost

- 4 cups watermelon, cubed - 1 cup feta cheese, crumbled - 1/4 cup fresh mint leaves, chopped The main ingredients make this salad shine. Watermelon brings sweetness and juiciness. Feta cheese adds a salty, creamy touch. Fresh mint gives a cool, herbal note. Together, they create a bright flavor balance. - 2 tablespoons olive oil - 1 tablespoon balsamic vinegar - Salt and pepper to taste These extra ingredients help tie everything together. Olive oil adds richness. Balsamic vinegar offers a tangy kick. Salt and pepper enhance all the flavors. Seasoning lets each bite pop. - Fresh mint sprigs Garnishing is fun! Fresh mint sprigs on top make the dish look pretty. They also add a fresh aroma. This small step makes a big difference in presentation. {{ingredient_image_1}} Start by cutting the watermelon into cubes. Use a sharp knife for clean cuts. Aim for 1-inch pieces for even bites. Place the cubes in a large mixing bowl. This watermelon forms the base of your salad. Next, crumble the feta cheese over the watermelon. Spread it evenly to get that tangy flavor in every bite. Then, add the chopped mint leaves. This fresh herb gives the salad a bright taste. In a small bowl, whisk together the olive oil and balsamic vinegar. This dressing brings your salad to life. Add a pinch of salt and pepper to enhance the flavor. Mix until it’s well combined and smooth. Now, drizzle the dressing over the watermelon, feta, and mint. Gently toss the ingredients together. Be careful not to break the feta. Taste the salad and adjust the salt or pepper if needed. Transfer the salad to a serving platter. Garnish with fresh mint sprigs for a colorful touch. Enjoy your refreshing salad! To pick ripe and sweet watermelons, look for these signs: - The skin should have a smooth, shiny surface. - Check for a yellow spot on one side, which shows ripeness. - A heavier watermelon usually means more juice inside. When you tap the watermelon, listen for a deep sound. This means it’s full of water. Avoid watermelons with dents or soft spots, as they may be overripe or damaged. Feta cheese adds a salty taste to the salad. You can try different types of feta for a new twist: - Greek feta has a rich flavor and crumbly texture. - Aged feta is firmer and has a stronger taste. - Goat feta is creamier and milder. Feel free to mix and match. Each type can change the salad's taste and texture. Keep your salad fresh by storing it properly. Here are some tips: - Place any leftover salad in an airtight container. - Store the salad in the fridge for up to two days. - If the salad becomes watery, drain excess liquid before serving. Keep in mind that watermelon can lose its crunch over time. It’s best to enjoy this salad fresh! Pro Tips Choose Ripe Watermelon: Select a watermelon that feels heavy for its size and has a uniform shape. A yellow spot on its skin indicates it has ripened on the ground and usually means it's sweeter. Feta Cheese Freshness: Use fresh feta cheese for the best flavor. If possible, look for feta packed in brine, as it stays fresher longer and retains its creamy texture. Mint Handling: Gently bruise the mint leaves before adding them to release more essential oils, enhancing the salad's aroma and flavor. Chill Before Serving: Let the salad chill in the refrigerator for about 30 minutes before serving. This allows the flavors to meld together beautifully. {{image_2}} You can make this salad even better by adding cucumber or red onion. Cucumber adds a cool crunch. Slice it thin and toss it in with the watermelon. Red onion gives a sharp taste. Use just a little, as it can be strong. Both options are simple but add great flavor. You can change up the dressing easily. Instead of balsamic vinegar, try fresh lemon juice. It adds a bright kick. You can also use different oils. Avocado oil or nut oil works well. Just remember to balance the flavors! This salad pairs well with grilled meats. Serve it alongside chicken or fish for a light meal. It also shines at picnics. Pack it in a container to take along. The fresh flavors make it a hit at any gathering! To keep your watermelon feta mint salad fresh, store it in the fridge. Place the salad in a sealed container. This helps to keep moisture in and air out. If you have extra dressing, store it separately. This prevents the salad from getting soggy. When you are ready to eat, just drizzle the dressing on top. Give it a gentle toss and enjoy! Your salad will stay fresh for about three days when stored properly. After that, the watermelon may start to lose its crunch. The feta cheese will soften, and the mint may wilt. Always check the salad for any odd smells before eating. If it looks or smells off, it’s best to toss it. I do not recommend freezing this salad. The watermelon has high water content. Freezing it will change its texture. When thawed, it may become mushy and less appealing. Instead, enjoy this salad fresh. It tastes best when made and eaten right away! Yes, you can prepare this salad in advance. To do this, follow these tips: - Prep the watermelon: Cut it into cubes and store it in an airtight container in the fridge. - Add ingredients separately: Keep the feta and mint aside. Add them just before serving to keep everything fresh. - Make the dressing: Whisk the olive oil and balsamic vinegar in a small bowl. Store it in a jar in the fridge. Add it right before serving. - Mix before serving: Toss everything together just before you want to eat. This keeps the salad crisp and tasty. Yes, this salad is gluten-free. All the ingredients are naturally free of gluten. Here’s a quick breakdown: - Watermelon: Pure fruit, no gluten. - Feta cheese: Typically gluten-free, but check the label to be sure. - Mint: Fresh herbs, also gluten-free. - Olive oil and balsamic vinegar: Both are gluten-free. This salad suits those with gluten sensitivities or celiac disease. You can easily make this salad vegan. Here are some ideas: - Substitute feta: Use plant-based feta cheese or crumble tofu for a similar texture. - Check dressing: Ensure that the balsamic vinegar is vegan. Most are, but some may have additives. - Add extra veggies: Toss in cucumbers or bell peppers for more flavor and crunch. These changes will keep the salad delicious and plant-based. Watermelon Feta Mint Salad offers a bright mix of fresh flavors. We discussed key ingredients like ripe watermelon and feta cheese. I shared tips on selecting the best watermelon and making simple dressings. You learned how to store leftovers and serve this salad in various ways. Enjoy this salad at your next meal or picnic! It's easy to make, healthy, and tasty. Try the variations I suggested to customize it to your taste.

Watermelon Feta Mint Salad Fresh and Flavorful Delight

PREV 1 … 43 44 45 … 57 NEXT
quick dish kitchen

explore

DessertsDinnerAppetizersDrinks

Our Policies

  • Cookie Policy
  • Copyright Policy
  • Disclaimer
  • GDPR Policy
  • Terms Of Use
Back to Top
  • About
  • Contact Us
  • Privacy Policy
© 2025 quick dish kitchen