FREE DINNER EBOOK! Get your copy!
  • Cookie Policy
  • GDPR Policy
  • Disclaimer
  • Terms Of Use
  • Visit my other site: Fun Cookie Recipes
quick dish kitchen
  • Home
  • Dinner
  • Desserts
  • Drinks
  • Appetizers
  • Contact
  • About
  • Privacy Policy
  • Home
  • Dinner
  • Desserts
  • Drinks
  • Appetizers
  • Contact
  • About
  • Privacy Policy
  • Cookie Policy
  • GDPR Policy
  • Disclaimer
  • Terms Of Use
Visit my other site: Fun Cookie Recipes

HOME / CATEGORIES /

Latest

To make these crispy air fryer fish tacos, you will need: - 1 lb white fish fillets (such as cod or tilapia) - 1 cup panko breadcrumbs - 1/2 cup all-purpose flour - 1 large egg - 1 teaspoon garlic powder - 1 teaspoon paprika - 1/2 teaspoon cumin - Salt and pepper to taste - Corn tortillas (8 small) - 1 cup shredded cabbage or coleslaw mix - 1 avocado, sliced - Fresh cilantro for garnish - Lime wedges for serving When choosing fish for your tacos, white fish works best. I recommend using cod or tilapia. Both types have a mild flavor and a tender texture. They cook well in the air fryer and get nice and crispy. Other options include haddock or catfish. Just make sure the fish is fresh and boneless for the best bite. The seasonings add flavor and depth to your fish. Here’s what each brings: - Garlic powder: It gives a nice aroma and rich taste. - Paprika: This adds a warm, smoky flavor and a lovely red color. - Cumin: It brings a slight earthiness and enhances the overall flavor. - Salt and pepper: Basic but essential for balancing all the tastes. Using these seasonings makes your fish more flavorful. They create a great base for the toppings that follow, like cabbage and avocado. Enjoy these tacos with lime for a bright finish. {{ingredient_image_1}} First, preheat your air fryer to 400°F (200°C). This step is key for crispy fish. While the air fryer heats, gather your ingredients. You will need: - 1 lb white fish fillets (cod or tilapia work well) - 1 cup panko breadcrumbs - 1/2 cup all-purpose flour - 1 large egg - 1 teaspoon garlic powder - 1 teaspoon paprika - 1/2 teaspoon cumin - Salt and pepper to taste - Corn tortillas (8 small) - 1 cup shredded cabbage or coleslaw mix - 1 avocado, sliced - Fresh cilantro for garnish - Lime wedges for serving Now, in a shallow bowl, mix the flour, garlic powder, paprika, cumin, salt, and pepper. This mix adds great flavor and helps the coating stick. Next, it's time to coat the fish. Start by beating the egg in a separate bowl. Then, place the panko breadcrumbs in another shallow bowl. Take each fish fillet and dip it in the flour mix first. Make sure it’s well-coated. Then, dip it in the egg, and finally, roll it in the panko breadcrumbs. Press gently to help the crumbs stick. This method gives your fish that perfect, crunchy texture. Once all your fish is coated, arrange the fillets in a single layer in the air fryer basket. You might need to cook them in batches to avoid overcrowding. Air fry the fish for 10-12 minutes. Flip them halfway through to ensure they cook evenly. They should turn golden brown and crispy. While the fish cooks, warm your corn tortillas in a dry skillet or microwave until they are soft. This makes them easier to fold. Now, you are ready to assemble your tacos! Place a crispy fish piece on each tortilla, top with shredded cabbage, sliced avocado, and fresh cilantro. Serve with lime wedges on the side for that zesty finish. Enjoy your crispy air fryer fish tacos! To get the best crispiness from your air fryer fish tacos, follow these steps: - Use panko breadcrumbs. They are light and create a great crunch. - Make sure the fish is dry before coating. Pat it with paper towels. - Preheat the air fryer. This helps cook the fish evenly and crisply. - Spread the fish in a single layer. Avoid overcrowding the basket. For extra crispiness, you can spray a little cooking oil over the fish before frying. This will help it brown nicely. Here are some common mistakes to watch out for: - Skipping the egg wash: The egg helps the breadcrumbs stick to the fish. - Not seasoning enough: A pinch of salt and pepper adds flavor to your fish. - Cooking too many pieces at once: This can lead to soggy fish. Cook in small batches for best results. - Overcooking the fish: Keep an eye on the cooking time. Aim for that golden brown color. If you notice your fish is not crisping up, check your air fryer settings. Adjust the time or temperature as needed. Cooking in batches can be key for crispy fish tacos. Here’s how to do it right: - Prepare all your fish first. Coat each piece and set them aside. - Preheat your air fryer before starting. This ensures even cooking. - Cook in small groups. This gives each piece enough space to fry well. - Keep cooked fish warm. Place them on a plate covered with foil while you finish the rest. By following these tips, you’ll ensure every taco is filled with crispy, delicious fish. Enjoy your cooking adventure! Pro Tips Fresh Fish is Best: Always choose the freshest fish fillets available for the best flavor and texture in your tacos. Double-Crunch Method: For extra crunch, try double-dipping the fish in the egg and panko breadcrumbs for a thicker coating. Customize Your Toppings: Feel free to add your favorite toppings such as salsa, jalapeños, or a creamy sauce to enhance the flavor. Preheat Your Air Fryer: Always preheat your air fryer for even cooking and to achieve that perfect crispy texture. {{image_2}} You can switch up the fish easily. Cod and tilapia are great, but feel free to try others. Salmon works well, giving a richer taste. Mahi-mahi also adds a nice touch with its meaty texture. Even shrimp can be a fun twist. Just remember to adjust cooking time based on the fish you choose. Toppings can change the whole vibe of your tacos. Try mango salsa for a sweet kick. A spicy chipotle sauce adds heat and flavor. You can also use fresh pico de gallo for a zesty touch. If you love crunch, consider radishes or pickled onions. They add a nice contrast to the tender fish. If you need a gluten-free option, swap the all-purpose flour for a gluten-free blend. You can also use crushed cornflakes or gluten-free panko for the coating. These will still give you that crispy texture. Make sure to check labels for any hidden gluten in all your ingredients. Enjoy your tacos without worry! To keep leftover fish tacos fresh, place them in an airtight container. Make sure the tacos cool down first. Store them in the fridge for up to three days. If you have extra ingredients, like cabbage or avocado, store them separately. This way, they won’t get soggy. Reheating fish tacos can be tricky. For the best results, use your air fryer. Preheat it to 350°F (175°C). Heat the tacos for about 3-5 minutes. This keeps them crispy and warm. You can also use a skillet on medium heat. Just flip them to crisp each side. If you want to freeze fish tacos, it’s best to freeze the fish separately. Cook the fish and let it cool. Then, wrap it tightly in plastic wrap and foil. You can freeze it for up to three months. When ready to eat, thaw it overnight in the fridge. Reheat as mentioned for the best texture. The best fish for air fryer tacos is white fish. I love using cod or tilapia. They have a mild taste and cook well in the air fryer. You can also try haddock or catfish for a tasty change. These fish stay flaky and moist inside while getting crispy outside. Yes, you can! If you don't have an air fryer, you can bake or pan-fry the fish. For baking, set your oven to 400°F (200°C). Place the coated fish on a baking sheet and bake for 15-20 minutes. For pan-frying, heat oil in a skillet and cook the fish for 3-4 minutes on each side. Both methods will give you delicious results. To spice up your fish tacos, try adding more seasoning. You can increase the garlic powder and paprika. For heat, add cayenne pepper or chili powder to the flour mix. You can also add spicy toppings like jalapeños or a hot sauce drizzle. A zesty salsa can bring great flavor too! Crispy air fryer fish tacos are easy and fun to make. We covered key ingredients, seasoning options, and step-by-step cooking tips. I shared common mistakes to watch for and ways to customize your tacos. Don't forget storage and reheating tips for leftovers. Enjoy experimenting with different fish and toppings. With these ideas, you’ll craft tasty tacos every time.

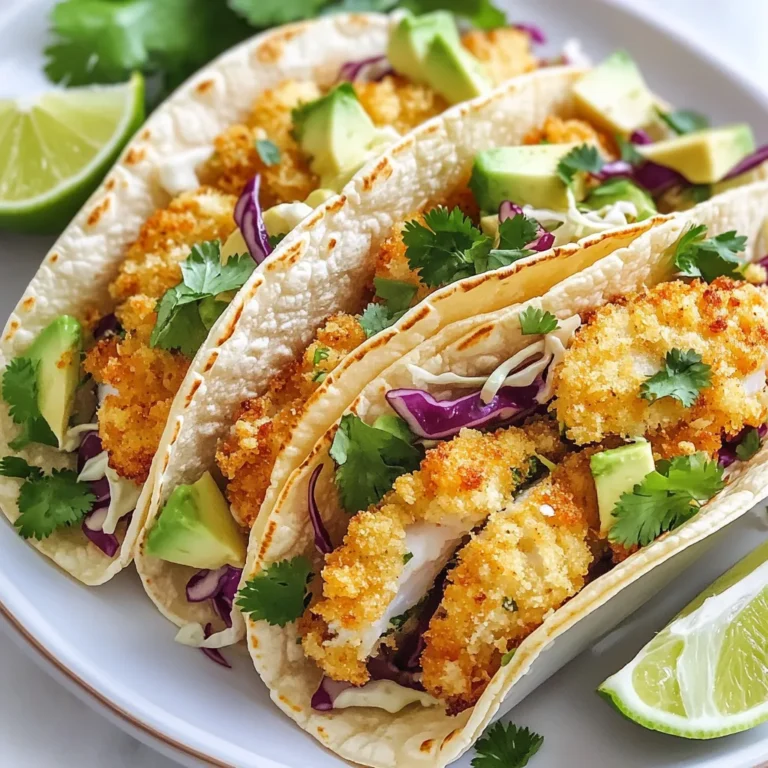
Crispy Air Fryer Fish Tacos Flavorful and Fun Meal

- 2 cups cooked black beans - 1 cup corn kernels - 1 cup diced bell peppers - 1 small onion - 2 cloves garlic - 1 tablespoon olive oil - 1 teaspoon ground cumin - 1 teaspoon smoked paprika - 1 teaspoon chili powder - Salt and pepper - 8 corn tortillas - 2 cups enchilada sauce - 1 cup shredded cheese - Fresh cilantro and avocado Gathering the right ingredients sets the stage for great enchiladas. Start with the black beans as your base. I like to use cooked black beans, but canned works too. Just rinse and drain them to cut down on sodium. Next, grab some corn kernels. Fresh is best, but frozen works perfectly in a pinch. For flavor, add diced bell peppers. They add color and sweetness. Onions and garlic bring depth to the dish. Sautéing them creates a sweet aroma that fills your kitchen. Now, let's spice it up! Ground cumin, smoked paprika, and chili powder add warmth and flavor. Don't forget to season with salt and pepper to taste. Don’t skip the tortillas. Corn tortillas hold everything together and bring that classic enchilada vibe. Finally, grab enchilada sauce and cheese for topping. I love cheddar or Monterey Jack. Fresh cilantro and avocado add brightness and creaminess. By picking quality ingredients, you create a dish that’s full of flavor. It makes cooking fun and enjoyable! {{ingredient_image_1}} 1. Preheat your oven to 375°F (190°C). This helps cook the enchiladas evenly. 2. In a large skillet, heat 1 tablespoon of olive oil over medium heat. 3. Add 1 small chopped onion and 1 cup of diced bell peppers. Sauté until soft. This should take about 5 minutes. 4. Stir in 2 minced garlic cloves, 1 teaspoon of ground cumin, 1 teaspoon of smoked paprika, and 1 teaspoon of chili powder. Season with salt and pepper. Cook for 2 more minutes. This will release great aromas. 5. Add 2 cups of cooked black beans and 1 cup of corn kernels to the skillet. Mix well and cook for 3-4 minutes until heated through. 1. Pour about 1/2 cup of enchilada sauce into a large baking dish. This prevents sticking. 2. Take 8 corn tortillas and spoon about 1/4 cup of the black bean mixture into the center of each one. 3. Roll up the tortillas tightly and place them seam-side down in the baking dish. Repeat until all are filled. 4. Pour the remaining enchilada sauce over the rolled tortillas. Make sure they are well coated. 5. Sprinkle 1 cup of shredded cheese on top. This will melt beautifully in the oven. 1. Cover the dish with foil. Bake in the preheated oven for 20 minutes. 2. Remove the foil and bake for another 10 minutes. This makes the cheese bubbly and golden. 3. Once baked, let the enchiladas sit for a few minutes before serving. 4. Garnish with fresh cilantro and sliced avocado for a tasty touch. You can change up the beans in this recipe. Try pinto beans or kidney beans. Both work well and add a nice taste. You can also use different vegetables. Try zucchini or spinach for a fresh twist. If you want a cheese swap, use dairy-free cheese for a vegan option. Nutritional yeast is great too. It gives a cheesy flavor without the dairy. To boost the flavor, add a splash of lime juice. It brightens the dish and adds a zing. You can also drizzle hot sauce on top for extra heat. If you like it milder, skip the hot sauce. Adjust the spice levels to match your taste. Just add more chili powder or cumin for a bolder flavor. Serve your enchiladas on a bright plate. Stack them neatly for a nice look. Add fresh cilantro on top for color. Sliced avocado also makes a great topping. For a restaurant-style touch, add a dollop of sour cream. This gives a creamy balance to the spicy enchiladas. Pro Tips Use Fresh Ingredients: Whenever possible, opt for fresh vegetables and herbs to enhance the flavor and nutritional value of your enchiladas. Customize Your Spice Level: Adjust the amount of chili powder and smoked paprika according to your heat preference. You can also add diced jalapeños for extra spice. Make Ahead: You can prepare the filling in advance and assemble the enchiladas the day of baking. This makes for a quick and easy dinner option. Experiment with Toppings: Besides avocado and cilantro, try adding sliced olives, diced red onions, or a sprinkle of lime juice for added flavor and presentation. {{image_2}} For those who want vegan options, skip the cheese. You can still enjoy tasty enchiladas. Use plant-based cheese or none at all. This keeps the dish light and fresh. Also, consider gluten-free tortillas. Corn tortillas are naturally gluten-free. They work perfectly in this recipe. Just check the labels to ensure they meet your needs. You can adjust the heat level. If you prefer a spicy version, add more chili powder or diced jalapeños. For a mild option, use less chili powder and skip the hot toppings. Experimenting with different sauces can also change the taste. Try tomatillo sauce for a tangy twist. Or drizzle some sour cream for creaminess. Pair your enchiladas with simple side dishes. A fresh salad or Mexican rice complements the meal well. You can also serve black beans or corn on the side. For drinks, consider pairing with a light beer or a refreshing margarita. These choices enhance the flavors and make for a fun meal. To store leftover enchiladas, place them in an airtight container. You can also cover the baking dish with plastic wrap. This keeps them fresh and prevents drying out. Store them in the fridge for up to 4 days. To freeze enchiladas, let them cool completely first. Then, wrap each one in plastic wrap. Place them in a freezer-safe bag to keep out air. You can freeze them for up to 3 months. When ready to eat, thaw in the fridge overnight. Reheat them in the oven at 350°F (175°C) until warm, about 20-25 minutes. This keeps the tortillas soft and the cheese melty. You can make enchiladas ahead of time for quick meals. Prepare them up to the baking step. Store them in the fridge for up to 2 days before baking. This makes weeknight dinners easy! Portion leftovers in single servings for easy lunches. Just warm them up in the microwave or oven when ready to eat. To reduce heat in your enchiladas, you can try these tips: - Use less chili powder. Start with half a teaspoon. - Add more cheese to balance the spice. - Include sour cream or yogurt as a topping. - Serve with a side of guacamole to cool the heat. These steps help you enjoy the flavors without too much spice. Yes, you can use canned black beans. Here are some tips: - Rinse and drain the beans before using. - You can skip the cooking time since they are already cooked. - Use one can for two cups of beans. Canned beans save time and are just as tasty! You can repurpose leftover enchilada sauce in many ways: - Use it as a dip for chips or veggies. - Add it to soups for extra flavor. - Mix it with scrambled eggs for a spicy breakfast. - Pour it over grilled chicken or fish for a quick meal. These ideas help you avoid waste and enjoy great flavors! This blog covers how to make tasty enchiladas with healthy ingredients. You learned about the key components, from vegetables to sauces, and how to prepare each step. We discussed ways to swap ingredients based on your diet and enhance flavors to meet your taste. Proper storage tips help keep leftovers fresh. Now, you're ready to impress friends with your cooking. Enjoy the process, and let your creativity shine in the kitchen!

Spicy Black Bean Enchiladas Flavorful and Easy Recipe

- 2 cups frozen corn (thawed) - 1 tablespoon olive oil - 1/2 cup red onion (diced) - 2 cloves garlic (minced) - 1 cup cotija cheese (crumbled) - 1/2 cup mayonnaise - 1/2 cup sour cream The main ingredients bring a wonderful mix of tastes. The corn gives sweetness and crunch. Olive oil adds richness, while red onion and garlic give depth. Cotija cheese brings saltiness and creaminess. Mayonnaise and sour cream make the dip smooth and tangy. - 1 teaspoon chili powder - 1 teaspoon smoked paprika - Salt and pepper to taste - Juice of 1 lime Seasonings add a kick to the dip. Chili powder and smoked paprika give it warmth and a hint of smoke. Salt and pepper balance the flavors. Fresh lime juice adds a bright and zesty note. - Fresh cilantro (chopped) - Tortilla chips (for serving) Garnishing with fresh cilantro brightens the dish. It adds a pop of color and freshness. Serve the dip with crispy tortilla chips for a fun and tasty pairing. The chips make it easy to scoop and enjoy every bite. {{ingredient_image_1}} - Heat 1 tablespoon of olive oil in a skillet over medium heat. - Add 2 cups of thawed corn to the skillet. Cook for 5-7 minutes, stirring often. You want the corn to get slightly charred. This adds great flavor! - Next, add 1/2 cup of diced red onion to the skillet. - Add in 2 cloves of minced garlic too. Cook for 2-3 minutes. The onion should become soft and clear. Remove the skillet from heat and let it cool a bit. - In a large mixing bowl, combine 1 cup of crumbled cotija cheese, 1/2 cup of mayonnaise, and 1/2 cup of sour cream. - Mix in 1 teaspoon of chili powder, 1 teaspoon of smoked paprika, the juice of 1 lime, and salt and pepper to taste. Blend this until it’s smooth. - Gently fold in the charred corn mixture. Make sure it’s all mixed well. Taste the dip and adjust seasonings as needed. - Finally, transfer your dip to a serving bowl. You can garnish it with fresh cilantro for that extra pop! To make your dip shine, adjust the seasoning. Start with salt and pepper, then taste. If you want more heat, add chili powder. You can also try smoked paprika for depth. The corn needs a nice char. Cook it for about 5 to 7 minutes. Watch for a golden color and slight crunch. If you can't find cotija cheese, feta works well. It gives a nice salty flavor. For fresh ingredients, shop at local farmers' markets. This helps you find the best corn and herbs. Fresh corn really enhances the taste of the dip. Serve the dip with crispy tortilla chips. Arrange them around the dip bowl for a pretty look. For a fun touch, add a lime wedge on the side. You can also sprinkle more cilantro on top. This adds a pop of color and flavor. Pro Tips Use Fresh Corn: If you have access to fresh corn, grill it for a smoky flavor that enhances the dip's taste. Adjust the Spice Level: Customize the heat by adding diced jalapeños or a dash of hot sauce to the mix for an extra kick. Make Ahead: Prepare the dip a few hours in advance to allow the flavors to meld. Just keep it refrigerated until serving! Serve Warm or Cold: This dip is delicious either way! For a warm version, pop it in the oven for a few minutes before serving. {{image_2}} To add heat to your dip, try jalapeños. You can chop them finely and mix them in. If you prefer, use hot sauce instead. Just add a few dashes to the creamy mix. For a twist, consider spices like cayenne or crushed red pepper. For a vegetarian-friendly dip, swap the mayo and sour cream for vegan versions. Look for vegan mayo and non-dairy sour cream at your store. You can also use plant-based cheese instead of cotija. It melts well and adds great flavor. Pair this dip with other tasty appetizers. Think about serving chips, veggies, or even tacos alongside it. You can create a fun dip platter. Include guacamole, salsa, or queso for variety. This makes your meal more colorful and exciting! To keep your Mexican Street Corn Dip fresh, store it in an airtight container. Place it in the fridge right after serving. This dip stays tasty for about 3 to 5 days. Always check for any change in smell or color before eating. If it looks or smells off, it's best to toss it. Yes, you can freeze Mexican Street Corn Dip! Just put it in a freezer-safe container. Make sure to leave some space at the top because the dip will expand as it freezes. It can last up to 2 months in the freezer. When ready to eat, thaw it in the fridge overnight. To reheat, place the dip in a skillet over low heat or microwave it in short bursts. Stir often to make sure it heats evenly. If it seems too thick after thawing, add a bit of sour cream or mayo to bring back the creamy texture. Enjoy your dip warm with crunchy tortilla chips! If you cannot find cotija cheese, try feta cheese. Feta gives a nice tang. You can also use queso fresco, which has a similar texture. For a dairy-free option, look for vegan crumbled cheese. This will keep the dip tasty without dairy. This dip has a mild heat level. The chili powder adds flavor, not fire. If you like more heat, add jalapeños or hot sauce. Remember, the lime juice brightens the flavor without adding spice. Yes, you can prepare this dip a day in advance. Store it in the fridge in an airtight container. Before serving, mix it again to blend the flavors. This dip tastes even better after resting. This blog post walked you through making a tasty Mexican Street Corn Dip. You learned about the main ingredients, seasonings, and the steps to prepare the dip. I shared tips to perfect it and offered variations for spice and dietary needs. Always remember to store leftovers properly to keep them fresh. Whether you have a party or a quiet night, this dip is a winner. Enjoy making it and sharing with friends!

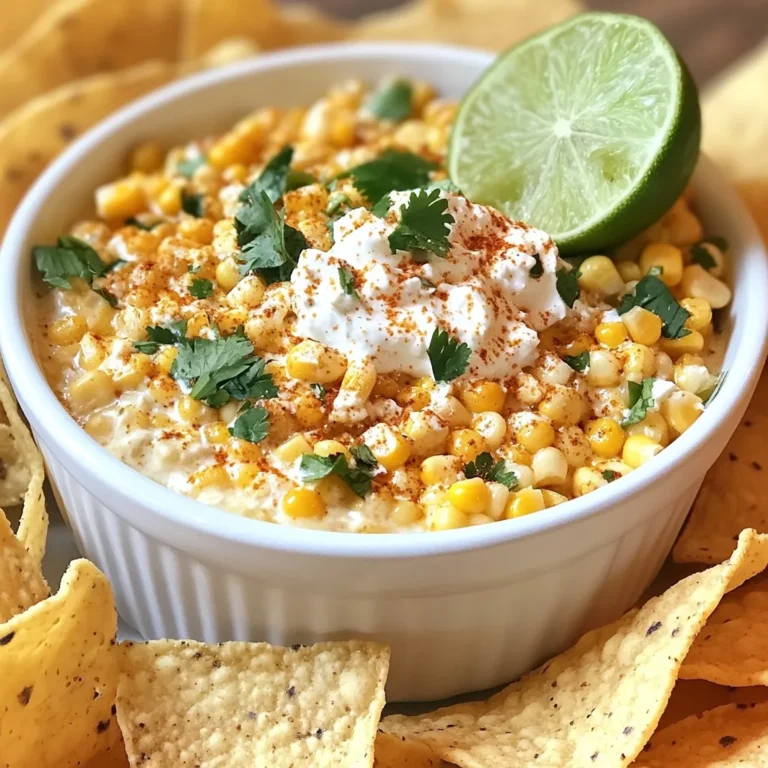
Mexican Street Corn Dip Flavorful and Easy Recipe

To make garlic butter salmon and asparagus, you need some simple main ingredients. Here’s what you’ll need: - 2 salmon fillets - 1 bunch of asparagus, trimmed - 4 tablespoons unsalted butter - 4 cloves garlic, minced - 2 tablespoons fresh lemon juice - Salt and pepper to taste - 1 teaspoon paprika - 1 tablespoon fresh parsley, chopped (for garnish) These ingredients come together to create a tasty and healthy meal. The salmon is rich and flaky, while the asparagus adds a nice crunch. Using fresh ingredients makes a big difference in this dish. Look for bright green asparagus with firm stems. The salmon should be vibrant and smell fresh, not fishy. Fresh garlic adds bold flavor, and fresh lemon juice gives a nice zing. If you can’t find some of the main ingredients, don’t worry! Here are some easy substitutions: - Instead of salmon, you can use trout or cod. - If you don’t have asparagus, try green beans or broccoli. - For butter alternatives, use olive oil or coconut oil. - You can swap fresh lemon juice with lime juice for a twist. These swaps can still give you a tasty meal while making this recipe work for you! {{ingredient_image_1}} Start by gathering all your ingredients. You need: - 2 salmon fillets - 1 bunch of asparagus, trimmed - 4 tablespoons unsalted butter - 4 cloves garlic, minced - 2 tablespoons fresh lemon juice - Salt and pepper to taste - 1 teaspoon paprika - 1 tablespoon fresh parsley, chopped (for garnish) Next, preheat your oven to 400°F (200°C). While it heats up, line a baking sheet with parchment paper. Place the salmon fillets on one side and the trimmed asparagus on the other. In a small saucepan, melt the butter over medium heat. Once melted, add the minced garlic. Sauté for 1-2 minutes until the garlic smells amazing. Then, stir in the lemon juice, salt, pepper, and paprika. This mixture adds rich flavor to the dish. Pour half of this garlic butter over the salmon. Use the other half for the asparagus. Make sure both are well coated. Bake everything in the preheated oven for 12-15 minutes. The salmon should flake easily with a fork, and the asparagus should be tender. Once your dish is done, take it out of the oven and let it sit for a minute. This helps the flavors settle. Before serving, sprinkle fresh parsley on top for a pop of color and taste. Enjoy your Garlic Butter Salmon and Asparagus warm. It looks great on the plate and tastes even better! When picking salmon, look for bright color. The flesh should be firm to touch. Avoid fish that smells strong or has brown spots. Fresh salmon should have a clean ocean scent. If possible, buy from a trusted source. Ask the fishmonger about the catch date. You want the freshest salmon for the best taste. Start with unsalted butter for more control over taste. Melt it gently to keep the flavor rich. Add minced garlic and cook until it smells great. This takes just 1-2 minutes. Stir in lemon juice for a zesty kick. Salt and pepper will enhance all the flavors. A dash of paprika adds depth and color. This mix will make your salmon shine. Trim the tough ends of the asparagus for easy eating. Choose thin stalks for tenderness. If you like crunch, don’t overcook them. Baking for 12-15 minutes at 400°F keeps them crisp. Toss them in garlic butter for added flavor. Check for doneness by poking with a fork. They should be bright green and tender to your bite. Pro Tips Use Fresh Ingredients: Fresh salmon and asparagus will provide the best flavor and texture, making your dish more enjoyable. Don’t Overcook the Salmon: Salmon should be cooked until it flakes easily with a fork; overcooking can make it dry. Aim for an internal temperature of 145°F (63°C). Add Extra Flavor: Experiment with herbs like dill or thyme for additional layers of flavor in your garlic butter mixture. Serve Immediately: This dish is best enjoyed fresh out of the oven, as the flavors and textures are at their peak. {{image_2}} You can mix in other vegetables for more flavor. Broccoli, green beans, or bell peppers work well. Just make sure to cut them into similar sizes as the asparagus. This way, they cook at the same rate. Toss them in the garlic butter, just like the salmon and asparagus. You’ll have a colorful and tasty dish! Herbs add great flavor to this meal. You can try dill, thyme, or basil. Just chop them and sprinkle on top before baking. If you like heat, add red pepper flakes or cayenne. This will give your dish a nice kick. Experiment with spices to find your favorite mix! If you want to change how you cook this dish, you can grill it! Just preheat your grill and cook the salmon and asparagus on medium heat. It takes about the same time. You can also pan-sear the salmon for a crispy skin. Use a skillet with some butter, and cook over medium-high heat for about 4-5 minutes per side. Each method brings a new flavor to your meal! To store leftover garlic butter salmon, let it cool first. Place the salmon in an airtight container. Add the asparagus in the same container or a separate one. This keeps both fresh. Store them in the fridge. They will last for up to two days. When you are ready to eat the salmon, reheat it gently. You can use the oven or the stovetop. For the oven, set it to 350°F (175°C). Place the salmon and asparagus on a baking sheet. Cover them with foil to keep them moist. Heat for about 10 minutes or until warm. On the stovetop, use a non-stick pan on low heat. This prevents overcooking and keeps the flavors intact. If you want to keep garlic butter salmon longer, freezing is a good option. Wrap the salmon and asparagus tightly in plastic wrap. Then place them in a freezer bag. Remove as much air as possible. You can freeze them for up to three months. To thaw, place them in the fridge overnight. Then reheat and enjoy! You can tell salmon is cooked when it flakes easily with a fork. The flesh turns from a deep pink to a lighter color. It should also feel firm, not mushy. For more precise results, aim for an internal temperature of 145°F (63°C). This ensures it is safe to eat and still moist. Yes, you can use frozen salmon. Just make sure to thaw it first. The best way is to place it in the fridge overnight. If you’re in a hurry, you can use the cold water method. Place the sealed salmon in cold water for about an hour. Once thawed, follow the recipe as usual. Garlic Butter Salmon and Asparagus go well with several sides. Here are a few tasty options: - Rice or quinoa for a hearty base - Mashed potatoes for creaminess - A simple green salad for freshness - Garlic bread for extra flavor These sides will balance the rich taste of the salmon and the crispness of the asparagus. In this post, we explored how to make garlic butter salmon and asparagus. We covered the main ingredients, preparation steps, and cooking methods. I shared tips on choosing fresh salmon and perfecting flavors. You can also try different veggies and herbs for variety. Lastly, I provided storage tips to keep leftovers fresh. Enjoy your delicious meal, and don’t hesitate to try new twists!

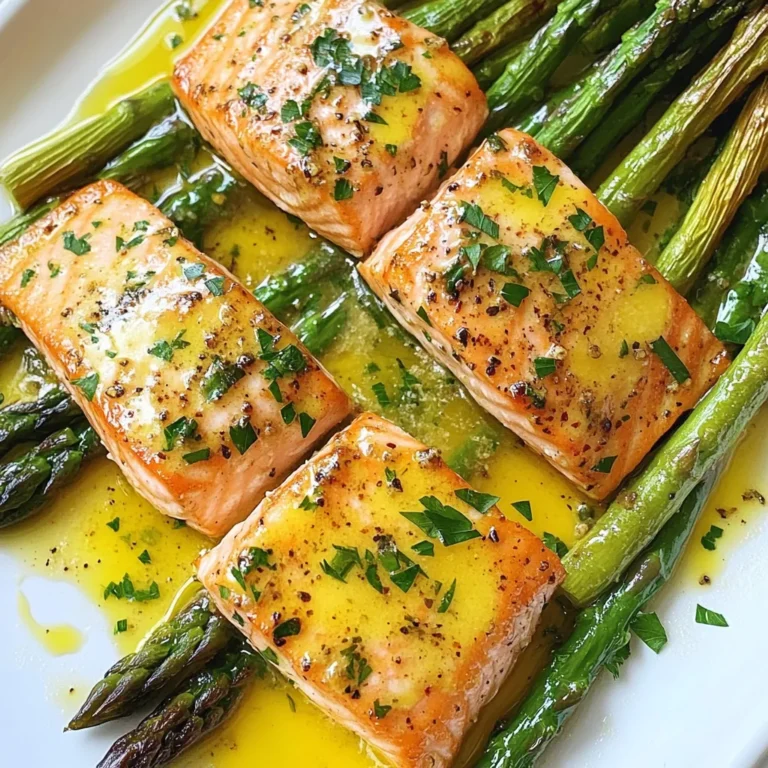
Garlic Butter Salmon and Asparagus Flavorful Delight

For this tasty dish, you need the following ingredients: - 1 lb ground chicken - 1 tablespoon vegetable oil - 2 cloves garlic, minced - 1 inch ginger, grated - 1 red bell pepper, diced - 2 green onions, chopped - 1 cup shredded carrots The ground chicken is the star of this recipe. It cooks quickly and absorbs flavors well. Garlic and ginger bring warmth and depth. The red bell pepper adds a sweet crunch, while green onions and carrots provide freshness and color. To make the sauce, gather these items: - 1/4 cup unsalted peanut butter - 2 tablespoons soy sauce - 1 tablespoon honey - 1 tablespoon sriracha (adjust to taste) Peanut butter gives this dish its name. It adds creaminess and nutty flavor. Soy sauce adds saltiness and umami. Honey balances the spice with sweetness. Adjust the sriracha to fit your heat level. For garnish and serving, you’ll need: - 1 head of butter or romaine lettuce, leaves separated - Crushed peanuts and fresh cilantro for garnish Lettuce acts as the cup for your filling. It is crisp and refreshing. Crushed peanuts add extra crunch, while cilantro brightens the dish. Serve with lime wedges for a zesty finish. These ingredients come together to create a vibrant and flavorful meal. Each bite offers a mix of textures and tastes, making these lettuce cups a fun and satisfying dish. {{ingredient_image_1}} First, gather all your ingredients. You will need: - 1 lb ground chicken - 1 tablespoon vegetable oil - 2 cloves garlic, minced - 1 inch ginger, grated - 1 red bell pepper, diced - 2 green onions, chopped - 1 cup shredded carrots - 1/4 cup unsalted peanut butter - 2 tablespoons soy sauce - 1 tablespoon honey - 1 tablespoon sriracha - 1 head of butter or romaine lettuce, leaves separated - Crushed peanuts and fresh cilantro for garnish Wash and chop the vegetables first. This saves time later. Set them aside in bowls. Heat a large skillet over medium-high heat. Add the vegetable oil. Once hot, toss in the minced garlic and grated ginger. Sauté for about 30 seconds until you smell that amazing aroma. Now, add the ground chicken. Cook it until it’s browned, breaking it up with a spatula. This takes about 5-7 minutes. Stir in the diced red bell pepper, chopped green onions, and shredded carrots. Cook for another 3-4 minutes until the veggies are soft. In a small bowl, mix the peanut butter, soy sauce, honey, and sriracha until smooth. Pour this sauce over the cooked chicken and veggies. Stir well to combine everything. Let it cook for another 2-3 minutes until it’s heated through. Remove the skillet from the heat and let the mixture cool a bit. To serve, spoon the spicy chicken mix into the lettuce leaves. Fold them like cups and enjoy your meal! To get perfectly browned chicken, start with a hot pan. Heat your vegetable oil over medium-high. When the oil shimmers, add your minced garlic and ginger. Cook them for about 30 seconds. This step adds great flavor. Then, add the ground chicken. Break it into small pieces with a spatula. Cook for about 5 to 7 minutes. Stir occasionally to avoid sticking. Wait until the chicken turns golden brown. This browning gives it a nice taste. For a beautiful presentation, use a large platter. Place your lettuce cups in a circle or a line. This makes them easy to grab. Sprinkle crushed peanuts over the tops for crunch. Add fresh cilantro for a pop of color. You can also serve lime wedges on the side. The lime adds a zesty kick. This brightens the dish and enhances flavors. To adjust the spice level, start with one tablespoon of sriracha. Mix it into the sauce with peanut butter and soy sauce. Taste the mixture before adding more. If you like it spicy, you can add more sriracha. Just remember, a little goes a long way. This way, everyone can enjoy the dish, no matter their spice preference. Pro Tips Choose the Right Lettuce: Butter or romaine lettuce provides a sturdy yet tender vessel for the filling, making them easy to hold and eat. Adjust the Spice Level: Feel free to modify the amount of sriracha based on your heat preference, or substitute with a milder sauce if desired. Prep Ahead: You can prepare the chicken mixture in advance and store it in the fridge. Just assemble the cups right before serving for a fresh taste. Garnish Creatively: Enhance the presentation by adding colorful toppings like julienned radishes or a sprinkle of sesame seeds along with crushed peanuts and cilantro. {{image_2}} You can swap ground chicken for other meats. Ground turkey works well and is leaner. You might also try ground beef for a richer taste. If you prefer something different, use shredded rotisserie chicken. This cuts down on prep time, too. For a vegetarian version, use tofu or tempeh. Both options soak up flavors well. Crumble them like ground meat, and cook until golden. Another great choice is mushrooms. Finely chop them for a hearty texture. Mix in extra veggies like zucchini or eggplant for added nutrition. If you want to change the sauce, try almond butter instead of peanut butter. This gives a nutty twist. You can also mix tahini with soy sauce for a unique flavor. For a spicy kick, add more sriracha or chili paste. Experiment with lime juice for a zesty touch. Each option brings a new taste to your lettuce cups! You can store leftover spicy peanut chicken in the fridge. Place the mixture in an airtight container. It stays fresh for up to three days. When you want to eat it again, just grab the lettuce cups. Keep the chicken mixture separate to avoid soggy lettuce. If you want to freeze the chicken mixture, use a freezer-safe container. It keeps well for about three months. Let it cool down before sealing. When ready to eat, thaw it in the fridge overnight. This helps retain the flavor and texture. To reheat, place the chicken mixture in a skillet. Heat it over medium until warm. You can also use the microwave. Heat it in short bursts, stirring in between. This keeps it moist and tasty. Once heated, serve it in fresh lettuce cups for a crunchy bite! Yes, you can. Prepare the chicken mixture ahead of time. You can store it in the fridge for up to three days. Just keep the lettuce leaves separate until you are ready to serve. This way, the lettuce stays fresh and crisp. When you are ready to enjoy, heat the chicken mixture in a pan and then spoon it into the lettuce cups. If you need a substitute, try almond butter or sunflower seed butter. Both options have a similar texture and add a nice flavor. You can also use tahini for a different taste. Just remember that tahini is less sweet than peanut butter, so you might need to adjust the honey a bit. Absolutely! To keep it gluten-free, use tamari instead of soy sauce. Tamari is made without wheat, making it safe for those who avoid gluten. Always check the labels on your ingredients to be sure they are gluten-free. This way, you can enjoy your spicy peanut chicken lettuce cups worry-free! This post covered every step for making tasty Spicy Peanut Chicken Lettuce Cups. We discussed key ingredients like ground chicken, fresh veggies, and delicious sauces. I shared simple instructions for cooking and combining flavors. You also learned tips for perfect chicken and great serving ideas. Variations add more choice, like vegetarian options and different sauces. Lastly, we looked at storage tips to keep leftovers fresh. Cooking should be fun and easy. Enjoy every bite of your creation!

Spicy Peanut Chicken Lettuce Cups Flavorful and Fresh

When making Raspberry Lemonade Cupcakes, quality ingredients make a big difference. Here’s what you need: - 1 cup all-purpose flour - 1 cup granulated sugar - 1/2 cup unsalted butter, softened - 2 large eggs - 1/2 cup buttermilk - 1/4 cup fresh lemon juice - Zest of 1 lemon - 1 teaspoon baking powder - 1/2 teaspoon baking soda - 1/4 teaspoon salt - 1 cup fresh raspberries (plus extra for garnish) - 1 teaspoon vanilla extract - Optional: Powdered sugar for dusting These ingredients blend to create a delightful cupcake. Each one plays a role. The flour gives structure. Sugar adds sweetness. Butter keeps the texture moist. Eggs help bind everything together. Buttermilk brings a nice tang. Fresh lemon juice and zest pack a punch of flavor. Baking powder and baking soda ensure the cupcakes rise. Salt balances the sweetness. Raspberries provide a burst of fruity goodness. Finally, vanilla extract rounds it all out with warmth. Using fresh ingredients will elevate your cupcakes. Choose ripe raspberries for the best taste. Fresh lemon juice and zest add brightness. Always measure carefully for the best results. Enjoy preparing your Raspberry Lemonade Cupcakes! {{ingredient_image_1}} 1. Preheat your oven to 350°F (175°C). This helps the cupcakes bake evenly. 2. Line a muffin tin with cupcake liners. This keeps them from sticking. 1. In a bowl, cream together 1/2 cup softened butter and 1 cup granulated sugar. Mix until light and fluffy, about 3-4 minutes. 2. Add in 2 large eggs, 1 teaspoon vanilla extract, 1/4 cup lemon juice, and the zest of 1 lemon. Mix well until everything is combined. 1. In another bowl, whisk together 1 cup all-purpose flour, 1 teaspoon baking powder, 1/2 teaspoon baking soda, and 1/4 teaspoon salt. 2. Gradually add the dry mix to the wet mix, alternating with 1/2 cup buttermilk. Start and end with the dry mix. Mix until just combined. 3. Gently fold in 1 cup of fresh raspberries. Be careful not to overmix. 1. Divide the batter evenly among the cupcake liners. Fill each about 2/3 full. 2. Bake in your preheated oven for 18-20 minutes. A toothpick should come out clean when done. 3. After baking, let the cupcakes cool in the pan for 5 minutes. Then, move them to a wire rack to cool completely. How to check for doneness To see if your cupcakes are ready, use a toothpick. Insert it into the center of a cupcake. If it comes out clean, they are done. If you see batter, bake them a little longer. Avoiding overmixing Mix your batter just until combined. Overmixing can make the cupcakes tough. When you add the raspberries, fold them in gently. This keeps the berries whole and the texture light. Suggestions for enhancing lemon flavor For a stronger lemon taste, add more lemon zest. You can also use lemon extract. A splash of lemon soda in the batter gives a fun twist too! Tips for using different berry varieties You can swap raspberries with other berries. Blueberries or strawberries work great. Just remember, if you use bigger berries, cut them into smaller pieces. Best frosting pairings Cream cheese frosting pairs well with these cupcakes. It adds a nice tang. You can also try a lemon buttercream for a sweeter touch. Presentation ideas For a pretty look, place a raspberry on top of each cupcake. Dust them lightly with powdered sugar before serving. This gives a nice finish and makes them eye-catching! Pro Tips Use Fresh Raspberries: For the best flavor, use fresh raspberries rather than frozen. They provide a burst of juicy flavor that complements the lemon beautifully. Check for Doneness: Oven temperatures can vary, so start checking your cupcakes a few minutes before the recommended baking time to ensure they don’t overbake. Alternate Mixing: When combining wet and dry ingredients, alternate adding them to the bowl. This helps to achieve a smoother batter without overmixing. Cool Completely: Make sure to let the cupcakes cool completely before frosting or adding powdered sugar, as heat can cause it to melt. {{image_2}} You can mix things up with raspberries and other fruits. Strawberries, blueberries, or blackberries work well. Each fruit adds its own taste. Try adding a splash of lime or orange juice for a different twist. This gives your cupcakes a fun, fruity vibe. If you need gluten-free options, use almond or coconut flour. These flours give a nice texture. For a vegan version, switch out butter for coconut oil. You can replace eggs with applesauce or flaxseed meal. These changes keep the cupcakes tasty and moist. Pair these cupcakes with lemon buttercream or cream cheese frosting. Both add a creamy touch. You can also turn this recipe into a cake. Just adjust the baking time. A round cake can be great for parties and gatherings. For short-term storage, keep your raspberry lemonade cupcakes in an airtight container. This method keeps them moist for about three days. Place them at room temperature away from direct sunlight. If you want to enjoy them later, freezing is a great option. Wrap each cupcake in plastic wrap, then place them in a freezer bag. They can last up to three months in the freezer. Just remember to label the bags with the date! These cupcakes last about three days at room temperature. If you keep them in the fridge, they can last up to a week. The cold can dry them out, so make sure they are sealed tightly. If you notice any signs of mold or an off smell, it’s best to throw them away. To revive your cupcakes, use the microwave. Heat them for about 10-15 seconds to warm them up. This method makes them soft again. If you want to keep the frosting intact, avoid microwaving them for too long. Enjoy your tasty creation with that fresh raspberry flavor! These Raspberry Lemonade Cupcakes stand out for their bright, zesty flavor. The sweet raspberries mix well with the tangy lemon juice. Each bite offers a refreshing taste, perfect for sunny days. The texture is light and fluffy, thanks to the creaming method used for the butter and sugar. This method creates air pockets, making the cupcakes rise beautifully. The fresh raspberries add bursts of flavor, making every cupcake a delightful treat. Yes, you can make these cupcakes ahead of time. I suggest baking them a day in advance. After baking, allow the cupcakes to cool completely. Store them in an airtight container at room temperature. For best results, frost them just before serving. This keeps the frosting fresh and the cupcakes moist. If you want to freeze them, wrap each cupcake in plastic wrap. They can last up to three months in the freezer. Sinking cupcakes often result from a few common mistakes. Overmixing the batter can create too much air, causing them to rise too quickly and then collapse. To avoid this, mix until just combined. Another cause is adding too many wet ingredients. Stick to the recipe to maintain the right balance. Lastly, check your baking powder and baking soda for freshness. Old leavening agents can lead to flat cupcakes. In this post, we explored how to make delicious lemon raspberry cupcakes. We discussed essential ingredients, step-by-step instructions, and helpful tips. You learned about flavor variations, storage, and how to keep your cupcakes fresh. Remember, baking is all about experimenting. Try different flavors and find what you love. Unique treats can brighten any day. Happy baking!

Raspberry Lemonade Cupcakes Delightful and Easy Recipe

To make Thai pineapple fried rice, you need these main ingredients: - 2 cups jasmine rice, cooked and cooled - 1 cup fresh pineapple, diced - 1 medium onion, diced - 2 cloves garlic, minced - 1 red bell pepper, diced - 1 cup peas and carrots (fresh or frozen) - 3 green onions, chopped - 2 tablespoons soy sauce (or tamari for gluten-free) - 1 tablespoon fish sauce (optional) - 2 tablespoons vegetable oil - 1 tablespoon curry powder - Salt and pepper to taste You can add these to make your dish special: - Cooked chicken or shrimp - Cashews or peanuts for crunch - Extra vegetables like broccoli or snap peas - A dash of chili sauce for heat - Fresh herbs like basil or mint Use these tools for cooking: - A large skillet or wok - A spatula for stirring - A measuring cup and spoons - A knife and cutting board - A serving bowl for presentation These ingredients and tools will help you create a tasty pineapple fried rice that everyone will love. {{ingredient_image_1}} To make this pineapple fried rice, start with a large skillet or wok. Heat 2 tablespoons of vegetable oil over medium heat. Add 1 medium diced onion. Sauté it for about 3 minutes until it becomes soft. Next, add 2 cloves of minced garlic and 1 diced red bell pepper. Cook these for 2 minutes until the bell pepper is tender. Now, stir in 1 tablespoon of curry powder. Let it cook for 30 seconds to bring out that great flavor. Then, add 2 cups of cooked jasmine rice. Break up any clumps and mix it well with the veggies. Push the rice to one side of the skillet. On the other side, add 1 cup of diced fresh pineapple and 1 cup of peas and carrots. Sauté these for 2-3 minutes until they are heated through. Mix everything together in the pan. Drizzle in 2 tablespoons of soy sauce and 1 tablespoon of fish sauce if you like it. Stir everything to combine evenly. Finally, season with salt and pepper to taste. Add 3 chopped green onions and mix for 1 more minute. Your fried rice is now ready to serve. Transfer it to a bowl and garnish with fresh cilantro. Serve with lime wedges on the side for a zesty kick. Using jasmine rice is key. It has a nice aroma and texture. Make sure to cook the rice ahead of time. Let it cool before using it in the dish. This helps prevent sticky rice. If you have leftover rice, that works great too. Day-old rice is often the best for fried rice. When sautéing vegetables, keep the heat at medium. This helps them cook evenly. Start with onions, as they take longer to soften. Add garlic next, as it cooks quickly. The bell pepper adds color and sweetness. Stir often to avoid burning. If you want more crunch, sauté the vegetables for a shorter time. Enjoy the fresh taste they bring to your dish! When picking a pineapple, look for one that feels heavy. A ripe pineapple has a sweet smell at the base. The skin should be golden and firm, not too soft. Avoid pineapples with dark spots or wrinkles. The leaves on top should be green and fresh. This way, your fried rice will taste bright and sweet. You can swap jasmine rice with basmati rice or brown rice. If you do not have fish sauce, use extra soy sauce. For a vegan twist, skip the fish sauce completely. Try adding tofu or tempeh for protein. You can also use any veggies you like, such as broccoli or corn. This recipe is flexible and fun to customize! One mistake is using hot rice. Make sure your rice is cooled before cooking. This helps keep the grains separate and fluffy. Another mistake is not seasoning enough. Taste as you cook and adjust salt and pepper. Lastly, don’t rush the sautéing. Give veggies time to soften and develop flavor. Taking your time makes a big difference! Pro Tips Use Day-Old Rice: For the best texture, use rice that has been cooked and cooled, preferably left in the fridge overnight. This helps the grains stay separate during frying. Customize Your Veggies: Feel free to swap in other vegetables like bell peppers, corn, or broccoli based on your preference or what you have on hand! Adjust the Spice: If you love heat, consider adding chopped chili peppers or a dash of sriracha to the mix for an extra kick! Garnish for Freshness: Always garnish with fresh herbs like cilantro or basil and serve with lime wedges. This adds brightness and enhances the dish's tropical flavors. {{image_2}} You can easily make this dish vegetarian or vegan. Simply skip the fish sauce. Use soy sauce or tamari instead. This option keeps the flavor while being meat-free. Add more veggies like broccoli or bell peppers for extra color and taste. You might also try tofu for added protein. Firm tofu works best when sautéed until golden. For a fun twist, add other tropical fruits. Mango, papaya, or even coconut can make this dish shine. You can also use different nuts like cashews or peanuts. They add a nice crunch. If you want more texture, consider adding cooked shrimp or chicken. Just make sure they are cooked before adding them to the rice. Like it spicy? Add some chopped chili peppers to the mix. You can also use chili flakes for heat. If you prefer it mild, stick with just curry powder. This gives the rice a warm flavor without the spice. Taste as you go to find your ideal heat level. To keep your Thai pineapple fried rice fresh, place it in an airtight container. Let it cool first. This keeps moisture out, which helps prevent sogginess. Make sure to store it in the fridge within two hours of cooking. It should last up to three days. When you're ready to eat, reheat the rice on the stove or in the microwave. For the stove, use a little oil in a pan. Heat it over medium heat and stir often. This helps keep the rice from sticking. In the microwave, use a microwave-safe dish. Add a splash of water to keep it moist. Heat in short bursts, stirring in between. You can freeze Thai pineapple fried rice for later. First, cool it completely. Then, pack it in freezer-safe bags or containers. Squeeze out as much air as you can. Label the bags with the date. It can stay in the freezer for about one month. To use, thaw it in the fridge overnight before reheating. You can serve Thai Pineapple Fried Rice with many tasty options. Try pairing it with spring rolls for a crunchy bite. Grilled chicken or shrimp works well for protein lovers. A fresh salad adds a nice crunch, too. You can even serve it with a sweet chili sauce for a spicy kick. Lime wedges brighten the dish and add fresh flavor. Yes, you can make Thai Pineapple Fried Rice in advance. Cook the rice and veggies, then store them in the fridge. It stays fresh for up to three days. When ready to eat, just reheat it in a pan or microwave. Add a little oil to keep it moist and tasty. Thai Pineapple Fried Rice has a unique sweet and savory flavor. The fresh pineapple gives it a tropical taste that stands out. The use of curry powder adds a warm spice not found in other styles. Also, the mix of veggies adds color and crunch, making it more vibrant. Thai Pineapple Fried Rice offers a fun mix of flavors and textures. You learned about key ingredients, cooking steps, and tips for perfect results. We also explored tasty variations and smart storage methods. Remember, you can customize this dish to suit your taste. Try different spices or add veggies to make it your own. Enjoy your cooking, and don’t hesitate to experiment. Happy cooking!

Thai Pineapple Fried Rice Flavorful and Simple Recipe

To make Mediterranean Chickpea Salad Wraps, you need these key ingredients: - 1 can (15 oz) chickpeas, drained and rinsed - 1 cup cherry tomatoes, halved - 1 cucumber, diced - ½ red onion, finely chopped - ¼ cup Kalamata olives, pitted and sliced - ½ cup feta cheese, crumbled - 2 tablespoons fresh parsley, chopped - 2 tablespoons fresh lemon juice - 2 tablespoons olive oil - 1 teaspoon dried oregano - Salt and pepper, to taste - 4 large whole wheat or spinach wraps Each ingredient adds flavor and texture. The chickpeas provide protein and fiber. The fresh veggies bring crunch and color. Feta cheese adds a creamy touch, while olives give a salty bite. If you can’t find some ingredients, here are great substitutes: - Use canned white beans instead of chickpeas. - Swap cherry tomatoes for diced red or yellow tomatoes. - Try bell peppers in place of cucumbers. - Use red wine vinegar instead of lemon juice. - Replace feta cheese with goat cheese or vegan feta. - Choose any wrap, like lettuce leaves for a low-carb option. These substitutes will keep your wraps delicious and fun. Mediterranean Chickpea Salad Wraps are healthy and full of nutrients. Here are some highlights: - Chickpeas provide protein and fiber, which help keep you full. - Fresh veggies like cucumbers and tomatoes are low in calories but high in vitamins. - Feta cheese adds calcium and healthy fats. - Olive oil offers heart-healthy monounsaturated fats. This meal is not only tasty but also good for your health. Enjoy these wraps as a light lunch or dinner. {{ingredient_image_1}} Start with one can of chickpeas. Rinse and drain them well. Then, place the chickpeas in a large mixing bowl. Next, add one cup of halved cherry tomatoes. Chop one cucumber and add it to the bowl. Finely chop half a red onion and toss it in too. Now, slice a quarter cup of Kalamata olives and add those as well. Crumble half a cup of feta cheese over the top. Finally, add two tablespoons of fresh parsley, chopped. This mix gives a bright and fresh taste. In a small bowl, whisk together two tablespoons of fresh lemon juice. Pour in two tablespoons of olive oil. Add one teaspoon of dried oregano, along with salt and pepper to taste. This dressing brings all the flavors together. Whisk until everything blends well. Pour this dressing over your chickpea salad. Gently toss the mixture until it is well coated. Let the salad sit for about ten minutes. This rest time helps the flavors meld together. Lay out four large whole wheat or spinach wraps on a clean surface. Spoon an equal amount of the chickpea salad mixture onto the center of each wrap. Make sure to not overfill, or it will be hard to wrap. Next, fold the sides of each wrap inward. Then, roll it up from the bottom to enclose the filling completely. For a nicer look, slice each wrap in half diagonally. Serve them on a colorful plate with a lemon wedge or extra parsley for a pop of color. Enjoy this healthy and tasty meal! To boost the flavor, try adding a splash of balsamic vinegar. This makes the salad more tangy. You can also mix in some diced bell peppers for extra crunch and sweetness. Fresh herbs are key. Use mint or dill along with parsley. They add bright notes to the dish. Don't forget to taste your salad before serving. Adjust the salt and pepper to your liking. These wraps are perfect for meal prep. You can make the salad a day in advance. Just keep it in the fridge. This allows the flavors to blend well. When you’re ready to eat, just assemble the wraps. If making for lunch, pack the salad and wraps separately. This keeps the wrap from getting soggy. Presentation matters! Serve the wraps on a colorful plate. You can slice each wrap in half for a lovely look. Add a sprinkle of parsley on top for color. A lemon wedge on the side adds a fresh touch. Consider using a fun garnish like edible flowers. This makes your meal even more inviting. Pro Tips Chickpea Preparation: For a creamier texture, mash half of the chickpeas before mixing them into the salad. Fresh Herbs: Experiment with other fresh herbs like mint or basil for a different flavor profile. Wrap Alternatives: Try using lettuce leaves instead of wraps for a low-carb option. Make Ahead: Prepare the salad a few hours in advance for even more developed flavors, but wrap just before serving to keep the wraps fresh. {{image_2}} You can easily make this wrap even more veggie-packed. Try adding roasted red peppers or artichoke hearts. These will boost the taste and color. Spinach or arugula can replace the wraps. This adds a fresh and nutritious twist. If you need a gluten-free option, use corn tortillas instead of wraps. You can also serve the salad in lettuce cups. Romaine or butter lettuce works well. These options keep the meal light and fun. Experiment with different ingredients to change the flavor. Add diced avocado for creaminess. You could also mix in some chopped bell peppers for a crunchy bite. If you like spice, try adding diced jalapeños or a sprinkle of red pepper flakes. For a sweet touch, toss in some raisins or dried cranberries. Each of these ideas makes the salad unique! Store your Mediterranean chickpea salad wraps in an airtight container. Use parchment paper between layers to keep them fresh. Keeping them cool helps the flavors stay bright. Place them in the fridge for up to three days. For best taste, eat them sooner rather than later. You can freeze the salad mix, but not the wraps. Place the chickpea salad in a freezer-safe bag. Remove as much air as possible before sealing it. It will stay good for about two months. When ready to eat, thaw it in the fridge overnight before using. These wraps are best served cold, but you can warm them up if you like. Unwrap them and place them on a skillet over medium heat. Heat for about 3-4 minutes on each side. Check to see if they are hot all the way through. Enjoy them warm if you prefer! Yes, you can use canned chickpeas. They save time and effort. Just drain and rinse them well. This helps remove extra salt and improves the taste. Canned chickpeas are ready to use, making them perfect for quick meals. The wraps last about 2 to 3 days in the fridge. Store them in an airtight container. If you want the wraps to stay fresh, keep the dressing separate until you are ready to eat. This keeps the wraps crisp and tasty. You can serve these wraps with many sides. Try fresh fruit, like grapes or melon, for a sweet touch. A side of chips gives a nice crunch. You can also add a simple yogurt dip for extra flavor. Enjoy these wraps with your favorite drink for a complete meal. Mediterranean chickpea salad wraps are simple and tasty. You learned about key ingredients, substitutes, and their nutrition. I shared step-by-step instructions for prep and assembly. Plus, tips for flavor, storage, and presentation will help you enjoy these wraps longer. Remember, you can make them your own with variations and add-ins. Now it’s time to get creative in the kitchen and enjoy a healthy meal!

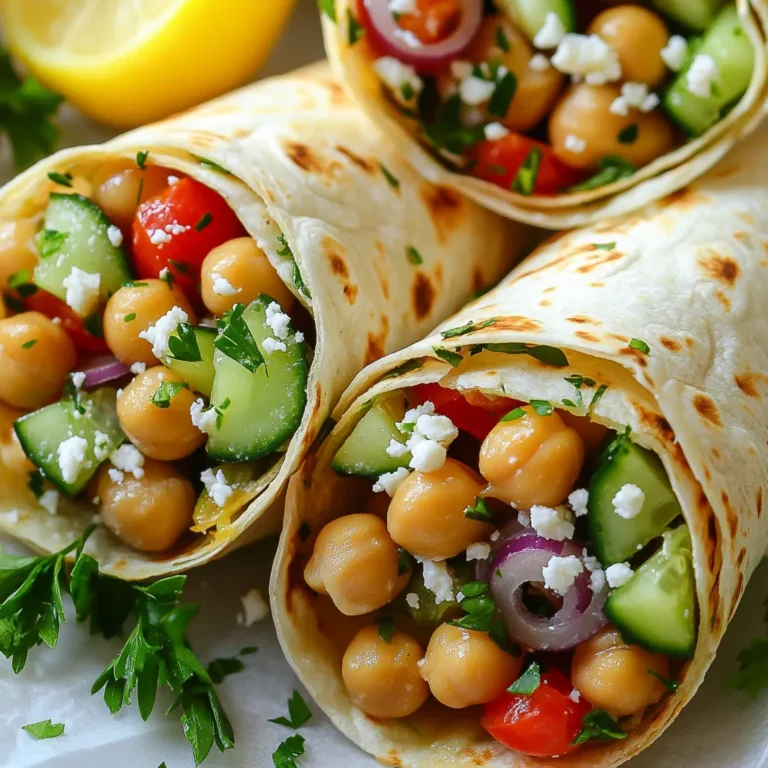
Mediterranean Chickpea Salad Wraps Flavorful and Fresh

- 1 cup rolled oats - 1 cup grated carrots (about 2 medium carrots) - 1/2 cup almond flour - 1/2 cup pitted dates, packed - 1/4 cup shredded coconut, unsweetened - 2 teaspoons ground cinnamon - 1/2 teaspoon nutmeg - 1/4 teaspoon ginger powder - 1/4 teaspoon vanilla extract - 1/4 cup walnuts, chopped (optional) - A pinch of salt - 2 tablespoons maple syrup (optional for extra sweetness) To make carrot cake energy balls, gather these simple ingredients. You need rolled oats for a hearty base. Grated carrots add moisture and flavor. Almond flour gives a nice texture and nutty taste. Pitted dates provide sweetness and bind the mix. Shredded coconut adds a tropical touch. Spices like cinnamon, nutmeg, and ginger give warmth and depth. Vanilla extract enhances the overall flavor. Optional walnuts bring crunch and healthy fats. A pinch of salt balances the sweetness. If you want a sweeter treat, add maple syrup. Each ingredient plays a key role in flavor and texture. Feel free to adjust the nuts or sweetener based on your taste. This will help you create a snack that’s just right for you! {{ingredient_image_1}} To start, gather your ingredients. In a food processor, combine the following dry ingredients: - 1 cup rolled oats - 1/2 cup almond flour - 1/4 cup shredded coconut (unsweetened) - 2 teaspoons ground cinnamon - 1/2 teaspoon nutmeg - 1/4 teaspoon ginger powder - A pinch of salt Next, add the grated carrots and pitted dates. You will need about 1 cup of grated carrots, which is about 2 medium carrots, and 1/2 cup of packed pitted dates. Now, pulse the mixture until it becomes sticky. This step helps all the flavors mix well. If the mix seems too dry, add a tablespoon of water or a bit more maple syrup. Once you have a sticky mixture, it's time to shape the energy balls. If you want a crunchier texture, stir in the optional walnuts (1/4 cup, chopped). Then, use your hands to roll the mixture into small balls, about 1 inch in diameter. You can also roll them in extra shredded coconut or chopped nuts for added texture if you like. After forming the balls, place them on a parchment-lined tray. This helps keep them from sticking. Now, refrigerate the tray for at least 30 minutes. This step firms up the energy balls, making them easier to enjoy. After chilling, they will be ready for snacking! You can make these energy balls your own. If you want them sweeter, add maple syrup. Just a couple of tablespoons can boost the flavor. You can also play with the nuts or seeds. Try pecans, almonds, or even sunflower seeds. Each nut adds its own taste and crunch. Want to amp up the flavor? Add extra spices! A pinch of cloves or allspice can bring warmth. You can also roll your energy balls in extras. Shredded coconut or crushed nuts make a fun finish. It adds texture and makes them look great! Pro Tips Use Fresh Carrots: Freshly grated carrots will provide the best flavor and moisture to your energy balls. Adjust Sweetness: Feel free to modify the amount of maple syrup based on your sweetness preference or use alternative sweeteners. Experiment with Add-ins: Try adding different nuts, seeds, or dried fruits for unique flavor combinations and textures. Storage Tips: Store the energy balls in an airtight container in the fridge for up to a week or freeze for longer shelf life. {{image_2}} You can easily change the flavor of your carrot cake energy balls. Here are two fun ideas: - Tropical Carrot Cake Energy Balls: Add 1/2 cup of crushed pineapple. This gives a sweet, fruity taste. You can reduce the dates a bit to balance the sweetness. - Chocolate Carrot Cake Energy Balls: Mix in 1/4 cup of cocoa powder. This will turn your energy balls into a rich chocolate treat. It pairs well with the spices in the original recipe. You can make these energy balls fit your diet easily. Here are some options: - Gluten-free options: Use certified gluten-free oats. This keeps the recipe safe for those who avoid gluten. - Nut-free substitutes: Swap almond flour with sunflower seed butter. This adds creaminess without nuts. It’s great for those with nut allergies. Feel free to mix and match these ideas! You can create your own favorite flavor. You should store your carrot cake energy balls in an airtight container. This helps keep them fresh and tasty. I recommend using glass containers or high-quality plastic ones. If you want to keep them cool, put the container in the fridge. You can also freeze them for longer storage. Just make sure they are in a sealed bag or container. In the fridge, these energy balls can last about one week. They stay good if kept sealed. If you freeze them, they can last up to three months. To enjoy them later, just take out what you need. Let them thaw at room temperature for a few minutes before eating. This way, they regain their perfect texture and flavor. Yes, you can make these energy balls in advance. I often prepare a batch on the weekend. This way, I have a healthy snack ready for the week. Store them in an airtight container in the fridge for up to a week. If you want them to last longer, freeze them. They stay fresh for about three months in the freezer. Just thaw them overnight in the fridge before eating. To make these energy balls vegan, simply swap honey or maple syrup with agave syrup. You can also skip the maple syrup if you prefer less sweetness. The dates already add natural sweetness to the mix. If you use another sweetener, adjust the amount to your taste. This way, you keep the energy balls plant-based and delicious. Carrot cake energy balls offer many health benefits. They are rich in fiber from rolled oats and dates. Fiber helps with digestion and keeps you full longer. Carrots bring vitamins A and C, which support eye health and boost your immune system. Almond flour adds healthy fats and protein, while coconut provides healthy energy. With walnuts, you get omega-3 fatty acids. These energy balls are a tasty way to snack healthy! In this post, we explored how to make tasty carrot cake energy balls. We listed essential ingredients like oats, carrots, and dates. I shared easy steps for mixing, shaping, and chilling the balls. You can customize flavors and textures to suit your taste. Remember to store them well for lasting freshness. Enjoy these healthy bites anytime! They are fun to make and great for quick energy. Try these energy balls today for a delicious snack!

Carrot Cake Energy Balls Healthy Snack Delight

To make your Lemon Parmesan Brussels Sprout Pasta, gather these simple items: - 8 oz whole wheat pasta (spaghetti or linguine) - 1 lb Brussels sprouts, trimmed and halved - 3 tablespoons olive oil - 3 cloves garlic, minced - 1 lemon (juice and zest) - ½ cup grated Parmesan cheese (plus extra for serving) - 1 teaspoon red pepper flakes (adjust for spice level) - Salt and black pepper to taste - Fresh parsley, chopped (for garnish) You can swap some ingredients if needed: - Use regular pasta instead of whole wheat for a different texture. - Try kale or green beans instead of Brussels sprouts for variety. - Substitute lemon juice with lime juice for a different citrus flavor. - Use nutritional yeast in place of Parmesan for a vegan option. - Swap olive oil with avocado oil for a mild taste. Choosing the right Brussels sprouts is key for great flavor: - Look for firm, bright green sprouts that feel heavy for their size. - Avoid any that are yellow, wilted, or have dark spots. - Small sprouts are often sweeter and more tender than larger ones. - Store fresh Brussels sprouts in the fridge in a plastic bag to keep them crisp. - Use them within a few days for the best taste and texture. {{ingredient_image_1}} To start, fill a large pot with water. Add a good amount of salt. Bring the water to a boil. Once boiling, add 8 oz of whole wheat pasta. Stir it right away so it does not stick. Cook the pasta until it is al dente, which takes about 8-10 minutes. When done, reserve 1 cup of the pasta water. Drain the pasta in a colander and set it aside. Next, grab a large skillet and heat 3 tablespoons of olive oil over medium heat. While the oil heats, trim and halve 1 lb of Brussels sprouts. Once the oil is hot, add the sprouts cut-side down. Cook them for about 5-7 minutes. You want them to turn golden brown and get a bit crispy. After the sprouts brown, add 3 cloves of minced garlic to the skillet. Stir well and cook for another 1-2 minutes. The garlic should smell good but not burn. Now, it’s time to bring it all together. Add the drained pasta to the skillet with the Brussels sprouts. Squeeze in the juice from 1 lemon and add the zest. Sprinkle in ½ cup of grated Parmesan cheese. Toss everything together. If it looks dry, add a bit of the reserved pasta water. This will make the dish creamy. Finally, season with 1 teaspoon of red pepper flakes, salt, and black pepper to taste. Toss again to mix well. Serve the pasta hot, topped with extra Parmesan cheese and chopped parsley. Enjoy your meal! To cook pasta just right, start with a big pot of salted water. The water should taste like the sea. Bring it to a boil before adding the pasta. Stir it well to prevent sticking. Follow the package time but check it a minute early. Pasta should feel firm but tender. Drain, but save a cup of that starchy water. It helps later. You can boost flavor by adding a few simple things. Try some lemon zest for more zing. Extra garlic gives a nice kick too. If you like heat, toss in more red pepper flakes. You can also add fresh herbs like basil or thyme. They brighten up the dish. For creaminess, a touch of cream or more cheese works wonders. When serving, use shallow bowls for a lovely look. A drizzle of olive oil adds shine. Top with extra Parmesan cheese for richness. Chopped parsley gives a fresh pop of color. You can add lemon wedges on the side. They let guests add more zest if they want. This makes each bite bright and tasty. Pro Tips Use Fresh Brussels Sprouts: Fresh Brussels sprouts will have a better texture and flavor compared to frozen ones. Look for firm, compact sprouts with bright green leaves. Adjust the Spice Level: If you prefer a milder dish, reduce the amount of red pepper flakes or omit them entirely. For extra heat, consider adding a pinch of cayenne pepper. Reserve Pasta Water: Always reserve some pasta water before draining. This starchy water can help to create a creamy sauce and improve the pasta's consistency. Garnish for Flavor: Enhance the dish's flavor and presentation by garnishing with additional Parmesan cheese and fresh parsley just before serving. {{image_2}} You can boost your Lemon Parmesan Brussels Sprout Pasta with protein. Adding chicken, shrimp, or tofu makes it heartier. For chicken, grill or sauté it first. Cut it into bite-sized pieces. Stir it in with the pasta for a tasty mix. If you prefer shrimp, cook it until pink and tender. Toss it in at the end for a quick and easy protein. For a vegan option, use tofu. Press it to remove water, then cube and sauté until golden. Each protein choice adds flavor and texture. You can easily adapt this dish for different diets. To keep it vegetarian, simply skip the meat and stick to the main recipe. For vegans, swap the Parmesan cheese with nutritional yeast. It gives a cheesy flavor without dairy. You can also use a vegan cheese that melts well. This keeps the dish rich and satisfying. Always check the labels to ensure the alternatives fit your diet. Cheese can change the whole taste of your dish. While Parmesan is classic, try other options for fun twists. Pecorino Romano adds a sharper taste. If you like a creamy texture, go for goat cheese. It melts beautifully and adds tang. For a nutty flavor, consider Grana Padano. Each cheese brings a unique taste, making every meal special. Experiment to find your favorite combination! To keep your Lemon Parmesan Brussels Sprout Pasta fresh, place it in an airtight container. Make sure it cools down first. Store it in the fridge for up to three days. If you want to keep it longer, freezing is a good option. To reheat, you have a few options. You can use the microwave for quick heat. Just cover it to keep moisture in. Stir halfway through to heat evenly. For the stovetop, add a splash of water in a pan. Heat over low heat until warm. This keeps the pasta from drying out. If you want to freeze your pasta, do this before adding cheese. Place the cooled pasta in a freezer bag. Remove as much air as possible before sealing. You can freeze it for up to two months. To enjoy, thaw overnight in the fridge and reheat as mentioned above. Yes, you can use regular pasta. Spaghetti or linguine works well. Whole wheat adds fiber and a nutty taste. Regular pasta is softer and lighter. If you prefer that, go for it. Just cook it the same way as directed. To add spice, increase the red pepper flakes. Start with 1 teaspoon and taste. If you want more heat, add more. You can also use fresh chopped chili peppers. They add flavor and heat. Try different kinds to find what you like best. This pasta pairs well with a simple salad. A green salad with mixed greens is great. You can also serve it with grilled chicken or fish. Garlic bread is another tasty side option. It adds crunch and goes well with the pasta. This blog post covered how to make Lemon Parmesan Brussels Sprout Pasta. We discussed the ingredients needed, and you learned how to choose fresh sprouts. I shared step-by-step instructions, plus tips for cooking perfect pasta. You also found ways to customize the recipe with proteins and vegan options. We touched on storing leftovers and answered common questions. Cooking can be fun and easy! With these tips, you can enjoy a tasty meal anytime.

Lemon Parmesan Brussels Sprout Pasta Flavorful Delight

PREV 1 … 41 42 43 … 57 NEXT
quick dish kitchen

explore

DessertsDinnerAppetizersDrinks

Our Policies

  • Cookie Policy
  • Copyright Policy
  • Disclaimer
  • GDPR Policy
  • Terms Of Use
Back to Top
  • About
  • Contact Us
  • Privacy Policy
© 2025 quick dish kitchen