FREE DINNER EBOOK! Get your copy!
  • Cookie Policy
  • GDPR Policy
  • Disclaimer
  • Terms Of Use
  • Visit my other site: Fun Cookie Recipes
quick dish kitchen
  • Home
  • Dinner
  • Desserts
  • Drinks
  • Appetizers
  • Contact
  • About
  • Privacy Policy
  • Home
  • Dinner
  • Desserts
  • Drinks
  • Appetizers
  • Contact
  • About
  • Privacy Policy
  • Cookie Policy
  • GDPR Policy
  • Disclaimer
  • Terms Of Use
Visit my other site: Fun Cookie Recipes

HOME / CATEGORIES /

Latest

To make these tasty pineapple coconut cupcakes, you need: - 1 cup all-purpose flour - 1/2 cup granulated sugar - 1/2 cup unsweetened shredded coconut - 1 tsp baking powder - 1/2 tsp baking soda - 1/4 tsp salt - 1/2 cup pineapple juice (fresh or canned) - 1/3 cup vegetable oil - 1 large egg - 1 tsp vanilla extract - 1/2 cup crushed pineapple, drained - Optional: Cream cheese frosting for topping You can swap ingredients if needed. Use whole wheat flour for a healthier option. Coconut sugar can replace granulated sugar for a richer taste. You can also use melted butter instead of vegetable oil for extra flavor. If you don’t have fresh pineapple juice, canned juice works just fine. For a dairy-free treat, try a plant-based egg substitute. Always choose high-quality ingredients. Fresh pineapple juice gives the best flavor. Look for unsweetened shredded coconut with no added sugar. When picking your egg, choose one that is organic or free-range for better taste. Use fresh baking powder and soda to ensure the cupcakes rise well. Quality ingredients make a big difference in taste and texture. {{ingredient_image_1}} To start, preheat your oven to 350°F (175°C). Grab a muffin tin and line it with cupcake liners. In a large bowl, mix together the dry ingredients: - 1 cup all-purpose flour - 1/2 cup granulated sugar - 1/2 cup unsweetened shredded coconut - 1 tsp baking powder - 1/2 tsp baking soda - 1/4 tsp salt Whisk these ingredients well until they blend. In a separate bowl, combine the wet ingredients: - 1/2 cup pineapple juice (fresh or canned) - 1/3 cup vegetable oil - 1 large egg - 1 tsp vanilla extract Whisk until smooth. Now, pour the wet mix into the dry mix. Stir gently until just combined. Be careful not to overmix. Next, fold in the crushed pineapple. Use a spatula for even distribution. Now, divide the batter into the cupcake liners. Fill each liner about two-thirds full. This helps them rise without spilling over. Place the tin in your preheated oven and bake for 18-20 minutes. To check if they are done, insert a toothpick in the center. If it comes out clean, they are ready. After baking, let the cupcakes cool in the tin for about 5 minutes. Then, move them to a wire rack to cool completely. This step is key for a good texture. If you want to frost them, use cream cheese frosting. Spread it on top once they are fully cool. For an extra touch, sprinkle more shredded coconut on top. Enjoy your tasty pineapple coconut cupcakes! One common mistake is overmixing the batter. Mix until just combined. This keeps your cupcakes light. Another mistake is not measuring ingredients correctly. Use a scale when possible. Scooping flour can add too much. Lastly, don’t skip the cooling step. Letting cupcakes cool helps them set. To get the best flavor, use fresh pineapple juice. It makes a big difference. Also, try to use high-quality coconut. Unsweetened shredded coconut adds a rich taste. You can also add a bit of extra vanilla extract. This little touch enhances the overall flavor. For moist cupcakes, use crushed pineapple. Drain it well but keep some juice. The juice adds more flavor and moisture. Don't forget the oil! Vegetable oil keeps the cupcakes soft. Finally, let them cool completely before frosting. This helps the frosting stick and taste great. Pro Tips Use Fresh Pineapple Juice: For the best flavor, opt for fresh pineapple juice instead of canned. It enhances the tropical taste of the cupcakes. Don’t Overmix: When combining wet and dry ingredients, stir just until combined. Overmixing can lead to dense cupcakes. Check for Doneness: Insert a toothpick into the center of a cupcake to check if it's done. If it comes out clean, they’re ready! Cool Completely Before Frosting: Allow cupcakes to cool completely before adding frosting to prevent it from melting and sliding off. {{image_2}} You can add a zesty twist to your pineapple coconut cupcakes. Just swap some pineapple juice for fresh lime juice. Use lime zest in the batter for extra flavor. This brightens every bite. The sweet coconut blends well with the tangy lime. These cupcakes taste like a tropical vacation. Want a fun twist? Make pineapple upside-down cupcakes! Start by placing a slice of pineapple at the bottom of each cupcake liner. Sprinkle brown sugar and a bit of butter over the pineapple. Then pour your batter on top. When you flip them over, you get a sweet, caramelized topping. It's a show-stopper for any dessert table. You can enjoy these cupcakes even if you're gluten-free. Just replace all-purpose flour with a gluten-free blend. Make sure the blend has xanthan gum for the best texture. The rest of the recipe stays the same. You’ll still get soft, moist cupcakes. Everyone will love them, gluten-free or not! To keep your pineapple coconut cupcakes fresh, store them in an airtight container. This helps retain moisture and flavor. Place a piece of parchment paper between layers if stacking. Keep the container at room temperature for up to three days. For longer storage, move the cupcakes to the fridge. They can last up to a week there. Make sure they are covered well to avoid drying out. Freezing cupcakes is simple and keeps them tasty. First, let the cupcakes cool completely. Then, wrap each cupcake in plastic wrap. After that, place them in a freezer-safe bag. Label the bag with the date. You can freeze them for up to three months. When you want to enjoy them, just take out what you need. When you’re ready to eat your frozen cupcakes, let them thaw in the fridge overnight. If you want them warm, preheat your oven to 350°F (175°C). Remove the wrapping and place the cupcakes on a baking sheet. Heat them for about 10 minutes. This brings back their soft texture. If you topped them with frosting, use the microwave for 10 seconds instead. Enjoy these treats fresh! Yes, you can make these cupcakes vegan. To do this, replace the egg with a flax egg. Mix 1 tablespoon of ground flaxseed with 2.5 tablespoons of water. Let it sit for about 5 minutes until it thickens. Use a plant-based oil, like coconut oil, instead of vegetable oil. For the frosting, you can use a vegan cream cheese or coconut whipped cream. Pineapple coconut cupcakes last for about 3 to 5 days at room temperature. Store them in an airtight container to keep them fresh. If you want to keep them longer, place them in the fridge, where they can last up to a week. Just remember to bring them to room temperature before serving for the best taste. If you prefer a different frosting, try using whipped coconut cream. Simply chill a can of coconut milk overnight, then scoop out the solid part and whip it until fluffy. You can add a bit of powdered sugar for sweetness. Another option is a simple vanilla buttercream made with vegan butter and powdered sugar. This will still give you a tasty and creamy topping! This blog post guides you through making cupcakes from start to finish. We covered the right ingredients and how to prepare the batter. You know the baking steps and cooling tips for perfect cupcakes. I shared common mistakes to dodge and how to improve flavor and texture. We even explored fun variations like coconut lime. Remember, quality ingredients make a big difference. Enjoy baking your cupcakes and sharing them with friends!

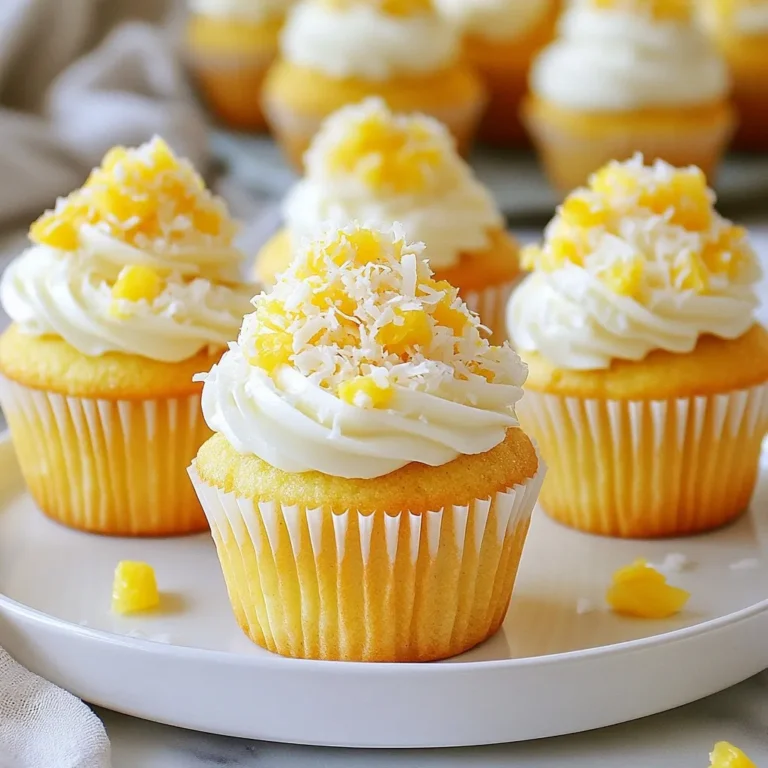
Pineapple Coconut Cupcakes Delightful and Easy Treat

To make these tasty blueberry pancake bites, you need simple ingredients. Here’s what you’ll need: - 1 cup all-purpose flour - 2 tablespoons sugar - 1 tablespoon baking powder - 1/2 teaspoon salt - 1 cup milk - 1 large egg - 2 tablespoons melted butter (plus more for greasing) - 1 cup fresh blueberries These ingredients come together to create a fluffy, sweet treat that everyone loves. While the essential ingredients work great, you can add some extras. Here are a few options to make your pancake bites even better: - A splash of vanilla extract for added sweetness - A pinch of cinnamon for warmth - Chopped nuts for crunch These optional ingredients can add new flavors and textures to your pancake bites. To serve these delicious bites, consider these tasty add-ons: - Maple syrup for drizzling - Extra fresh blueberries on top - A dollop of whipped cream for a fun twist These add-ons will make your blueberry pancake bites look and taste amazing. Enjoy! {{ingredient_image_1}} First, gather your ingredients. You need: - 1 cup all-purpose flour - 2 tablespoons sugar - 1 tablespoon baking powder - 1/2 teaspoon salt - 1 cup milk - 1 large egg - 2 tablespoons melted butter (plus more for greasing) - 1 cup fresh blueberries - Maple syrup (for serving) Next, preheat your oven to 350°F (175°C). Grease a mini muffin tin with melted butter. In a big bowl, whisk the flour, sugar, baking powder, and salt together. In another bowl, mix the milk, egg, and melted butter. Combine the wet and dry mixes gently. You want some lumps, so don’t overmix. Now, fold in the blueberries carefully. Using a spoon or small ice cream scoop, fill each muffin cup three-quarters full with the batter. Place the tin in the oven and bake for 12-15 minutes. Keep an eye on them. They are done when golden brown, and a toothpick comes out clean. Let the pancake bites cool in the tin for a few minutes. After that, transfer them to a wire rack to cool slightly. Serve warm with maple syrup and a few extra blueberries on top. Enjoy these fluffy bites! To make fluffy pancake bites, start with fresh ingredients. Use baking powder that is not expired. Mix the dry and wet ingredients separately. Combine them gently. Stir just until you see the flour disappear. It’s okay if there are lumps. Overmixing can lead to dense bites. When adding blueberries, use fresh ones if possible. Rinse and dry them first. Fold them into the batter carefully. This keeps the batter light. If you want to use frozen blueberries, thaw and dry them first. This prevents extra water from making your bites soggy. One mistake is filling the muffin cups too full. Fill them only three-quarters full. This allows space for rising. Another mistake is not greasing the tin well. Always grease the tin with melted butter. Lastly, don’t skip the cooling step. Let them cool slightly before serving. This helps improve texture and flavor. Pro Tips Use Fresh Blueberries: Always opt for fresh blueberries over frozen for the best flavor and texture. Don’t Overmix: Gently fold the batter to keep the pancake bites light and fluffy; a few lumps are okay. Adjust Sweetness: Feel free to adjust the sugar based on your preference or the sweetness of the blueberries. Perfect Portioning: Use an ice cream scoop for consistent portion sizes, ensuring even baking and presentation. {{image_2}} If you have dietary needs, you can swap some ingredients. Use gluten-free flour instead of all-purpose flour. This works well for those who are gluten-sensitive. You can replace the milk with almond milk or oat milk. For a vegan option, use a flax egg instead of a regular egg. Simply mix one tablespoon of flaxseed meal with three tablespoons of water and let it sit until it thickens. You can change the flavor of your pancake bites easily. Try adding a teaspoon of vanilla extract for a sweet touch. Want more fruit? Mix in strawberries or raspberries along with the blueberries. For a fun twist, add a pinch of cinnamon or nutmeg to the batter. Chocolate lovers can fold in mini chocolate chips for an extra treat. Both fresh and frozen blueberries work great in this recipe. Fresh blueberries give you a bright flavor and nice texture. If you use frozen blueberries, do not thaw them first. This keeps them from getting mushy. Just fold them in straight from the freezer. Using frozen berries can also make these pancake bites even easier to prepare, especially when fresh blueberries are out of season. To keep your tasty pancake bites fresh, place them in an airtight container. You can store them at room temperature for one day. If you want to keep them longer, store them in the fridge for up to three days. Make sure they cool completely before sealing the container. This way, they won’t get soggy. Reheating blueberry pancake bites is simple. You can use a microwave or an oven. For the microwave, heat them for about 15-20 seconds. Check to see if they are warm throughout. If you use an oven, preheat it to 350°F (175°C). Place the bites on a baking sheet and heat for about 5-7 minutes. This method keeps them nice and soft. If you want to freeze your pancake bites, first let them cool completely. Then, arrange them in a single layer on a baking sheet. Freeze them for about one hour until they are firm. After that, place the bites in a freezer bag or container. They will stay good for up to three months. When you’re ready to eat them, just thaw in the fridge overnight and reheat as needed. Yes, you can make these pancake bites ahead of time. Bake them and let them cool. Then, store them in an airtight container in the fridge. They stay fresh for about three days. When you want to eat them, just warm them up in the microwave for a quick breakfast. This makes mornings easier! If you need an egg substitute, try using applesauce or mashed banana. Use 1/4 cup of either for each egg. This keeps your pancake bites moist and tasty. You can also use flaxseed meal. Mix 1 tablespoon of flaxseed with 2.5 tablespoons of water. Let it sit for a few minutes before adding it to your batter. To make these pancakes healthier, use whole wheat flour instead of all-purpose flour. This adds fiber and nutrients. You can also reduce the sugar by half or use honey or maple syrup as a natural sweetener. Add in some chopped nuts or seeds for extra protein and healthy fats. This way, you enjoy a delicious treat that’s good for you! These blueberry pancake bites are a fun and tasty treat. We covered the key ingredients, like essential and optional ones. I shared simple steps for preparation and baking for best results. You now know how to avoid common mistakes and get fluffy bites. We discussed variations to fit your needs and how to store leftovers. Keep experimenting with flavors and ingredients. Enjoy your cooking adventures with these pancake bites!

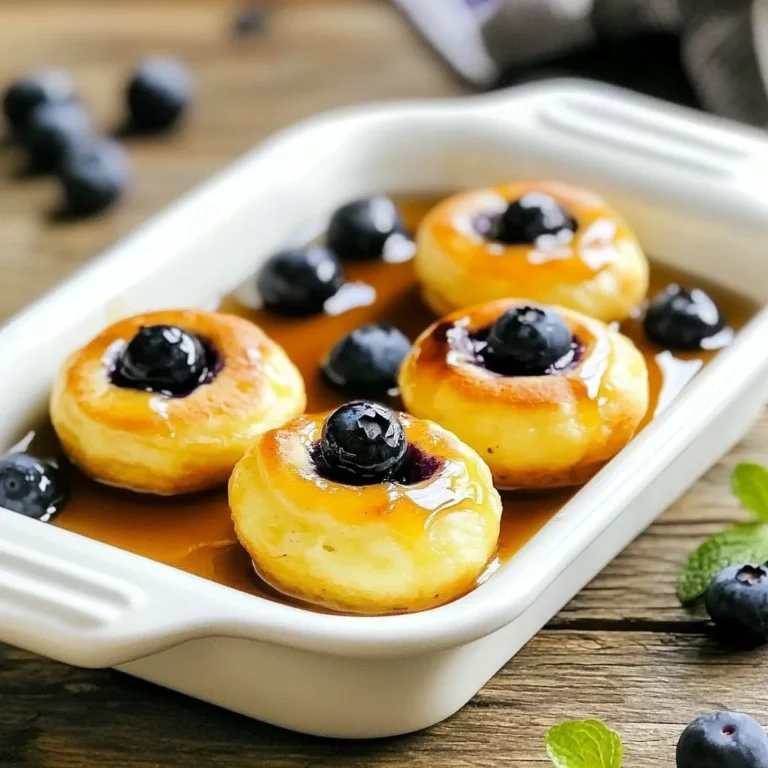
Blueberry Pancake Bites Tasty and Easy Recipe

To make spicy Thai basil chicken, gather these main ingredients: - 1 lb (450g) boneless chicken thighs, sliced thinly - 2 tablespoons vegetable oil - 4 cloves garlic, minced - 2-3 bird's eye chilies, finely chopped (adjust to taste) - 1 red bell pepper, sliced - 1 cup fresh Thai basil leaves - 2 tablespoons soy sauce - 1 tablespoon fish sauce - 1 teaspoon sugar These ingredients create a rich, vibrant dish with bold flavors. You can add these optional ingredients for even more taste: - 1 tablespoon oyster sauce (for added depth) Oyster sauce brings a nice umami flavor to the dish. Serve spicy Thai basil chicken with these tasty sides: - Cooked jasmine rice - Steamed vegetables - Cucumber salad These sides balance the heat and enhance your meal. Enjoy experimenting with these flavors! {{ingredient_image_1}} Start by gathering all your ingredients. You will need: - 1 lb (450g) boneless chicken thighs, sliced thinly - 2 tablespoons vegetable oil - 4 cloves garlic, minced - 2-3 bird's eye chilies, finely chopped - 1 red bell pepper, sliced - 1 cup fresh Thai basil leaves - 2 tablespoons soy sauce - 1 tablespoon oyster sauce (optional) - 1 tablespoon fish sauce - 1 teaspoon sugar - Cooked jasmine rice, for serving Wash your vegetables well. Slice the chicken into thin strips. Mince the garlic and chop the chilies. This prep makes cooking easier and faster. Heat the vegetable oil in a large skillet or wok on medium-high heat. Once hot, add the minced garlic and chopped chilies. Sauté for about 30 seconds. You want the garlic fragrant but not burnt. Next, add the sliced chicken thighs. Stir frequently for about 5-7 minutes. Cook until the chicken is browned and no longer pink inside. Now, toss in the sliced red bell pepper. Cook for another 2-3 minutes. The peppers should be slightly soft but still crisp. This adds great texture to the dish. In a small bowl, mix together the soy sauce, oyster sauce (if you're using it), fish sauce, and sugar. Stir well to combine. Pour this sauce mixture into the skillet. Stir to coat the chicken and peppers evenly. Let everything cook for another minute. This allows the sauce to stick to the chicken and veggies. Finally, turn off the heat and gently fold in the fresh Thai basil leaves. They will wilt quickly from the heat. Serve your spicy Thai basil chicken over jasmine rice. Enjoy! You control how spicy your dish is. Start with one bird's eye chili. Taste, then add more if you want it hotter. Remember, fresh chilies are very strong! If it's too spicy, add a little sugar. This balances the heat nicely. You can also serve it with extra lime. Lime juice cools down the spice, making it more enjoyable. For tender chicken, slice the thighs thinly. This helps them cook quickly and evenly. Cook on medium-high heat for the best results. Avoid overcrowding the pan. If the pan is too full, the chicken will steam instead of fry. This can make it tough. Stir often to get an even cook. Make your dish look great! Serve the chicken on a bed of jasmine rice. Add fresh basil leaves on top for color. A slice of lime on the side adds brightness. This makes your dish pop! You can also use a colorful plate to enhance the look. Enjoy your meal with a smile! Pro Tips Use Fresh Ingredients: Opt for fresh Thai basil and the freshest chicken you can find for the best flavor in your dish. Adjust Spice Level: Feel free to adjust the number of bird's eye chilies to match your heat tolerance; start with fewer and add more if desired. Perfect Rice: Make sure to serve this dish over perfectly steamed jasmine rice, which complements the bold flavors beautifully. Garnish for Appeal: A few whole basil leaves and a slice of lime not only enhance presentation but also add a burst of freshness when served. {{image_2}} You can easily make Spicy Thai Basil Chicken vegetarian. Use firm tofu instead of chicken. Slice the tofu into thin pieces. Pan-fry the tofu until golden brown. This gives it a nice texture. Follow the same steps in the recipe after adding the garlic and chilies. Use the same sauces to keep the flavors. If you prefer other proteins, try shrimp or beef. For shrimp, cook them quickly, about 2-3 minutes. Add them just after the garlic and chilies. For beef, use thin strips of flank steak. Cook the beef until it’s browned, about 5-7 minutes. Both options will still taste great with the sauce. Many ingredients can change based on what you have. If you can’t find Thai basil, use regular basil or mint. You can replace fish sauce with soy sauce for a vegetarian option. If you want less sweetness, skip the sugar or use honey. Each swap can offer a new twist on the dish. To store leftovers, let the dish cool down first. Place it in an airtight container. Make sure to cover it well. Store the container in the fridge. It will stay fresh for about 3 days. To reheat, take the chicken out of the fridge. You can use a skillet or microwave. If using a skillet, heat it on medium. Add a splash of water to keep it moist. Stir it for about 5 minutes or until hot. If using a microwave, heat it in short bursts. Check every 30 seconds to avoid overcooking. You can freeze Spicy Thai Basil Chicken too. Use a freezer-safe container for best results. It will last up to 3 months in the freezer. When ready to eat, thaw it in the fridge overnight. Reheat it as mentioned above. Enjoy the flavors again! Spicy Thai Basil Chicken is a tasty dish from Thailand. It features tender chicken cooked with spicy chilies and fresh basil. The dish has a bold flavor, thanks to soy sauce, fish sauce, and garlic. You serve it over jasmine rice for a complete meal. This dish is quick to make and perfect for busy days. Yes, you can use different meats. Feel free to swap chicken for pork, beef, or shrimp. Each meat brings its own flavor. Just make sure to adjust cooking times. For example, shrimp cooks faster than chicken. Always ensure the meat is fully cooked before serving. To reduce the heat, use fewer bird's eye chilies. You can add more bell pepper to balance the spice. Another option is to remove the seeds from the chilies. You can also serve the dish with a side of yogurt or sour cream. This helps to cool the heat and makes it more enjoyable for everyone. This blog post covered how to make Spicy Thai Basil Chicken. We discussed main and optional ingredients, plus tasty side dishes. I walked you through step-by-step cooking and shared helpful tips. We even explored variations for different diets and storage methods. In the end, you can enjoy this dish your way. Make it spicy or mild and choose what fits your taste. Each bite brings fresh flavors. Take these ideas to your kitchen and have fun making it!

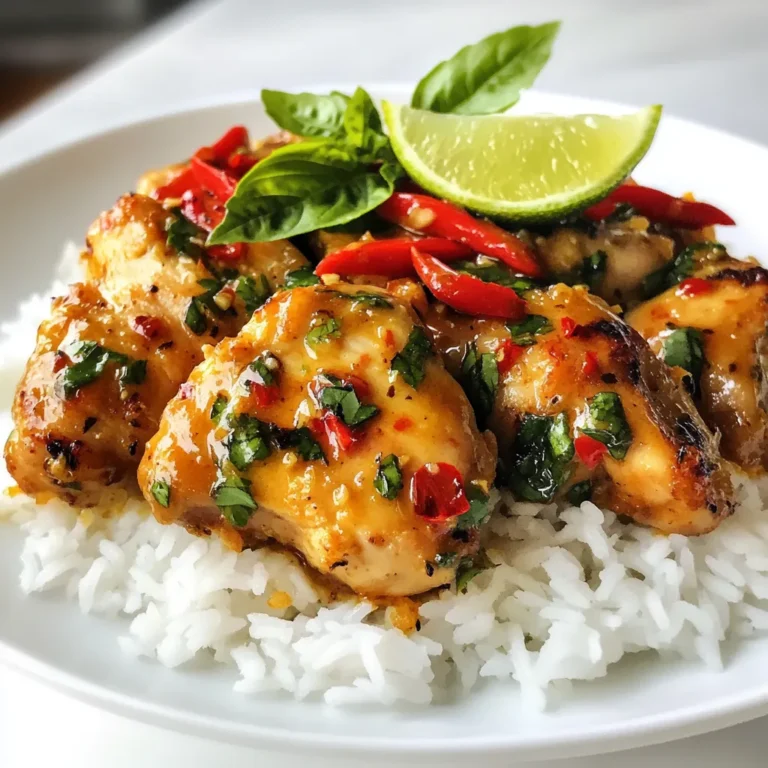
Spicy Thai Basil Chicken Flavorful and Easy Recipe

- 1 cup unsalted butter - 1 cup packed brown sugar - 1/2 cup granulated sugar - 2 large eggs - 2 teaspoons vanilla extract - 2 1/4 cups all-purpose flour - 1 teaspoon baking soda - 1/2 teaspoon salt - 1 cup pecans, chopped - 1/2 teaspoon cinnamon (optional) - 1 cup chocolate chips (optional) When making brown butter pecan cookies, the right ingredients matter a lot. Each item adds flavor and texture. Unsalted Butter: This is key for rich, nutty flavor. Brown it slowly to get that perfect taste. Brown Sugar: It brings moisture and a deep caramel flavor. The more packed it is, the better. Granulated Sugar: This helps with sweetness and gives a slight crunch. Eggs: They bind everything together and add some fluffiness. Vanilla Extract: Adds warmth and a nice scent. Use pure for best flavor. All-Purpose Flour: This is the base of your cookies. It gives them structure. Baking Soda: This helps the cookies rise a little. It keeps them soft. Salt: A pinch is needed to balance the sweetness. Chopped Pecans: They give a lovely crunch and nutty taste. Toast them for extra flavor. Cinnamon (Optional): A little spice can make a big difference. Use it if you like warmth. Chocolate Chips (Optional): They add sweetness and richness. Use dark or milk chocolate, your choice. Having these ingredients ready will set you up for success. Each one plays a role in making these cookies rich and flavorful. {{ingredient_image_1}} Melting the Butter Start by cutting 1 cup of unsalted butter into pieces. Place it in a saucepan over medium heat. Stir it often as it melts. Achieving the Perfect Golden Brown Color Keep cooking the butter until it turns golden brown. You will notice a nutty smell, which is great! This takes about 5 to 7 minutes. Once it reaches this color, take it off the heat and let it cool a bit. Mixing the Sugars with Brown Butter In a large bowl, mix the brown butter with 1 cup of brown sugar and 1/2 cup of granulated sugar. Use a whisk or a mixer until the mixture is creamy and well combined. Adding Eggs and Vanilla Add 2 large eggs to the mix, one at a time. Stir well after each egg. Then, add in 2 teaspoons of vanilla extract. Make sure everything is mixed in nicely. Whisking Together Flour, Baking Soda, and Salt In another bowl, whisk together 2 1/4 cups of all-purpose flour, 1 teaspoon of baking soda, and 1/2 teaspoon of salt. If you like, add 1/2 teaspoon of cinnamon for extra flavor. Combining Wet and Dry Mixtures Gradually add the dry mix to the wet mix. Stir it gently until it just comes together. Don't overmix; it should be a bit lumpy. Incorporating Pecans and Chocolate Fold in 1 cup of chopped pecans and 1 cup of chocolate chips if you want. Make sure they are evenly mixed into the dough. Chilling the Dough Cover the bowl with plastic wrap. Put the dough in the fridge for at least 30 minutes to an hour. This step helps the flavors blend and makes the cookies chewier. Preheating the Oven Preheat your oven to 350°F (175°C). Line a baking sheet with parchment paper to keep cookies from sticking. Scooping and Spacing Dough on Baking Sheet Use a spoon to scoop tablespoons of dough onto the baking sheet. Leave about 2 inches between each scoop. Baking Time and Indicators Bake the cookies for 10 to 12 minutes. Look for golden edges and soft centers to know they are done. Cooling on Baking Sheet After baking, let the cookies cool on the baking sheet for 5 minutes. This helps them set up a bit more. Transferring to Wire Rack Carefully move the cookies to a wire rack to cool completely. Now, they are ready to enjoy! - Importance of Brown Butter Brown butter is key for rich flavor. It adds a nutty taste that makes cookies special. To make brown butter, melt unsalted butter over medium heat. Keep stirring until it turns golden brown. This should take about 5-7 minutes. - Chilling Dough for Better Flavor Chilling the dough is crucial. It makes the flavors blend well. Cover the bowl with plastic wrap and chill for at least 30 minutes. This step helps the cookies stay soft and chewy. - Checking for Doneness Look for golden edges and soft centers. The cookies should not be too brown. Remove them from the oven when they are slightly underbaked. They will firm up as they cool. - Avoiding Overmixing Mix just until combined. Overmixing can lead to tough cookies. Stir in the flour carefully to keep the texture light and airy. - Presentation Tips for Visual Appeal Serve cookies on a rustic platter. Dust them with powdered sugar for a nice touch. Warm cookies look and taste great. - Pairing with Beverages Pair these cookies with a glass of milk. You can also enjoy them with a scoop of ice cream. This makes for a delicious treat! Pro Tips Brown Butter Timing: Ensure you keep an eye on the butter as it cooks; it can go from perfectly browned to burnt quickly. Remove it from the heat as soon as it reaches a golden color and smells nutty. Chilling the Dough: Chilling the dough not only enhances the flavor but also helps the cookies maintain their shape during baking. For a richer taste, consider chilling overnight. Pecan Toasting: For an extra depth of flavor, toast the pecans in a dry skillet over medium heat for a few minutes before adding them to the dough. This enhances their nuttiness. Cookie Size Consistency: Use a cookie scoop for uniform cookie sizes, ensuring even baking and consistent texture. This will help all cookies bake at the same rate. {{image_2}} - Walnuts: If you want a different crunch, try walnuts. They add a lovely flavor. Walnuts are also softer than pecans, which can change the cookie's texture. - Pecans with a Twist: You can mix pecans with other nuts like almonds. This gives your cookies a new taste and texture. - Adding Additional Spices: You can add more spices like nutmeg or allspice. These spices bring warmth and depth to your cookies. Just a pinch can change the whole flavor. - Infusing with Zest: Try adding lemon or orange zest. The zest gives a bright, fresh taste. It pairs nicely with the nutty flavor of the pecans. - Gluten-Free Flour Options: You can use gluten-free flour instead of all-purpose flour. Brands like almond flour or oat flour work well. They keep the texture nice and chewy. - Vegan Substitutions: To make these cookies vegan, substitute eggs with flax seeds or applesauce. Use vegan butter instead of regular butter. This way, everyone can enjoy these treats! To keep your brown butter pecan cookies fresh, store them in an airtight container. This helps to lock in moisture and flavor. You can also use a cookie jar, but it may not keep them as fresh. If you use a jar, place a slice of bread inside. The bread will absorb excess air and keep your cookies soft. Freezing cookie dough is a great way to save some for later. To freeze, scoop the dough into balls and place them on a baking sheet. Freeze them for about an hour, then transfer the balls to a freezer bag. Make sure to label the bag with the date. To bake, thaw the dough in the fridge overnight. Preheat your oven and bake directly from the fridge without letting it warm up. At room temperature, your cookies will stay fresh for about a week. Store them in an airtight container to keep them tasty. If you choose to refrigerate them, they can last up to two weeks. Just remember to let them sit out for a few minutes before enjoying. This makes them soft and warm again. The secret to chewy cookies lies in the butter and sugars. Use brown sugar for moisture. Brown butter adds a rich flavor that enhances chewiness. Also, don't overmix the dough. This keeps the cookies softer. Yes, you can use salted butter. Just reduce the added salt by half. This helps balance the flavors. Salted butter can add a nice depth to your cookies. Check the edges of the cookies. They should be golden brown, while the center looks soft. If they puff up and start to crack, they are ready. Remove them from the oven promptly. Absolutely! Feel free to add mix-ins like dried fruit or different nuts. Chocolate chips are great too. Just keep the total mix-ins to about 1 to 1.5 cups. Chilling the dough firms it up and helps the flavors meld. It also prevents the cookies from spreading too much while baking. This step ensures a perfect texture and rich taste. In this post, I covered the key steps to make delicious cookies. We discussed the essential ingredients, and how to prepare brown butter for the best flavor. I shared tips for perfect texture and ways to store your cookies. Finally, I highlighted variations to make your cookies unique. For tasty, chewy cookies, remember to chill your dough and watch for that golden brown color. With these tips, enjoy baking and sharing your treats!

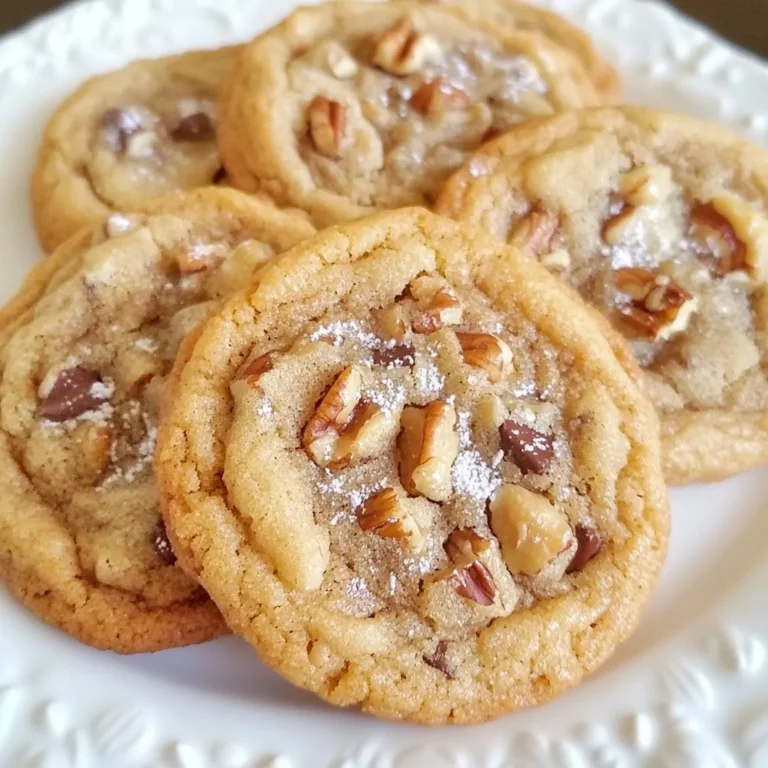
Brown Butter Pecan Cookies Rich and Flavorful Treat

To make the perfect Cinnamon Apple Crumble, gather these simple ingredients: - 4 medium-sized apples (use Granny Smith or Honeycrisp for the best flavor) - 1 tablespoon lemon juice - 1 teaspoon cinnamon - 1/2 cup brown sugar, packed - 1/2 cup rolled oats - 1/2 cup all-purpose flour - 1/4 cup granulated sugar - 1/4 teaspoon salt - 1/2 cup cold unsalted butter, cubed - 1/4 teaspoon nutmeg (optional) - Vanilla ice cream or whipped cream for serving I love using Granny Smith or Honeycrisp apples. They give the crumble a great balance of tartness and sweetness. The tart apples hold their shape and provide a nice contrast to the sweet topping. For the dry mix, you'll need rolled oats, all-purpose flour, brown sugar, granulated sugar, and salt. These ingredients blend to create a delightful crumbly texture. The oats add a nice chew, while the sugars caramelize as they bake, creating a golden crust. I use cold unsalted butter to create that crumbly topping. You can also add nutmeg for a warm spice note. Nutmeg works well with apple flavors. It gives your crumble an extra layer of taste that feels homey and comforting. {{ingredient_image_1}} To start, grab four medium-sized apples. I love using Granny Smith or Honeycrisp. They have a nice tartness that balances the sweet crumble. Peel, core, and slice the apples. This step takes a bit of time, but it’s worth it. Next, put the sliced apples in a large bowl. Add one tablespoon of lemon juice, one teaspoon of cinnamon, and a quarter cup of brown sugar. Mix everything well. You want the apples coated nicely. Once mixed, transfer the apple mixture to a greased 9-inch pie or baking dish. Now, let’s prepare the crumble topping. In another bowl, combine half a cup of rolled oats, half a cup of all-purpose flour, and a quarter cup of granulated sugar. Add the remaining brown sugar and a pinch of salt. If you like, you can add a little nutmeg for extra flavor. Mix all these dry ingredients well. Next, add half a cup of cold unsalted butter, cut into cubes. Use a pastry cutter or your fingers to work the butter into the dry mix. You want it to look like coarse crumbs. This step is key for that crunchy topping. Before baking, preheat your oven to 350°F (175°C). Once it's ready, evenly sprinkle the crumble topping over the apple mixture in the baking dish. Bake the crumble for about 35 to 40 minutes. Look for the apples to be tender and the topping to be golden brown. When it’s done, remove it from the oven and let it cool slightly. The smell will be amazing, and you’ll want to dive right in! - Choosing the right apples: Use Granny Smith or Honeycrisp apples. These apples give the best balance of sweet and tart. Their firm texture holds up well during baking. Avoid soft apples like Red Delicious; they turn mushy. - Ensuring perfect crumble texture: For a great crumble, mix cold butter into the dry ingredients until they look like coarse crumbs. This helps create a crunchy topping. Do not overmix, or the crumble will be dense. - Ideal accompaniments: Serve your warm cinnamon apple crumble with vanilla ice cream or whipped cream. The cold creaminess pairs well with the warm, spiced apples. You can also add a drizzle of caramel sauce for extra sweetness. - Presentation ideas: To make your dish look special, sprinkle a bit of cinnamon on top. Add a few apple slices as a garnish. You can serve it in a rustic baking dish for a homey feel or in individual ramekins for a fun twist. Pro Tips Choose the Right Apples: For the best flavor and texture, opt for tart apples like Granny Smith or Honeycrisp, as they hold up well during baking and provide a nice contrast to the sweetness of the crumble. Keep Butter Cold: Ensure your butter is cold and cut into small cubes before mixing with dry ingredients. This helps create a crumbly texture that adds a delightful crunch to your topping. Add a Twist of Flavor: Experiment with spices like cardamom or allspice in addition to cinnamon to elevate the flavor profile of your apple filling. Perfect Serving Temperature: Serve your crumble warm, ideally right out of the oven, paired with a scoop of vanilla ice cream or whipped cream for a delicious contrast. {{image_2}} You can change some ingredients for your Cinnamon Apple Crumble. If you want a different sweet taste, try using maple syrup or honey instead of brown sugar. These alternatives add unique flavors. If you don’t have apples, use pears or peaches. Both fruits give a nice twist. You can even mix different fruits together for a fun flavor blend. Add some excitement to your crumble with different flavors. Chopped nuts, like walnuts or pecans, add crunch. You can sprinkle them on the topping or mix them in. Want more spice? Include ginger or cardamom for a warm kick. If you love chocolate, try adding chocolate chips to the crumble. They melt and create a rich taste. Or, drizzle caramel sauce over the top before serving for a sweet finish. These add-ins make your dish even more delightful! To keep your cinnamon apple crumble fresh, store it in the fridge. Use an airtight container. This way, it stays tasty for about 3 to 4 days. If you want to save it longer, freeze it. Wrap the crumble tightly in plastic wrap, then foil. It can last up to 3 months in the freezer. Just remember to label it with the date. When you’re ready to enjoy your leftovers, the best practice is to reheat in the oven. Preheat your oven to 350°F (175°C). Place the crumble in a baking dish. Cover it with foil to keep it moist. Heat for about 15-20 minutes or until warm. This method helps keep the topping crispy and the apples tender. If you’re in a hurry, you can use the microwave. Heat in short bursts of 30 seconds. Check often to make sure it doesn’t get soggy. Enjoy your warm and delightful cinnamon apple crumble! Yes, you can make this dish ahead of time. Prepare the apples and crumble topping. Store them separately in the fridge. When you are ready, just combine and bake. If you lack some ingredients, don’t worry. You can swap apples for pears or berries. Use oats or crushed cookies instead of flour. Get creative with what you have! This crumble lasts about three to four days in the fridge. Store it in an airtight container. Reheat it in the oven for the best taste. Yes, you can use frozen apples. Just thaw them first and drain excess moisture. They may be softer, but they will still taste delicious. Absolutely! You can double or halve the recipe. Just adjust the baking time if you change the size. Use a larger or smaller dish to fit the amount you make. In this blog post, we explored how to make a delicious cinnamon apple crumble. We covered selecting the best apples, mixing dry ingredients, and creating a perfect crumble topping. I shared tips for baking, serving, and storing your dish. Remember, you can get creative with ingredient swaps and flavor add-ins. This recipe is easy to adjust and fun to make! Enjoy your tasty treat, and I hope you feel inspired to try it soon.

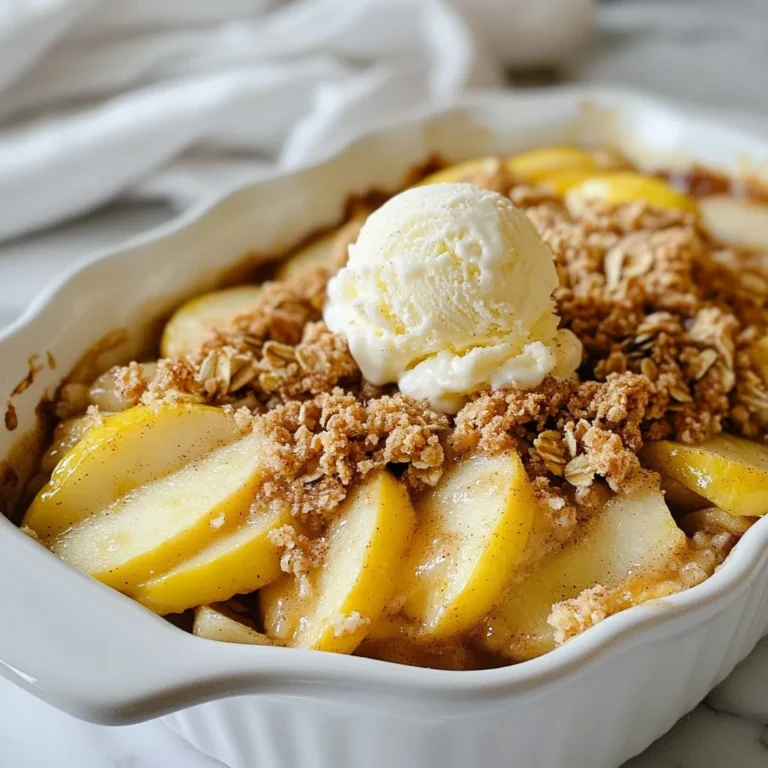
Cinnamon Apple Crumble Delightful and Easy Recipe

When making Garlic Herb Roasted Mushrooms, gather these simple ingredients: - 500g button mushrooms, cleaned and stems trimmed - 4 tablespoons olive oil - 4 cloves garlic, minced - 1 tablespoon fresh thyme leaves, chopped - 1 tablespoon fresh rosemary, chopped - 1 teaspoon smoked paprika - Salt and pepper to taste - Fresh parsley, chopped (for garnish) These ingredients bring together rich flavors. The mushrooms absorb the oil and garlic well, making them tasty. Fresh thyme and rosemary add a lovely aroma. Smoked paprika gives a nice depth that you will love. Use fresh parsley for a pop of color on the plate. I like to use button mushrooms for this recipe because they are easy to find. However, you can use other types. Just make sure they are fresh. Fresh herbs make a big difference, so don’t skip them. They add brightness and flavor that dried herbs can’t match. With these ingredients ready, you will create a dish that is both simple and delicious. Enjoy the process of combining them to make something special! {{ingredient_image_1}} - Preheat your oven to 200°C (400°F). - In a large bowl, mix the cleaned mushrooms with olive oil, minced garlic, chopped thyme, chopped rosemary, smoked paprika, salt, and pepper. - Toss the mushrooms well to coat them evenly with the oil and herbs. - Spread the mushrooms on a baking sheet lined with parchment paper. Make sure to keep them in a single layer. - Roast the mushrooms in the oven for about 20-25 minutes. Stir them halfway through to promote even cooking. - Check for doneness by looking for a golden brown color and a tender texture. - Once done, transfer the mushrooms to a serving dish. Sprinkle fresh parsley on top for garnish. - For a nice touch, serve them in a rustic bowl. Drizzle any leftover garlic-herb oil from the baking sheet over the top for added flavor. Optionally, add a sprinkle of coarse sea salt for that extra crunch. - Best practices for mushroom cleaning: Clean your mushrooms gently. Use a damp cloth or a soft brush. Avoid soaking them in water. Mushrooms absorb water quickly and can become soggy. - Ensuring even roasting: Spread mushrooms out on the baking sheet. Keep them in one layer. This helps them roast evenly. Stir them halfway through to brown all sides. - Variations of herbs: Try different herbs for fun flavors. Basil and oregano can add a Mediterranean twist. Dill gives a fresh taste. Mix and match to find your favorite. - Suggested additional seasonings: Add a pinch of red pepper flakes for heat. Lemon zest brightens the dish. You can also try balsamic vinegar for a sweet touch. Pro Tips Use Fresh Herbs: Fresh herbs provide a vibrant flavor that dried herbs simply can’t match. Always opt for fresh thyme and rosemary if possible. Don't Overcrowd the Pan: Ensure the mushrooms are in a single layer on the baking sheet. Overcrowding can lead to steaming instead of roasting, preventing that delicious caramelization. Experiment with Mushrooms: While button mushrooms work great, try using a mix of mushrooms like cremini or shiitake for added depth of flavor and texture. Serve Warm: Roasted mushrooms are best served warm. If making ahead of time, reheat in the oven briefly before serving to maintain their texture. {{image_2}} For this recipe, you can switch up the mushrooms. While I love button mushrooms, you can use portobello, cremini, or shiitake. These options add a deeper taste and different textures. If you want a vegan version, just keep everything as is. The olive oil and herbs are already plant-based. If you like cheese, sprinkle some nutritional yeast on top for a cheesy flavor. Garlic herb roasted mushrooms are great on their own, but you can mix them in other dishes. Try adding them to pasta or risotto for an earthy kick. They also work well in salads, bringing a warm touch. When it comes to pairing, they are fantastic with grilled chicken or fish. You can also serve them with grains like quinoa or rice. This adds a nice balance to your meal. To keep your Garlic Herb Roasted Mushrooms fresh, store them in an airtight container. This helps keep the flavors locked in. Place the container in the fridge. They will last for up to three days. If you want to keep them longer, consider freezing them. Use a freezer-safe bag and remove as much air as possible. Mushrooms can last up to three months in the freezer. When you are ready to enjoy your leftovers, reheating is key. The best way to reheat mushrooms is in the oven. Preheat the oven to 180°C (350°F). Spread the mushrooms on a baking sheet. Heat for about 10 to 15 minutes. This method helps keep their texture and flavor. You can also use a pan on the stove. Heat it over medium heat and add a splash of olive oil to help them crisp up. Stir them gently until warmed through. How long should I roast mushrooms? You should roast mushrooms for 20 to 25 minutes. Check them halfway through. Stirring helps them cook evenly. Look for a golden brown color and tenderness. This tells you they are ready. Can I use dried herbs instead? Yes, you can use dried herbs. Use about one-third of the amount. Dried herbs are strong in flavor. So, be careful not to overpower the dish. Thyme and rosemary work well as dried options. What to serve with Garlic Herb Roasted Mushrooms? These mushrooms pair nicely with many dishes. Try serving them with grilled chicken or fish. They also go well with pasta or rice. You can add them to salads for extra flavor. How to tell if mushrooms are fresh? Fresh mushrooms should be firm and smooth. They should not be slimy or sticky. Look for a clean cap with no dark spots. A pleasant, earthy smell is a good sign too. In this post, we covered how to make delicious garlic herb roasted mushrooms. You learned about the key ingredients, preparation steps, and roasting techniques. I shared handy tips for storing and reheating leftovers. You can also explore ingredient swaps and serving suggestions for extra flair. Remember, cooking is fun. Experiment with flavors and enjoy your meals. Embrace this simple recipe to impress your friends and family. Happy cooking!

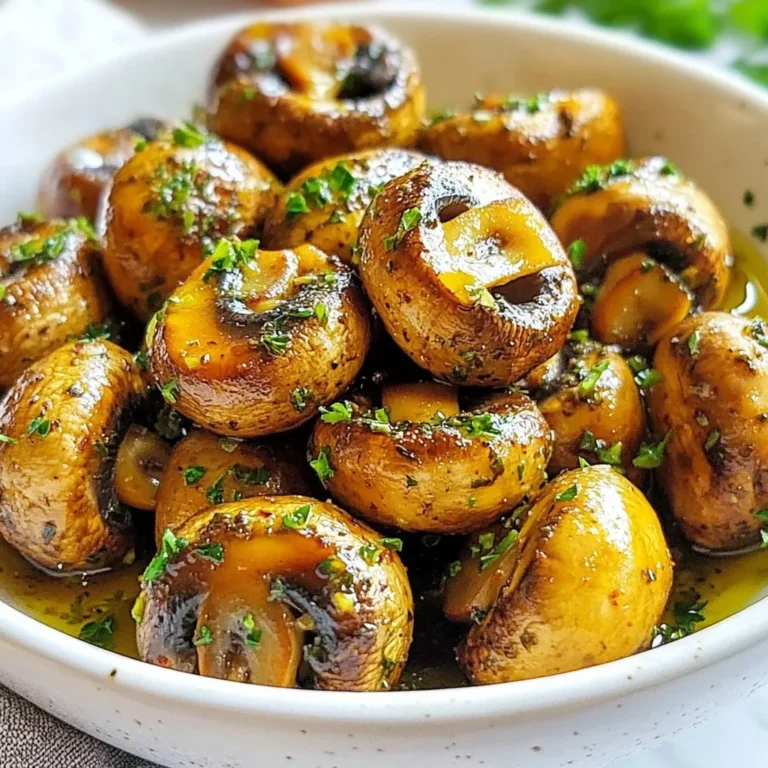
Garlic Herb Roasted Mushrooms Flavorful Easy Recipe

- 4 boneless, skinless chicken breasts - 1 cup cherry tomatoes, halved - 8 oz fresh mozzarella cheese, sliced - 1 cup fresh basil leaves - 1/2 cup balsamic vinegar - 2 tablespoons honey - 2 tablespoons olive oil - 3 cloves garlic, minced - Salt and pepper to taste The heart of Balsamic Glazed Caprese Chicken lies in its fresh ingredients. The chicken breasts provide a tender base. I always choose boneless and skinless for ease. Cherry tomatoes add a burst of sweetness, while fresh mozzarella gives a creamy texture. Basil leaves not only add color but flavor too. To create that sticky glaze, balsamic vinegar and honey work wonders. The vinegar gives a sweet tang, while honey adds a touch of richness. Olive oil helps to cook the chicken perfectly, while garlic brings in a lovely aroma. Salt and pepper are simple yet crucial for seasoning. These ingredients create a dish that is fresh and flavorful. You can easily find them at your local market. Each element plays a role in making your meal not just tasty but also vibrant. {{ingredient_image_1}} First, set your oven to 400°F (200°C). This makes sure it's hot when you bake the chicken. While the oven heats, clear your workspace. Gather all your tools and ingredients. This will make cooking smooth and easy. Next, grab a small saucepan. Pour in 1/2 cup of balsamic vinegar and 2 tablespoons of honey. Heat it over medium heat. Keep an eye on it as it simmers. Stir it occasionally for about 10 minutes. You want it thick, but not burnt. Set the glaze aside when done. Now, take a large oven-safe skillet. Add 2 tablespoons of olive oil and heat it on medium-high. Season your 4 chicken breasts with salt and pepper on both sides. Place the chicken in the hot skillet. Cook for 5-7 minutes on each side. You need a nice golden brown color. Once the chicken is cooked through, add 3 cloves of minced garlic to the skillet. Cook for one more minute. The garlic should smell great but not burn. Now, reduce the heat to low. Layer the halved cherry tomatoes on top of the chicken. Then, add the sliced fresh mozzarella cheese. Carefully transfer the skillet to your preheated oven. Bake for about 15 minutes. Look for melted and bubbly cheese as a sign it’s done. After baking, take the skillet out. Drizzle your balsamic glaze over the chicken, tomatoes, and cheese. Finally, top your dish with fresh basil leaves. This adds color and flavor. Serve the chicken on a platter. You can drizzle extra balsamic glaze for a nice touch. Enjoy your fresh and flavorful Balsamic Glazed Caprese Chicken! To ensure succulent chicken every time, start with good quality chicken breasts. Thicker breasts cook more evenly. Always season your chicken well with salt and pepper. This adds flavor. Use a meat thermometer to check the temperature. Aim for 165°F (75°C). This ensures it is fully cooked but still juicy. Searing the chicken in hot oil gives it a nice golden crust. Don’t rush this step; it’s key for flavor. Adding garlic later in the cooking process keeps it fragrant without burning. For sides to complement the dish, consider a fresh mixed green salad. The crisp greens balance the rich chicken. Garlic bread pairs nicely too, soaking up the balsamic glaze. Roasted vegetables bring a colorful touch and add nutrition. Grilled asparagus or zucchini work well. If you want something different, try quinoa. It adds texture and is full of protein. Creative ways to serve for visual appeal include using a large white platter. This makes the colors pop. Drizzle extra balsamic glaze over the chicken before serving. It adds shine and flavor. Garnish with fresh basil leaves for a bright touch. You can also slice the chicken and fan it out. This makes each bite look delicious. Remember, we eat with our eyes first! Pro Tips Perfectly Cooked Chicken: Use a meat thermometer to ensure your chicken reaches an internal temperature of 165°F (75°C) for safe and juicy results. Make-Ahead Glaze: Prepare the balsamic glaze in advance and store it in the refrigerator for up to a week for quick meal prep. Fresh Ingredients Matter: Opt for fresh mozzarella and basil for the best flavor and texture in this dish. They elevate the overall taste significantly. Experiment with Veggies: Feel free to add other vegetables like zucchini or bell peppers along with the tomatoes for more color and nutrition. {{image_2}} You can easily change the flavor of this dish. Try adding fresh herbs like thyme or oregano. A pinch of red pepper flakes adds a nice kick, too. You can also use lemon zest for a bright, citrusy note. These small changes bring new life to your meal! Don’t have mozzarella? You can use goat cheese or feta instead. These cheeses will add a tangy flavor. If you want a different protein, try turkey or even tofu for a vegetarian option. The key is to use ingredients you love. For gluten-free options, this recipe is already safe! If you follow a low-carb diet, replace the balsamic glaze with a sugar-free option. You can also serve the chicken over zucchini noodles instead of pasta. There are plenty of ways to adapt this dish to fit your needs! To store leftovers, let the chicken cool down first. Place it in an airtight container. Make sure to cover the chicken, tomatoes, and cheese well. This helps keep the flavors fresh. You can store it in the fridge for up to three days. When you are ready to eat, reheat it gently in the microwave or oven. If you want to freeze the Balsamic Glazed Caprese Chicken, it’s best to do it right after cooking. Allow it to cool completely, then wrap it tightly in plastic wrap. After that, place it in a freezer bag or container. This dish can be frozen for up to three months. To reheat, thaw it overnight in the fridge. Then, warm it in the oven until heated through. Balsamic Glazed Caprese Chicken should be enjoyed fresh for the best taste. However, if stored properly, it can last in the fridge for up to three days. If frozen, aim to eat it within three months for optimal flavor. Always check for any off smells or changes in texture before consuming leftovers. Bake the chicken for about 15 minutes. The cheese should melt and bubble. You want the chicken's internal temperature to reach 165°F (75°C). This ensures it is safe to eat. Yes, you can use chicken thighs. They have more flavor and stay moist. Just adjust the cooking time slightly. Thighs may need an extra few minutes to cook through. Pair this chicken with garlic bread or a fresh salad. Roasted veggies also make a great side. The flavors blend well with the dish. You can add a light pasta if you want more carbs. In this blog post, we explored how to make Balsamic Glazed Caprese Chicken. We covered the main ingredients, preparation steps, and cooking tips to create a tasty dish. You learned how to layer flavors and ensure the chicken stays juicy. Remember, you can customize this recipe by adding your favorite herbs or sides. Storing leftovers properly keeps them fresh for your next meal. Enjoy making this dish and impress your family with your cooking skills!

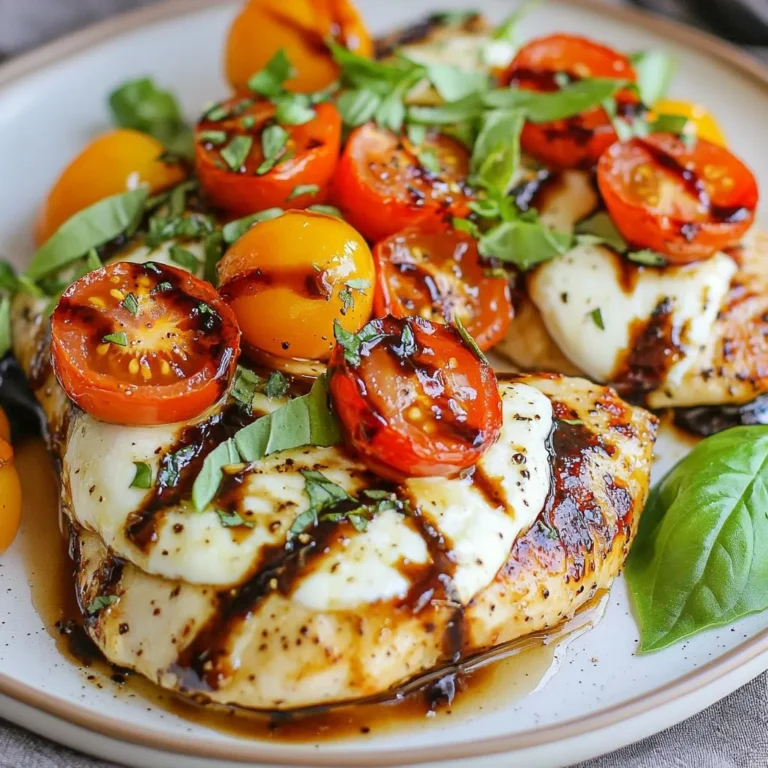
Balsamic Glazed Caprese Chicken Fresh and Flavorful Meal

To make spinach ricotta stuffed shells, you need a few key ingredients. Start with 12 jumbo pasta shells. These shells hold all the tasty filling. You will also need 2 cups of fresh spinach, chopped. Fresh spinach adds flavor and nutrition. Finally, use 1 cup of ricotta cheese. This cheese gives the filling a creamy texture. Cheese makes this dish rich and delicious. You will use 1 cup of shredded mozzarella cheese. This cheese melts beautifully and adds a gooey texture. You also need 1/2 cup of grated Parmesan cheese for a salty kick. For seasoning, include 1 teaspoon of garlic powder and 1 teaspoon of onion powder. These spices enhance the flavors. Add 1/2 teaspoon of salt and 1/4 teaspoon of black pepper for extra taste. No dish is complete without sauce. You need 2 cups of marinara sauce. You can use store-bought or homemade sauce. It adds moisture and flavor to the dish. Lastly, fresh basil leaves are a great garnish. They add a pop of color and fresh taste. {{ingredient_image_1}} First, you need to cook the jumbo pasta shells. Boil water in a large pot. Add the shells and cook them for about 10 minutes. Check the package for exact times. You want them al dente, which means they should be firm but not hard. Drain the shells and set them aside to cool. In a big bowl, mix the chopped spinach and ricotta cheese. Add half of the mozzarella cheese and 1/4 cup of Parmesan cheese. Then, sprinkle in the garlic powder, onion powder, salt, and black pepper. Mix everything well until it looks creamy. This filling is tasty and very easy to make. Now it’s time to stuff the shells. Take a shell and fill it with about 2 tablespoons of the spinach and ricotta mix. Place each stuffed shell in a 9x13 inch baking dish, open side up. Spread 1 cup of marinara sauce on the bottom of the dish. After that, pour the rest of the marinara sauce over the shells. Top it off with the remaining mozzarella and Parmesan cheese. Cover the dish with aluminum foil and bake at 375°F (190°C) for 25 minutes. After that, remove the foil and bake for another 10 to 15 minutes. This will make the cheese bubbly and golden. Let it cool for a bit, then garnish with fresh basil leaves. Enjoy your savory delight! To make the filling creamy, mix ricotta cheese with your spinach well. Use fresh spinach for the best taste. Chop it finely to blend smoothly. You can add a bit of extra mozzarella for more creaminess as well. If you want a richer flavor, try adding a pinch of nutmeg. This secret twist can elevate your dish to new heights. For perfect melted cheese, cover your dish with foil for the first part of baking. This keeps moisture in, making the cheese gooey. Remove the foil in the last 10-15 minutes to get that golden crust. If you want even more flavor, add a sprinkle of Italian seasoning on top before baking. This small step can enhance the overall taste. Serve your Spinach Ricotta Stuffed Shells with a fresh side salad. A mix of greens and a light vinaigrette pairs nicely. You can also add garlic bread for a comforting touch. For a garnish, use fresh basil leaves to add color and flavor. Keep the meal light and enjoyable with these simple sides! Pro Tips Choose the Right Shells: Make sure to use jumbo pasta shells for the best filling and presentation. Smaller shells may not hold enough filling. Fresh Spinach vs. Frozen: Fresh spinach gives a brighter flavor and texture, but if using frozen, be sure to drain it well to avoid excess moisture. Layering Marinara Sauce: For extra flavor, mix a little of the marinara sauce with the ricotta filling before stuffing the shells. Rest Before Serving: Allow the dish to rest for a few minutes after baking. This helps the cheese set a bit, making it easier to serve. {{image_2}} You can change the cheese mix for a unique taste. Try using gouda or feta. These cheeses add new flavors and textures. Mixing in cream cheese gives a richer filling. You can also use a blend of cheeses for more depth. For a sharper taste, add aged cheddar. Each cheese choice makes the dish special. Adding veggies boosts nutrition and flavor. You can mix in cooked mushrooms or zucchini. These add moisture and a nice earthiness to the shells. Bell peppers provide sweetness, while artichokes add a tangy bite. For a fresh twist, try adding chopped sun-dried tomatoes. Their flavor shines through the creamy filling and marinara sauce. Herbs can truly elevate your dish. Fresh basil adds a sweet aroma that pairs well with ricotta. Try mixing in chopped parsley or oregano for a savory kick. You can also sprinkle some red pepper flakes for heat. For a unique twist, add a pinch of nutmeg. This spice enhances the creamy filling and adds warmth. After you cook the spinach ricotta stuffed shells, let them cool. Cover the dish with plastic wrap or foil. Store it in the fridge for up to three days. If you want to keep them longer, consider freezing. To freeze the stuffed shells, first cool them completely. Place them in a freezer-safe container. You can also use an airtight bag. They will last for up to three months in the freezer. When you want to eat them, thaw in the fridge overnight before reheating. For reheating, preheat your oven to 350°F (175°C). Place the stuffed shells in an oven-safe dish. Cover with foil to keep them moist. Bake for about 20 to 25 minutes until heated through. You can also microwave them for quicker results, but they may not be as crispy. Enjoy your delicious dish! Yes, you can use frozen spinach. Just thaw it first. Squeeze out the water. This helps keep the filling from being too soggy. Frozen spinach is a great time-saver. It still packs a lot of flavor. If you don’t have ricotta cheese, you can use cottage cheese. It has a similar taste and texture. You can also blend it for a smoother feel. Cream cheese works well too, but it is richer. Adjust the seasoning to balance the taste. To make this dish gluten-free, use gluten-free pasta shells. For a vegan option, try cashew cheese or tofu instead of ricotta. Replace mozzarella and Parmesan with dairy-free cheese. Adjust the seasonings to keep the flavor. Always check labels for hidden allergens. This blog post covered how to make a delicious spinach and ricotta dish. We explored the key ingredients, from the pasta shells to the tasty sauce. I shared step-by-step instructions that guide you in preparing and baking it. Tips on perfecting the filling and serving ideas add extra value. You can also customize the dish with various cheeses and veggies. Lastly, I included storage tips for freshness. With everything you learned today, you’re ready to try this recipe and impress everyone at the table. Enjoy!

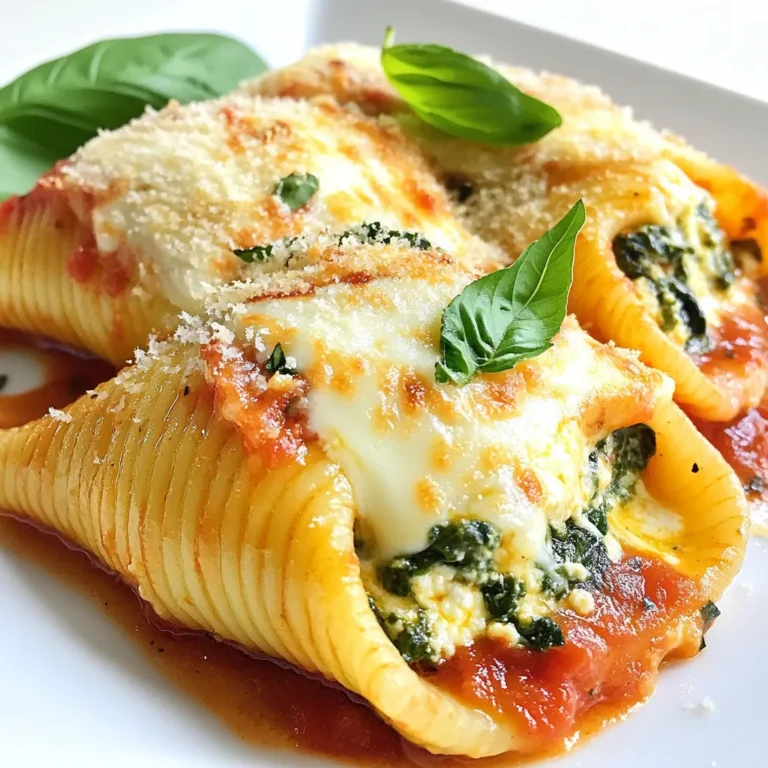
Spinach Ricotta Stuffed Shells Savory Delight Dish

- 1 large head of broccoli, cut into florets - 4 cloves of garlic, minced - 1/4 cup grated Parmesan cheese - 3 tablespoons olive oil - 1 teaspoon lemon zest - 1/2 teaspoon red pepper flakes - Salt and pepper - Fresh parsley for garnish To make Garlic Parmesan Roasted Broccoli, gather these simple ingredients. Start with a large head of broccoli, fresh and green. The garlic adds a punch of flavor, and you’ll need four cloves, minced finely. Grated Parmesan cheese gives a rich, nutty taste, so don’t skip it. Use three tablespoons of olive oil to help everything roast nicely. Lemon zest brightens the dish, adding freshness. If you like spice, add half a teaspoon of red pepper flakes. Finally, season with salt and pepper to taste. For a nice touch, sprinkle chopped fresh parsley on top before serving. This combination makes a tasty side dish that pairs well with many meals. {{ingredient_image_1}} Set your oven to 425°F (220°C). This high heat helps the broccoli get crispy. Line a baking sheet with parchment paper. This makes cleanup easy and keeps the broccoli from sticking. In a large bowl, add the broccoli florets. Then, add the minced garlic, olive oil, lemon zest, and red pepper flakes if you like heat. Sprinkle in some salt and pepper. Toss everything well. Make sure each floret gets a good coat of oil and flavor. Spread the broccoli mixture out on the baking sheet. Place it in a single layer. This helps each piece cook evenly. Roast in the oven for about 20 minutes. Watch for the broccoli to turn tender and the edges to crisp up. Once the broccoli is done, take it out of the oven. Sprinkle the grated Parmesan cheese over the hot broccoli. Toss gently to mix. The heat will make the cheese melt nicely. Return the baking sheet to the oven for 2 more minutes. This melts the cheese and gives it a great taste. When it's finished, take it out and add chopped parsley for a fresh look. Enjoy your delicious Garlic Parmesan Roasted Broccoli! To pick the best broccoli, look for bright green florets. They should feel firm and tight. Avoid broccoli with yellow spots or limp stems. The fresher the broccoli, the better your dish will taste. You want that nice crunch! Roasting at 425°F (220°C) gives you great results. This high heat helps to caramelize the broccoli. It gets tender inside while staying crispy on the outside. Make sure to spread the florets in a single layer. Crowding them will make them steam instead of roast. For that perfect crispy texture, don’t skip the olive oil. It helps the broccoli brown nicely. Toss the florets well to coat them evenly. After the first roasting time, sprinkle on the Parmesan cheese. This adds flavor and helps create a tasty crust. If you want extra crunch, leave them in the oven for a few more minutes. Pro Tips Choose Fresh Broccoli: Selecting bright green, firm broccoli florets will enhance the flavor and texture of your dish. Don't Skip the Zest: Adding lemon zest elevates the dish with a refreshing citrus note, balancing the richness of the cheese. Adjust Roasting Time: Keep an eye on the broccoli towards the end of roasting to achieve your preferred level of crispiness. Experiment with Cheese: Try substituting Parmesan with other cheeses like Pecorino Romano or nutritional yeast for a dairy-free option. {{image_2}} You can switch up the cheese in this dish. Try using sharp cheddar or creamy mozzarella. Each cheese brings its own taste. You can even mix them! This adds fun flavors and keeps things fresh. For a stronger kick, consider using aged gouda or feta. These cheeses melt well and add a nice touch. If you're looking for a vegan version, it’s easy! Skip the Parmesan and use nutritional yeast instead. Nutritional yeast adds a cheesy flavor without dairy. You can also use a plant-based cheese that melts well. Just make sure to check the label for ingredients. Herbs can change the whole vibe of your broccoli. Try adding fresh thyme or rosemary for a new taste. You might also enjoy using basil or oregano. If you like a bit of heat, add crushed red pepper or cayenne pepper. They will give your dish a nice kick! Mix and match to find what you love most. To store leftover Garlic Parmesan Roasted Broccoli, place it in an airtight container. Keep it in the fridge for up to three days. Make sure it is cooled down before you close the lid. This helps keep the broccoli fresh and tasty. You can also separate the broccoli from the cheese if you like. This keeps the cheese from getting soggy. When you want to reheat your broccoli, use the oven or a skillet. The oven works best to keep it crispy. Preheat your oven to 350°F (175°C). Spread the broccoli on a baking sheet and heat for about 10 minutes. If you use a skillet, heat it on medium-low. Stir it gently for 5 to 7 minutes until warmed through. You can also add a sprinkle of cheese while heating for extra flavor. You can freeze Garlic Parmesan Roasted Broccoli for later. Start by letting the broccoli cool completely. Next, place it in a freezer-safe bag or container. Remove as much air as possible to prevent freezer burn. It can last up to three months in the freezer. When you're ready to eat it, thaw it overnight in the fridge. Reheat it in the oven for the best texture. Yes, you can use frozen broccoli. It is quick and easy. Just remember to thaw it first. Pat it dry to remove excess water. This helps it roast well. The flavor might be a bit different, but it's still tasty. To make it healthier, you can use less oil and cheese. Try adding lemon juice instead of some oil. You can also mix in more veggies, like carrots or bell peppers. This adds color and nutrition, too. Garlic Parmesan roasted broccoli pairs well with many dishes. Try it with grilled chicken or fish. It also goes great with pasta or quinoa. For a vegetarian meal, serve it with rice and beans. Don't forget a nice salad to round out your meal! Now you know how to make tasty Garlic Parmesan Roasted Broccoli. We covered the ingredients and how to cook it step by step. I shared tips to choose the best broccoli and create the perfect crispy texture. You can also try variations with different cheeses or herbs. Remember to store leftovers correctly and reheat them well. This dish adds flavor to any meal and is both easy and healthy. Enjoy your cooking and the delicious results!

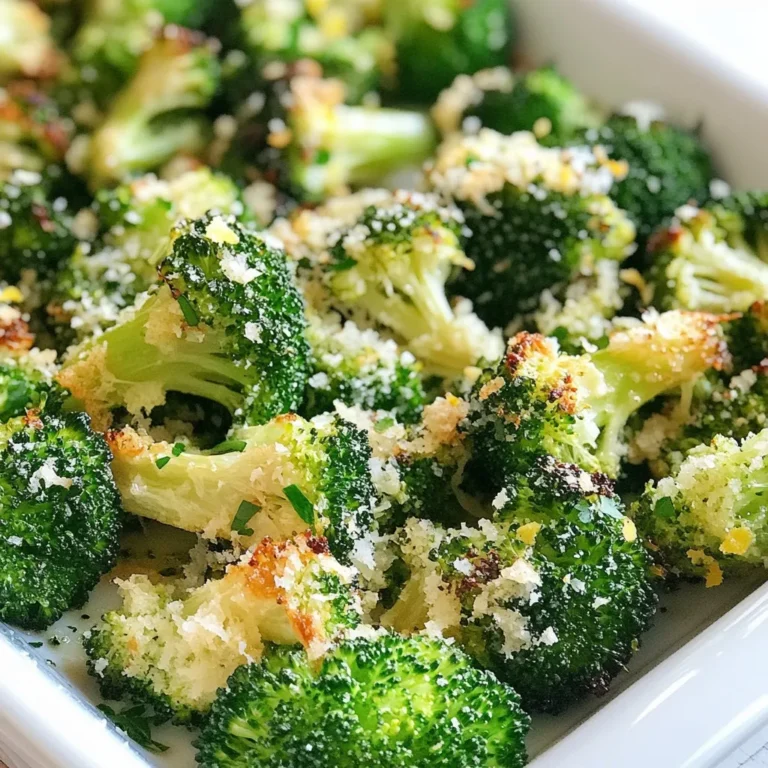
Garlic Parmesan Roasted Broccoli Flavorful Side Dish

- 1 ripe mango, peeled and diced - 2 ripe peaches, pitted and sliced Using fresh fruit makes this smoothie tasty and healthy. Ripe mango adds sweetness and creaminess. Peaches give it a nice tartness. When you pick your fruit, look for soft spots that smell sweet. This means they’re ripe and ready. - 1 cup coconut milk (or almond milk) - 1/2 cup Greek yogurt (vanilla or plain) For a creamy texture, use coconut milk or almond milk. Coconut milk adds a nice tropical vibe. Greek yogurt boosts protein and gives it a thicker feel. If you want a sweeter flavor, go for vanilla yogurt. - 1 tablespoon honey or agave syrup (optional) - 1/2 cup ice cubes If you like your smoothie sweeter, honey or agave syrup is great. You can skip this if your fruit is sweet enough. Ice cubes give a refreshing chill. They help make the smoothie cold and smooth. {{ingredient_image_1}} Start by peeling and dicing the ripe mango. Use a sharp knife for this task. Make sure to cut the mango into small, even pieces. Next, take the ripe peaches. Slice them in half and remove the pit. Then, slice the peaches into thin wedges. Now, measure one cup of coconut milk. You can also use almond milk if you prefer. Next, scoop out half a cup of Greek yogurt. You can choose plain or vanilla yogurt for added flavor. Set these aside for the blending stage. In your blender, add the diced mango and sliced peaches first. Pour in the measured coconut milk and Greek yogurt next. If you want extra sweetness, add a tablespoon of honey or agave syrup. Then, toss in half a cup of ice cubes for a refreshing chill. Blend the mixture on high speed for about one to two minutes. Watch for a smooth and creamy texture. If the smoothie looks too thick, you can add a bit more coconut milk. Blend again until you reach your desired consistency. Once blended, it’s time to taste your smoothie. If it needs more sweetness, just add a bit more honey or agave syrup. Blend again for a few seconds to mix it well. Keep tasting until you find the right balance. This step is key for a perfect peach mango smoothie. Enjoy experimenting with flavors that suit your taste! To make your smoothie shine, pick ripe peaches and mangoes. Look for peaches that feel slightly soft when you squeeze them. A sweet scent also means they are ready to eat. For mangoes, select ones with a little give when pressed. Their skin should have some color, too. In summer, fresh fruit is best. In winter, you might find them in stores, but they may not taste as great. For a smooth and creamy texture, use a high-speed blender. Start by blending on low, then switch to high. This helps mix everything well without lumps. Blend for about 1-2 minutes. If your smoothie is too thick, add a little more coconut milk. This will help it blend smoothly. If it’s too thin, add more Greek yogurt or ice. When serving, pour the smoothie into chilled glasses for a refreshing touch. You can garnish with fresh mint leaves on top. This adds a pop of color and flavor. Pair your smoothie with light snacks like granola bars or fruit. It also goes well with breakfast items like toast or pancakes. Enjoy it any time of the day! Pro Tips Use Frozen Fruits: For an extra chilled and thick smoothie, consider using frozen mangoes and peaches instead of fresh ones. Experiment with Flavors: Add a splash of orange juice or a handful of spinach for a nutritional boost and a pop of color. Adjust Sweetness: Always taste your smoothie before serving; you can easily adjust the sweetness with more honey or agave if needed. Garnish Creatively: For a beautiful presentation, use additional fruit slices or edible flowers along with mint for garnish. {{image_2}} For a dairy-free option, use non-dairy yogurt. Look for coconut, almond, or cashew yogurt. These alternatives add creaminess without dairy. If you want a milk substitute, coconut milk works well. Almond milk is another great choice. Both keep the smoothie light and tasty. To boost the flavor, try adding spices. A pinch of cinnamon adds warmth. Ginger gives a nice zing and pairs well with the fruits. You can also sneak in greens like spinach or kale. They blend well and add nutrients without changing the taste much. Mix in other fruits to change the flavor. Berries like strawberries or blueberries make a great addition. You can also use tropical fruits like pineapple or papaya. These fruits add sweetness and a fun twist. Seasonal fruits can add freshness. Try peaches in summer or apples in fall for new flavors. A peach mango smoothie lasts about 1-2 days in the fridge. Store it in a sealed container. Keeping it airtight helps maintain flavor and texture. If you notice separation, just stir it well before drinking. You can freeze your smoothie for up to 3 months. Pour it into ice cube trays or freezer bags. To thaw, place it in the fridge overnight or blend it frozen for a thick treat. Add a splash of coconut milk to refresh the taste. Use travel cups designed for smoothies. Look for ones with a tight lid and straw. To keep it fresh, fill the cup just before you leave. If you plan to drink later, pack it in a cooler or insulated bag. This way, your smoothie stays cold and delicious! Yes, you can use frozen peaches or mangoes. Frozen fruit can make your smoothie cold and thick. If you choose frozen fruit, skip the ice cubes. This will help you get the right texture. To thicken your smoothie, add more Greek yogurt. You can also use less liquid. Another option is to add a banana. Bananas blend well and add creaminess without changing the flavor too much. Yes, you can make this smoothie ahead of time. Store it in a sealed jar in the fridge. It will stay fresh for up to a day. If it separates, just shake or stir before you drink it. You can create a delicious peach mango smoothie using fresh fruit, dairy alternatives, and tasty sweeteners. I shared step-by-step instructions to help you blend the best flavors. With tips on choosing ripe ingredients and variations for different tastes, you now have many ways to enjoy this treat. Don’t forget about storage options to keep your smoothie fresh. Experiment with the ideas I've shared, and make this recipe your own. Smoothies can be fun, healthy, and tasty when you try new twists!

Peach Mango Smoothie Refreshing and Healthy Drink

PREV 1 … 40 41 42 … 57 NEXT
quick dish kitchen

explore

DessertsDinnerAppetizersDrinks

Our Policies

  • Cookie Policy
  • Copyright Policy
  • Disclaimer
  • GDPR Policy
  • Terms Of Use
Back to Top
  • About
  • Contact Us
  • Privacy Policy
© 2025 quick dish kitchen