FREE DINNER EBOOK! Get your copy!
  • Cookie Policy
  • GDPR Policy
  • Disclaimer
  • Terms Of Use
  • Visit my other site: Fun Cookie Recipes
quick dish kitchen
  • Home
  • Dinner
  • Desserts
  • Drinks
  • Appetizers
  • Contact
  • About
  • Privacy Policy
  • Home
  • Dinner
  • Desserts
  • Drinks
  • Appetizers
  • Contact
  • About
  • Privacy Policy
  • Cookie Policy
  • GDPR Policy
  • Disclaimer
  • Terms Of Use
Visit my other site: Fun Cookie Recipes

HOME / CATEGORIES /

Latest

- 1 block (14 oz) firm tofu - 1/4 cup honey - 3 cloves garlic - 1 tablespoon soy sauce The main ingredients give this dish its unique taste. Firm tofu holds up well and gets crispy. Honey adds sweetness, while garlic brings strong flavor. Soy sauce gives a savory depth. - 1/2 teaspoon red pepper flakes - Sesame seeds - 3 green onions Optional ingredients can change the dish. Red pepper flakes add heat if you like spice. Sesame seeds give a nutty crunch. Chopped green onions add freshness and color. - Cutting board - Pan for frying - Small saucepan Having the right tools makes cooking easier. A cutting board helps with chopping tofu. A pan for frying ensures even cooking. A small saucepan is perfect for making the sauce. {{ingredient_image_1}} Pressing and draining the tofu Start by pressing the tofu. Wrap your block of firm tofu in a clean kitchen towel. Place something heavy on top, like a cast iron pan. Let it sit for about 15 minutes. This removes extra water and helps the tofu get crispy. Cutting tofu into cubes Once the tofu is pressed, cut it into 1-inch cubes. Place the cubes on a kitchen towel. This will help absorb any remaining moisture. Drier tofu fries better and gets a nice crunch. Coating tofu cubes with cornstarch Toss the tofu cubes in cornstarch. Make sure each piece is well-coated. This starch forms a crispy layer when fried. It gives your tofu that nice crunch we all love. Frying techniques for crispy tofu Heat vegetable oil in a large pan over medium-high heat. Once hot, add the coated tofu cubes in a single layer. Fry them for about 6-8 minutes. Turn them to get golden brown on all sides. When they are crispy, remove them and let them drain on paper towels. Combining sauce ingredients In a small saucepan, mix honey, minced garlic, soy sauce, rice vinegar, and grated ginger. If you like a little heat, add red pepper flakes. Stir well and heat over medium. Thickening the sauce Bring the mixture to a simmer for 2-3 minutes. This helps the sauce thicken. It should be sticky and glossy. Pour the honey garlic sauce over the crispy tofu. Gently toss to coat each piece. Cook for an extra 1-2 minutes for the flavors to blend. To make your tofu super crispy, removing moisture is key. Start by pressing the tofu. Place it on a towel and let it sit for about 15 minutes. This step is vital. It helps the tofu fry better. After pressing, cut the tofu into 1-inch cubes. Toss these cubes in cornstarch. Make sure each piece is covered well. The cornstarch creates a crunch when frying. It’s like a magic coat for your tofu! Do you want more flavor? Try adding spices! Red pepper flakes bring a nice heat. You can adjust the amount to fit your taste. If you want it spicier, add more flakes. You can also customize your sauce. Want a tangy kick? Add more rice vinegar. Prefer a sweeter taste? Increase the honey. Mixing these flavors makes your dish unique. Garnishing is fun! Top your tofu with chopped green onions. It adds color and freshness. A sprinkle of sesame seeds makes it look fancy too. Think about how you serve it. This dish is great for parties or family dinners. Pair it with rice or noodles for a full meal. Your guests will love the beautiful spread! Pro Tips Press Your Tofu: Make sure to press your tofu for at least 30 minutes to remove excess moisture. This helps achieve a crispier texture when frying. Coat Evenly: Ensure each tofu cube is evenly coated with cornstarch for a consistent crunch. Shake off any excess cornstarch before frying. Control the Heat: Fry the tofu on medium-high heat. If the oil is too hot, the outside may burn before the inside is heated through. Customize the Sauce: Feel free to adjust the sweetness or spiciness of the honey garlic sauce by adding more honey or red pepper flakes to suit your taste. {{image_2}} You can easily make this dish vegan. Instead of honey, use maple syrup or agave nectar. Both options offer sweetness and keep the sauce tasty. For protein, consider using tempeh or seitan. They have great textures and absorb flavors well. Crispy honey garlic tofu pairs wonderfully with rice or noodles. The sauce soaks into the grains, making each bite more flavorful. You can also add vegetables like broccoli, bell peppers, or snap peas. This adds color and nutrition to your meal. Explore other sauces for variety. Try a sweet chili sauce for a spicy kick. You can also make a teriyaki sauce for a different flavor. Asian-inspired sauces like hoisin or sesame sauce can also work well. Just mix and match to find your favorite! To store your crispy honey garlic tofu, let it cool first. After it cools, place it in an airtight container. This keeps the tofu fresh and tasty. You can store it in the fridge for up to three days. Just remember, the longer it sits, the less crispy it gets. When you are ready to enjoy your leftovers, use the oven or a skillet to reheat. Preheat your oven to 375°F (190°C) and bake for about 10 minutes until crispy again. If using a skillet, heat it over medium heat and add a little oil. Cook the tofu for a few minutes on each side until warm and crispy. Avoid the microwave; it makes the tofu soft. Yes, you can freeze crispy tofu. However, the texture may change. To freeze, place cooled tofu in a freezer-safe bag or container. It can last for up to three months in the freezer. When you want to eat it, thaw it in the fridge overnight. Reheat it using the oven or skillet for the best results. This way, you can still enjoy your tasty dish later! To achieve crispy tofu, follow these key techniques: - Press the Tofu: Remove excess moisture by pressing the tofu. This helps it crisp up well. - Cut into Cubes: Slice the tofu into 1-inch cubes. Smaller pieces fry better. - Cornstarch Coating: Toss the tofu cubes in cornstarch. This creates a crunchy outer layer when fried. - Hot Oil: Use a hot pan with vegetable oil. Fry the tofu in a single layer to get even crispiness. - Avoid Overcrowding: Fry in batches if needed. Overcrowding the pan steams the tofu, making it soggy. These steps ensure your tofu comes out crunchy and golden. Honey garlic tofu is not vegan due to honey. Honey is an animal product. If you want a vegan option, use maple syrup or agave nectar instead. Both add sweetness without animal ingredients. Yes, you can use other types of tofu. Here are some options: - Extra-Firm Tofu: This variety works well for frying, just like firm tofu. - Soft or Silken Tofu: While softer, these types can be used for sauces or soups, not frying. - Tofu Alternatives: You might also try tempeh or seitan. Both provide great texture and can soak up flavors well. Each type offers a different taste and texture, giving you choices for your dish. This blog post covered how to make delicious honey garlic tofu step by step. You learned about key ingredients, tools needed, and tips for perfecting your dish. Remember, pressing tofu is key for crispiness and flavor. Don't forget the fun variations you can try, from sauces to pairings. Whether you are cooking for yourself or for guests, this dish is sure to impress. Enjoy your cooking adventure and explore new flavors!

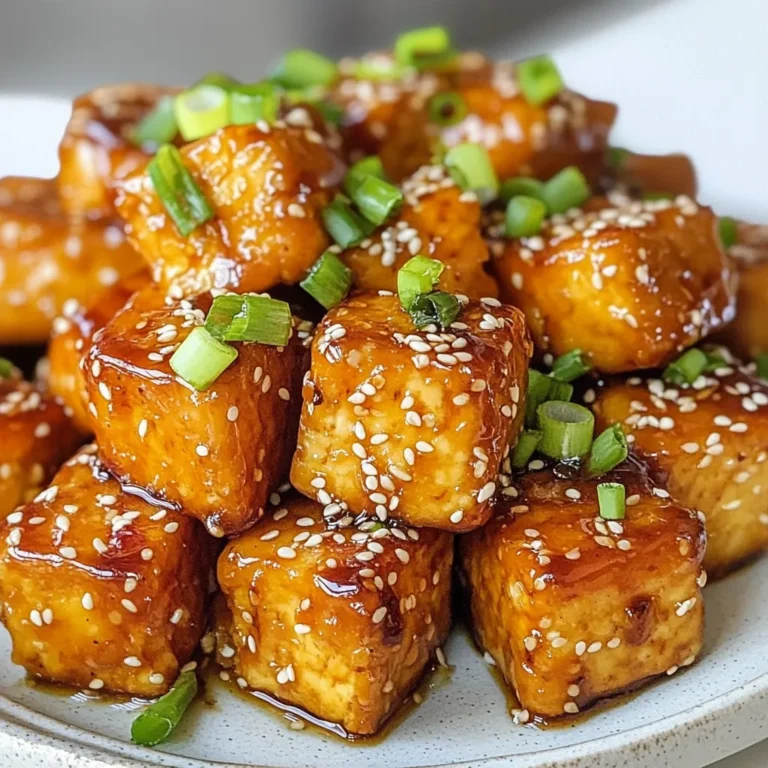
Crispy Honey Garlic Tofu Flavorful Vegan Delight

I love gathering fresh ingredients for Ginger Soy Glazed Chicken Thighs. Each one adds a special touch. Here’s what you need: - Chicken - 4 boneless, skinless chicken thighs - Marinade Ingredients - 4 tablespoons soy sauce - 2 tablespoons fresh ginger, grated - 2 tablespoons honey - 2 cloves garlic, minced - 2 tablespoons sesame oil - 1 teaspoon rice vinegar - 1 teaspoon cornstarch (optional, for thickening) - 1 tablespoon water (if using cornstarch) - Garnishes - 2 green onions, chopped - Sesame seeds Each ingredient plays a key role in creating that delicious flavor. The chicken thighs soak up the marinade well, making them juicy and tasty. The ginger and honey balance each other. The soy sauce adds depth. You can even adjust the ingredients to fit your taste! {{ingredient_image_1}} To start, grab a medium bowl. You will whisk together soy sauce, grated ginger, honey, minced garlic, sesame oil, and rice vinegar. This mix will create a flavorful marinade that gives the chicken its tasty glaze. If you want a thicker glaze, you can add cornstarch. Mix the cornstarch with water in a small bowl to make a slurry. Then, stir this into your marinade. This step is optional but adds a nice texture. Next, it’s time to marinate the chicken. Place the chicken thighs in a resealable plastic bag or a shallow dish. Pour the marinade over the chicken, making sure it’s well coated. Seal the bag or cover the dish. For the best flavor, let the chicken marinate in the fridge for at least 30 minutes. If you have time, 1 to 2 hours is even better. Make sure to store the marinated chicken in the fridge. This keeps it safe and flavorful. Now, let’s cook the chicken. Preheat your grill or skillet over medium-high heat. Remove the chicken from the marinade, letting the extra drip off. You can grill the chicken thighs for about 6 to 7 minutes on each side. Look for a nice golden brown color and ensure they are cooked through. For extra flavor, brush the chicken with the reserved marinade in the last few minutes of cooking. Once cooked, take the chicken off the heat and let it rest for a few minutes. This helps keep it juicy. Slice it up, and don’t forget to garnish with chopped green onions and sesame seeds for that extra crunch. Enjoy your meal! To get a nice glaze, focus on even coating. Use a brush to spread the marinade on the chicken. This helps it stick better. I also recommend marinating for a longer time. The chicken will soak up more flavor. Aim for at least one hour in the fridge. If you want a thicker glaze, mix cornstarch with water. Add this to the marinade before cooking. It will give a lovely shine and depth. Timing is key when brushing the marinade. Brush it on during the last few minutes of cooking. This ensures the glaze caramelizes without burning. It adds a beautiful finish to your chicken thighs. Resting the chicken thighs after cooking is very important. Let them sit for about five minutes. This helps the juices redistribute, making them more tender. If you cut into them right away, all the juices will run out. Be careful not to overcook the chicken. The thighs should cook until they reach an internal temperature of 165°F. Use a meat thermometer for best results. Cooking them too long will make them dry. Keep an eye on the time and check for doneness to enjoy juicy, flavorful chicken. Pro Tips Marination Time: For the best flavor, marinate the chicken thighs for at least 1-2 hours, or even overnight if you can. This allows the flavors to penetrate the meat more deeply. Grilling Technique: Make sure your grill or skillet is preheated before adding the chicken. This helps achieve a nice sear and prevents sticking. Thickening the Glaze: If you want a thicker glaze, don't forget to mix cornstarch with water to create a slurry before adding it to the marinade. Resting the Chicken: Let the chicken rest for a few minutes after grilling. This helps the juices redistribute, making the chicken more tender and flavorful. {{image_2}} You can switch up the chicken thighs for other proteins. Tofu works great for a plant-based meal. Just press the tofu to remove water and marinate it like you would chicken. Pork is another option, and it pairs well with the ginger soy glaze too. For sweeteners, honey is fantastic, but you can try maple syrup or agave. These sweeteners add a different flavor. Each will still give you a tasty glaze. To make your ginger soy glazed chicken even better, add some spices or herbs. A pinch of red pepper flakes gives it some heat. Fresh herbs like cilantro or basil add freshness and depth. Don't forget citrus zest! Grate some lime or orange peel into the marinade. This adds a bright note that balances the savory flavors. These tweaks can take your dish to the next level. To keep your Ginger Soy Glazed Chicken Thighs fresh, store them in the fridge. Place them in an airtight container. They will last for up to four days. If you want to keep them longer, freeze the chicken. Wrap each piece tightly in plastic wrap, then place them in a freezer bag. They can stay in the freezer for up to three months. When reheating, I recommend using the oven for the best taste. Preheat your oven to 350°F (175°C). Place the chicken thighs on a baking sheet and cover them with foil. Heat for about 15-20 minutes. This keeps the chicken juicy and warm. If you prefer the microwave, use low power. Heat in short bursts, checking often to avoid drying out the chicken. Enjoy the tasty flavors just as they were! You should marinate the chicken for at least 30 minutes. For the best flavor, aim for 1-2 hours. This time allows the chicken to soak up the ginger and soy sauce. If you have more time, marinating overnight works well too. Just be sure to keep it in the fridge to stay safe. Yes, you can use bone-in chicken thighs! They will take a bit longer to cook. Cook bone-in thighs for about 8-9 minutes on each side. Always check that the internal temperature reaches 165°F to ensure they are safe to eat. You can serve these chicken thighs with many tasty sides. Here are some great options: - Steamed rice or quinoa for a filling base. - Stir-fried vegetables for added crunch and color. - A fresh salad with greens and a light vinaigrette. Pairing suggestions include a light white wine or iced green tea. These drinks complement the flavors nicely and keep the meal refreshing. In this post, we explored making Ginger Soy Glazed Chicken Thighs. We covered key ingredients, detailed preparation steps, and cooking methods. I shared tips for perfect glazing, juicy chicken, and ingredient variations. Storing leftovers and reheating also played a role in keeping your meal tasty. In the end, this dish is simple and fun to make. You can tweak flavors to fit your taste. Enjoy trying these methods and impressing friends and family with your cooking skills.

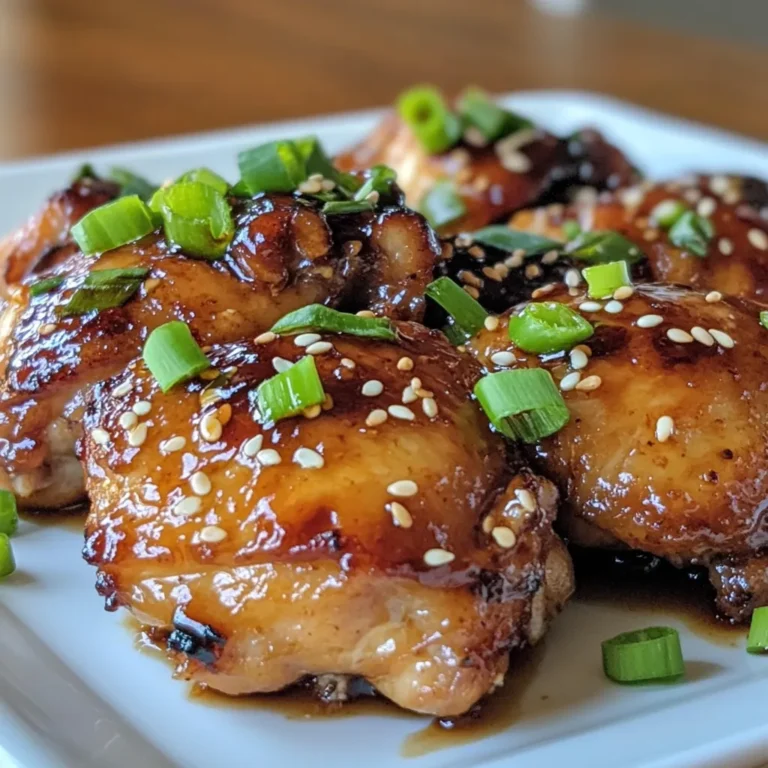
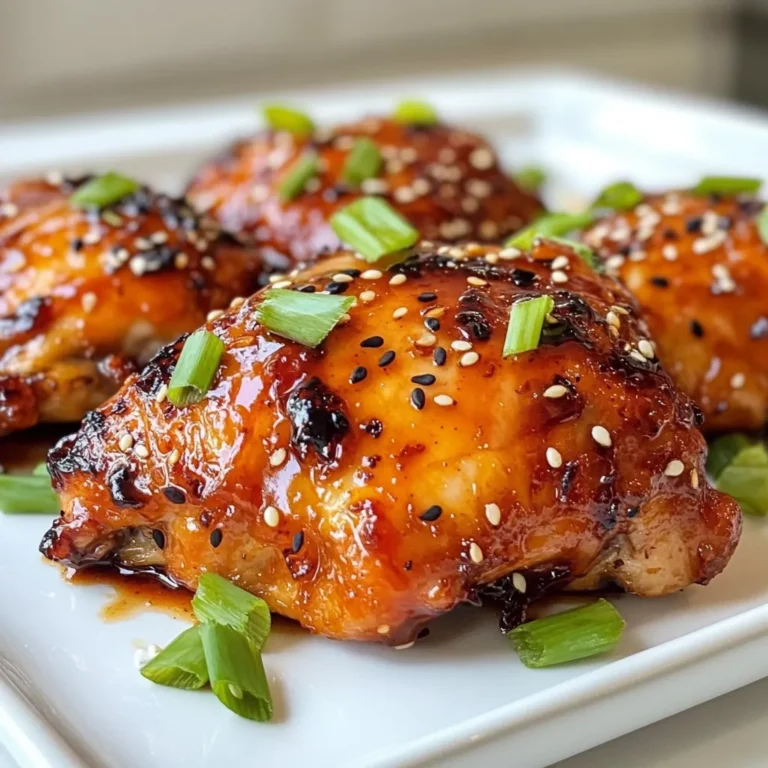
Ginger Soy Glazed Chicken Thighs Simple and Tasty Meal

To make a tasty Mediterranean Chickpea Salad, gather these simple ingredients: - 1 can (15 oz) chickpeas, rinsed and drained - 1 cup cherry tomatoes, halved - 1 cucumber, diced - 1/2 red onion, finely chopped - 1/4 cup Kalamata olives, pitted and sliced - 1/4 cup feta cheese, crumbled - 2 tablespoons fresh parsley, chopped - 1 tablespoon fresh mint, chopped - Juice of 1 lemon - 3 tablespoons olive oil - 1 teaspoon dried oregano - Salt and pepper to taste You can use either fresh or canned chickpeas. Canned chickpeas save time. They are already cooked and ready to use. Just rinse and drain them well. Fresh chickpeas take longer to cook. You must soak and boil them. Canned chickpeas also have a soft texture. This makes them perfect for salads. If you prefer fresh, go for it! This salad is flexible for different diets. If you're dairy-free, swap feta cheese with avocado. For a lower sodium option, choose no-salt-added chickpeas. You can also use green olives instead of Kalamata olives. If you don’t like mint, skip it or use basil. Adjust the ingredients based on what you enjoy or what you have. {{ingredient_image_1}} Start by rinsing and draining the chickpeas. This step helps remove excess salt. Next, cut the cherry tomatoes in half. Dice the cucumber and finely chop the red onion. Slice the Kalamata olives. These colors and textures make the salad bright and fresh. In a large bowl, combine the chickpeas, tomatoes, cucumber, red onion, and olives. Add the crumbled feta cheese, parsley, and mint. Stir gently with a spoon. Mixing allows the ingredients to mingle, enhancing the taste. In a small bowl, whisk together the lemon juice, olive oil, oregano, and a pinch of salt and pepper. This dressing adds a zesty flavor to the salad. The balance of acidity and oil is key for a tasty dish. Pour the dressing over the salad mixture. Toss gently to coat every ingredient. Let the salad sit for at least 15 minutes. This waiting time helps the flavors blend beautifully. Serve it in a chilled bowl. Garnish with mint and cherry tomatoes for a stunning look. Enjoy! To boost the taste of your Mediterranean chickpea salad, use fresh herbs. Fresh parsley and mint add bright notes. You can also try adding a splash of red wine vinegar. This adds a tangy kick that makes flavors pop. Mix in some chopped bell peppers for extra crunch and sweetness. Using high-quality olive oil will enhance richness too. You can also sprinkle in some red pepper flakes for heat if you like it spicy. When meal prepping, chop your veggies in advance. Store them in airtight containers in the fridge. Keep the dressing separate until you’re ready to eat. This keeps the salad fresh and crisp. You can make a big batch of the salad and portion it out. It’s an easy grab-and-go lunch! To save time, you can also use canned chickpeas, just remember to rinse them well. For a beautiful presentation, serve your salad in a chilled bowl. This keeps it fresh and adds a nice touch. Garnish with a sprig of mint on top. A few cherry tomatoes arranged attractively can make it look even better. Serve with lemon wedges on the side for a pop of color and extra flavor. A colorful dish is always more inviting! Pro Tips Fresh Ingredients: Use the freshest produce available for the best flavor and texture in your salad. Chill Before Serving: Refrigerate the salad for at least 30 minutes before serving to enhance the flavors. Customizable Ingredients: Feel free to add other ingredients like bell peppers or avocados for extra nutrition and taste. Make It Ahead: This salad can be made a day in advance; just store it in the fridge to save time. {{image_2}} You can enhance this salad by adding feta cheese or olives. Feta brings a creamy, salty flavor that pairs well with the chickpeas. If you love olives, try using Kalamata or green olives for a briny kick. Both options add depth to the salad and make it even more satisfying. This salad is naturally vegetarian. To make it vegan, simply leave out the feta cheese. You can also add more veggies like bell peppers or radishes for extra crunch. This keeps the salad fresh and full of flavor while meeting your dietary needs. Use seasonal ingredients to keep the salad exciting. In summer, add diced bell peppers or zucchini. In fall, consider roasted sweet potatoes or butternut squash. These swaps keep the dish vibrant and full of nutrients, making it perfect for any time of year. Store your Mediterranean Chickpea Salad in a clean, airtight container. This keeps it fresh. If you have extra dressing, store it separately. This way, the salad stays crisp. The salad lasts for about 3 to 5 days in the fridge. Always check for freshness before eating. If it smells off or looks strange, toss it out. You don’t need to reheat this salad. It tastes best cold. If you want warmth, consider adding it to a grain bowl or serving it with warm pita bread. Enjoy the cool and fresh flavors! Mediterranean Chickpea Salad is packed with nutrients. It contains protein, fiber, and healthy fats. One serving has about 200 calories. It offers around 10 grams of protein and 5 grams of fiber. The salad is rich in vitamins A and C, thanks to the tomatoes and cucumber. Chickpeas provide iron and magnesium, which support your body’s needs. Yes, you can make this salad ahead of time. It tastes even better after sitting for a while. Prepare it a few hours before serving. This lets the flavors blend nicely. Just keep it in the fridge until you are ready to eat. Absolutely! Mediterranean Chickpea Salad is gluten-free. Chickpeas are a great source of protein without gluten. You can enjoy this dish safely if you have gluten sensitivity. Always check labels for any added ingredients that might contain gluten. You can serve Mediterranean Chickpea Salad with many dishes. It pairs well with grilled chicken or fish. You can also serve it with pita bread or hummus for a light meal. This salad makes a great side for barbecues or picnics too. Enjoy it with a refreshing drink like iced tea or lemonade. This blog post explored Mediterranean Chickpea Salad, from ingredients to storage. We covered fresh and canned chickpeas and substitutions for allergies. You learned how to prepare, mix, and dress your salad, with helpful tips for flavor and presentation. In the end, this salad is versatile and easy to make. It’s a healthy choice that fits many diets. Enjoy trying different variations and sharing it with friends. Happy cooking!

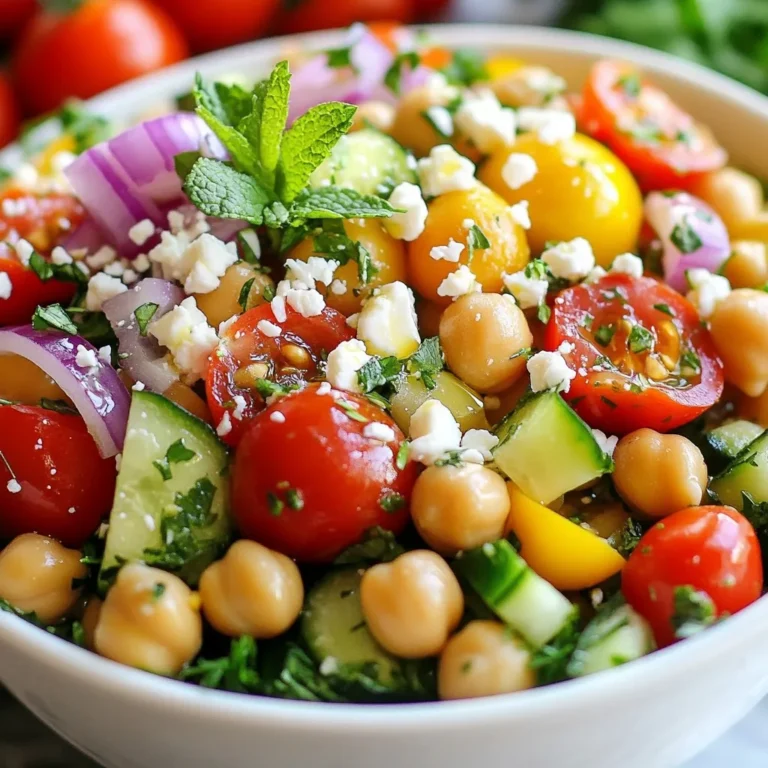
Mediterranean Chickpea Salad Fresh and Flavorful Dish

- 2 cans of tuna in olive oil, drained - 1 cup cherry tomatoes, halved - 1/2 cucumber, diced - 1/4 red onion, finely chopped - 1/4 cup Kalamata olives, pitted and sliced - 1/4 cup feta cheese, crumbled - 1/4 cup fresh parsley, chopped - 2 tablespoons capers, drained Tuna is the star of this dish. I love using canned tuna in olive oil because it adds great flavor. It’s also very tender. Cherry tomatoes and cucumber bring freshness and crunch. Red onion adds a slight bite that balances the salad well. Kalamata olives provide a rich, briny taste. Feta cheese gives a nice creaminess with a salty kick. Fresh parsley brightens it all up. Capers add a unique tang that makes this salad special. - Juice of 1 lemon - 3 tablespoons olive oil - Salt and pepper to taste The dressing is simple yet powerful. Fresh lemon juice adds acidity and zest. Olive oil ties everything together with a smooth, rich flavor. I recommend using a high-quality olive oil for the best taste. Salt and pepper enhance all the flavors. You can adjust these based on your taste. Mixing the dressing well helps ensure every bite is flavorful. This dish is fresh, colorful, and perfect for any meal. {{ingredient_image_1}} Mixing the Salad Ingredients Start with a large bowl. Add two cans of drained tuna. Then, toss in one cup of halved cherry tomatoes. Next, add half a diced cucumber. Chop a quarter of a red onion and mix it in. Don’t forget the quarter cup of sliced Kalamata olives. Crumble in a quarter cup of feta cheese. Finally, add a quarter cup of chopped fresh parsley and two tablespoons of drained capers. Preparing the Dressing In a small bowl, whisk together the juice of one lemon and three tablespoons of olive oil. Add salt and pepper to taste. Mix until it blends well. This dressing adds a bright flavor to your salad. Folding the Ingredients Together Pour the dressing over the salad mixture. Gently fold everything together. Be careful not to break up the tuna too much. You want all the flavors to mix well while keeping some texture. Adjusting Seasoning Taste your salad. If it needs more flavor, add a little more salt or pepper. This step ensures the salad is just right for you. Refrigeration Tips Cover the salad and chill it in the fridge for at least 30 minutes. This wait lets the flavors blend together. If you have time, chilling it longer makes it even better. Suggestions for Serving You can serve this salad cold or at room temperature. Pair it with crusty bread for a nice crunch. Or, serve it on a bed of greens for a refreshing meal. Enjoy your tasty Mediterranean tuna salad! How to Choose the Best Tuna When picking tuna, look for high-quality cans. Choose tuna packed in olive oil for great flavor. Check for brands that use sustainable fishing. The best tuna will have a firm texture and a nice color. Always read the label for any added ingredients. Tips for Fresh Vegetables Fresh veggies make your salad pop. Select ripe cherry tomatoes that are bright and firm. Look for cucumbers that are crisp and free from soft spots. Red onions should be vibrant and crunchy. Always wash your veggies to remove any dirt. Cut them right before mixing for freshness. Ideas for Pairing This salad goes well with crusty bread. You can also serve it on a bed of mixed greens. Pair it with a light white wine for a nice touch. A crisp sparkling water adds a refreshing feel. You can add some lemon wedges for extra zing. Creative Serving Options Serve the salad in individual bowls for a fun touch. You can also wrap it in lettuce leaves for a low-carb option. Try using pita bread to scoop up the salad. For a twist, serve it with a side of hummus and pita chips. This makes a great lunch or light dinner. Pro Tips Quality Tuna Matters: Use high-quality tuna packed in olive oil for a richer flavor and better texture in your salad. Fresh Herbs for Flavor: Fresh parsley enhances the taste significantly; consider adding fresh dill or basil for a unique twist. Customize Your Ingredients: Feel free to add other ingredients like bell peppers, artichokes, or even hard-boiled eggs to make it your own. Chill for Best Flavor: Allowing the salad to chill for at least 30 minutes helps the flavors meld, making each bite more delicious. {{image_2}} Alternative Proteins You can swap tuna for other proteins. Try canned salmon for a different taste. Cooked chicken can also work well. For a vegetarian option, use chickpeas. They add a nice texture and flavor. Different Vegetables Feel free to mix up the veggies. Bell peppers add crunch and sweetness. Zucchini can bring a fresh taste. Carrots offer a nice pop of color. Use what you love or what you have on hand. Additional Herbs and Spices Fresh herbs boost the flavor. Try dill or basil for a twist. You can also add a pinch of red pepper flakes for heat. Garlic powder can add a warm depth. Experiment to find your favorite mix. Different Dressings While lemon and olive oil is classic, you can try new dressings. A balsamic vinaigrette adds sweetness. Greek yogurt can give a creamy texture. Experiment with different dressings to suit your taste. Refrigeration Guidelines To store leftovers, place the tuna salad in an airtight container. Make sure to seal it well. It will stay fresh in the fridge for about three days. Keep it on a middle shelf for the best temperature. Always check for any signs of spoilage before eating. Freezing Options You can freeze this salad, but it may change the texture. If you want to freeze it, use a freezer-safe container. Leave some space at the top for expansion. Thaw it in the fridge overnight before serving. Use the salad within three months for the best taste. How Long it Lasts in the Fridge In the fridge, this Mediterranean tuna salad lasts up to three days. After this, you should discard it. Always check the salad before enjoying it again. Signs of Spoilage Look for any off smells or changes in color. If the salad appears slimy or has an unusual texture, it’s time to throw it away. Trust your senses; they often guide you well. Can I use canned tuna in water? Yes, you can use canned tuna in water. However, tuna in olive oil adds more flavor. The oil also keeps the tuna moist and gives a richer taste. If you use tuna in water, you may want to add a bit more olive oil to the salad. This keeps the dish bright and tasty. Is Mediterranean tuna salad healthy? Yes, Mediterranean tuna salad is very healthy. It is packed with protein from the tuna. The fresh veggies and olives add vitamins and minerals. Feta cheese gives you calcium too. You can enjoy this meal without feeling guilty. Can I make it ahead of time? Yes, you can make this salad ahead of time. It tastes even better after sitting for a while. Make it a few hours before or even the night before. Just keep it in the fridge. The flavors will blend nicely. How should I serve it? You can serve this salad cold or at room temperature. It goes great with crusty bread or on a bed of greens. You can also use it as a filling for wraps. This makes it a versatile dish for any meal. Mediterranean tuna salad is fresh, healthy, and easy to make. We covered main ingredients like tuna, veggies, feta, and olives. You learned how to mix, chill, and serve it right. Remember to pick the best tuna and veggies for the best taste. Don’t hesitate to try different proteins or herbs for fun flavors. With these tips, you will enjoy this dish for days. Keep leftovers safe in the fridge and watch for spoilage. Enjoy your cooking and sharing this vibrant salad!

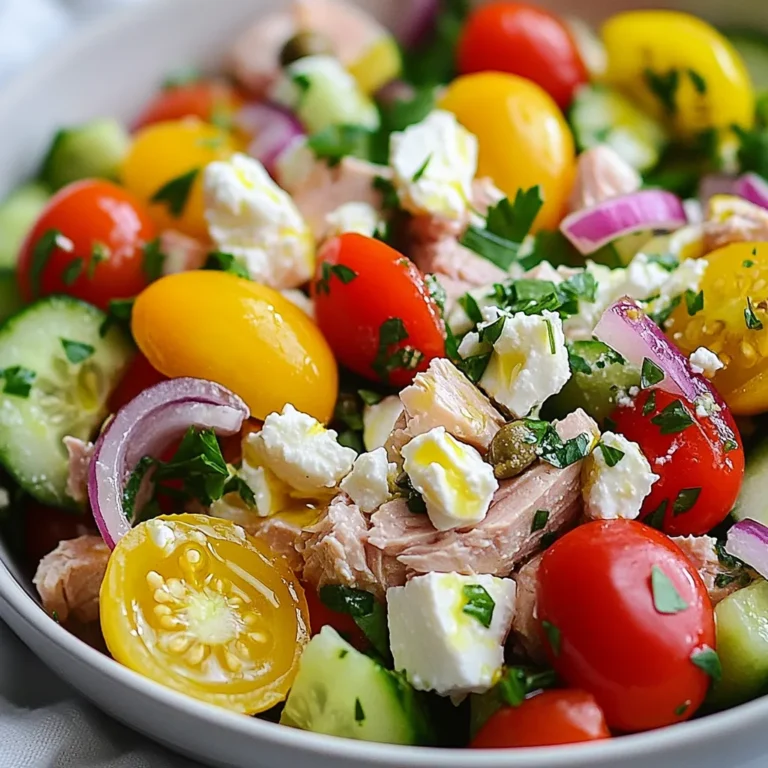
Mediterranean Tuna Salad Fresh and Flavorful Option

The key to making Spicy Thai Peanut Noodles lies in using fresh and vibrant ingredients. Here is what you need: - 8 oz rice noodles - 1 tablespoon sesame oil - 1 red bell pepper, sliced - 1 cup snap peas, trimmed - 2 carrots, julienned - ½ cup scallions, sliced - 1 cup fresh cilantro leaves, chopped - ½ cup creamy peanut butter - 3 tablespoons soy sauce - 2 tablespoons lime juice - 2 teaspoons sriracha (adjust to taste) - 1 tablespoon honey (or maple syrup for vegan option) - 1 clove garlic, minced - Salt and pepper to taste - Crushed peanuts and lime wedges for garnish These ingredients mix together to create a dish packed with flavor and texture. To make your dish even better, consider these optional garnishes and add-ins: - Crushed peanuts for extra crunch - Lime wedges for a tangy kick - Extra cilantro for freshness - Bean sprouts for a crisp bite - Green onions for added flavor These options can enhance the visual appeal and taste of your meal. If you can't find some ingredients, don't worry! Here are some easy swaps: - Use whole wheat noodles instead of rice noodles. - Swap sesame oil for olive oil if needed. - Replace red bell pepper with green or yellow peppers. - Use almond butter instead of peanut butter for a different flavor. - Try agave syrup instead of honey for a vegan option. These substitutions can help you customize the dish while keeping it delicious. {{ingredient_image_1}} To start, boil water in a large pot. Add 8 oz of rice noodles to the pot. Cook them according to the package instructions, usually about 4-6 minutes. Once they are done, drain the noodles. Rinse them under cold water. This step keeps them from sticking together. Next, take a large skillet or wok. Heat 1 tablespoon of sesame oil over medium heat. Add the sliced red bell pepper, snap peas, and julienned carrots to the skillet. Sauté these veggies for about 3-4 minutes. You want them to be tender yet still crisp. This adds great texture to your dish. In a mixing bowl, combine ½ cup of creamy peanut butter, 3 tablespoons of soy sauce, 2 tablespoons of lime juice, 2 teaspoons of sriracha, 1 tablespoon of honey, and 1 clove of minced garlic. Whisk these ingredients together until smooth. If your sauce is too thick, add a splash of warm water. This helps reach your desired consistency. Now, add the cooked rice noodles to the skillet with the sautéed vegetables. Pour the peanut sauce over everything. Toss the noodles and veggies together until well coated. Heat this mixture for an extra 1-2 minutes. Take it off the heat, and stir in the sliced scallions and chopped cilantro. Don’t forget to season with salt and pepper to taste! To get the best noodle texture, cook the rice noodles just until tender. Follow the package instructions closely. After cooking, rinse the noodles under cold water. This stops the cooking process. It also keeps the noodles from sticking together. Toss them with a little sesame oil for extra flavor and to avoid clumping. If you love heat, add more sriracha to the peanut sauce. Start with two teaspoons, then taste it. You can always add more. If you want less heat, use one teaspoon or skip it altogether. You can also add sugar or honey to balance the spice if it gets too hot. To make this dish vegan, swap honey for maple syrup. All other ingredients are naturally vegan. Check your soy sauce too; some brands use ingredients that aren't vegan. Be sure to use a gluten-free soy sauce if needed. This way, everyone can enjoy a tasty bowl of noodles! Pro Tips Adjust the Spice Level: If you're sensitive to heat, start with less sriracha and gradually increase it to your desired spice level. Perfect Peanut Sauce: For a creamier sauce, make sure your peanut butter is at room temperature. If needed, microwave it for a few seconds to soften. Fresh Veggies Matter: Use fresh, crisp vegetables for the best texture and flavor. You can also mix and match seasonal veggies based on your preference. Meal Prep Friendly: This dish can be made ahead of time and stored in the fridge for up to 3 days. Just reheat gently before serving. {{image_2}} You can add protein to your spicy Thai peanut noodles. Chicken, tofu, or shrimp work well. For chicken, use thin slices. Cook them in the skillet until they are golden brown. If you choose tofu, press and cube it first. Sauté it until crispy for the best texture. For shrimp, cook them until they turn pink and opaque. Any of these options boosts flavor and nutrition. Feel free to swap in different veggies as you like. Broccoli, bell peppers, or zucchini can work great. Use what is fresh or in season. You can also toss in leafy greens like spinach or kale for a healthy twist. Just add them at the end to keep them bright and crunchy. This way, you keep your dish exciting and full of color. You can change the sauce for new flavors. Try tahini, almond butter, or even a spicy chili paste. Each gives a unique taste to the dish. You can also add fresh ginger or lime zest to brighten the flavor. For a sweeter touch, consider using coconut sugar instead of honey. These simple swaps can take your spicy Thai peanut noodles to a whole new level. To store your Spicy Thai Peanut Noodles, let them cool first. Place them in an airtight container. Your noodles will stay fresh for about 3 to 5 days in the fridge. Make sure to separate the sauce if you can. This helps keep everything tasting great. When you’re ready to enjoy your leftovers, reheat them in a pan. Add a splash of water or extra sauce to prevent sticking. Heat over medium for about 5 minutes, stirring often. You can also use a microwave. Just heat in short bursts and stir in between. If you want to freeze your noodles, they can last up to 2 months. Pack them in a freezer-safe container. Keep the sauce separate to maintain flavor and texture. When ready to eat, thaw them overnight in the fridge. Reheat as mentioned above for the best taste. You can serve these noodles with many great sides. Try steamed broccoli or bok choy for veggies. Crispy tofu or grilled chicken adds protein. For a refreshing touch, serve a simple cucumber salad. Each adds flavor and balance to your meal. Yes, you can make the sauce in advance! Just mix all ingredients and store them in a jar. Keep it in the fridge for up to a week. When you’re ready to cook, just stir and warm it slightly. This saves time on busy nights. To make it gluten-free, switch to gluten-free soy sauce, like tamari. Rice noodles are already gluten-free, so you’re in luck! Always check labels on sauces to ensure they do not contain gluten. This way, everyone can enjoy this tasty dish. Peanut sauce is super versatile! Use it as a dip for fresh veggies or spring rolls. Drizzle it on grilled meats or tofu for extra flavor. You can even mix it into salads for a creamy dressing. The options are endless, so get creative! In this blog post, we explored how to make Spicy Thai Peanut Noodles. We looked at essential ingredients, step-by-step cooking methods, and tips for perfect noodles. You learned how to adjust spice levels and make vegan options. We also discussed protein additions, vegetable swaps, and storage tips. With these insights, you can create a tasty meal that fits your taste. Enjoy making this dish and feel free to personalize it! Your cooking adventure starts now.

Spicy Thai Peanut Noodles Delicious and Easy Recipe

- 1 pound boneless, skinless chicken thighs - 1 tablespoon olive oil - 1 medium onion, chopped - 3 cloves garlic, minced - 1 jalapeño, seeded and diced - 1 bell pepper (red or yellow), diced - 1 can (15 oz) black beans, rinsed and drained - 1 can (15 oz) corn, drained - 1 can (14 oz) diced tomatoes with green chilies - 4 cups chicken broth - 1 tablespoon ground cumin - 1 tablespoon chili powder - 1 teaspoon smoked paprika - Salt and black pepper to taste - Fresh cilantro, for garnish - Lime wedges, for serving You will need a few key ingredients to make this soup flavorful. First, boneless, skinless chicken thighs bring great taste and tenderness. Next, fresh veggies like onion, garlic, jalapeño, and bell pepper add crunch and flavor. Canned black beans, corn, and diced tomatoes with green chilies bring heartiness. Spices pull everything together. Ground cumin, chili powder, and smoked paprika add depth and warmth. Don’t forget salt and black pepper to enhance all the flavors. For a fresh touch, add some cilantro for garnish. A lime wedge on the side gives a zesty kick. These ingredients make this soup come alive with flavor and warmth. {{ingredient_image_1}} 1. Sautéing onions and garlic Heat 1 tablespoon of olive oil in a large pot over medium heat. Add 1 medium chopped onion. Cook for about 3-4 minutes. The onion should turn translucent. Next, add 3 minced garlic cloves and 1 diced jalapeño. Cook for another 1-2 minutes until it smells great. 2. Browning the chicken Raise the heat to medium-high. Add 1 pound of boneless, skinless chicken thighs to the pot. Cook for about 5-6 minutes. Make sure the chicken is browned on all sides. 3. Adding remaining ingredients and seasoning Stir in 1 diced bell pepper, 1 can of rinsed black beans, 1 can of drained corn, and 1 can of diced tomatoes with their juices. Pour in 4 cups of chicken broth. Add 1 tablespoon of ground cumin, 1 tablespoon of chili powder, and 1 teaspoon of smoked paprika. Season with salt and black pepper to taste. 4. Simmering the soup Bring the soup to a boil. Then reduce the heat to low. Cover the pot and let it simmer for 25-30 minutes. This allows the flavors to mix well and the chicken to cook. 5. Shredding chicken and final adjustments After simmering, take the chicken thighs out of the pot. Use two forks to shred the chicken. Return the shredded chicken to the soup and stir it in. Taste the soup and adjust the seasoning if needed. Want more spice? Add more jalapeño or hot sauce. This soup is now ready to enjoy! - Choosing the right chicken cuts I recommend using boneless, skinless chicken thighs. They stay juicy and tender during cooking. Thighs also add rich flavor. If you prefer, you can use chicken breasts, but they may dry out. - Adjusting spice levels to personal preference Spice can vary based on taste. To make the soup milder, skip the jalapeño or remove the seeds. For more heat, add extra jalapeño or a splash of hot sauce. Taste as you go! - Cooking times for maximum flavor Simmer the soup for at least 25 minutes. This allows the flavors to blend well. Make sure the chicken is fully cooked before shredding it. This step is key for a tasty soup. - Garnishing the soup for visual appeal Fresh cilantro adds color and flavor. Sprinkle it on top just before serving. Lime wedges on the side look great and give a zesty kick when squeezed in. - Serving suggestions and accompaniments Serve the soup with crusty bread or tortilla chips. Both pair well and add crunch. A light salad can also complement this hearty soup. Enjoy your meal! Pro Tips Use Fresh Ingredients: Fresh herbs and vegetables enhance the flavor of the soup significantly. Try to use fresh cilantro and freshly chopped veggies for the best taste. Adjust the Spice Level: If you like it spicier, don't hesitate to add more jalapeño or a dash of your favorite hot sauce. You can also use different types of peppers for varying heat. Perfectly Shredded Chicken: Allow the chicken to rest for a few minutes after cooking before shredding. This helps retain moisture and makes it easier to shred. Make it a Meal: Serve the soup with crusty bread or over rice for a heartier meal. Adding avocado slices on top can also elevate the dish. {{image_2}} You can switch the chicken thighs for turkey. Turkey works well and adds great flavor. If you want a meatless option, use beans instead of chicken. Black beans or chickpeas are both good choices. You can also add more veggies to boost nutrition. Try adding zucchini or carrots for extra crunch and color. To make the soup even better, play around with spices. Try adding cayenne pepper for more heat. Smoked paprika gives a nice, deep flavor. Using homemade broth boosts the taste too. Store-bought broth is fine, but homemade adds a richer taste. You can simmer bones or veggies to create your own broth. It’s simple and makes a big difference! To keep your Spicy Southwest Chicken Soup fresh, follow these tips: - Refrigeration: Allow the soup to cool to room temperature. Transfer it to an airtight container. Store it in the fridge for up to 3-4 days. - Freezing: For long-term storage, place the cooled soup in freezer-safe containers. Leave some space at the top to allow for expansion. It will freeze well for up to 3 months. When it’s time to enjoy your soup again, here are the best ways to reheat it: - Stovetop: Pour the soup into a pot. Heat over medium heat, stirring often until warmed through. This helps keep the flavors intact. - Microwave: Place the soup in a microwave-safe bowl. Cover it with a microwave-safe lid or wrap. Heat in 1-minute intervals, stirring in between, until hot. These methods ensure your soup stays tasty and enjoyable every time! Can I use frozen chicken in this recipe? Yes, you can use frozen chicken. Just add a few extra minutes to the cooking time. Make sure to check that the chicken is fully cooked before serving. How can I make this soup less spicy? To make the soup less spicy, skip the jalapeño or use less of it. You can also add more corn or beans to balance the heat. Cream or yogurt can help cool it down too. Is it possible to prepare this soup in advance? Yes, you can make the soup ahead of time. Store it in the fridge for up to three days. The flavors will blend even more when it sits. What are some recommended side dishes to serve with this soup? This soup pairs well with tortilla chips, cornbread, or a fresh salad. You could also serve it with avocado slices or a dollop of sour cream. Overview of calories and macronutrients This soup has about 300 calories per serving. It has a good balance of protein from the chicken and fiber from beans and corn. Health benefits of key ingredients - Chicken thighs provide protein and iron. - Black beans are high in fiber and help with digestion. - Vegetables like onions and peppers add vitamins and minerals. - Spices such as cumin and chili powder can boost your metabolism. In this blog post, we covered how to make Spicy Southwest Chicken Soup. We discussed key ingredients like chicken thighs, fresh veggies, and flavorful spices. The step-by-step guide walks you through preparation and cooking. I shared tips to enhance your soup and explored variations for different tastes. Don’t forget about storing leftovers and reheating them to keep flavors intact. Enjoy creating your own delicious soup at home!

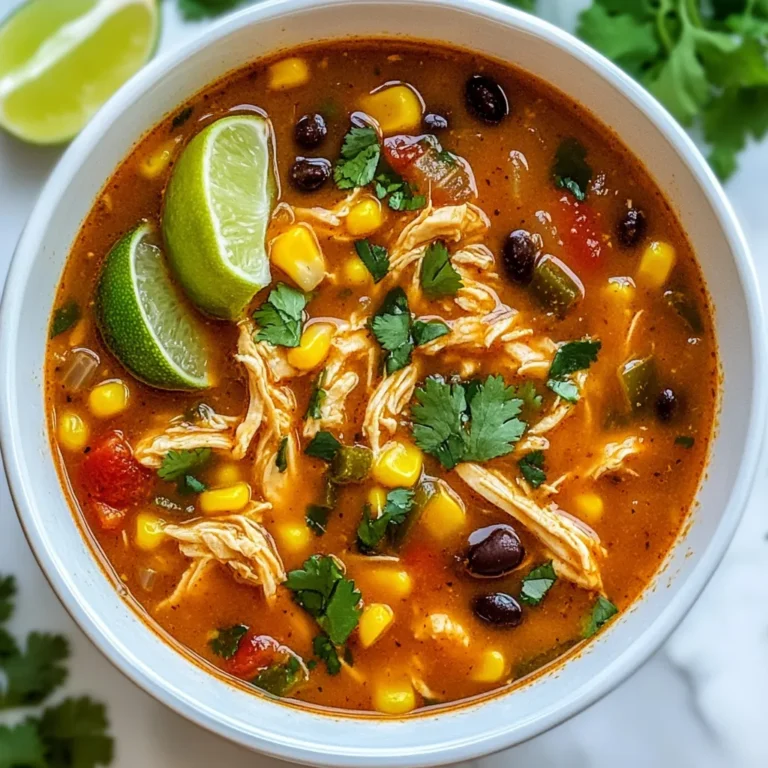
Spicy Southwest Chicken Soup Flavorful and Easy Recipe

- 1 lb large shrimp, peeled and deveined - 4 cloves garlic, minced - 3 tablespoons olive oil - Zest of 1 lemon - Juice of 1 lemon - 1 teaspoon smoked paprika - ½ teaspoon red pepper flakes (adjust to taste) - Salt and black pepper to taste - 2 tablespoons fresh parsley, chopped (for garnish) You can swap large shrimp for medium shrimp if that’s what you have. Just remember to adjust the cooking time. If you don’t have smoked paprika, regular paprika works too. For a spicy kick, try adding more red pepper flakes. If you want a lighter version, use less olive oil. Fresh ingredients make a big difference in flavor. Fresh shrimp tastes sweet and tender. Fresh garlic adds a nice kick. Using a fresh lemon gives a bright zest and juice that makes the dish pop. Whenever possible, choose fresh over frozen. This choice elevates your meal and keeps it vibrant. {{ingredient_image_1}} To make Lemon Garlic Roasted Shrimp, start by gathering your ingredients. You will need large shrimp, garlic, olive oil, lemon, smoked paprika, red pepper flakes, salt, black pepper, and fresh parsley. This dish is quick, so have everything ready. Preheat your oven to 400°F (200°C). Lining your baking sheet with parchment paper makes cleanup easy. 1. In a large bowl, mix the olive oil, minced garlic, lemon zest, and lemon juice. 2. Add smoked paprika, red pepper flakes, salt, and black pepper. Stir until combined. 3. Toss the shrimp in the bowl until they are fully coated in the marinade. Let them sit for 15 minutes. This step helps the shrimp soak in the flavors. 4. Spread the shrimp in a single layer on the prepared baking sheet. This ensures even cooking. 5. Roast the shrimp in the oven for 8-10 minutes. They should turn pink and opaque. Watch them closely, as overcooking can make them tough. 6. Once done, remove the shrimp from the oven. Sprinkle with fresh parsley to add color and freshness. - Use fresh shrimp for the best taste. - Adjust the red pepper flakes to control spiciness. - Do not overcrowd the baking sheet. This helps the shrimp roast evenly. - If you want more flavor, let the shrimp marinate longer than 15 minutes. - Make sure to check the shrimp at the 8-minute mark to avoid overcooking. These steps will lead you to a delicious Lemon Garlic Roasted Shrimp dish. Enjoy the burst of flavors! When making Lemon Garlic Roasted Shrimp, avoid overcooking. Shrimp cooks fast. If you cook them too long, they will turn tough. Keep an eye on the clock. Another mistake is skipping the marinating step. Letting the shrimp soak in the garlic and lemon mix is key. This step adds flavor. A quick 15 minutes makes a big difference. To boost the taste, use fresh garlic. Fresh garlic gives a stronger flavor than jarred. You can also add more herbs. Try thyme or basil for a twist. If you like heat, increase the red pepper flakes. Adjust it to your taste. A squeeze of lemon before serving can brighten the dish more. Serve your shrimp over rice or pasta. They pair well with a fresh salad too. A simple green salad with a lemon vinaigrette works great. For a more filling meal, add some crusty bread. It’s perfect for soaking up the tasty juices. Enjoy this dish with a glass of white wine for a nice touch. Pro Tips Fresh Shrimp Matters: Always opt for the freshest shrimp you can find. Fresh shrimp will have a better flavor and texture compared to frozen varieties. Marinate for Flavor: Letting the shrimp marinate for at least 15 minutes allows the flavors to penetrate the shrimp, enhancing the overall taste of the dish. Watch the Cooking Time: Keep a close eye on the shrimp while roasting. They cook quickly and should be removed from the oven as soon as they turn pink and opaque to avoid toughness. Customize the Heat: Adjust the amount of red pepper flakes to suit your spice preference. You can also add a pinch of cayenne for extra heat if desired. {{image_2}} Want some heat? Add more red pepper flakes! I love the kick from spicy lemon garlic shrimp. You can mix in a teaspoon of cayenne for extra spice. This dish pairs well with rice or quinoa. The spice makes it fun and exciting! Lemon garlic shrimp pasta is a great twist. Cook your favorite pasta while the shrimp roast. I suggest linguine or spaghetti. Toss the shrimp with the pasta and add a splash of pasta water. This helps bind the sauce. Top with fresh parsley and lemon zest for a bright finish. Grilling adds a smoky flavor. Marinate the shrimp just like the roasted version. Then, thread them onto skewers. Grill for about 2-3 minutes on each side. Make sure they turn pink and opaque. Serve with grilled veggies for a fun summer meal. To keep your Lemon Garlic Roasted Shrimp fresh, let it cool first. Place the shrimp in an airtight container. Store it in the fridge if you plan to eat it within two days. If you want to save it for longer, consider freezing it. When you want to enjoy your shrimp again, the oven is your best friend. Preheat your oven to 350°F (175°C). Place the shrimp on a baking sheet. Heat for about 5-7 minutes until warm. This keeps them juicy and tasty. You can also reheat them in a pan over medium heat for a few minutes. If you freeze your shrimp, do it within two hours of cooking. Place the shrimp in a freezer-safe bag. Remove as much air as possible before sealing. Label the bag with the date. You can freeze them for up to three months. To use, just thaw in the fridge overnight before reheating. You can tell shrimp are cooked when they turn bright pink. The flesh should look opaque and firm. If shrimp curl tightly, they are likely done. Avoid overcooking them, as they can become tough. For best results, watch them closely while they roast. Yes, you can use frozen shrimp. Just be sure to thaw them first. You can place them in cold water for about 15-20 minutes. Once thawed, pat them dry with a towel. This helps the shrimp absorb the flavors better. Lemon Garlic Roasted Shrimp pairs well with many side dishes. Here are some ideas: - Rice: Fluffy white or brown rice works well. - Salad: A fresh green salad adds nice crunch. - Vegetables: Roasted or steamed veggies balance the meal. - Pasta: Garlic pasta complements the shrimp's flavor. Feel free to mix and match! Each option brings out the taste of the shrimp. This blog post guides you through making delicious Lemon Garlic Roasted Shrimp. We covered key ingredients, steps to cook, and tips for perfect results. Fresh ingredients greatly enhance flavor, while careful cooking avoids common mistakes. You can also explore tasty variations like spicy shrimp or pasta. Proper storage ensures your leftovers stay fresh. Finally, the FAQs help answer common cooking questions. Remember, using quality ingredients and following these tips will make your dish shine. Enjoy your cooking adventure!

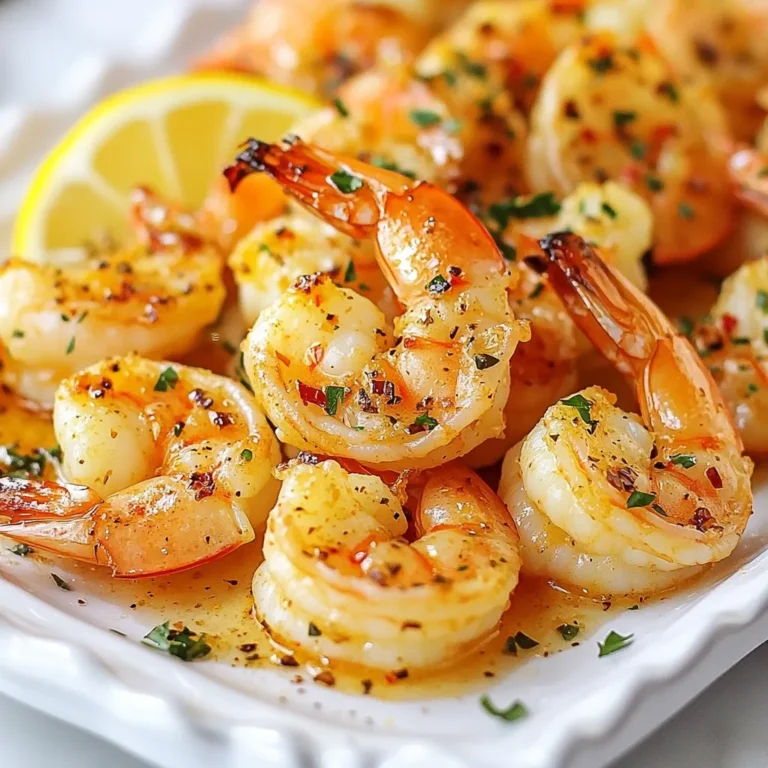
Lemon Garlic Roasted Shrimp Flavorful and Easy Meal

- 500g chicken thighs, boneless and skinless - 3 tablespoons Sriracha sauce - 2 tablespoons honey - 1 tablespoon soy sauce - 2 cloves garlic, minced - 1 teaspoon ginger, grated - 1 tablespoon olive oil - Salt and pepper to taste These ingredients create a tasty dish that packs a punch. The chicken thighs stay juicy, while the Sriracha gives heat. Honey adds sweetness, balancing the spice. Garlic and ginger bring depth to the flavor. - Sesame seeds for garnish - Sliced green onions for garnish Using these garnishes makes your dish look stunning. They add color and a fresh taste. The sesame seeds give a nice crunch, while green onions offer a mild onion flavor. - 1 tablespoon = 15 ml - 1 teaspoon = 5 ml - 500g chicken = about 1.1 lbs Knowing these conversions helps if you need to adjust. You can easily double or halve the recipe based on your needs. Always weigh your ingredients for best results. {{ingredient_image_1}} Start by gathering all your ingredients. You need: - 500g chicken thighs, boneless and skinless - 3 tablespoons Sriracha sauce - 2 tablespoons honey - 1 tablespoon soy sauce - 2 cloves garlic, minced - 1 teaspoon ginger, grated - 1 tablespoon olive oil - Salt and pepper to taste - Sesame seeds for garnish - Sliced green onions for garnish In a medium bowl, whisk together Sriracha sauce, honey, soy sauce, minced garlic, and grated ginger. Mix until it's smooth and well combined. This sauce packs flavor! Pat the chicken thighs dry using paper towels. This helps the chicken brown better. Season both sides with salt and pepper. Heat olive oil in a large skillet over medium-high heat. Once hot, add the seasoned chicken. Cook for about 5 to 7 minutes on each side. You're looking for a nice golden brown color. The chicken should reach an internal temperature of 75°C (165°F) for safety. After the chicken is cooked, pour the Sriracha-honey mixture over it. Reduce the heat to medium. Let it cook for an extra 2 to 3 minutes. This helps the sauce thicken and coat the chicken perfectly. Once the chicken is coated in that delicious sauce, remove it from the skillet. Let it rest for a couple of minutes before slicing. This keeps the juices in the chicken. To serve, sprinkle sesame seeds and sliced green onions on top. These add a nice crunch and freshness. Enjoy this spicy Sriracha honey chicken with rice or veggies for a complete meal! To cook chicken thighs perfectly, start by drying them with paper towels. This helps the skin get crispy. Season both sides with salt and pepper. Heat olive oil over medium-high heat. Cook the chicken for 5-7 minutes on each side. It should be golden brown and reach an internal temperature of 75°C (165°F). Using a meat thermometer ensures safety and juiciness. If you want less heat, cut back on the Sriracha. Use only 1 tablespoon instead of 3. For those who like a kick, add more Sriracha or sprinkle in some red pepper flakes. Mixing in a little extra honey balances the heat nicely, making the dish sweet and spicy. For deeper flavor, marinate the chicken in the Sriracha-honey mix for at least 30 minutes. You can also add a splash of lime juice for brightness. Fresh herbs like cilantro or basil can bring a fresh taste. Finally, finish with sesame seeds and sliced green onions to add texture and color. Pro Tips Marinate for Extra Flavor: For a deeper flavor, consider marinating the chicken in the Sriracha honey mixture for at least 30 minutes or overnight. This will enhance the taste significantly. Adjust the Heat: If you prefer a milder dish, reduce the amount of Sriracha or mix in a little ketchup to balance the heat while still keeping some spice. Use a Meat Thermometer: To ensure perfectly cooked chicken, use a meat thermometer to check that the internal temperature reaches 75°C (165°F). Serve with Rice or Noodles: This dish pairs beautifully with steamed rice or noodles to soak up the delicious sauce. Consider adding a side of vegetables for a complete meal. {{image_2}} You can grill Spicy Sriracha Honey Chicken for an amazing flavor twist. To do this, marinate the chicken thighs in the sauce mix for at least one hour. Preheat your grill to medium-high heat. Grill the chicken for about 6-8 minutes per side. You want nice grill marks and juicy meat. Brush extra sauce on the chicken while grilling for added flavor. If grilling is not an option, try the oven-baked version. Preheat your oven to 200°C (400°F). After seasoning the chicken, place it on a baking sheet lined with parchment paper. Bake for 25-30 minutes, or until fully cooked. Pour the Sriracha-honey sauce over the chicken halfway through cooking. This keeps the chicken moist and adds a sticky glaze. For a vegetarian version, swap out chicken for tofu or tempeh. Cut the tofu into thick slices and press it to remove excess moisture. Marinate the tofu in the Sriracha-honey sauce for at least 30 minutes. Cook it in a skillet on medium heat until golden brown. You can also bake or grill it using the same methods as chicken. This way, you still enjoy that spicy-sweet flavor. After cooking your Spicy Sriracha Honey Chicken, let it cool. Place it in an airtight container. This keeps the chicken fresh and safe. Refrigerate it within two hours of cooking. It can last for up to four days in the fridge. Always check for any off smells before eating. You can freeze Spicy Sriracha Honey Chicken for longer storage. First, let the chicken cool completely. Then, place it in a freezer-safe bag or container. Try to remove as much air as possible. It can stay frozen for up to three months. When ready to eat, thaw it overnight in the fridge. To reheat, use the oven or a skillet for best results. If using the oven, preheat it to 180°C (350°F). Place the chicken on a baking sheet for about 10-15 minutes. In a skillet, add a little oil over medium heat. Cook for about 5-7 minutes, turning often. Make sure the internal temperature reaches 75°C (165°F) before serving. You can try different hot sauces. Some good options are chili garlic sauce or gochujang. These sauces add heat and flavor. Adjust the amount based on your taste. Yes, you can use chicken breast. Chicken breast will cook faster and may be drier. Make sure to check the internal temperature. It should reach 75°C or 165°F. This dish lasts about three to four days in the fridge. Store it in an airtight container. For best taste, eat it within two days. You can serve this chicken with rice or noodles. It pairs well with steamed veggies too. Try adding a fresh salad for a crunchy bite. In this post, we covered how to make a tasty Spicy Sriracha Honey Chicken. We looked at main ingredients, cooking steps, and tips for great results. I also shared variations for grilling and baking, plus vegetarian options. Proper storage helps keep your dish fresh even after cooking. Lastly, I answered common questions to help you cook confidently. Enjoy your spicy chicken with friends and family!

Spicy Sriracha Honey Chicken Quick and Tasty Dish

- 2 boneless skinless chicken breasts - 200g rice noodles - 2 tablespoons sesame oil - 1 tablespoon fresh ginger, grated - 2 cloves garlic, minced - 2 tablespoons soy sauce (or tamari for gluten-free) - 1 tablespoon honey or maple syrup - 1 red bell pepper, julienned - 1 cup snap peas, trimmed - 3 green onions, sliced - Optional garnishes: sesame seeds and fresh cilantro When I make Sesame Ginger Chicken Noodles, I start by gathering my main ingredients. You need two boneless skinless chicken breasts. These cook quickly and soak up the flavors well. Next, I grab 200 grams of rice noodles. They add a nice chewy texture to the dish. Finally, I use two tablespoons of sesame oil. This oil gives a rich, nutty taste. For flavor, I use fresh ginger. I grate one tablespoon for a bright kick. I also add two cloves of minced garlic. Garlic adds depth to the dish. To bring everything together, I mix in two tablespoons of soy sauce. If you want it gluten-free, use tamari instead. Lastly, I sweeten it with one tablespoon of honey or maple syrup. This balance of sweet and savory is key. Now, let’s talk about vegetables! I like to add one red bell pepper, sliced into thin strips. It adds color and crunch. I also include one cup of snap peas for their crispness. They cook quickly and stay vibrant. Finally, I slice three green onions for a fresh finish. I often sprinkle sesame seeds and fresh cilantro on top as optional garnishes. They add extra flavor and make the dish look great. {{ingredient_image_1}} First, cook the rice noodles according to the package instructions. This usually takes about 4-6 minutes. Once cooked, drain the noodles and set them aside. To prevent sticking, toss the noodles with a teaspoon of sesame oil. This simple step adds flavor and keeps your noodles nice and loose. Next, grab a large skillet or wok. Heat one tablespoon of sesame oil over medium-high heat. Add the sliced chicken breasts to the pan. Season with salt and pepper, then cook until the chicken turns golden brown. This should take about 5-7 minutes. Once done, remove the chicken from the skillet and set it aside. In the same skillet, add the remaining tablespoon of sesame oil. Toss in the grated ginger, minced garlic, and julienned red bell pepper. Sauté for about 2-3 minutes until the bell pepper starts to soften. Add the snap peas next. Stir-fry them for another 2 minutes, making sure all the veggies stay vibrant and tender-crisp. Now, return the cooked chicken to the skillet. Pour in the soy sauce and honey or maple syrup. Mix everything well to ensure the sauce coats all the ingredients. Heat through for another 2 minutes. This lets all the flavors blend nicely together. Gently fold in the cooked rice noodles and sliced green onions. Toss everything together until the noodles are heated through and well mixed. Be sure to adjust the seasoning if necessary. Finally, sprinkle sesame seeds on top for that extra crunch. If you like, add fresh cilantro as a garnish. Serve your dish immediately to enjoy the best flavors. Enjoy your delightful Sesame Ginger Chicken Noodles! - Cook chicken until it is fully done and tender. You want it juicy, not dry. - Avoid overcooking your veggies. They should stay bright and crunchy for the best bite. - To boost flavor, add more ginger or garlic. They both add a punch. - Consider using extra soy sauce or a dash of chili sauce for more zest. - Plate the dish with care. Use a large bowl and twirl the noodles for a nice look. - Pair it with fresh vegetables or a light salad. A cold drink also complements the dish well. Pro Tips Prepping Ahead: Slice the chicken and vegetables ahead of time to save on cooking time during the weeknight rush. Marinate for Flavor: For an extra flavor boost, marinate the chicken in soy sauce and ginger for 30 minutes before cooking. Vegetable Variations: Feel free to add or substitute other vegetables such as broccoli, carrots, or zucchini to customize your dish. Leftover Storage: Store any leftovers in an airtight container in the fridge, and enjoy them within 2-3 days for the best taste. {{image_2}} You can easily make this dish vegetarian. Swap the chicken for tofu or tempeh. Both options soak up the sauce well. Use firm tofu for the best texture. You can also add more veggies. Try mushrooms, carrots, or broccoli for extra flavor and nutrients. To make this dish gluten-free, choose gluten-free noodles. Rice noodles work great here. For soy sauce, use tamari. This sauce is gluten-free and adds the same rich flavor. Don't forget to taste as you cook. Adjust the seasoning to keep it flavorful. Want some heat? Add chili paste or red pepper flakes. Start with a small amount, then taste and adjust. If you prefer milder flavors, skip the spice. You can also use sweet bell peppers for a fresh taste without heat. This way, everyone can enjoy the dish! To keep your Sesame Ginger Chicken Noodles fresh, cool them down first. Place the noodles in an airtight container. This helps prevent moisture loss. Store them in the fridge for up to three days. Use clear containers so you can see what’s inside. This makes it easy to grab a quick meal later. You can freeze the noodles if you want to save some for later. Divide the dish into portions. Use freezer-safe bags or containers to store them. Make sure to squeeze out as much air as possible. This step helps avoid freezer burn. When you're ready to eat, thaw overnight in the fridge. Reheat on the stove or microwave for best results. To reheat your Sesame Ginger Chicken Noodles, use low heat. A skillet works best to keep them from overcooking. Add a splash of water or broth to help them steam. Stir often until heated through. If using a microwave, place the noodles in a bowl. Cover with a lid or paper towel to trap steam. Heat in short bursts, stirring in between. This keeps the noodles moist and tasty. Cooking this dish takes about 30 minutes total. You will spend 15 minutes on prep. Cooking will take about 15 minutes. It’s quick and fits well in a busy schedule. Yes, you can use different noodles! Rice noodles work great, but you can try egg noodles too. Soba noodles or even whole wheat noodles are also tasty options. Just cook them according to package instructions. This recipe is perfect for meal prep! You can cook a big batch and store it. Divide it into portions for easy lunches or dinners. Just keep it in airtight containers in the fridge. It will stay fresh for about 3-4 days. Absolutely! To add spice, try adding chili flakes or sriracha. You can mix in a dash of hot sauce while cooking. Adjust the spice level to your taste. Start with a little and add more if you want it hotter. Pair this dish with a fresh salad or steamed veggies. A cucumber salad or a simple green salad complements it well. You can also serve it with spring rolls for a fun meal. This post showed you how to make quick and tasty Sesame Ginger Chicken Noodles. We covered tasty ingredients like chicken, rice noodles, and fresh veggies. You learned step-by-step how to cook and combine everything. I shared tips for making it even better, plus storage info for leftovers. Whether you adapt the recipe for diet needs or make it spicier, this dish pleases all. Enjoy your cooking and the delicious meal ahead!

Savory Sesame Ginger Chicken Noodles Easy Recipe

- 1 lb Brussels sprouts, halved - 3 tablespoons balsamic vinegar - 2 tablespoons honey or maple syrup - 2 tablespoons olive oil - 3 cloves garlic, minced - ¼ cup pomegranate seeds - ¼ cup crumbled feta cheese - 2 tablespoons toasted pine nuts - Salt and pepper to taste To make balsamic roasted Brussels sprouts, you need fresh Brussels sprouts. I love to use one pound, halved for even cooking. The key to the flavor is the balsamic vinegar. I use three tablespoons for a tangy kick. For sweetness, honey or maple syrup adds depth; I prefer two tablespoons. Olive oil helps everything roast nicely, so I add two tablespoons. Garlic is a must, and I use three cloves, minced, for bold flavor. For garnishes, consider adding pomegranate seeds, crumbled feta cheese, or toasted pine nuts. These add crunch and color. A pinch of salt and pepper enhances the taste. This simple blend of ingredients creates a dish that is both tasty and visually appealing. {{ingredient_image_1}} - Preheat your oven to 400°F (200°C). - In a large bowl, combine the halved Brussels sprouts, olive oil, minced garlic, balsamic vinegar, and honey or maple syrup. Season with salt and pepper to taste. This step is key. The mix of sweet and tangy flavors will soak into the sprouts. It makes them taste amazing when roasted. Make sure each sprout gets coated well. - Toss to coat and spread evenly on a baking sheet. - Roast for 20-25 minutes, flipping halfway through. Even cooking is important. Flipping the sprouts helps them brown and crisp up nicely. You want them golden on the outside and tender inside. Keep an eye on them as they roast. - Let cool slightly and drizzle with remaining balsamic glaze. - Garnish and serve. After roasting, let the sprouts cool for a moment. This makes them easier to handle. Drizzling with balsamic glaze adds extra flavor and shine. If you like, garnish with pomegranate seeds, feta cheese, or toasted pine nuts. They look great and taste even better! When choosing Brussels sprouts, focus on firmness. Look for sprouts that feel solid and tightly packed. These will roast better and taste fresher. Steer clear of any that show yellowing or blemishes. These signs mean the sprouts may not be as tasty. To get that nice, crispy finish, spread the sprouts out on the baking sheet. They should be in a single layer. Crowding them will steam instead of roast them. For even better browning, place the baking sheet on a higher rack in the oven. This allows hot air to circulate around the sprouts. Balsamic vinegar is a star, but you can play with flavors. Try different vinegars like apple cider or red wine. You can also swap honey for maple syrup for a different sweetness. Adding spices like paprika or chili flakes can bring more depth. Don't be afraid to experiment! Pro Tips Choose Fresh Brussels Sprouts: Look for bright green, firm sprouts that are tightly closed for the best flavor and texture. Adjust the Sweetness: Depending on your preference, feel free to increase or decrease the amount of honey or maple syrup to achieve your desired level of sweetness. Don’t Skip the Flip: Flipping the Brussels sprouts halfway through roasting ensures even cooking and browning, leading to a crispy exterior. Experiment with Garnishes: Try adding different toppings like toasted walnuts or a sprinkle of chili flakes for an extra flavor boost. {{image_2}} You can spice up your Brussels sprouts with crushed red pepper flakes. This adds heat and wakes up the dish. For a sweet twist, try caramelized onions. They add a rich flavor that complements the balsamic glaze perfectly. If you want a vegan option, swap honey for maple syrup. This keeps the sweetness while ensuring it's plant-based. Also, always check that your ingredients are gluten-free if that's a concern. Many sauces and dressings can have hidden gluten. Adding seasonal veggies like carrots or sweet potatoes makes this dish even better. They roast well and add more color. Don't forget to toss in fresh herbs, like thyme or rosemary, to enhance the flavor. They add a lovely aroma and freshness to the dish. Cool the Brussels sprouts completely before storing them. Use an airtight container to keep them fresh. This helps maintain their taste and texture. You can store roasted Brussels sprouts in the fridge for up to three days. Just place them in the fridge as soon as they cool down. This keeps them safe to eat later. You can freeze these tasty sprouts for up to two months. Make sure to pack them in a freezer-safe bag. When ready to eat, I recommend reheating them in the oven. This method keeps them crispy and delicious. Yes, you can roast them and store for later reheating. This makes meal prep easy. Just let them cool and place in an airtight container. They stay tasty in the fridge for up to three days. When you're ready, simply reheat them. Pair these sprouts with grilled chicken, steak, or even as part of a vegetarian meal. Their flavor complements many dishes. You can serve them alongside quinoa or rice for a filling option. They also work well in a salad for a crunchy twist. Reheat in the oven to keep them crispy. Set your oven to 350°F (175°C). Spread the sprouts on a baking sheet. Heat for about 10 minutes or until warm. This method helps them stay crunchy, unlike the microwave. Enjoy that great texture again! This blog post shared a simple, tasty recipe for balsamic roasted Brussels sprouts. We explored the main ingredients, step-by-step instructions, helpful tips, and variations to enhance flavors. You learned how to select fresh sprouts and store leftovers effectively. Remember, these Brussels sprouts are not just a side dish; they can shine in any meal. With a few easy changes, you can make it your own. Enjoy experimenting with flavors and making this dish a staple at your table.

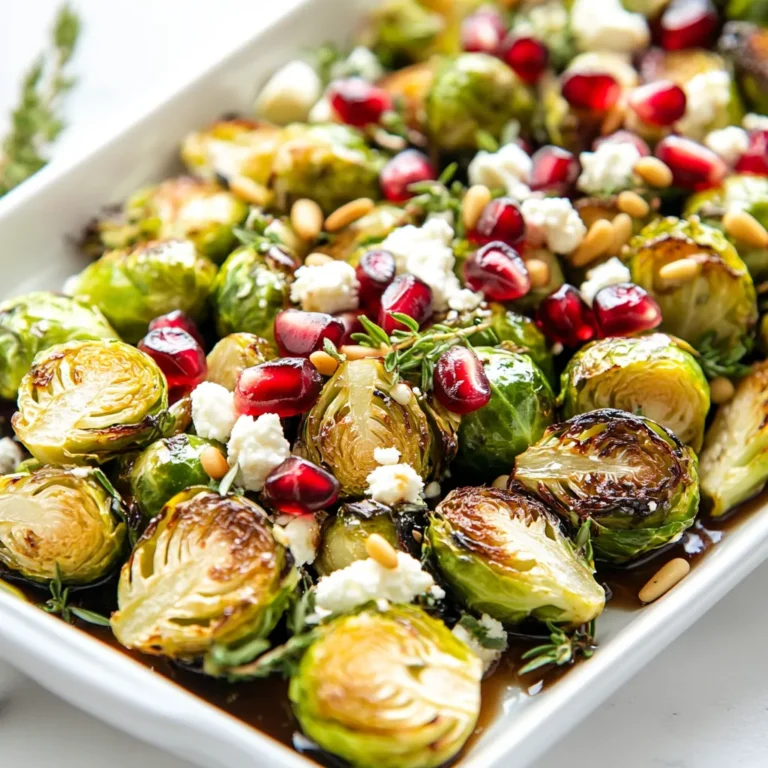
Balsamic Roasted Brussels Sprouts Flavorful Side Dish

PREV 1 … 38 39 40 … 57 NEXT
quick dish kitchen

explore

DessertsDinnerAppetizersDrinks

Our Policies

  • Cookie Policy
  • Copyright Policy
  • Disclaimer
  • GDPR Policy
  • Terms Of Use
Back to Top
  • About
  • Contact Us
  • Privacy Policy
© 2025 quick dish kitchen