FREE DINNER EBOOK! Get your copy!
  • Cookie Policy
  • GDPR Policy
  • Disclaimer
  • Terms Of Use
  • Visit my other site: Fun Cookie Recipes
quick dish kitchen
  • Home
  • Dinner
  • Desserts
  • Drinks
  • Appetizers
  • Contact
  • About
  • Privacy Policy
  • Home
  • Dinner
  • Desserts
  • Drinks
  • Appetizers
  • Contact
  • About
  • Privacy Policy
  • Cookie Policy
  • GDPR Policy
  • Disclaimer
  • Terms Of Use
Visit my other site: Fun Cookie Recipes

HOME / CATEGORIES /

Latest

For this Balsamic Glazed Caprese Chicken, you will need: - 2 boneless, skinless chicken breasts - Salt and pepper, to taste - 2 tablespoons olive oil - 1 cup cherry tomatoes, halved - 1 cup fresh mozzarella balls, drained - 1 cup fresh basil leaves - 1/2 cup balsamic vinegar - 1 tablespoon honey - 1 clove garlic, minced - 1 teaspoon dried oregano The chicken breasts are the star. They soak up all the rich flavors from the glaze. The balsamic vinegar adds a sweet and tangy taste that balances well with the chicken. Cherry tomatoes bring freshness and color. Mozzarella offers a creamy texture, while basil adds a lovely aroma. You can elevate this dish with some extra herbs and spices. Consider adding: - Fresh thyme or rosemary for added aroma - A pinch of red pepper flakes for heat - Extra balsamic glaze for drizzling For presentation, plate the chicken with a scoop of cherry tomatoes and mozzarella on top. A drizzle of balsamic glaze adds a nice touch. Whole basil leaves make it pop with color. This dish not only tastes great but looks stunning too! {{ingredient_image_1}} 1. Start by preheating your oven to 400°F (200°C). This step is key for cooking. 2. Next, season your chicken breasts with salt and pepper on both sides. This adds flavor. 3. Heat 2 tablespoons of olive oil in a large oven-safe skillet over medium-high heat. 4. Add the seasoned chicken to the skillet. Sear for 4-5 minutes on each side until golden. 5. Once browned, remove the skillet from heat. 1. In a small bowl, mix 1/2 cup of balsamic vinegar, 1 tablespoon of honey, 1 minced garlic clove, and 1 teaspoon of dried oregano. 2. Pour this mixture over the browned chicken in the skillet. This glaze adds a rich taste. 3. Now, add 1 cup of halved cherry tomatoes, 1 cup of drained mozzarella balls, and 1 cup of fresh basil leaves on top of the chicken. 1. Transfer the skillet to the preheated oven. Bake for 20-25 minutes. Check the chicken’s internal temperature. It should reach 165°F (74°C). 2. After baking, remove the skillet from the oven. Let it rest for 5 minutes before serving. This helps the flavors meld together. 3. When serving, plate the chicken with a scoop of tomatoes and mozzarella on top. Drizzle with extra balsamic glaze if you like. Garnish with whole basil leaves for a lovely touch. To achieve perfectly cooked chicken, use boneless, skinless breasts for quick cooking. Season them well with salt and pepper. Sear the chicken in a hot skillet with olive oil for 4-5 minutes on each side. This creates a nice brown crust. After searing, check the internal temperature. It should reach 165°F (74°C) before serving. You can adjust the sweetness or acidity in the balsamic glaze easily. If you like it sweeter, add more honey. For a tangy kick, you can increase the balsamic vinegar. Mix these ingredients well to ensure even flavor throughout the dish. Tasting as you go helps find the perfect balance. For an appealing dish, plate the chicken with a scoop of cherry tomatoes and mozzarella on top. Drizzle with extra balsamic glaze for shine and flavor. Garnish with whole basil leaves to add color. A beautiful plate makes your meal more inviting and enjoyable. Pro Tips Use Fresh Ingredients: Fresh mozzarella and basil will elevate the flavor of your Caprese chicken. Opt for high-quality ingredients for the best results. Marinate for Extra Flavor: If time allows, marinate the chicken in balsamic vinegar and honey for 30 minutes before cooking to enhance the taste. Adjust Sweetness: Taste the balsamic glaze before pouring it over the chicken. Adjust the honey to your preference for sweetness level. Let It Rest: Allow the chicken to rest for a few minutes after baking. This helps retain moisture and makes for a juicier meal. {{image_2}} If you want to switch things up, try these options. You can use turkey or pork instead of chicken. For a vegan take, use firm tofu or tempeh. Both options will work well with the balsamic glaze. Just remember to adjust your cooking times. You can change the herbs to suit your taste. Try using thyme or rosemary for a new twist. If you love heat, add some crushed red pepper flakes. This will give your dish a nice kick. You can also swap dried oregano for Italian seasoning to enhance the flavors. This dish pairs well with many sides. A fresh green salad balances the rich flavors. Roasted vegetables or garlic bread make great options too. For a heartier meal, serve it with creamy risotto. Whatever you choose, your dinner will shine! To store any leftovers, let the chicken cool first. Place it in an airtight container. Make sure to add the tomatoes and mozzarella to the container too. Leftovers stay fresh for up to three days in the fridge. When you're ready to enjoy your meal again, use the oven for reheating. Preheat it to 350°F (175°C). Place the chicken in an oven-safe dish and cover it with foil. Heat for about 15-20 minutes. This helps keep the chicken moist. You can also use a microwave if you’re in a hurry. Heat it in 30-second bursts until warm. If you want to freeze the dish, wrap each piece tightly in plastic wrap. Place it in a freezer-safe bag. This will keep it for up to three months. When you’re ready to eat it, thaw it in the fridge overnight. After thawing, reheat it in the oven or microwave. This way, you keep all the great flavors. If you don’t have balsamic vinegar, you can use red wine vinegar. It has a nice tang. You can also mix red wine vinegar with a bit of honey. This adds sweetness, similar to balsamic. Just use equal parts red wine vinegar and honey. You can even add a bit of soy sauce for depth. Yes, you can use frozen chicken breasts. Just make sure to thaw them first. You can do this in the fridge overnight or in cold water for a quick thaw. Once thawed, follow the same steps as fresh chicken. Searing may take a bit longer, so check the internal temperature. To know if your chicken is cooked, use a meat thermometer. The safe internal temperature is 165°F (74°C). Insert the thermometer into the thickest part of the chicken. If you don’t have one, you can cut into the chicken. The meat should be white and juices should run clear. This recipe guides you through making a tasty Caprese chicken dish. We covered key ingredients like chicken, balsamic vinegar, and mozzarella. The steps included preheating, seasoning, and baking. Tips on cooking techniques and flavor enhancements help you nail the dish. Variations and storage info offer flexibility for your meal. By following these steps, you can impress anyone at your table. Enjoy your cooking journey!

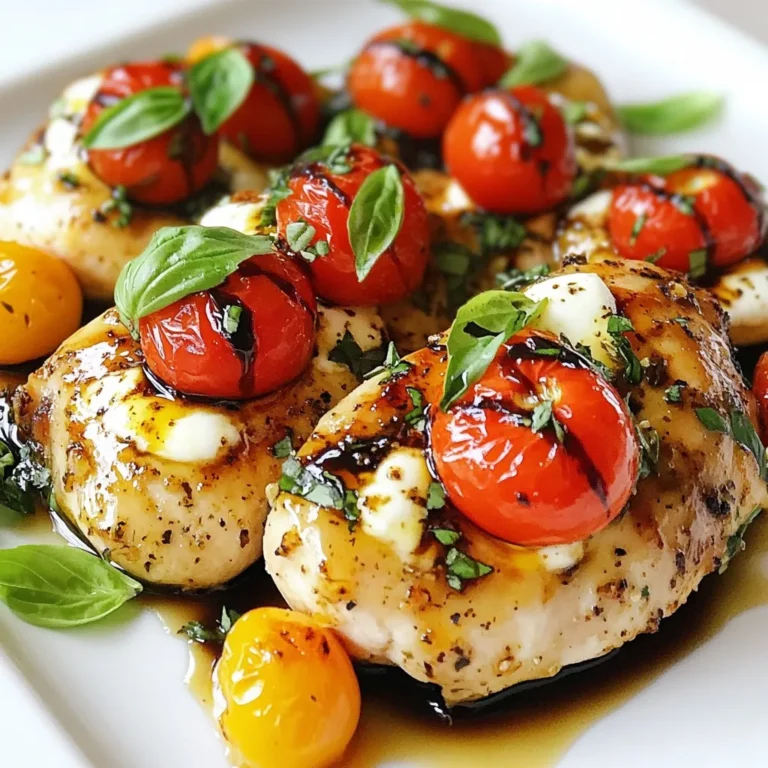
Balsamic Glazed Caprese Chicken Flavorful Dinner Delight

- 1 cup quinoa, rinsed - 4 cups fresh baby spinach, washed and dried - 1 cup strawberries, hulled and sliced - 1/2 cup feta cheese, crumbled - 1/4 cup walnuts, chopped - 1/4 red onion, thinly sliced - 2 tablespoons olive oil - 2 tablespoons balsamic vinegar - 1 tablespoon honey - Salt and pepper to taste The first main ingredient is quinoa. Quinoa is a whole grain. It is rich in protein and easy to cook. I use one cup for this salad. Rinse it well before cooking. Next, we have fresh baby spinach. This green is full of vitamins and minerals. I like to use four cups of washed and dried spinach for a nice crunch. Strawberries add a sweet touch. They are fresh and juicy. One cup, hulled and sliced, brings bright flavor to the dish. Feta cheese gives the salad a creamy texture. Use half a cup, crumbled, for a tangy taste that pairs well with the other ingredients. For extra crunch, I add walnuts. They give a nice contrast. A quarter cup, chopped, works perfectly. Red onion adds a sharp bite. You only need a quarter, thinly sliced, to balance the sweetness of the strawberries. The dressing is simple but flavorful. I mix two tablespoons each of olive oil and balsamic vinegar. This brings a rich depth to the salad. Honey is our secret ingredient. One tablespoon adds sweetness to the dressing without being overpowering. Finally, salt and pepper enhance all the flavors. Adjust these to your taste for the perfect finish. These ingredients come together to create a fresh and flavorful dish that is good for any meal. {{ingredient_image_1}} First, rinse 1 cup of quinoa in cold water. This step washes away any bitterness. Next, combine the rinsed quinoa with 2 cups of water or vegetable broth in a medium saucepan. Bring this mixture to a boil over medium heat. Once it starts boiling, lower the heat. Cover the pot and let it simmer for about 15 minutes. The quinoa is ready when it looks fluffy and all the liquid is gone. Remove the pot from the heat and let it cool for a bit. In a small bowl, gather your dressing ingredients. You will need 2 tablespoons of olive oil, 2 tablespoons of balsamic vinegar, 1 tablespoon of honey, and salt and pepper. Whisk these ingredients together until they blend well. This step creates a tasty dressing that will enhance the salad's flavor. In a large mixing bowl, add the cooled quinoa. Next, toss in 4 cups of fresh baby spinach, 1 cup of sliced strawberries, 1/2 cup of crumbled feta cheese, 1/4 cup of chopped walnuts, and 1/4 of a thinly sliced red onion. Drizzle the dressing over the salad and gently toss everything together. Make sure all the ingredients are coated. Taste the salad and adjust the seasoning with more salt and pepper if needed. To make perfect quinoa, rinse it well. This step removes any bitterness. Use a fine mesh strainer for best results. After rinsing, add one cup of quinoa to two cups of water or vegetable broth. Bring it to a boil. Then, reduce heat and let it simmer. Cook for about 15 minutes until fluffy. Let it cool before adding to your salad. Making this salad ahead of time is easy. You can cook quinoa a day in advance. Store it in the fridge until you need it. Wash and dry the spinach and strawberries before use. However, store the dressing separately. This keeps everything fresh and crisp when you serve it. To impress at gatherings, serve the salad in a large bowl. You can layer the ingredients to show off the colors. Top with extra strawberries and feta for a pop of color. Add a sprinkle of chopped walnuts for crunch. This salad looks great and tastes even better! Pro Tips Rinse Your Quinoa: Always rinse quinoa under cold water before cooking to remove its natural coating, called saponin, which can taste bitter. Fresh Ingredients Matter: Use the freshest strawberries and spinach available for the best flavor and texture in your salad. Customize Your Nuts: Feel free to swap walnuts for your favorite nuts or seeds, such as almonds or pecans, to add a different flavor profile. Make It Ahead: This salad can be prepared in advance. Just keep the dressing separate until you're ready to serve to prevent the spinach from wilting. {{image_2}} You can change the greens in this salad. Try kale, arugula, or mixed greens. Each will add a new taste. For fruits, swap strawberries for blueberries, raspberries, or apples. These fruits pair well with spinach and quinoa. Nuts are also easy to swap. Use pecans, almonds, or sunflower seeds instead of walnuts. If you want a vegan dressing, mix olive oil with lemon juice and maple syrup. This will add a bright flavor. You can also create a citrus-based dressing. Combine orange juice, olive oil, and a little honey. This will give your salad a fresh twist. For a heartier dish, add grilled chicken or chickpeas. This makes the salad filling. You can serve it as a main dish by increasing the protein. Adding some cooked shrimp or tofu works well too. This way, you can enjoy this salad as a full meal. You can keep the strawberry spinach quinoa salad in the fridge for about 3 days. To store it, place it in an airtight container. This helps keep it fresh and tasty. If you add the dressing, it might get soggy. For best results, store the dressing separately. Freezing quinoa salad is not the best idea. When you freeze it, the texture can change. Quinoa can become mushy after thawing. Fresh spinach and strawberries do not freeze well either. They can become limp and lose their flavor. If you want to reheat quinoa, use a microwave or a stove. Add a little water or broth to keep it moist. Reheat it gently to avoid overcooking. This helps keep the flavors fresh. You can enjoy it warm or at room temperature, but I prefer it cold! Yes, you can make this salad vegan. For cheese, use vegan feta or skip it entirely. Instead of honey, consider agave syrup or maple syrup. These options keep the salad tasty and plant-based. To make the salad gluten-free, avoid using regular quinoa. Stick with certified gluten-free quinoa. Check the balsamic vinegar and any pre-made dressings for gluten. Most should be safe, but it’s good to check labels. You can add many fruits to this salad. Try blueberries, raspberries, or blackberries for a pop of color. Peaches or apples also work well. Seasonal fruits keep the salad fresh and exciting! This blog post gave you a tasty quinoa salad recipe with fresh ingredients. You learned how to cook quinoa, make a simple dressing, and assemble a beautiful salad. I shared useful tips for prep, variations, and proper storage. Remember, salads can be fun and flexible. Feel free to mix and match ingredients to suit your taste. Enjoy this vibrant dish at your next meal or gathering!

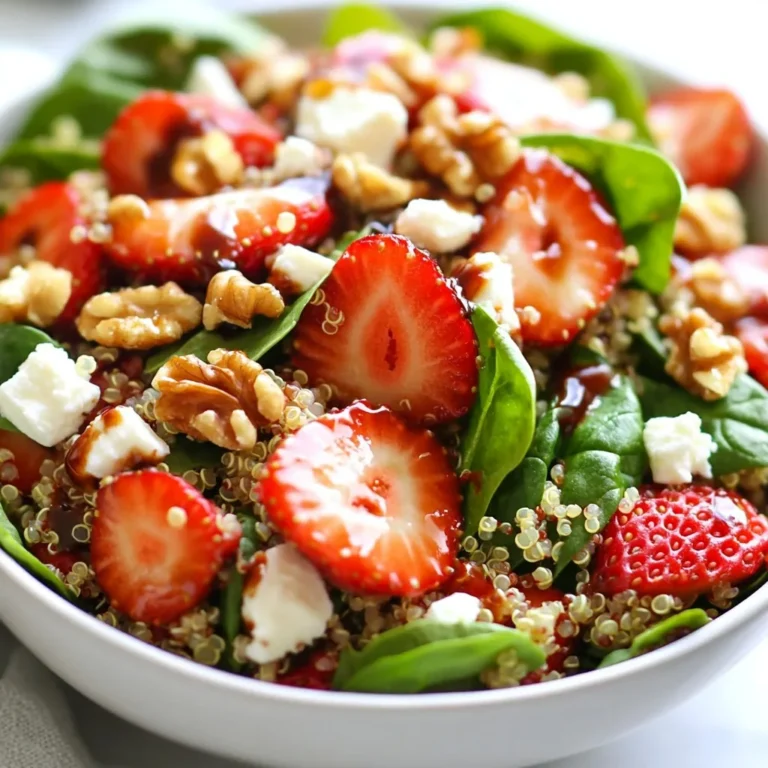
Strawberry Spinach Quinoa Salad Fresh and Flavorful Dish

- Chicken wings (2 pounds) - Honey (1/2 cup) - Soy sauce (low sodium) (1/4 cup) - Garlic (4 cloves, minced) - Fresh ginger (1 tablespoon, grated) - Apple cider vinegar (1 tablespoon) - Red pepper flakes (1/2 teaspoon, optional for heat) - Salt and pepper (to taste) - Sesame seeds (2 tablespoons, for garnish) - Chopped green onions (for garnish) When making honey garlic chicken wings, fresh ingredients matter. Use quality chicken wings for the best taste. I prefer organic wings if possible. Honey gives the wings their sweet flavor. Low-sodium soy sauce adds depth without making the dish too salty. Fresh garlic and ginger provide a bold kick that balances the sweetness. Apple cider vinegar adds a tangy note. If you like heat, try red pepper flakes for a spicy twist. Adjust salt and pepper to your taste. Sesame seeds and green onions make a lovely garnish. They add color and crunch to your finished dish. These simple ingredients come together to create a flavorful dish. Enjoy the process of gathering and prepping them. Each step builds excitement for the tasty wings ahead! {{ingredient_image_1}} - Preheat the oven to 425°F (220°C). - Line a large baking sheet with parchment paper or a silicone mat. - In a big bowl, combine honey, soy sauce, minced garlic, grated ginger, and vinegar. - Add salt and pepper to taste. Whisk it all together until mixed. - Toss the chicken wings in the marinade. Make sure they are well coated. - Place the coated wings in a single layer on the baking sheet. - Bake the wings for 25-30 minutes. Remember to flip them halfway through. - For extra flavor, baste the wings with more marinade during the last five minutes. Choosing the best chicken wings is key. Fresh wings usually taste better than frozen ones. Look for plump, clean wings with no bruising. Fresh wings have a nice texture and flavor. If you use frozen wings, thaw them completely before cooking. To achieve the right crispiness, I recommend a few oven tips. First, preheat your oven to 425°F (220°C). This high heat helps the wings crisp up nicely. Line your baking sheet with parchment paper to prevent sticking. Arrange the wings in a single layer, giving them space to cook evenly. Flip the wings halfway through cooking for even browning. If you want extra crispiness, broil them for the last few minutes. Presentation can make a meal more enjoyable. Serve the wings on a large platter for a fun look. Drizzle some leftover sauce from the baking sheet over the wings. This adds flavor and makes them shine. Add celery sticks on the side for crunch. For dips, I suggest ranch or blue cheese dressing to enhance the flavors. You could also try a sweet chili sauce for a different twist. These options make your meal even more exciting. You will need some essential kitchen tools. A large mixing bowl helps mix the sauce and coat the wings. A baking sheet lined with parchment paper ensures easy cleanup. For oven settings, keep it at 425°F (220°C) for the best results. Monitor the wings closely during baking. This way, you can catch them at the perfect crispness. Using a meat thermometer can help too; the wings should reach 165°F (74°C) for safe eating. Pro Tips Marinade Time: For the best flavor, allow the chicken wings to marinate in the sauce for at least 1 hour, or overnight in the refrigerator if time permits. Crispy Skin: To achieve extra crispy wings, pat them dry with paper towels before seasoning and baking. Add Variety: Experiment with different types of honey or add citrus zest to the marinade for a unique flavor twist. Serving Suggestion: Pair the wings with a cooling dip like ranch or blue cheese to balance the sweetness and heat of the sauce. {{image_2}} You can make your honey garlic wings spicy. To do this, add more red pepper flakes. If you want more control, try different hot sauces. Sriracha or buffalo sauce can add a nice kick. Just mix these sauces into the marinade for extra flavor. You can change the sweetener in the sauce. Maple syrup or agave nectar works well. These options bring a new taste to the wings. For soy sauce, you can use tamari or coconut aminos. These are great for those who need gluten-free options. You can cook honey garlic wings in an air fryer. Set the air fryer to 400°F (200°C). Cook for about 25 minutes. Flip the wings halfway through for even cooking. This method gives a nice crisp without deep frying. Grilling is another tasty option. Grilling adds a smoky flavor that pairs well with honey garlic sauce. Preheat your grill to medium heat. Grill the wings for about 20-25 minutes. Turn them often to avoid burning. Both methods create delicious wings. To store leftovers, place the wings in an airtight container. Make sure they cool down first. You can keep them in the fridge for up to 3 days. If you want to keep them longer, consider freezing. You can freeze honey garlic chicken wings for up to 3 months. To do this, place the wings in a freezer-safe bag or container. Squeeze out as much air as you can before sealing. When you're ready to eat, thaw them in the fridge overnight. Reheat the wings in the oven for best results. Preheat your oven to 350°F (175°C) and place the wings on a baking sheet. Heat for about 10-15 minutes. This method keeps them crispy. If you use a microwave, heat them in short bursts. This can make them soggy, so be careful. You can brush on some extra honey garlic sauce for added flavor while reheating. I love pairing honey garlic chicken wings with fresh sides. Here are some great options: - Celery sticks: Crunchy and refreshing, they balance the sweet wings. - Carrot sticks: Sweet and crunchy, carrots add color and flavor. - Coleslaw: Creamy slaw adds coolness to the spicy wings. - Green salad: A simple salad with greens, tomatoes, and cucumbers works well. - Rice or quinoa: They soak up the sauce and round out the meal. These sides bring color and taste to your meal. They also help balance the sweet and savory flavors of the wings. Yes, you can use chicken drumsticks! Drumsticks will take a bit longer to cook. Here are some tips: - Cooking time: Bake drumsticks for about 35-40 minutes. Make sure they reach 165°F (75°C) for safety. - Coating: Use the same marinade as for wings. Toss them well to coat. - Placement: Arrange them in a single layer, just like the wings. This swap gives you juicy meat with the same delicious flavor. If you want a thicker honey garlic sauce, try these tips: - Cornstarch: Mix 1 tablespoon of cornstarch with 2 tablespoons of water. Stir this mix into the sauce while cooking. - Reduce the sauce: Let it simmer on low heat. This helps to concentrate the flavors. - Add more honey: Honey thickens as it cooks. Just be careful not to make it too sweet. These methods help you achieve the perfect sauce texture for your wings. In this blog post, we explored how to make delicious honey garlic chicken wings. We covered the key ingredients, step-by-step instructions, and helpful tips. You learned about fun variations and how to store leftovers. For a tasty meal, serve these wings with your favorite sides. Remember, you can adjust the recipe to match your taste. Whether you cook them in the oven, air fryer, or on the grill, enjoy the sticky, sweet flavor!

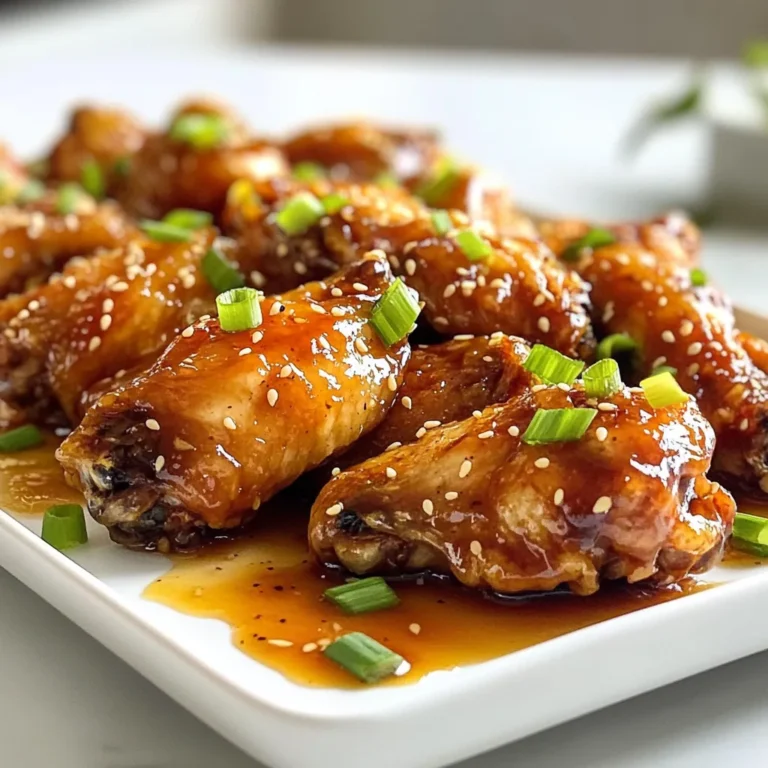
Honey Garlic Chicken Wings Flavorful Easy Recipe

To make creamy white chicken enchiladas, gather these key ingredients: - 2 cups cooked chicken, shredded - 1 cup cream cheese, softened - 1 cup sour cream - 1 cup shredded Monterey Jack cheese - 1 can (10 oz) green enchilada sauce - 1/2 cup chopped green onions - 8 flour tortillas - 1 teaspoon garlic powder - 1 teaspoon onion powder - Salt and pepper to taste - Fresh cilantro, for garnish These ingredients blend nicely to create a rich and creamy filling. The chicken provides protein, while the cream cheese and sour cream add creaminess. The green enchilada sauce gives a zesty kick, making this dish delightful. You might want to swap some ingredients. Here are some common substitutes: - Use rotisserie chicken for quick prep. - Swap cream cheese with Greek yogurt for a lighter option. - Try different cheeses like cheddar or pepper jack for added flavor. - If you prefer, use corn tortillas instead of flour ones. These swaps can make the dish fit your taste or dietary needs while keeping it delicious. Choosing quality ingredients is key to great flavor. Here are some tips: - Look for fresh chicken without added preservatives. - Choose full-fat cream cheese and sour cream for richness. - Select good-quality cheese with a nice melt. - For green onions, pick firm stalks with bright green tops. Fresh ingredients help the flavors shine through in your enchiladas. Quality matters, so invest in your ingredients for the best results. {{ingredient_image_1}} Start by preheating your oven to 350°F (175°C). In a large bowl, mix the cooked chicken, cream cheese, and sour cream. Add half a cup of Monterey Jack cheese, chopped green onions, garlic powder, onion powder, salt, and pepper. Stir well until everything is nicely combined. This mixture gives the enchiladas a creamy and rich flavor. Grab a flour tortilla and place about 1/4 cup of the chicken mixture in the center. Roll it up tightly, making sure the filling stays inside. Place the rolled tortilla seam-side down in a greased 9x13 inch baking dish. Repeat this for all the tortillas. This step creates a beautiful layer of enchiladas that will be delicious when baked. Once all the tortillas are in the dish, pour the green enchilada sauce evenly over them. Then sprinkle the remaining Monterey Jack cheese on top. Cover the dish with aluminum foil and bake it for 20 minutes. After that, remove the foil and bake for another 10 minutes. The cheese should be bubbly and golden when done. Let the dish cool for a few minutes before serving. Enjoy your creamy white chicken enchiladas! For creamy enchiladas, Monterey Jack cheese is a great choice. It melts well and adds a mild flavor. You can also mix in some sharp cheddar for extra richness. Pepper Jack cheese gives a nice spicy kick if you like heat. Don't forget to sprinkle some cheese on top for a bubbly finish. To make your enchiladas pop, add spices like cumin or smoked paprika. These spices bring warmth and depth to the dish. Fresh herbs like cilantro or parsley can brighten up the flavor. You can also add lime juice for a zesty touch. Experiment with these to find your favorite blend. Make these enchiladas ahead of time for a quick dinner. You can prepare the filling and roll the tortillas a day in advance. Store them in the fridge until you’re ready to bake. If you want to freeze them, wrap the assembled enchiladas tightly. When ready to cook, just add a few extra minutes to the baking time. Pro Tips Use Rotisserie Chicken: For a quicker option, use store-bought rotisserie chicken. It saves time and adds great flavor. Customize Your Cheese: Feel free to mix different types of cheese, such as pepper jack for a spicy kick or cheddar for a sharper taste. Add Veggies: Incorporate vegetables like bell peppers or spinach into the chicken mixture for added nutrition and flavor. Make Ahead: Assemble the enchiladas in advance and refrigerate before baking. Just add a few extra minutes to the baking time. {{image_2}} You can easily make this dish vegetarian. Replace the chicken with veggies like zucchini, bell peppers, or mushrooms. Chop them into small pieces and sauté them until soft. Mix these veggies with cream cheese and sour cream for a creamy filling. This way, you keep the rich taste while making it meat-free. For those who enjoy heat, spice it up! Add sliced jalapeños to the filling or drizzle hot sauce on top. If you like a stronger kick, mix in some diced jalapeños into the chicken mixture. This will give your enchiladas a fun, fiery flavor that will excite your taste buds. While green enchilada sauce is tasty, try red sauce for a different flavor. You can also make your own sauce at home. Blend tomatoes, onions, garlic, and chili powder for a fresh taste. Pour this over your enchiladas before baking for a new twist on this classic dish. After enjoying your creamy white chicken enchiladas, store any leftovers. Place them in an airtight container. This will keep them fresh for up to three days. Make sure to let them cool before sealing. If you have extra sauce, keep it separate. When you reheat your enchiladas, keep them moist. Preheat your oven to 350°F (175°C). Place the enchiladas in a baking dish. Add a splash of water or extra sauce on top. Cover with foil to prevent drying. Heat for about 15-20 minutes until warm. You can freeze these enchiladas for later. Wrap each enchilada tightly in plastic wrap. Then, place them in a freezer bag. They can last for up to three months in the freezer. To thaw, place them in the fridge overnight. When ready to eat, reheat as described above. Yes, you can use corn tortillas. They add a nice flavor and texture. Just make sure to warm them up before rolling. This helps prevent tearing and makes them easier to handle. If you like a gluten-free option, corn tortillas are a great choice. To spice up your enchiladas, add jalapeños to the chicken mix. You can also mix in some hot sauce or chili powder. If you want extra heat, sprinkle cayenne pepper on top before baking. Taste as you go to find your perfect level of spice. Absolutely! You can assemble the enchiladas earlier in the day. Just cover them tightly and store in the fridge. When you’re ready to eat, pour on the sauce and bake. This makes it easy for busy nights or gatherings. A fresh salad pairs well with the enchiladas. You can also serve rice or beans on the side. For a crunchy touch, try tortilla chips with salsa. These sides balance the creaminess and add extra flavor to your meal. Creamy White Chicken Enchiladas are easy to make and delicious. We covered key ingredients, cooking steps, and helpful tips. I shared ideas for variations, like vegetarian options and spicy twists. Proper storage helps you enjoy leftovers without losing taste. Now, you can create your own enchiladas with confidence. Explore the flavors and make it your own. With these guidelines, your next meal will be a hit. Enjoy every bite!

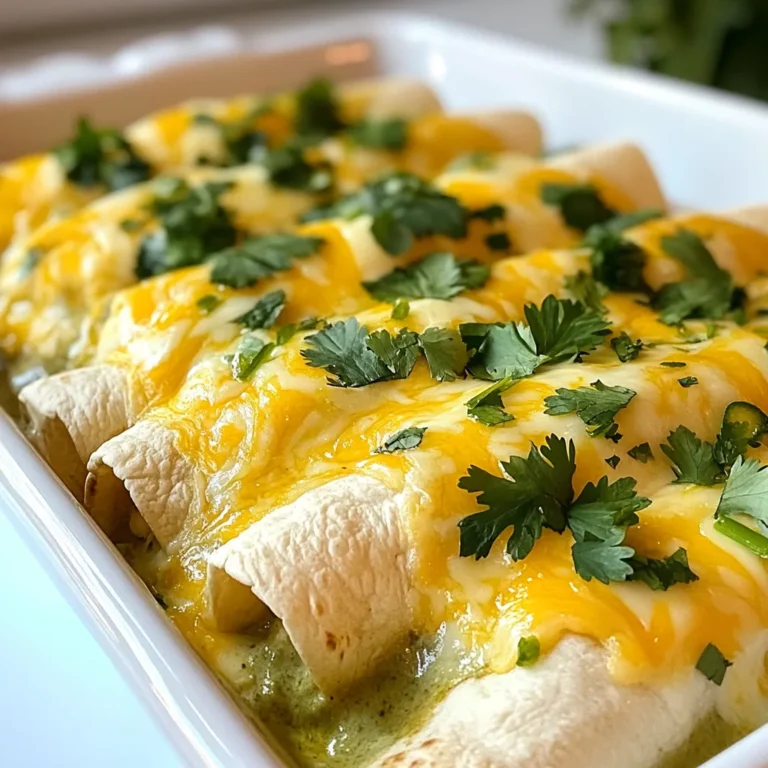
Creamy White Chicken Enchiladas Delightful Dinner Idea

To create a delicious Garlic Butter Shrimp Rice Skillet, you need the following ingredients: - 1 pound large shrimp, peeled and deveined - 1 cup jasmine rice - 2 tablespoons unsalted butter - 4 cloves garlic, minced - 1 small onion, finely chopped - 1 bell pepper (red or yellow), diced - 2 cups low-sodium chicken broth - 1 cup frozen peas - 1 teaspoon paprika - 1 teaspoon dried thyme - Salt and pepper to taste - Fresh parsley, chopped (for garnish) - Lemon wedges (for serving) These ingredients come together to create a tasty and quick dinner. The shrimp adds protein, while jasmine rice makes the dish hearty. The garlic and onion bring great flavor, and the bell pepper adds color. The butter keeps everything rich and smooth. Don’t forget the lemon! It brightens the dish when served. You can easily find these items at your local grocery store. This recipe is simple, so you can whip it up on a busy weeknight. {{ingredient_image_1}} Rinsing jasmine rice is key for great texture. It removes extra starch, making the rice fluffy. To rinse, place the rice in a bowl and cover it with cold water. Swirl it around, then drain the water. Repeat this a few times until the water runs clear. This simple step sets up your dish for success. Start by melting 1 tablespoon of butter in a large skillet over medium heat. Add the finely chopped onion and diced bell pepper. Sauté these for about 3-4 minutes. You want the onions to become translucent. This adds a sweet flavor to your dish. Now, add the minced garlic. Cook it for just 1 minute. You will know it's ready when it smells amazing. Next, stir in the rinsed rice, paprika, and dried thyme. Mix everything well so the rice absorbs all the flavors. Pour in 2 cups of chicken broth, and season with salt and pepper. Bring this mix to a boil. Once it's boiling, lower the heat. Cover the skillet and let it simmer for about 15 minutes. The rice should soak up the broth. While the rice cooks, season 1 pound of shrimp with salt and pepper. In another pan, melt the remaining 1 tablespoon of butter over medium-high heat. Cook the shrimp for about 2-3 minutes on each side. You want them to turn pink and opaque. This quick cooking keeps the shrimp juicy. Once your rice is cooked, fold in the shrimp and 1 cup of frozen peas. Cover the skillet again and let it sit for 5 more minutes. This will warm the peas. Finally, fluff the rice with a fork. Taste and adjust the seasoning as needed. Serve this dish garnished with fresh parsley and lemon wedges. Enjoy your meal! To avoid mushy rice, rinse jasmine rice well. Rinse it under cold water until the water runs clear. This removes extra starch. Extra starch can make rice sticky. For heat adjustments, start on medium-high. Once boiling, lower to low heat. Cover the skillet to keep steam in while it cooks. To add a richer flavor, consider extra spices. Try a pinch of cayenne for heat or a dash of lemon zest for brightness. Fresh herbs like basil or cilantro can also boost taste. For garnishes, I recommend using fresh parsley. Chopped parsley adds a nice color and flavor. Lemon wedges on the side give a fresh kick. Timing is key for perfect shrimp. Cook them for about 2-3 minutes on each side. They should turn pink and opaque when done. If you overcook them, they can get tough. If you don’t have shrimp, use chicken or tofu as alternatives. Just be sure to adjust the cooking time based on the protein you choose. Pro Tips Rinse the Rice: Rinsing jasmine rice under cold water removes excess starch, resulting in fluffier rice. Perfectly Cooked Shrimp: Cook shrimp just until they turn pink and opaque; overcooking can make them tough. Seasoning Adjustment: Always taste the dish before serving and adjust seasoning as needed for the best flavor. Garnish for Flavor: Fresh parsley and lemon wedges not only enhance presentation but also add a burst of freshness when served. {{image_2}} If you want to swap shrimp, chicken works well. Simply cut it into small pieces. Cook it for about 5-7 minutes until it’s fully done. For a vegetarian option, use tofu. Press the tofu to remove moisture, then cube it. Sauté it until golden and crispy, about 5-6 minutes. You can use brown rice instead of jasmine rice. Brown rice takes longer to cook, about 40-45 minutes. You’ll need to adjust the liquid to about 2.5 cups of broth. Quinoa is another great choice. It cooks faster, around 15 minutes, and requires about 1.5 cups of broth. Adding seasonal vegetables can boost flavor and nutrition. Think about bell peppers, zucchini, or asparagus. Chop them into bite-sized pieces and add them when you sauté the onions. Use about 1-2 cups of veggies. Cook them until they’re tender, about 3-5 minutes. To keep your Garlic Butter Shrimp Rice Skillet fresh, store leftovers in the fridge. Use an airtight container. This helps keep it from drying out. Make sure it cools first before sealing. It will stay good for up to three days. When you reheat, use low heat to keep it moist. The best way is to use a skillet. Add a splash of water or broth to help. Heat for about 5-7 minutes, stirring often. You can also use a microwave. Heat in short bursts, about 1-2 minutes, checking in between. If you want to freeze it, let it cool completely first. Place it in a freezer-safe container. It can last up to three months in the freezer. When you want to eat it, thaw it overnight in the fridge. Reheat it as mentioned above for the best results. Making Garlic Butter Shrimp Rice Skillet takes about 30 minutes. You spend 10 minutes prepping. Then, the cooking takes around 20 minutes. This quick time makes it perfect for a busy weeknight meal. Yes, you can! If you don't have chicken broth, use vegetable broth. You can also use water, though it may not be as flavorful. For a richer taste, add a splash of white wine. If you want a different protein, consider using chicken or tofu. Chicken should be cut into small pieces and cooked until no longer pink. Tofu should be firm and cubed. Both options work well with this recipe. Yes, this dish can be made ahead. Cook it and let it cool. Then, store it in an airtight container in the fridge. It stays fresh for about three days. When ready to eat, reheat it on the stove or in the microwave. This blog post explored a delicious Garlic Butter Shrimp Rice Skillet. We walked through essential ingredients, including shrimp, jasmine rice, and spices. I shared step-by-step instructions to cook fluffy rice and perfectly tender shrimp. You also learned tips for flavor and variations, plus how to store leftovers. In the end, this dish is versatile and easy to make. With simple ingredients, you can whip up a tasty meal any night. Enjoy your cooking!

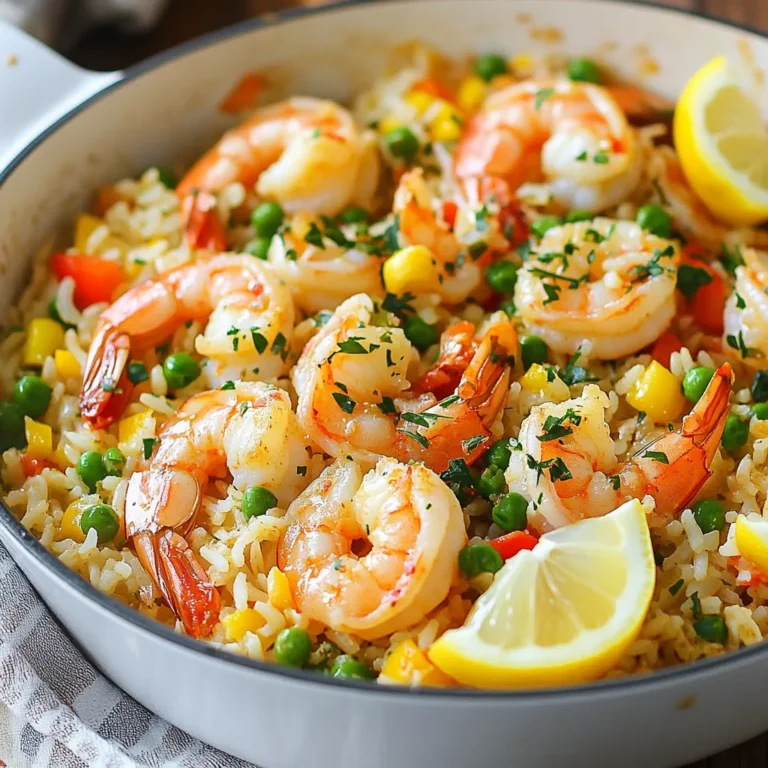
Garlic Butter Shrimp Rice Skillet Quick and Tasty Dinner

- 1 pound large shrimp, peeled and deveined - 2 tablespoons Cajun spice mix - 1 tablespoon olive oil To make these tacos, you need fresh shrimp. The Cajun spice mix gives them a strong flavor. Olive oil helps cook the shrimp evenly and adds some richness. - 1 red bell pepper, sliced - 1 avocado, sliced - 1 cup shredded lettuce Fresh veggies make these tacos pop. The red bell pepper adds crunch and sweetness. Sliced avocado gives a creamy texture. Shredded lettuce adds a nice crispness. - 8 small corn tortillas - 1/2 cup sour cream - 1 tablespoon lime juice - Fresh cilantro for garnish - Salt and pepper Corn tortillas hold all the goodness together. Sour cream mixed with lime juice makes a tangy sauce. Fresh cilantro adds color and freshness. Don't forget to season with salt and pepper to taste. These ingredients come together for a tasty meal that's quick to prepare. Each bite bursts with flavor and freshness, making it a perfect choice for any day. {{ingredient_image_1}} - Start by tossing 1 pound of shrimp in 2 tablespoons of Cajun spice mix. Make sure each shrimp gets a good coat. This step builds flavor. - Next, heat 1 tablespoon of olive oil in a large skillet over medium-high heat. Add the shrimp to the hot skillet. Cook them for about 2-3 minutes on each side. They should turn pink and opaque. When done, remove them from the heat. - In the same skillet, add 1 sliced red bell pepper. Cook it for 2-3 minutes. You want it to soften just a bit. - Once the pepper is cooked, mix it with the shrimp. This adds a nice crunch and sweetness to the tacos. - In a small bowl, combine 1/2 cup of sour cream with 1 tablespoon of lime juice. Stir it well to make a creamy sauce. This sauce adds tang and creaminess to the tacos. - To warm the tortillas, place them in a dry skillet over medium heat. Heat them for about 30 seconds on each side. This makes them soft and ready to hold the fillings. - Now it’s time to build your tacos. Take a warm tortilla and add a generous portion of the shrimp and bell pepper mix. - Top it with 1 cup of shredded lettuce and slices of 1 avocado. Drizzle the sour cream sauce over the top. - For a colorful finish, garnish each taco with fresh cilantro. Serve these tacos on a vibrant platter. Add lime wedges on the side for extra flavor. A sprinkle of Cajun seasoning on top adds visual appeal too. To cook shrimp just right, start with fresh or thawed shrimp. Toss them in Cajun spice mix. This ensures an even coating. Heat olive oil in your skillet over medium-high heat. When hot, add the shrimp. Cook for about 2-3 minutes on each side. They should turn pink and opaque. Overcooking makes them tough, so keep an eye on them! Want to elevate your shrimp tacos? Try adding extra spices. A pinch of smoked paprika adds depth. You can also toss in a little garlic powder for a kick. For toppings, consider diced tomatoes or pickled onions. These add color and zing to your dish. A squeeze of fresh lime juice brightens everything up. Make your tacos stand out! Use a bright platter for serving. Lay out the tacos neatly and add lime wedges on the side. This adds a pop of color. Sprinkle a little extra Cajun seasoning over the top for flair. Fresh cilantro not only tastes great but also looks lovely. These small touches make your meal visually appealing. Pro Tips Fresh Shrimp is Key: Always use fresh or properly thawed shrimp for the best texture and flavor. Customize Your Spice Level: Adjust the amount of Cajun spice to suit your heat preference; add more for extra kick! Perfectly Warm Tortillas: Make sure to warm the tortillas just enough to be pliable, which helps prevent tearing when assembling your tacos. Garnish for Extra Flavor: Don't skip the cilantro; it adds a fresh, herbal note that complements the spicy shrimp beautifully. {{image_2}} You can change the protein in these tacos. Try chicken, fish, or even tofu. Each swap gives a new taste. For veggies, add corn, zucchini, or mushrooms. Just slice them up and cook them with your shrimp. You can keep it fresh by mixing and matching. To make these tacos gluten-free, choose corn tortillas. They work great and add flavor. If you want them dairy-free, swap sour cream for avocado or a dairy-free yogurt. Each option keeps the dish tasty and satisfying. Want to change the heat? Use less Cajun spice for a milder taco. You can add more if you love spice. For a fun twist, mix in some diced jalapeños or hot sauce. This way, you can enjoy your tacos just how you like them. To keep your Spicy Cajun Shrimp Tacos fresh, store each component separately. Place leftover shrimp and bell peppers in an airtight container. Cool them to room temperature before sealing. For tortillas, wrap them in foil or plastic wrap. Store them in the fridge for up to three days. If you have extra sour cream sauce, keep it in a small container with a tight lid. This helps maintain flavors and texture. When you reheat shrimp, do it gently. Heat a skillet over low heat. Add a splash of olive oil and warm the shrimp for about two minutes. This helps them stay moist. For tortillas, warm them in a dry skillet for 30 seconds on each side. This method keeps them soft and pliable. Avoid using the microwave, as it can make them tough. You can prepare several taco components in advance. Season the shrimp and store them in the fridge for up to 24 hours. Slice the bell pepper and keep it in a sealed bag. You can also make the sour cream sauce ahead of time. Just mix it and store it in the fridge. This way, you can assemble the tacos quickly for a fast meal. To make the shrimp less spicy, reduce the Cajun spice mix. Use half the amount. You can also add more sour cream to balance the heat. Serve with extra toppings like avocado to cool it down. Yes, you can use frozen shrimp. Just thaw them first. Place them in a bowl of cold water for about 15 minutes. Drain well before cooking. This helps keep them fresh and tasty. Great sides include rice, beans, or a fresh salad. Chips and salsa add a nice crunch. Corn on the cob is also a sweet option that goes well with the tacos. You can add sliced jalapeños for heat or diced tomatoes for freshness. Chopped green onions or radishes add a nice crunch. Feel free to experiment with your favorite toppings to make it your own. Leftovers can be stored in the fridge for up to two days. Keep the shrimp and toppings separate if possible. This helps keep everything fresh and tasty when you reheat. In this blog post, we explored how to make Spicy Cajun Shrimp Tacos. We discussed the key ingredients, from shrimp and vegetables to tortillas and tasty sauces. I provided a step-by-step guide to prepare each part. Remember, you can customize your tacos with different proteins or spice levels. Fresh toppings enhance both flavor and look. Keep your leftovers fresh and enjoy your meal prep. Taste and fun are what make cooking exciting. Dive in and make your own tacos today!

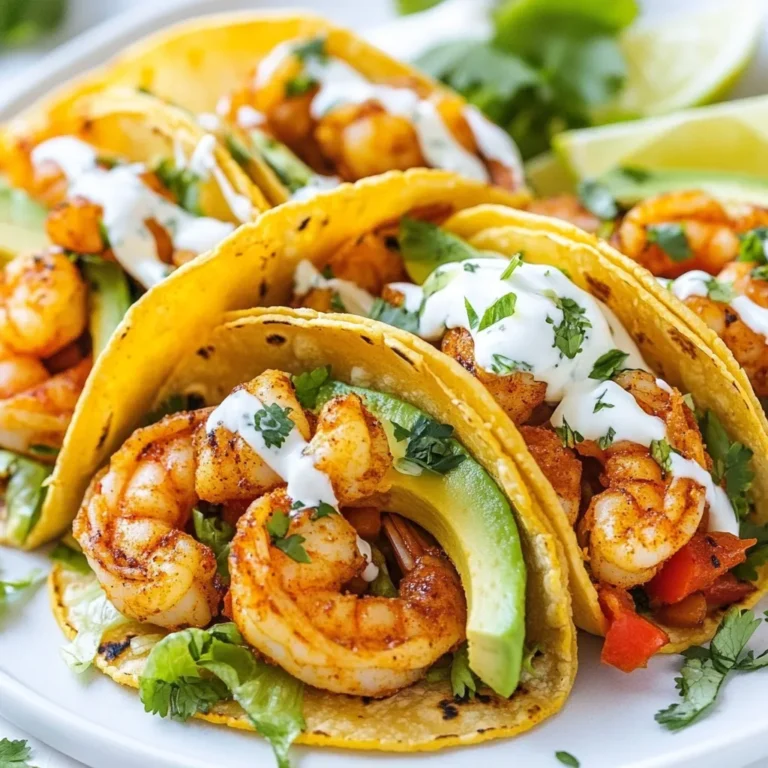
Spicy Cajun Shrimp Tacos Flavorful and Quick Meal

- 1 lb boneless, skinless chicken thighs - 4 tablespoons gochujang (Korean chili paste) - 2 tablespoons soy sauce - 1 tablespoon honey - 2 tablespoons sesame oil - 1 tablespoon minced garlic - 1 teaspoon grated ginger For these tacos, chicken thighs work great. They stay juicy and cook well. You will create a tasty marinade with gochujang, soy sauce, honey, sesame oil, garlic, and ginger. Each ingredient adds depth and flavor to the chicken. - 1 cup cooked jasmine rice - 8 small corn tortillas - 1 cup shredded red cabbage - 1 carrot, julienned - ½ cucumber, sliced - Fresh cilantro leaves for garnish - Lime wedges for serving For the toppings, jasmine rice adds a nice base. Warm corn tortillas hold everything together. Fresh veggies like red cabbage, carrot, and cucumber add crunch. Cilantro gives a fresh taste, while lime adds brightness. These toppings balance the spice of the chicken perfectly. {{ingredient_image_1}} To start, you need to mix the marinade. In a bowl, combine: - 4 tablespoons gochujang - 2 tablespoons soy sauce - 1 tablespoon honey - 2 tablespoons sesame oil - 1 tablespoon minced garlic - 1 teaspoon grated ginger Stir these ingredients together until smooth. The marinade is key for flavor. Marinate the chicken for at least 30 minutes. If you have more time, let it sit for up to 2 hours. This longer marination gives the chicken a richer taste. Next, you will cook the chicken. You can use a grill or a skillet. - Preheat your grill or skillet to medium-high heat. - Cook the marinated chicken thighs for about 5-7 minutes on each side. Make sure the chicken is fully cooked. It should reach an internal temperature of 165°F. Remove it from the heat and let it rest for a few minutes. Resting helps keep the chicken juicy. Now, it’s time to build your tacos. First, warm your corn tortillas. - Heat them in a dry skillet until they are soft and pliable. Then, slice the rested chicken into thin pieces. To assemble, place a scoop of jasmine rice on each tortilla. Layer the sliced chicken, shredded red cabbage, julienned carrot, and cucumber slices on top. Finish with fresh cilantro leaves and a squeeze of lime juice. This adds a zesty touch to your tacos. Enjoy the bold flavors! Marinating chicken adds deep flavor. For the best taste, marinate for at least 30 minutes. If you can, let it sit for two hours. This allows the spices to soak in well. Gochujang brings heat, while honey adds sweet notes. The soy sauce gives a savory bite. The longer you marinate, the better your chicken will taste. To keep your chicken juicy, don’t overcook it. Use a grill or skillet set to medium-high heat. Cook for about 5-7 minutes on each side. Look for a nice golden color. Your chicken should reach an internal temperature of 165°F. Let it rest before slicing. This helps keep the juices inside. Serve your tacos on a wooden board for a rustic touch. Add lime wedges for a burst of freshness. A small bowl of extra gochujang on the side makes a great dip. Stack the tacos high for a colorful display. Use fresh cilantro leaves on top for a pop of green. This makes your meal look as good as it tastes! Pro Tips Marinating Time: For maximum flavor, marinate the chicken for at least 2 hours or overnight if possible. Chicken Cooking: Ensure the chicken reaches an internal temperature of 165°F for safe consumption. Tortilla Warping: Warm the tortillas on a skillet to enhance their flavor and make them more pliable for easy folding. Fresh Garnish: Add fresh lime juice and cilantro right before serving to brighten up the dish. {{image_2}} You can easily change the protein. Try using tofu or shrimp instead of chicken. Tofu absorbs flavors well and makes a great meat substitute. Shrimp cooks quickly and adds a nice touch to the tacos. For veggies, use what you love. Bell peppers, radishes, or even avocado work great. The key is to keep it colorful and crunchy. Want it spicier? Add more gochujang to the marinade. You can also sprinkle chili flakes on top. If you prefer less heat, reduce the gochujang. Try adding a bit of honey for sweetness, which helps balance the heat. You control the spice, so make it just how you like! Not in the mood for tacos? Turn it into a taco bowl. Just layer jasmine rice at the bottom, then add all your toppings on top. This makes for a filling and fun meal. You can also make it a wrap. Use a larger tortilla and load it up. Roll it tightly for a tasty grab-and-go meal. To keep your Spicy Korean Chicken Tacos fresh, follow these tips. Store the chicken and toppings in separate containers. This helps maintain texture and flavor. For chicken, use an airtight container. It stays good for up to three days in the fridge. Place veggies like cabbage, carrots, and cucumbers in another container. Keep them crisp by adding a paper towel to absorb moisture. When you are ready to enjoy leftovers, reheat the chicken and tortillas properly. For chicken, use a skillet over low heat. Stir occasionally until heated through. This keeps the chicken juicy. For tortillas, warm them in a dry skillet for about 30 seconds on each side. This makes them soft again. Avoid using the microwave, as it can make them tough. If you want to save some for later, freezing is a great option. Place the marinated chicken in a freezer bag. Remove as much air as possible before sealing. It can stay in the freezer for up to three months. When you're ready to cook, thaw the chicken in the fridge overnight. After thawing, cook it as usual. Enjoy your tacos whenever you crave them! Yes, you can prepare these tacos ahead of time. Here’s how: - Marinate Chicken: You can marinate the chicken thighs the night before. It helps deepen the flavor. - Cook and Store: Cook the chicken and store it in the fridge. It stays fresh for up to three days. - Warm Tortillas: Warm the corn tortillas just before serving. This keeps them soft and tasty. - Prepare Toppings: You can slice the veggies and store them in airtight containers. This saves time during meal prep. These tacos pair well with several side dishes, including: - Mexican Street Corn: This dish adds a sweet and spicy kick. - Kimchi: The tangy crunch complements the tacos perfectly. - Cucumber Salad: A light salad balances the spicy flavors of the tacos. - Rice or Quinoa: These options offer a filling side and help soak up the sauce. You can easily scale this recipe. Here’s how: - Increase Chicken: For every additional four servings, add one pound of chicken thighs. - Adjust Marinade: Double the marinade ingredients for larger amounts of chicken. This keeps the flavor consistent. - Tortillas: Make sure to have enough corn tortillas. Each person usually enjoys two. - Toppings: Increase toppings like cabbage, carrots, and rice in proportion to the chicken. This ensures everyone gets enough. In this article, we covered the key ingredients and steps for making Spicy Korean Chicken Tacos. You learned about the marinade, cooking methods, and how to assemble these delicious tacos. We also shared tips on marinating, cooking, and presenting your dish. Remember, you can adjust the recipe to fit your taste and needs. Feel free to experiment with different proteins and toppings. Enjoy creating and eating these flavorful tacos with friends and family. They are sure to impress!

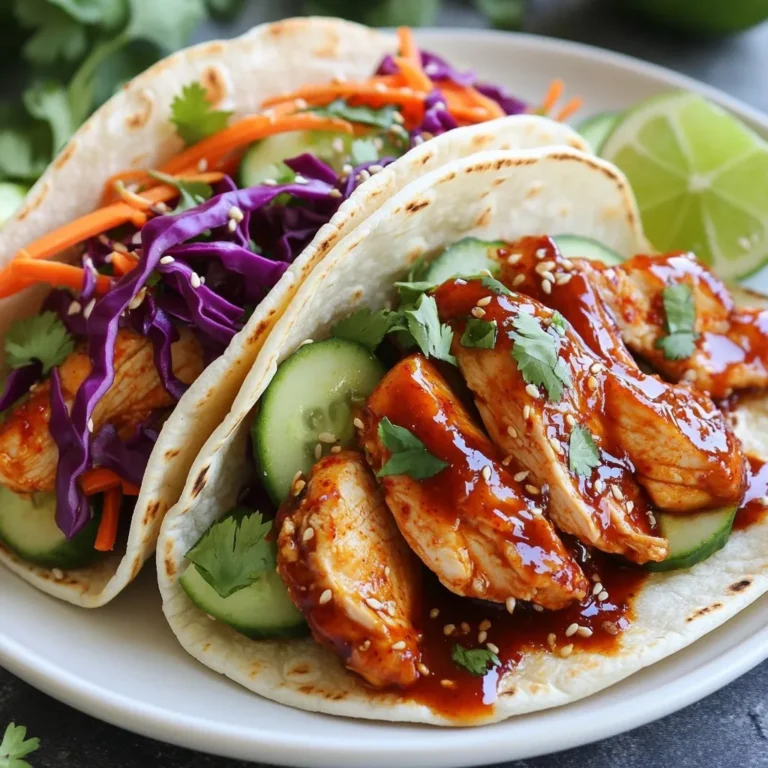
Spicy Korean Chicken Tacos Flavorful and Filling Meal

- 2 cups cooked chicken breast, shredded - 2 cups mixed greens (lettuce, spinach, arugula) - 1 cup cherry tomatoes, halved - 1 cup corn kernels (fresh or frozen) - 1/2 red onion, thinly sliced - 1/2 cup shredded cheddar cheese - 1/4 cup crispy tortilla strips (for garnish) - 1/2 cup BBQ sauce - 1/4 cup ranch dressing - Salt and pepper to taste For this BBQ Ranch Chicken Salad, I focus on fresh and simple ingredients. The chicken adds protein, while the greens provide crunch and nutrition. Cherry tomatoes and corn bring sweetness, and the onion adds a nice bite. The cheese adds creaminess, while the BBQ sauce and ranch dressing tie all the flavors together. You can make this salad your own with extra toppings. Consider adding: - Avocado slices for creaminess - Black beans for more protein - Jalapeños for a kick - Bell peppers for added color and crunch - Sliced olives for a briny touch These add-ins can elevate your salad, making it even more delicious and satisfying. Each serving of this salad packs a punch! It has around 400 calories, depending on your add-ins. Key nutrients include: - Protein from chicken and cheese - Fiber from greens and veggies - Healthy fats if you add avocado This salad is not just tasty; it's a balanced meal option for any day. Enjoying it will keep you energized! {{ingredient_image_1}} To coat the chicken with BBQ sauce, start with your shredded chicken. Place it in a medium bowl. Pour in about 1/3 cup of BBQ sauce. Mix well until every piece is covered. This adds great flavor to your chicken. Set it aside so the flavors can blend. Now it’s time to layer the salad for a great look. Take a large salad bowl and put in the mixed greens first. Spread them evenly across the bottom. Next, add halved cherry tomatoes on top. Then, sprinkle the corn kernels and sliced red onion. Finish with the shredded cheddar cheese. This colorful layer adds more than just taste; it makes the salad pretty too. Finally, spoon the BBQ chicken mixture right over the top. For tossing and seasoning, drizzle ranch dressing over the salad. You can add more or less, depending on your taste. Gently toss the salad to mix it without breaking the chicken too much. This keeps the chunks nice and big. Season with salt and pepper to your liking. For a crunch, top with crispy tortilla strips. You can also drizzle a bit of extra BBQ sauce if you want. This makes it even more delicious! To make the best BBQ ranch chicken salad, avoid some common mistakes. First, do not rush the chicken coating. Make sure each piece gets enough BBQ sauce. This adds flavor and keeps the chicken moist. Second, do not overdo the ranch dressing. Too much can make the salad soggy. Use just enough to enhance the taste. Finally, be gentle when tossing the salad. You want to mix it, but not break up the chicken. You can elevate your BBQ ranch chicken salad with extra seasonings. Try adding a pinch of smoked paprika for a nice kick. You can also mix in some garlic powder or onion powder for depth. If you enjoy heat, consider a dash of cayenne pepper or some diced jalapeños. These flavors bring complexity to your dish. You may also swap ranch dressing with a zesty cilantro dressing for a fresh twist. Making your salad look great is easy. Start with a colorful base of mixed greens. Layer the salad ingredients in a pretty way. Arrange the cherry tomatoes and corn in a circle for a pop of color. Sprinkle the cheese on top for a nice finish. For added crunch, top it with crispy tortilla strips. Drizzle extra BBQ sauce over the salad for a finishing touch. This not only looks good but also adds flavor. Pro Tips Use Rotisserie Chicken: For a quicker meal, you can use store-bought rotisserie chicken instead of cooking your own. Just shred it and mix it with the BBQ sauce. Customize Your Greens: Feel free to use any combination of greens you prefer. Kale, romaine, or even coleslaw mix can add a different flavor and texture. Add Avocado: For a creamier texture, consider adding sliced avocado to your salad. It pairs beautifully with both BBQ sauce and ranch dressing. Make It Ahead: If preparing in advance, keep the chicken and dressing separate until serving to prevent the greens from wilting. {{image_2}} You can switch up the ingredients in BBQ Ranch Chicken Salad. If you want a different protein, try grilled shrimp or smoked tofu. Both options add flavor and change the texture. For greens, use kale or romaine instead of mixed greens. Both give a crunchy bite. If you like a sweet twist, add diced mango or apple to the mix. This adds color and brightens the dish. While ranch dressing is tasty, you can try other dressings. A honey mustard dressing adds a sweet kick. A vinaigrette made with olive oil and vinegar can lighten the salad. You could also use a spicy sriracha mayo for a kick. Each dressing gives a unique flavor and keeps the salad fresh. To round out your meal, serve the salad with garlic bread or a side of quinoa. Both options make the meal filling. You can also add fresh fruit like watermelon or berries for a refreshing contrast. If you want a crunchy side, try homemade potato chips. These ideas make your BBQ Ranch Chicken Salad even more enjoyable. To keep your leftover BBQ Ranch Chicken Salad fresh, use airtight containers. Glass or plastic containers both work well. Make sure to divide the salad into servings. This way, you can grab just what you need. Avoid letting the salad sit in the open air. This keeps it from getting soggy or losing flavor. If you have leftover BBQ chicken, you can reheat it. The best way is to use the microwave. Place the chicken in a microwave-safe dish. Heat it for about 30 seconds. Stir and check if it’s warm enough. If not, heat for another 30 seconds. Avoid reheating the salad greens. They can wilt and lose their crunch. Your BBQ Ranch Chicken Salad stays fresh for about three days in the fridge. After that, the flavors may fade. The greens may also become soggy. Always check for any off smells or changes in texture before eating. If it looks or smells bad, it's best to toss it out. Yes, you can prep this salad early. Start by making the BBQ chicken. Store it in the fridge. You can also chop the veggies ahead. Keep them in separate containers. Mix everything just before serving. This keeps your greens fresh and crisp. If you don’t have chicken, use canned beans. Black beans or chickpeas work well. For a vegan option, try tofu or tempeh. Shredded rotisserie chicken is also a quick fix. You can even use leftover turkey if you have some. This salad has a nice balance of nutrients. It includes protein from chicken and fiber from veggies. The mixed greens add vitamins. However, watch the BBQ sauce and ranch dressing. They can add sugar and fat. You can use low-fat versions to make it lighter. This BBQ Ranch Chicken Salad is easy to make and delicious. We covered all the key ingredients and measurements, plus optional add-ins to spice things up. I shared simple steps for preparing the chicken and assembling the salad for the best look. You learned tips to enhance flavor and avoid common mistakes. Try swaps for different ingredients or toppings to fit your taste. Store leftovers properly to keep them fresh. Remember, this salad can be made ahead to save time. Enjoy this tasty, healthy dish as a meal or side. Get creative and have fun!

BBQ Ranch Chicken Salad Fresh and Flavorful Meal

For this dish, you will need: - 1 pound chicken breast, cut into bite-sized pieces - 4 tablespoons unsalted butter - 4 cloves garlic, minced - 1 teaspoon fresh thyme leaves (or ½ teaspoon dried thyme) - Salt and pepper to taste - 1 tablespoon lemon juice - 1 teaspoon paprika - ½ teaspoon chili flakes (optional for heat) These main ingredients make a flavorful base for the garlic butter chicken bites. The chicken is tender and juicy, while the butter and garlic add rich taste. Herbs like thyme enhance the dish's aroma. To make this dish even better, consider these options: - Fresh lemon zest for brightness - Grated Parmesan cheese for a cheesy twist - Other herbs like oregano or basil for more flavor - A splash of white wine to deglaze the pan Adding these ingredients can elevate your garlic butter chicken bites. They offer unique flavors that complement garlic and butter nicely. If you don't have something on hand, try these swaps: - Olive oil instead of butter for a lighter dish - Chicken thighs instead of breasts for more flavor - Garlic powder if you don't have fresh garlic - Dried thyme if fresh thyme is unavailable These substitutions will keep your recipe tasty and enjoyable. Don't hesitate to experiment with what you have! {{ingredient_image_1}} To start, cut the chicken breast into bite-sized pieces. This helps them cook evenly. Then, season the chicken with salt, pepper, paprika, and chili flakes if you like heat. Mix the spices well to coat all the pieces. This adds a great flavor to the chicken. Next, grab a large skillet and set it over medium heat. Add the butter to the skillet and let it melt. Once the butter is bubbling, lay the seasoned chicken bites in a single layer. Cook them for about 5 to 7 minutes. Stir them occasionally to brown all sides. Check that they reach an internal temperature of 165°F to ensure they are safe to eat. Now, lower the heat and add the minced garlic to the skillet. Cook the garlic for about 1 to 2 minutes while stirring constantly. This step is important; you want the garlic to be fragrant but not burnt. Then, mix in the fresh thyme and lemon juice. Stir everything well to blend the flavors. Cook for another minute to let the herbs infuse their taste into the dish. After this, your garlic butter sauce will be ready to pour over the chicken. To make the best garlic butter chicken bites, use fresh ingredients. Fresh herbs, like thyme and parsley, add great taste. Always cut your chicken into even pieces. This helps them cook evenly. Season well with salt, pepper, and paprika. The spices bring out the flavor in each bite. If you like heat, add chili flakes. This adds a nice kick without overpowering the dish. Cook the chicken bites at medium heat for around 5-7 minutes. This gives them a nice golden color. Check that the internal temperature reaches 165°F. Use a meat thermometer to ensure it's safe to eat. Once the garlic goes in, lower the heat. Cooking garlic too long can make it bitter. Just 1-2 minutes is enough to bring out its rich flavor. Serve your garlic butter chicken bites on a beautiful plate. Drizzle the buttery sauce over the top for extra flavor. A sprinkle of fresh parsley adds color and freshness. Pair them with rice or fresh veggies to make a full meal. For a fun twist, serve with crusty bread to soak up the sauce. Drinks like iced tea or lemonade work well with this dish. Enjoy the blend of flavors in every bite! Pro Tips Use Fresh Ingredients: Fresh garlic and herbs will elevate the flavor of your dish significantly, so opt for fresh whenever possible. Don’t Overcrowd the Pan: Cook the chicken in batches if necessary to ensure even cooking and a nice golden crust. Perfect Cooking Time: Keep an eye on the chicken to avoid overcooking; it should be golden brown and reach an internal temperature of 165°F. Serve Immediately: This dish is best enjoyed fresh from the skillet, as the buttery sauce and garlic flavors will be at their peak. {{image_2}} To make spicy garlic butter chicken bites, add more heat. Use extra chili flakes or add hot sauce. You can also use jalapeños for a fresh twist. Spice levels can suit your taste, so feel free to adjust. This version gives a nice kick to the dish. Herbs can elevate the flavor of garlic butter chicken bites. Try using rosemary, basil, or oregano. Fresh herbs add a nice touch. You can mix different herbs to find a blend you love. This adds depth and freshness to each bite. You can cook garlic butter chicken bites in different ways. Grilling gives a smoky flavor. Simply marinate the chicken as per the recipe and grill until cooked through. Baking is another great method. Preheat the oven to 400°F and bake on a lined sheet for about 15-20 minutes. Each method gives a unique taste, so try them all! To keep your garlic butter chicken bites fresh, place them in an airtight container. Make sure to cool them to room temperature first. Store them in the fridge for up to three days. This helps maintain their flavor and texture. When you're ready to enjoy leftovers, reheat them on the stove. Place the chicken bites in a skillet over low heat. Add a splash of water or a bit of butter to prevent sticking. Heat until warm, about 5 minutes. Stir occasionally to ensure even heating. If you want to save the chicken bites for later, freezing is a great option. Allow the chicken to cool completely, then place it in a freezer-safe bag. Remove as much air as possible before sealing. They can last up to three months in the freezer. To reheat, thaw in the fridge overnight before reheating on the stove. Garlic Butter Chicken Bites can last up to four days in the fridge. Store them in an airtight container to keep them fresh. When ready to eat, just reheat them on the stove or in the microwave. The bites will still be tasty and full of flavor! Yes, you can use frozen chicken. Thaw it first in the fridge or microwave. Once thawed, cut it into bite-sized pieces. The cooking time may change slightly, so ensure the chicken is cooked through, reaching 165°F. These chicken bites pair well with many sides. Here are some tasty options: - Steamed vegetables like broccoli or green beans - A fresh garden salad - Rice or quinoa for a hearty meal - Pasta tossed in olive oil or garlic sauce Feel free to mix and match based on what you like! This blog post covered how to make tasty garlic butter chicken bites. We explored key ingredients and other options for extra flavor. I shared step-by-step cooking instructions to ensure perfect bites. You learned tips for cooking times and serving ideas. We also discussed different versions and how to store leftovers. In closing, garlic butter chicken bites are easy and fun to make. With the right ingredients and methods, you can impress anyone at your table.

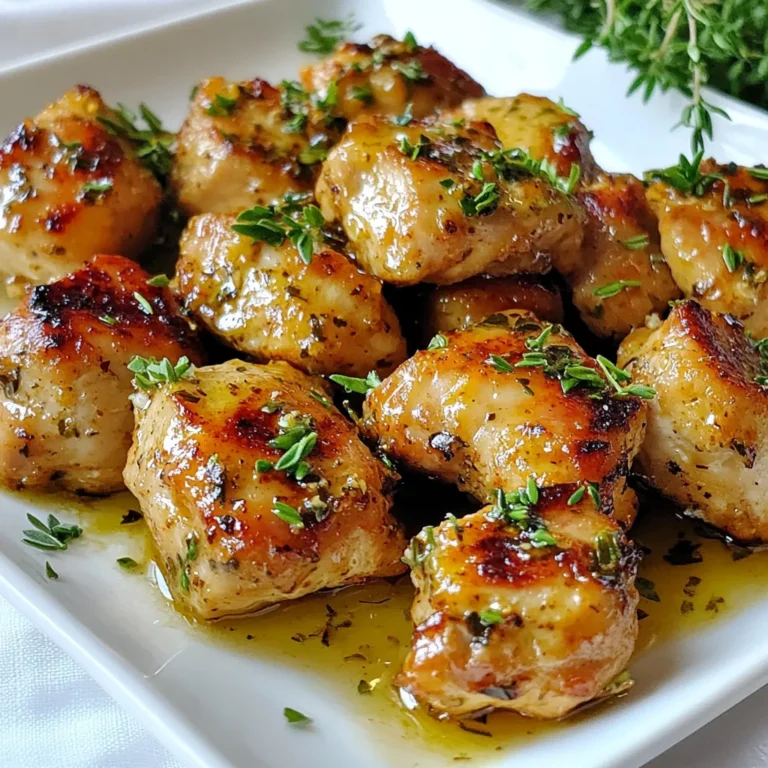
Garlic Butter Chicken Bites Tasty and Simple Dish

To make Chicken Alfredo Stuffed Shells, you need a few key ingredients: - 12 jumbo pasta shells - 2 cups cooked chicken, shredded - 1 cup ricotta cheese - 1 cup mozzarella cheese, shredded - ½ cup Parmesan cheese, grated - 2 cups Alfredo sauce - 1 teaspoon garlic powder - Salt and pepper to taste These ingredients create a creamy, rich flavor. The chicken brings protein, while the cheeses add creaminess. The jumbo shells hold the filling well and make serving easy. You can add your twist to this dish with optional ingredients: - Fresh spinach or kale for greens - Sun-dried tomatoes for a burst of flavor - Different cheeses like fontina or gouda - Fresh herbs like basil or thyme These options let you customize the recipe to your taste. Adding greens boosts nutrition, while different cheeses can change the flavor profile. Choose fresh ingredients for the best taste. Here are some tips: - Look for pasta shells that are firm and not broken. - Select chicken that is cooked and shredded just before use. - Use whole milk ricotta for a creamier filling. - Choose high-quality cheeses for richer flavor. - Check the Alfredo sauce for simple, clean ingredients. Fresh, quality ingredients make your dish shine. They improve texture and enhance overall flavor. Enjoy the cooking process and feel free to experiment! {{ingredient_image_1}} First, set your oven to 350°F (175°C). This will help cook the shells evenly. Next, fill a large pot with salted water and bring it to a boil. Once boiling, add your jumbo pasta shells. Cook them for about 10-12 minutes until they are al dente. After cooking, drain the shells and let them cool slightly. This step makes them easier to handle later. In a large mixing bowl, combine the cooked chicken and cheeses. Add 1 cup of ricotta cheese, half a cup of shredded mozzarella, and half a cup of grated Parmesan cheese. Then, add 1 teaspoon of garlic powder, along with salt and pepper to taste. Mix everything well until fully combined. This filling will bring rich flavors to your stuffed shells. Take each cooled pasta shell and fill it with the chicken and cheese mixture. Be gentle to avoid tearing the shells. Place the stuffed shells into a greased baking dish. Make sure they fit snugly but aren’t overcrowded. Once all the shells are filled, pour 2 cups of Alfredo sauce evenly over them. This sauce adds creaminess and depth to the dish. Cover the baking dish with aluminum foil and put it in the preheated oven. Bake for 25 minutes. After that, remove the foil and sprinkle the remaining mozzarella and Parmesan on top. Bake for an additional 10-15 minutes until the cheese is bubbly and golden. This will give your dish a delicious, cheesy crust that everyone will love. Making your own Alfredo sauce is easy and fun. Start with these simple steps: - Melt ½ cup of butter in a saucepan over low heat. - Add 1 cup of heavy cream and stir. - Mix in 1 cup of grated Parmesan cheese. - Keep stirring until the cheese melts. - Season with salt, pepper, and garlic powder to taste. This sauce is rich and creamy. It tastes great in the stuffed shells. You can adjust the flavors to your liking. Having the right tools makes cooking easier. Here are some must-haves: - Large pot for boiling pasta. - Large mixing bowl for the filling. - Baking dish for the stuffed shells. - Measuring cups and spoons for accuracy. - Wooden spoon for mixing. - Aluminum foil to cover the dish while baking. These tools help you create the best Chicken Alfredo Stuffed Shells. Avoid these mistakes for perfect stuffed shells: - Overcooking the pasta can make it mushy. Cook it al dente. - Not cooling the shells can lead to messy stuffing. Let them cool a bit. - Skipping seasoning can make the dish bland. Don’t forget salt and pepper. - Using too much sauce can make it soggy. Use just enough to coat. Being aware of these tips will help you make the best Chicken Alfredo Stuffed Shells. Pro Tips Use Fresh Ingredients: Fresh herbs and high-quality cheeses will elevate the flavor of your stuffed shells, making them taste even more delicious. Don’t Overcook the Pasta: Cooking the pasta shells until just al dente ensures that they hold their shape when stuffed and baked, preventing a mushy texture. Experiment with Fillings: Feel free to mix in vegetables like spinach or mushrooms into the filling for added nutrition and flavor. Let it Rest: Allow the dish to cool for a few minutes after baking; this helps the cheese set and makes serving easier. {{image_2}} If you want a meat-free meal, try using spinach and ricotta. Combine 2 cups of fresh spinach with 1 cup of ricotta cheese. Mix in some garlic powder and herbs for added flavor. You can also add mushrooms for a nice texture. This mix fills the shells well and tastes great with Alfredo sauce. For those who like heat, add some spice! Use pepper jack cheese instead of mozzarella. You can mix in diced jalapeños or crushed red pepper flakes into the chicken filling. This adds a nice kick. Another option is to mix in a bit of hot sauce with the Alfredo sauce for a spicy twist. If you're gluten-free, you can still enjoy this dish. Look for gluten-free pasta shells at your store. Many brands offer great options. Make sure your Alfredo sauce is also gluten-free. You can make your own sauce using gluten-free flour or cornstarch. This way, you can enjoy Chicken Alfredo Stuffed Shells without worry. Storing leftover stuffed shells is simple. First, let them cool to room temperature. Then, place them in an airtight container. Be sure to cover the shells with extra Alfredo sauce to keep them moist. Store them in the fridge for up to three days. This keeps the taste fresh and delicious. You can freeze stuffed shells for a quick meal later. Start by preparing the shells as normal. Instead of baking, place them in a freezer-safe dish. Cover them tightly with plastic wrap and foil. They can stay in the freezer for up to three months. When you want to eat them, just thaw in the fridge overnight before baking. Reheating stuffed shells is easy. Preheat your oven to 350°F (175°C). Place the shells on a baking dish. Add a splash of Alfredo sauce to prevent drying. Cover the dish with foil. Bake for about 20 minutes until hot and bubbly. This method keeps the flavors rich and the cheese melty. Enjoy your delicious meal! Yes, you can use different cheeses. Try using cream cheese for a creamier texture. You can also mix in cheddar or gouda for extra flavor. Just keep the total amount the same to maintain balance. To make this dish ahead, prepare everything until the baking step. Stuff the shells and place them in a baking dish. Cover it tightly with foil and store it in the fridge. When ready, just bake it straight from the fridge. You can use cooked turkey or even shredded pork. For a plant-based option, try using lentils or chickpeas. Adjust the seasoning to keep the flavor delicious. Yes, you can make it dairy-free. Use dairy-free cheese and a non-dairy Alfredo sauce. You can also blend cashews to create a creamy sauce. These stuffed shells last about 3 to 4 days in the fridge. Make sure they are in an airtight container to keep them fresh. Absolutely! Spinach, mushrooms, or bell peppers work great. Sauté them first to soften them and enhance the flavor. Mix them into the filling for some added nutrition. In this blog post, we covered all you need to make Chicken Alfredo Stuffed Shells. We explored the essential and optional ingredients to customize your dish. You learned step-by-step instructions for cooking and assembling. Plus, we shared tips for making homemade sauce, avoiding common mistakes, and storing leftovers. These delicious stuffed shells are a hit for any meal. Remember, you can mix and match ingredients to fit your taste. Enjoy making and sharing this dish with family and friends!

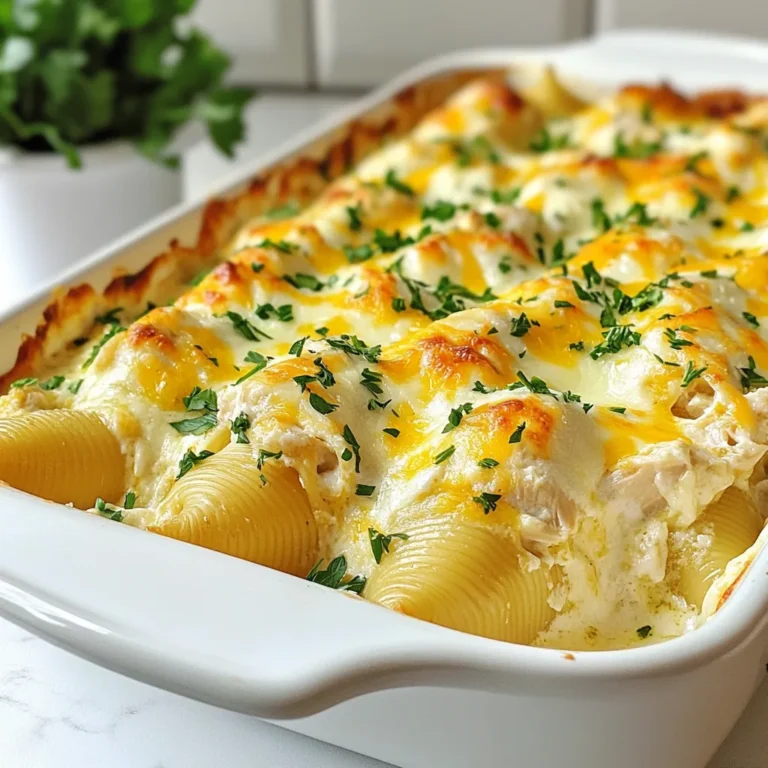
Chicken Alfredo Stuffed Shells Flavorful and Easy Meal

PREV 1 … 36 37 38 … 58 NEXT
quick dish kitchen

explore

DessertsDinnerAppetizersDrinks

Our Policies

  • Cookie Policy
  • Copyright Policy
  • Disclaimer
  • GDPR Policy
  • Terms Of Use
Back to Top
  • About
  • Contact Us
  • Privacy Policy
© 2025 quick dish kitchen