FREE DINNER EBOOK! Get your copy!
  • Cookie Policy
  • GDPR Policy
  • Disclaimer
  • Terms Of Use
  • Visit my other site: Fun Cookie Recipes
quick dish kitchen
  • Home
  • Dinner
  • Desserts
  • Drinks
  • Appetizers
  • Contact
  • About
  • Privacy Policy
  • Home
  • Dinner
  • Desserts
  • Drinks
  • Appetizers
  • Contact
  • About
  • Privacy Policy
  • Cookie Policy
  • GDPR Policy
  • Disclaimer
  • Terms Of Use
Visit my other site: Fun Cookie Recipes

HOME / CATEGORIES /

Latest

- 8 oz (225g) whole wheat noodles - 3 tablespoons sesame oil - 2 tablespoons soy sauce - 1 tablespoon rice vinegar - 1 tablespoon chili paste - 1 tablespoon honey - 2 cloves garlic, minced - 1 inch ginger, grated - 1 cucumber, julienned - 2 green onions, sliced - 1 tablespoon toasted sesame seeds - Fresh cilantro for garnish These ingredients blend perfectly to create a rich and spicy flavor. Whole wheat noodles add a nutty taste and a nice texture. The sesame oil gives a toasty aroma, while soy sauce adds depth. Rice vinegar brings a tangy note to balance the dish. Chili paste gives the kick. Adjust it based on your heat preference. Honey adds a hint of sweetness to brighten flavors. Fresh garlic and ginger enhance the overall aroma and taste. Cucumber and green onions provide a crisp and fresh crunch. Don't forget toasted sesame seeds for a nutty finish and cilantro for a fresh touch. - Large pot for boiling noodles - Mixing bowls - Whisk or fork for sauce - Serving bowls Using these tools makes cooking easier. A large pot is key for boiling noodles. Mixing bowls help to combine your sauce. A whisk or fork mixes the sauce well, ensuring all flavors blend. Serving bowls will present your dish beautifully. Ready to dive into making this dish? Grab your tools and let’s cook! {{ingredient_image_1}} Start by boiling salted water in a large pot. Use enough water to let the noodles move freely. Add the whole wheat noodles once the water is boiling. Cook them according to package instructions. You want them to be al dente, so check the noodles a minute or two before the time is up. Once they are ready, drain and rinse them under cold water. This stops the cooking and cools them down. Next, grab a medium bowl. In this bowl, combine the sesame oil, soy sauce, rice vinegar, chili paste, honey, minced garlic, and grated ginger. Whisk these ingredients together until they blend well. This step is key for a smooth sauce. A good whisk makes sure every bite has the same great flavor. Now, take a large mixing bowl. Add the cooled noodles you just rinsed. Pour the sesame sauce over the top. Toss the noodles gently to coat them evenly. Then, add in the julienned cucumber and sliced green onions. Stir everything until it’s well mixed. This gives you a colorful and tasty dish. Divide the spicy noodles into serving bowls. For a nice touch, sprinkle toasted sesame seeds on top. You can also garnish with fresh cilantro. This not only adds flavor but also makes the dish look beautiful. Serve it chilled for a refreshing meal. Enjoy your tasty creation! To get the right kick in your spicy sesame cold noodles, adjust the chili paste. Start with one tablespoon. Taste it, then add more if you like it hotter. You can also enhance the flavor with a splash of lime juice or a pinch of sugar. These little tweaks can make a big difference. Cooking the noodles perfectly is key. Boil them just until they are al dente, which means firm to the bite. This helps them hold their shape when mixed with the sauce. After draining, always rinse the noodles under cold water. This stops the cooking and cools them down. It also helps the sauce cling better. Serve these noodles cold for a refreshing meal. For the best experience, chill them in the fridge for a bit before serving. When plating, use shallow bowls. Arrange the cucumber on top and sprinkle with extra sesame seeds and cilantro for a pop of color. This makes the dish look appealing and tasty. Pro Tips Customize the Heat: Adjust the amount of chili paste based on your spice preference. Start with less and add more to taste. Chill for Flavor: Allow the noodles to chill in the refrigerator for at least 30 minutes after mixing with the sauce for enhanced flavor. Fresh Herbs: Add fresh mint or Thai basil along with cilantro for an extra layer of flavor and aroma. Protein Addition: Consider adding grilled chicken, shrimp, or tofu to make this dish a complete meal. {{image_2}} You can add grilled chicken or tofu for extra protein. They both work well with the noodles. If you love seafood, try shrimp. Simply sauté them before adding to the dish. Each protein choice gives the cold noodles a new taste. Feel free to use other crunchy veggies like bell peppers or carrots. These add color and texture. You can swap out the cucumber if you prefer other options. Choose what you like best to make the dish your own. You can switch up the oils and vinegars for different flavors. Try using olive oil or apple cider vinegar. For an extra kick, add spices like red pepper flakes or sesame seeds. These changes can take the sauce to a new level. I love saving leftovers for a quick meal later. To keep your spicy sesame cold noodles fresh, store them in an airtight container. Make sure the container is clean to avoid any bad smells. Place the noodles in the fridge. They will stay good for about three days. After that, the texture may change and the flavor might fade. Reheating these noodles can be tricky. I prefer to serve them cold, as the flavors blend well after chilling. If you want to warm them up, do so gently. Place the noodles in a pot over low heat. Stir often to avoid sticking. You may also add a splash of water to help. Warm them just until heated through. Enjoying them cold or warm is a matter of personal taste, so feel free to choose what you like best! I recommend using whole wheat noodles. They add a nutty flavor and a nice texture. Traditional noodles work too, but whole wheat is healthier. You can choose any noodle that you like, but make sure it's good for cold dishes. Yes! You can add more chili paste to the sauce. You could also use fresh chili peppers for more heat. Try adding sriracha or red pepper flakes. Taste as you go to find your perfect spice level. Yes, this dish can be vegan. Just use maple syrup instead of honey. All other ingredients are plant-based. If you love a creamy sauce, add tahini for extra flavor while keeping it vegan. It takes about 15 minutes to prep and 15 minutes to cook, so 30 minutes total. You can make this dish quickly for a tasty meal. It's perfect for busy days or a quick lunch. This blog post covered a tasty recipe for spicy sesame cold noodles. We discussed each step, from cooking the noodles to making the flavorful sesame sauce. You learned how to mix in fresh veggies, add proteins, and serve it all beautifully. Remember, you can adjust flavors and textures to fit your liking. Don’t forget to store any leftovers properly. Enjoy this simple dish that is perfect for any meal! Your kitchen creativity will shine with this recipe.

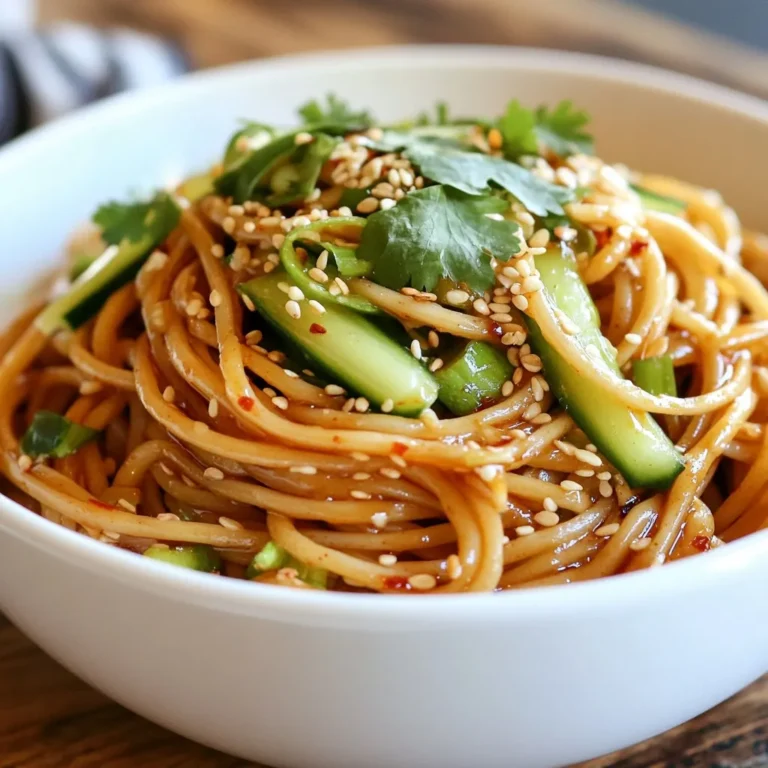
Spicy Sesame Cold Noodles Tasty and Simple Dish

To make delicious pesto chicken stuffed peppers, gather these simple ingredients: - 4 large bell peppers (any color) - 2 cups cooked chicken, shredded - 1 cup basil pesto - 1 cup cooked quinoa or rice - 1 cup cherry tomatoes, halved - 1/2 cup mozzarella cheese, grated - 1/4 cup parmesan cheese, grated - Salt and pepper to taste - Olive oil for drizzling These ingredients come together to create a colorful and tasty dish. The bell peppers serve as a vibrant vessel, while the chicken and pesto mix brings flavor and nutrition. You can choose any color of bell peppers, like red, green, yellow, or orange. Each adds a unique touch to your meal. With cooked chicken, you can save time by using leftovers or rotisserie chicken. The pesto adds a rich, herby taste that pairs perfectly with the other ingredients. The quinoa or rice gives the filling a hearty base, making it filling. Cherry tomatoes add a burst of freshness, and the cheeses provide that gooey, melty goodness we all love. Don't forget the salt and pepper! They enhance all the flavors in the dish. A drizzle of olive oil helps to keep everything moist while baking. These ingredients are easy to find and make this meal fun to prepare. Enjoy creating this colorful dish that brings joy to your table! {{ingredient_image_1}} First, preheat your oven to 375°F (190°C). This step is key for even cooking. While the oven heats, grab your bell peppers. Slice off the tops and remove the seeds and membranes inside. This helps the peppers cook well and hold the filling. Set them aside for now. In a large mixing bowl, combine the shredded chicken and basil pesto. Add your cooked quinoa or rice to the bowl. This adds a nice texture and makes the dish filling. Next, toss in the halved cherry tomatoes. These add sweetness and color. Mix in half of the mozzarella and all of the parmesan cheese. Season the mixture with salt and pepper to your taste. This adds flavor to the filling. Now, it's time to stuff the peppers. Take each bell pepper and fill it with the chicken and pesto mixture. Press down gently to pack the filling inside. Arrange the stuffed peppers upright in a baking dish. Drizzle a bit of olive oil over the tops. This helps keep them moist while baking. Cover the dish with foil and bake for about 25 minutes. After that, remove the foil and sprinkle the remaining mozzarella cheese on top of each pepper. Bake uncovered for another 10 to 15 minutes. You want the peppers to be tender and the cheese to be bubbly and slightly golden. Let them cool for a few minutes before serving. To make your peppers tender, bake them long enough. This allows the flavors to blend well. I recommend checking them after 25 minutes. If your peppers are larger, add 5 to 10 more minutes. You want the cheese bubbly and golden. For a vibrant platter, place the stuffed peppers upright. Use colorful peppers for a fun look. You can garnish with fresh basil leaves for a pop of green. Drizzle extra pesto around the platter for a tasty touch. You can customize the flavors easily. Try adding spices like garlic powder or red pepper flakes. Other ingredients, like olives or spinach, can boost the taste too. Mix and match to find your favorite combination! Pro Tips Choose Colorful Peppers: Using a mix of red, yellow, and green bell peppers not only adds visual appeal but also a variety of flavors. Make It Ahead: Prepare the stuffed peppers in advance and store them in the refrigerator. Bake them right before serving for a quick meal. Flavor Variations: Experiment with different proteins like turkey or sautéed mushrooms, and try adding spices like red pepper flakes for heat. Garnish for Presentation: A sprinkle of fresh herbs or a drizzle of balsamic glaze can elevate the dish visually and add a fresh taste. {{image_2}} You can swap chicken for ground turkey or meat substitutes. Ground turkey makes a lighter option. It cooks quickly and blends well with pesto. If you want a plant-based choice, try lentils or jackfruit. Both options absorb flavors nicely. They add a hearty texture to your stuffed peppers without meat. To make a fully vegetarian stuffed pepper, skip the chicken. Use extra vegetables instead. Zucchini, mushrooms, or spinach work well. Mix these veggies with pesto, quinoa, and cheese for flavor. You can also add black beans for protein. This gives you a tasty and filling meal. If you want to change the grain, try couscous or farro. Couscous cooks fast and has a light texture. It pairs nicely with pesto. Farro offers a chewy bite and nutty flavor. Both grains add variety while keeping the dish healthy. You can use them in place of quinoa or rice easily. To keep your pesto chicken stuffed peppers fresh, place them in an airtight container. Store them in the fridge for up to three days. Make sure the peppers are cool before sealing the container. If you have extra filling left over, store it separately. This prevents the peppers from getting soggy. When you are ready to eat, you can easily reheat them. When reheating, I recommend using the oven. Preheat your oven to 350°F (175°C). Place the stuffed peppers in a baking dish and cover with foil. Heat for about 15-20 minutes. Check that the filling is hot. If you want the cheese to be melty again, remove the foil for the last five minutes. This keeps the flavor and texture delicious. For future meals, you can freeze these stuffed peppers. First, let them cool completely. Wrap each pepper tightly in plastic wrap, and then place them in a freezer bag. Remove as much air as possible. They can last in the freezer for up to three months. When you are ready to eat, thaw them in the fridge overnight. Reheat them as mentioned before for the best taste. You can tell when the peppers are done by looking for a few signs. First, they should be tender and soft to the touch. You can poke them gently with a fork. The cheese on top should be bubbly and slightly golden. If you see those signs, your stuffed peppers are ready to eat! Yes, you can make these stuffed peppers ahead of time! Here are the steps: 1. Prepare the filling and stuff the peppers as usual. 2. Instead of baking right away, cover the peppers with foil. 3. Store them in the fridge for up to 24 hours. 4. When ready, bake them as directed. Just add a few extra minutes if they are cold. If you want to change the protein, there are great options. You can use ground turkey or beef. For a vegetarian choice, try black beans or lentils. Both will add protein and flavor to your dish. Choose what you like best! Stuffed peppers are easy and fun to make. You learned about the key ingredients and how to prepare them. The steps to fill and bake the peppers help you create a tasty dish. Remember the tips for cooking and serving to impress anyone. You can personalize your recipe with different meats or grains. Don't forget to store leftovers right. With these ideas, you'll enjoy stuffed peppers often. Try making them your way and share your results!

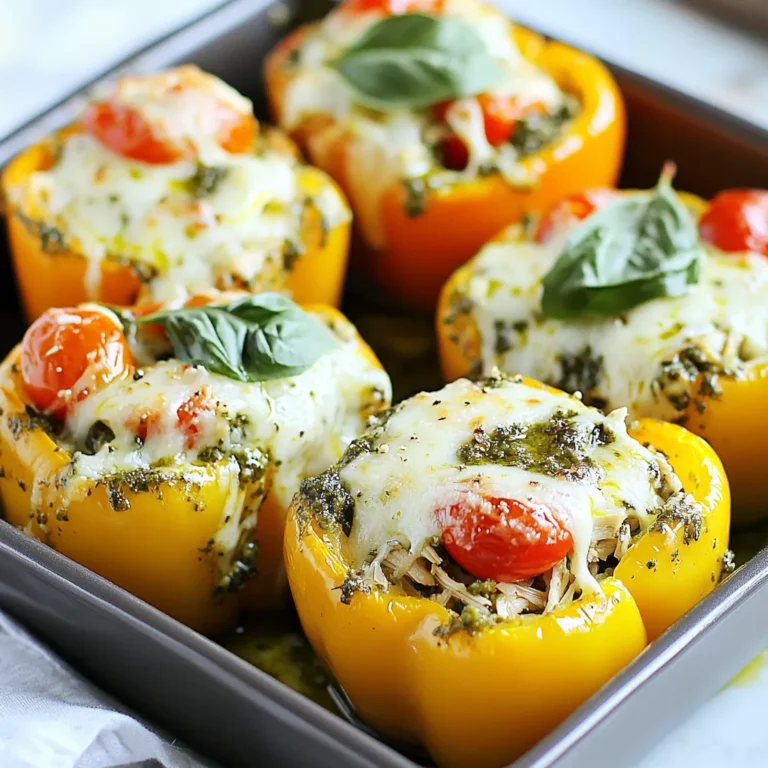
Pesto Chicken Stuffed Peppers Flavorful and Easy Meal

- 1 lb (450g) chicken breasts, cubed - 1 ripe mango, pureed - 1 can (14 oz) coconut milk - 1 medium onion, finely chopped - 3 cloves garlic, minced - 1-inch piece of ginger, minced - 2 tablespoons curry powder - 1 tablespoon olive oil - 1 tablespoon lime juice - Salt and pepper to taste - Fresh cilantro for garnish - 1 red bell pepper, sliced - 1 tablespoon honey (optional for sweetness) In this dish, chicken breasts are the star. They soak up all the tasty flavors. The ripe mango adds a sweet and creamy touch. Coconut milk makes it rich and smooth. Together, these main ingredients create a great base for the curry. Now, let’s talk about the extra ingredients. Chopped onion, minced garlic, and ginger start the flavor party. They add warmth and depth. Curry powder brings that classic spice mix, filling the air with an amazing aroma. Olive oil helps cook everything perfectly. You can add honey if you want a sweeter dish. It balances the spices well. The red bell pepper adds color and crunch. Fresh cilantro on top gives a nice finish. These ingredients work together to make a dish that is both simple and packed with flavor. {{ingredient_image_1}} 1. First, heat 1 tablespoon of olive oil in a large skillet over medium heat. 2. Add 1 medium onion, finely chopped. Sauté until it turns translucent, about 5 minutes. 3. Next, add 3 cloves of minced garlic and 1-inch piece of minced ginger. Cook for 2 more minutes until you smell the aroma. 4. Now, stir in 2 tablespoons of curry powder. Allow the spices to bloom for 1 minute. 1. Add 1 pound of cubed chicken breasts to the pan. Sauté until browned on all sides, which should take about 6 to 8 minutes. 2. Pour in the 1 ripe mango, pureed, and 1 can of coconut milk. Mix everything well. 3. Bring the mixture to a gentle simmer. 1. Add 1 sliced red bell pepper to the skillet. Cook for 10 to 15 minutes. This lets the chicken cook through and become tender. 2. Stir in 1 tablespoon of lime juice. This step balances the flavors. 3. Season with salt and pepper to taste. 4. Finally, remove from heat and garnish with fresh cilantro before serving. Enjoy your Mango Curry Chicken over jasmine rice for a delightful meal! To get the best texture for chicken, cut it into small, even cubes. This helps it cook evenly. Sauté the chicken until it's browned on all sides. This step adds a nice flavor. Keep the heat at medium to avoid burning. For flavor enhancement, add garlic and ginger early. This allows their flavors to bloom. Use fresh ingredients whenever possible. Fresh garlic and ginger make a big difference. If you want extra sweetness, try adding honey. It pairs well with the mango. When serving Mango Curry Chicken, a bed of jasmine rice works well. The rice soaks up the sauce, adding flavor. Drizzle extra coconut milk on top for a creamy touch. For garnishing ideas, add fresh cilantro for color and freshness. You can also sprinkle some sliced red bell pepper on the dish. This adds a pop of color and crunch. Consider using lime wedges on the side. They add a bright burst of flavor when squeezed over the dish. Pro Tips Use Fresh Mango: For the best flavor, opt for a ripe, fresh mango rather than canned puree. This will enhance the dish's sweetness and freshness. Adjust Spice Level: If you prefer a spicier curry, consider adding a pinch of cayenne pepper or diced chili peppers with the garlic and ginger. Let it Simmer: Allowing the curry to simmer longer can deepen the flavors. Just make sure to check the chicken for doneness. Garnish Generously: Fresh cilantro adds not only color but also a burst of flavor. Don’t skimp on the garnish for a restaurant-quality presentation. {{image_2}} You can change the protein in this dish. If you prefer tofu, use firm tofu instead of chicken. Just cube it and cook it the same way. Shrimp is another great choice. Cook it until pink and tender. You can also swap the mango. Pineapple adds a sweet twist. Peaches can bring a nice touch too. For veggies, try adding zucchini or carrots. They will add crunch and color. Want more heat? Add red pepper flakes or fresh chili. You can also use hot curry powder for a kick. If you prefer it milder, leave out the red pepper. Use sweet curry powder to keep it gentle. Different curry powders can change the flavor. Garam masala adds warmth and depth. Thai curry powder brings a different vibe. Experiment with what you have in your spice rack! Mango curry chicken lasts in the fridge for up to four days. Store it in an airtight container. Glass or plastic containers work well. This keeps the dish fresh and tasty. Always let it cool down before storing. To freeze mango curry chicken, first, let it cool completely. Then, transfer it to a freezer-safe bag or container. Remove as much air as possible. This prevents freezer burn and keeps the flavor. You can freeze it for up to three months. When you’re ready to eat, thaw it in the fridge overnight. Reheat it in a skillet over low heat. Add a splash of water or coconut milk to keep it moist. Stir well and heat until warm. This keeps the dish delicious and enjoyable. You can serve Mango Curry Chicken with several tasty sides. Here are my top picks: - Jasmine rice: It soaks up the delicious curry sauce well. - Quinoa: This adds a nutty flavor and boosts nutrition. - Naan bread: Use it to scoop up the curry for a fun experience. - Steamed veggies: Broccoli or green beans add color and crunch. - Cucumber salad: This fresh side cools the palate and adds a crunchy contrast. These sides will make your meal more enjoyable and balanced. Yes, you can make this dish dairy-free easily. Instead of coconut milk, use: - Almond milk: This gives a light, nutty flavor. - Soy milk: A good option, but choose unsweetened for best taste. - Cashew cream: A rich and creamy choice that adds depth. Each alternative works well, so choose what you like best! To check if the chicken is cooked, use these tips: - Color check: The chicken should be white and no longer pink inside. - Juice test: When cut, the juices should run clear, not pink. - Thermometer method: Use a meat thermometer. Chicken should reach 165°F (75°C). These methods will help you avoid undercooked chicken and ensure a safe meal. This blog post covered a tasty mango curry chicken recipe. You learned about key ingredients, step-by-step instructions, and useful tips. Variations let you swap proteins and adjust spices for your taste. Remember, proper storage keeps leftovers fresh. In closing, mango curry chicken is adaptable and satisfying. It's a dish that shines with creativity and flavor. Enjoy exploring different twists on this recipe!

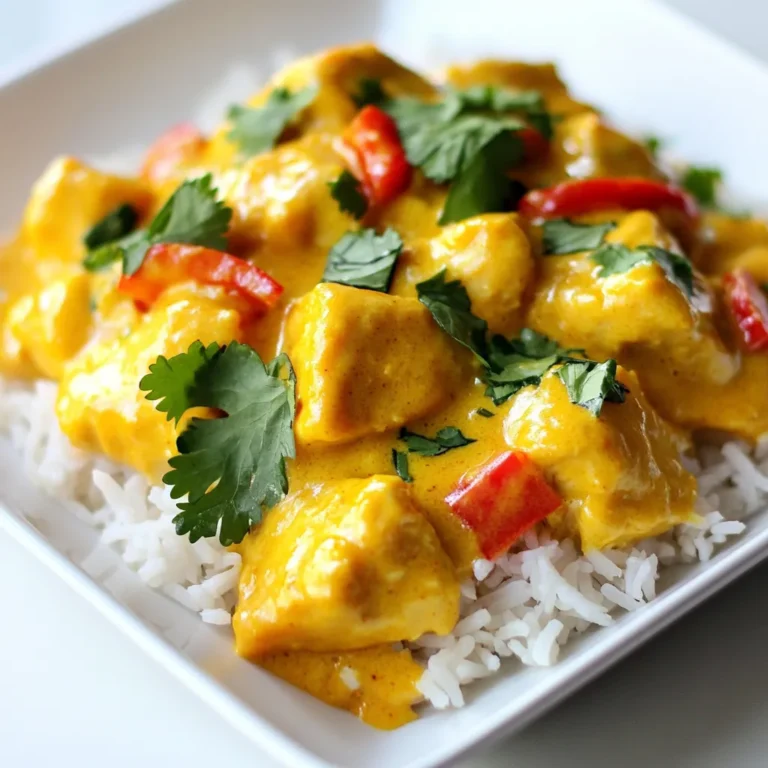
Mango Curry Chicken Flavorful and Simple Recipe Guide

- 2 chicken breasts, diced - 1 cup couscous - 1 ½ cups chicken broth - 1 tablespoon olive oil - 1 onion, finely chopped - 2 cloves garlic, minced - 1 teaspoon ground cumin - 1 teaspoon ground coriander - 1 teaspoon cinnamon - 1 teaspoon ground turmeric - 1 cup carrots, diced - 1 cup chickpeas, drained and rinsed - 1/2 cup dried apricots, chopped - 1/2 cup almonds, toasted and sliced - Salt and pepper to taste - Fresh coriander or parsley, for garnish The ingredients for Moroccan chicken couscous create a rich and tasty dish. You start with the chicken breasts, which give protein and flavor. Diced chicken cooks quickly and absorbs all the spices. Couscous, a tiny pasta, cooks fast and soaks up the broth well. Next, you have vegetables. Onions and garlic bring depth and aroma. They add a sweet and savory base when sautéed. Carrots offer crunch and color, while chickpeas add creaminess and fiber. Dried apricots provide a sweet contrast, and toasted almonds add a nice texture. Now, let's talk about spices. Cumin and coriander give warmth and earthiness. Cinnamon adds a hint of sweetness, and turmeric brings a lovely golden color. These spices create a distinct Moroccan flavor that sets this dish apart. Finally, fresh herbs like coriander or parsley brighten up the dish. They add a fresh touch right before serving. Each ingredient plays a role, making it a balanced and delightful meal. {{ingredient_image_1}} First, heat 1 tablespoon of olive oil in a large skillet over medium heat. Once the oil is warm, add 2 diced chicken breasts. Season the chicken with salt and pepper. Cook the chicken for about 5-7 minutes until it turns brown and is fully cooked. Once done, remove the chicken from the skillet and set it aside. In the same skillet, add the finely chopped onion. Sauté it for about 3-4 minutes until it becomes translucent. Next, add 2 minced garlic cloves. Cook the garlic for about 1 minute until it smells great. Now, stir in 1 teaspoon each of ground cumin, ground coriander, cinnamon, and turmeric. Let the spices bloom in the oil for 1-2 minutes. This step is key for full flavor. After that, add 1 cup of diced carrots. Sauté the carrots for 3 more minutes, then add 1 cup of chickpeas. Cook for an additional 2 minutes. Pour in 1 ½ cups of chicken broth and bring it to a boil. Once it boils, stir in 1 cup of couscous. Cover the skillet and remove it from the heat. Let it sit for about 5 minutes. This allows the couscous to absorb all the tasty broth. After 5 minutes, fluff the couscous with a fork. Add back the browned chicken, along with ½ cup of chopped dried apricots and ½ cup of toasted almonds. Mix everything gently to combine. Adjust the seasoning with more salt and pepper if needed. Finally, garnish the dish with fresh coriander or parsley before serving. Blooming spices is key for deep flavor. When you stir spices in hot oil, they release their oils and scents. This makes the dish taste richer. Always add your spices after the onion and garlic. This timing lets the spices shine without burning. To get perfect couscous, use the right ratio of liquid. For every cup of couscous, use 1.5 cups of broth. Bring the broth to a boil before adding the couscous. After adding, cover it and let it sit. This helps the couscous absorb the liquid. To avoid overcooking, don’t leave the couscous on the heat. After adding it to the broth, remove the pan from the heat. Let it rest for five minutes. This way, it stays fluffy and light. Pair your Moroccan chicken couscous with fresh salads or yogurt. A simple green salad adds crunch and brightness. You can also serve it with roasted veggies for more flavor. For plating, use a large bowl or plate. Start with couscous as a base. Then, add the chicken and veggies on top. Finish with a sprinkle of toasted almonds and fresh herbs. This makes your dish look stunning and appetizing. Pro Tips Marinate the Chicken: For enhanced flavor, marinate the diced chicken in olive oil, cumin, and coriander for at least 30 minutes before cooking. Use Homemade Broth: If possible, use homemade chicken broth for a richer taste compared to store-bought options. Customize Veggies: Feel free to add other vegetables like bell peppers or zucchini for extra color and nutrition. Garnish Generously: Don’t skimp on the fresh coriander or parsley; it adds a refreshing touch and enhances the dish's presentation. {{image_2}} If you want to swap chicken, you have options. You can use turkey breast or even fish like salmon. These proteins cook quickly and pair well with couscous. If you're looking for vegetarian options, try tofu or lentils. Tofu soaks up flavors well, while lentils add a nice texture. You can easily enhance the flavor of your dish. Adding harissa gives a spicy kick. This North African chili paste adds depth and warmth. You can also use seasonal vegetables for freshness. Think zucchini in summer or squash in fall. They bring vibrant colors and flavors to your couscous. Couscous varies by region, each with unique touches. In Algeria, they might use lamb instead of chicken. In Tunisia, they often add a spicy sauce called “chermoula.” Historically, couscous had many forms, often influenced by local ingredients. These variations show how versatile this dish can be. To store leftovers, let the Moroccan chicken couscous cool first. Place it in a clean, airtight container. Use glass or plastic containers with tight lids. This keeps the dish fresh and tasty. Leftovers can stay in the fridge for about 3 days. Make sure to label the container with the date to track freshness. Freezing couscous is a simple way to save extra food. First, let it cool completely. Then, scoop it into freezer-safe bags. Remove as much air as possible before sealing. This helps prevent freezer burn. You can freeze it for up to 3 months. When you're ready to eat, thaw it overnight in the fridge. To reheat, add a splash of water and warm it gently in the microwave or on the stove. Understanding when to discard food is key. If you see mold, strange colors, or off smells, it's time to throw it away. Cooked couscous should be eaten within 3 days if stored properly in the fridge. If you freeze it, try to use it within 3 months for the best taste. Always trust your senses. If something seems off, it’s better to be safe and discard it. You can pair Moroccan chicken couscous with many tasty sides. Here are a few ideas: - A fresh green salad with lemon vinaigrette. - Roasted vegetables like bell peppers and zucchini. - Warm pita bread or flatbreads for dipping. - A refreshing yogurt sauce for cooling contrast. For drinks, try mint tea or a light white wine. They both complement the flavors nicely. Yes, you can make Moroccan chicken couscous ahead of time. Prepare it as usual and let it cool. Store it in an airtight container in the fridge. It will last for up to three days. When you're ready to eat, just reheat it gently on the stove. Add a splash of broth to keep it moist while warming. Traditional couscous is made from wheat, so it is not gluten-free. However, you can use alternatives. Quinoa or rice make great substitutes. Both have a nice texture and absorb flavors well. You can still enjoy the Moroccan spices and chicken with these options. To ensure chicken is fully cooked, check its internal temperature. It should reach 165°F (75°C). Use a meat thermometer for accuracy. The chicken should be white all the way through, with no pink. If unsure, cut into a piece to check. Proper cooking keeps your meal safe and tasty. In this blog post, we covered the essentials for making Moroccan Chicken Couscous. We discussed the main ingredients, spices, and step-by-step cooking methods. You learned useful tips for perfecting flavor and texture. We explored variations and proper storage techniques. By trying this dish, you embrace a rich cultural tradition. Enjoy the vibrant flavors and let your culinary skills shine. Happy cooking!

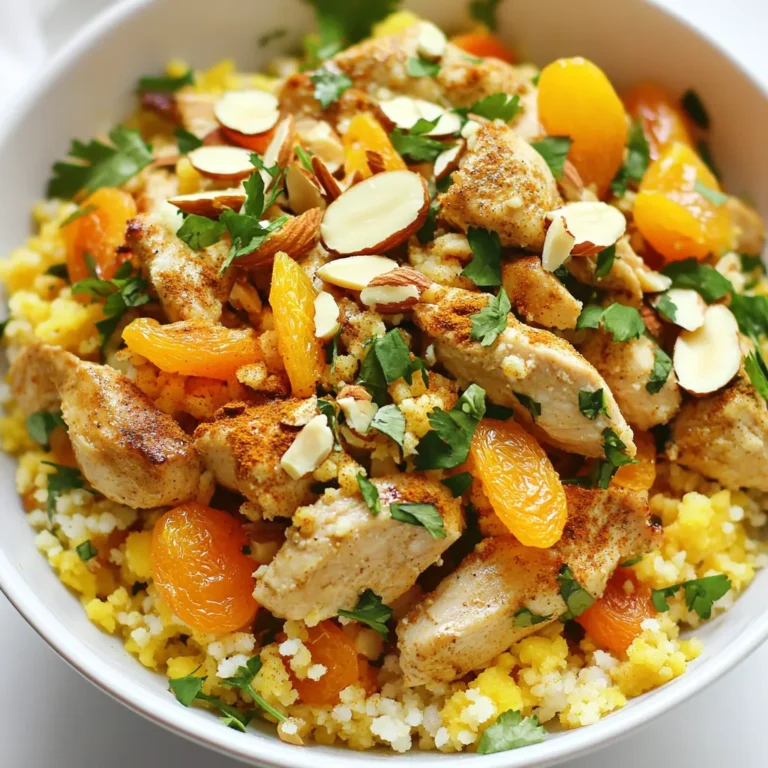
Moroccan Chicken Couscous Flavorful and Easy Recipe

To make these delicious Peanut Butter Blossom Cookies, gather the following items: - 1 cup creamy peanut butter - 1 cup granulated sugar - 1 cup brown sugar, packed - 1 large egg - 1 teaspoon vanilla extract - 1 teaspoon baking soda - ½ teaspoon salt - 2 cups all-purpose flour - 24 chocolate kisses, unwrapped - Additional granulated sugar for rolling You can swap some ingredients if needed. Here are my top suggestions: - Use natural peanut butter for a richer taste. - Coconut sugar can replace granulated sugar for a lower glycemic index. - If you need to go egg-free, use a flax egg (1 tablespoon ground flaxseed mixed with 2.5 tablespoons water). - For gluten-free options, try a 1:1 gluten-free flour blend. Quality matters in baking. Here are my tips: - Choose creamy peanut butter with no added sugar or oils for the best flavor. - Use fresh eggs for a nice rise in your cookies. - Pick light brown sugar for a deeper flavor than granulated sugar. - Check your baking soda's freshness; it should bubble when mixed with vinegar. - Freshly milled flour gives the best texture and taste. These choices will help you create cookies that everyone loves! {{ingredient_image_1}} First, set your oven to 350°F (175°C). This heat makes the cookies bake just right. Next, take a baking sheet and line it with parchment paper. This helps the cookies not stick and makes cleanup easy. In a large bowl, add 1 cup of creamy peanut butter, 1 cup of granulated sugar, and 1 cup of brown sugar. Mix these until they blend into a smooth and creamy mix. Then, crack in 1 large egg and pour in 1 teaspoon of vanilla extract. Stir well until everything is combined. In another bowl, whisk together 1 teaspoon of baking soda, ½ teaspoon of salt, and 2 cups of all-purpose flour. Slowly add this dry mix to your peanut butter blend. Keep stirring until a dough forms. It should feel soft but not sticky. Now, take tablespoons of dough and roll them into small balls using your hands. Roll each ball in granulated sugar for a sweet touch. Place the balls on the prepared baking sheet, leaving about 2 inches between each one. Bake these cookies for 10-12 minutes. Look for a light golden edge. As soon as they come out, press a chocolate kiss into the center of each cookie. Pop them back in the oven for 1-2 minutes. This step melts the chocolate just enough. Let the cookies cool on the baking sheet for a few minutes before moving them to a wire rack to cool completely. To bake great peanut butter cookies, follow these simple steps. First, use room temperature ingredients. This helps the dough mix well. Make sure you preheat your oven. A hot oven gives the cookies a nice rise. Use a timer and check the cookies at 10 minutes. The edges should be slightly golden. If you want them softer, take them out a bit earlier. Sometimes, things can go wrong. If your cookies spread too much, it may be too warm. Chill the dough for 30 minutes before baking. If your cookies are too dry, you might have added too much flour. Use a kitchen scale for accuracy. If they stick to the pan, make sure to use parchment paper. This helps with easy removal. These cookies shine when served warm. Place them on a nice plate for guests. You can add extra chocolate kisses on the side. This way, people can grab more if they want. Try pairing them with a glass of cold milk. The flavors blend perfectly! For a fun twist, serve them with a scoop of vanilla ice cream. Pro Tips Chill the Dough: For a firmer dough that’s easier to roll, chill it in the refrigerator for about 30 minutes before shaping into balls. Use Fresh Ingredients: Ensure your baking soda is fresh for the best rise and texture in your cookies. Perfectly Melted Kisses: Press the chocolate kisses into the cookies right after they come out of the oven for a perfectly melted look. Storage Tips: Store cookies in an airtight container to keep them soft and fresh for up to a week. {{image_2}} You can change up the flavor of your Peanut Butter Blossom Cookies. Here are some fun ideas: - Chopped Nuts: Add ½ cup of chopped peanuts or walnuts for a crunchy twist. - Chocolate Chips: Mix in 1 cup of chocolate chips for extra chocolatey goodness. - Oatmeal: Substitute ½ cup of flour with rolled oats for a chewy texture. - Spices: A pinch of cinnamon or nutmeg can add warmth and depth. These small changes can make a big impact on taste. You can make these cookies fit many diets. Here are a few tips: - Gluten-Free: Use a gluten-free flour blend instead of all-purpose flour. - Vegan: Replace the egg with ¼ cup of unsweetened applesauce or a flax egg. - Nut-Free: Try sunflower seed butter in place of peanut butter for a nut-free option. These swaps let everyone enjoy your cookies. Make your Peanut Butter Blossom Cookies special for holidays. Here are some ideas: - Christmas: Use red and green sprinkles on top of the cookies. - Valentine’s Day: Swap chocolate kisses for heart-shaped candies. - Halloween: Add orange and black sprinkles or use pumpkin spice flavor. These twists can make your cookies fit any celebration! To keep your Peanut Butter Blossom Cookies fresh, use an airtight container. Place a piece of bread inside. The bread helps keep the cookies moist. You can stack the cookies, but separate layers with parchment paper. This keeps them from sticking. These cookies last about five days at room temperature. If you want to keep them longer, freeze them. Wrap each cookie in plastic wrap, then place them in a freezer bag. They can stay in the freezer for up to three months. When you're ready to enjoy, simply thaw at room temperature. To enjoy the cookies warm, preheat your oven to 350°F (175°C). Place the cookies on a baking sheet. Heat them for about five minutes. This brings back their soft texture. If you want melty chocolate kicks, add a kiss on top before reheating. Enjoy the warm, gooey goodness! Peanut Butter Blossom Cookies stand out for their rich, nutty flavor. The creamy peanut butter gives each cookie a soft, chewy texture. Plus, the chocolate kiss on top adds a sweet surprise. This balance of flavors and textures makes them a family favorite. Yes, you can make the dough ahead of time. Simply prepare the dough and roll it into balls. Place the balls on a baking sheet and freeze them until firm. After that, transfer the dough balls to a bag. When ready to bake, just add a few minutes to the baking time. To make your cookies softer, try these tips: - Use more brown sugar. It helps keep the cookies moist. - Avoid overbaking. Take them out when they are golden at the edges. - Add an extra egg yolk. This can increase moisture. These small changes can create the perfect soft and chewy cookie! Now you have all you need to bake amazing Peanut Butter Blossom Cookies. We covered the key ingredients, instructions, tips, and fun variations. Remember to choose good ingredients and follow the steps carefully for the best results. With these methods, you can fix common problems and even adjust recipes for special diets. Enjoy your cookies fresh or store them for later. Happy baking, and may your cookie creations be as delightful as they are tasty!

Peanut Butter Blossom Cookies Delightful and Simple Recipe

- 1 lb (450g) ground beef - 1 cup fresh Thai basil leaves - 2-3 Thai red chilies, sliced (adjust to taste) - 4 cloves garlic, minced - 1 bell pepper, sliced The main ingredients are simple yet bold. Ground beef gives the dish its heartiness. Fresh Thai basil adds a fragrant touch. Thai red chilies bring the heat. Garlic adds a strong flavor. The bell pepper adds crunch and sweetness. - 1 tablespoon soy sauce - 1 tablespoon oyster sauce - 1 tablespoon fish sauce - 1 teaspoon sugar - Salt and pepper to taste The sauces make this dish shine. Soy sauce adds umami. Oyster sauce brings richness. Fish sauce gives depth. Sugar balances the flavors. Salt and pepper enhance everything. Together, they create a harmonious mix. - Cooked jasmine rice - Additional garnishes (lime, basil leaves) Serve this dish hot over jasmine rice. The rice soaks up the sauce well. For garnish, add lime for brightness. Extra basil leaves add color and aroma. These simple touches make your meal look great and taste even better. {{ingredient_image_1}} 1. Heat 2 tablespoons of vegetable oil in a large pan or wok over medium-high heat. 2. Add 4 minced garlic cloves and 2-3 sliced Thai red chilies to the pan. Stir-fry for about 30 seconds until fragrant. 3. Increase the heat to high and add 1 pound of ground beef. Cook for about 5-7 minutes until browned. Break the beef into small pieces as it cooks. 1. Add 1 sliced bell pepper to the pan. Stir-fry for 2-3 minutes until tender yet still crisp. 2. In a small bowl, mix 1 tablespoon of soy sauce, 1 tablespoon of oyster sauce, 1 tablespoon of fish sauce, and 1 teaspoon of sugar. Pour this mixture over the beef and bell pepper. Stir well to coat everything evenly. 1. Add 1 cup of fresh Thai basil leaves to the pan. Toss everything together for 1-2 minutes until the basil wilts. 2. Season the dish with salt and pepper to taste. Adjust the seasoning to your liking. 3. Serve the spicy Thai basil beef hot over cooked jasmine rice. Enjoy the burst of flavors! To get the best browning on your beef, use a hot pan. Heat the oil until it shimmers. Then, add the garlic and chilies, stirring for just a few seconds. This builds flavor. Next, increase the heat before adding the beef. Stir and break it apart. Cook until it’s fully browned. This step is key for great texture and taste. If you want less heat, use fewer chilies or remove the seeds. Balancing sauces is important. Soy sauce adds saltiness, while oyster sauce adds depth. Fish sauce gives umami. Start with equal parts, then adjust to taste. A pinch of sugar helps balance flavors too. For extra zing, try adding lime juice or a splash of vinegar. Fresh herbs like cilantro can also add a nice touch. For a beautiful plate, serve the beef in a large bowl. Add a few extra basil leaves on top. This makes it look fresh. You can also add a slice of lime on the side. The lime adds color and a pop of flavor. Try arranging jasmine rice in a small mound next to the beef. This creates a nice contrast and makes your dish stand out. Pro Tips Adjust Spice Level: If you prefer a milder dish, reduce the number of Thai red chilies or remove the seeds before slicing. Use Fresh Ingredients: Fresh Thai basil is key to authentic flavor; avoid dried herbs for the best results. Cook Rice Ahead: Prepare jasmine rice in advance to save time; it can be reheated easily before serving. Garnish for Presentation: A few extra basil leaves and a lime wedge on the side not only enhance the look but add fresh flavor when squeezed over the dish. {{image_2}} You can easily switch up the proteins in this dish. Ground beef is popular, but chicken or tofu works great too. Both options soak up the sauce well. For a veggie boost, swap out the bell pepper for broccoli or snap peas. This adds different flavors and colors to your meal. If you like it milder, use less Thai red chili. You can remove the seeds to tone down the heat. For more spice, try adding sliced bird’s eye chilies. These small peppers pack a punch. Remember, start with a little, then taste as you go. For a gluten-free version, use gluten-free soy sauce. This way, you keep the same taste without the gluten. If you want a vegetarian or vegan dish, replace the beef with tofu and skip the fish sauce. You can use soy sauce or a vegan alternative instead. Enjoy the same great flavors while meeting your diet needs. To keep your spicy Thai basil beef fresh, store it in an airtight container. Place it in the fridge as soon as it cools. This dish lasts about three to four days in the fridge. If you want to keep it longer, consider freezing it. When you're ready to eat the leftovers, reheat them safely. You can use the microwave or a pan on the stove. If using a microwave, heat in short bursts and stir between. This helps keep the beef tender. If using a pan, add a splash of water to maintain moisture. This keeps the dish flavorful. To freeze leftovers, let the dish cool completely. Divide it into portions and put them in freezer bags. Squeeze out as much air as you can. Label the bags with the date. When you want to eat it, thaw the beef in the fridge overnight. For a quick method, you can use cold water to thaw. Avoid microwaving from frozen, as it can cook unevenly. Use the thawed dish within three months for the best taste. Spicy Thai Basil Beef is a vibrant stir-fry dish. It features ground beef, fresh Thai basil, and bold spices. The dish hails from Thailand, where it is a popular street food. The combination of flavors makes it both savory and spicy. The use of Thai red chilies gives it a kick, while the basil adds a fragrant touch. Yes, you can use other proteins in this dish. Chicken, turkey, or tofu are great alternatives. They will still absorb the tasty sauces well. Just adjust the cooking time as needed. Ground chicken or turkey will cook faster than beef. Tofu works well too; just make sure to press it to remove excess water. This dish goes well with several sides. Here are a few ideas: - Jasmine rice - Steamed vegetables - Spring rolls - Thai cucumber salad These sides add balance to the meal and enhance the flavors. The heat can vary based on how many chilies you use. Typically, it has a nice kick from 2-3 Thai red chilies. If you prefer less heat, start with one chili and taste as you go. You can also remove the seeds from the chilies for milder heat. Adjust it to fit your taste buds! Spicy Thai Basil Beef is a delicious dish that combines fresh ingredients and bold flavors. We covered the essential ingredients, step-by-step cooking instructions, and tips for the best results. You can also explore various adaptations to suit your taste. By storing leftovers correctly, you ensure great meals for days to come. This dish provides a fun culinary experience, whether you enjoy it as a quick weeknight dinner or share it with friends. Embrace the flavors of Thailand right in your home kitchen!

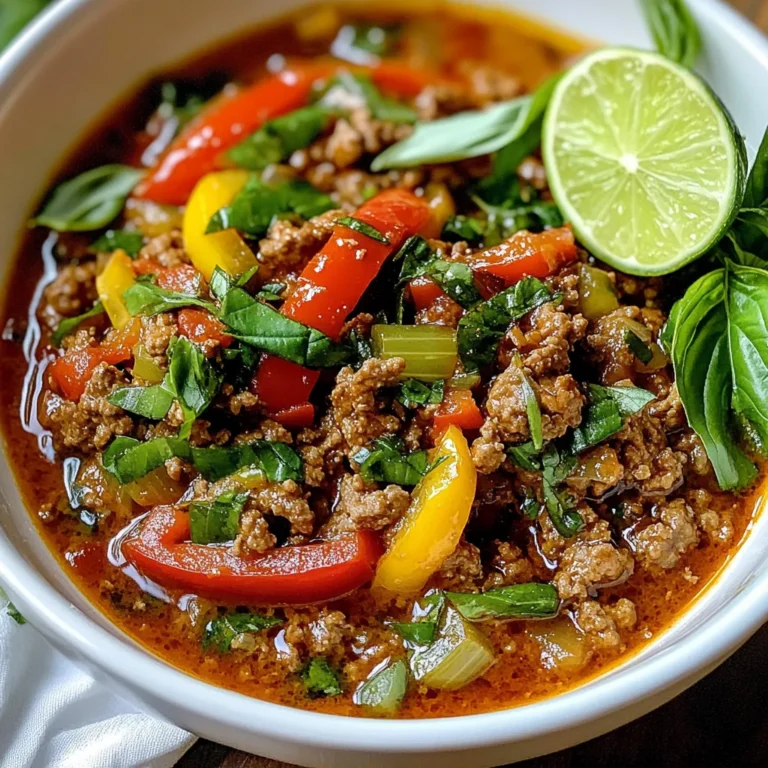
Spicy Thai Basil Beef Flavorful and Quick Recipe

- 1 lb large shrimp, peeled and deveined - 2 ripe avocados, diced - 1 cup cherry tomatoes, halved - 1 small red onion, finely chopped - 1/4 cup fresh cilantro, chopped - Juice of 2 limes - 3 tablespoons olive oil - Salt and pepper to taste - 1 teaspoon cumin - 1/2 teaspoon garlic powder These ingredients create a fresh and tasty salad. Each adds its own unique flavor. The shrimp provides protein. The avocados offer creaminess. Cherry tomatoes add sweetness. The onion gives a crunch. Cilantro gives a fresh taste. Lime juice adds a zesty kick. - 1 jalapeño pepper, minced (optional for spice) Adding jalapeño gives the salad a spicy touch. If you like heat, include it. If not, skip it for a milder dish. You can also try adding different herbs or spices. Experiment to find your favorite mix! - Medium bowl - Large bowl - Skillet - Whisk - Cutting board - Knife These tools help make the cooking process smooth. A medium bowl is great for marinating shrimp. The large bowl is perfect for mixing salad ingredients. A skillet cooks the shrimp quickly and evenly. Having the right tools makes cooking fun and easy! {{ingredient_image_1}} Start by placing one pound of large shrimp in a medium bowl. Peel and devein the shrimp first. Then, add one tablespoon of olive oil, a teaspoon of cumin, and half a teaspoon of garlic powder. Sprinkle salt and pepper to taste. Toss the shrimp well to coat them in the spices. Let this mix sit for about 10 minutes to let the flavors blend. Next, heat a skillet over medium-high heat. Once hot, add the marinated shrimp to the skillet. Cook for 2 to 3 minutes on each side. The shrimp should turn pink and opaque when done. Remove them from the heat and let them cool for a bit. In a large bowl, combine two diced avocados, one cup of halved cherry tomatoes, and one finely chopped small red onion. If you like spice, add one minced jalapeño pepper. Finally, toss in a quarter cup of chopped fresh cilantro. In a small bowl, whisk together the juice of two limes, the remaining two tablespoons of olive oil, and a pinch of salt. Pour this dressing over the salad ingredients in the big bowl. Toss gently to make sure everything is well coated. Now, add the cooled shrimp to the salad mix. Toss gently again to combine all the ingredients well. This step makes sure each bite is full of flavor. Divide the salad into serving bowls or plates. For a fresh look, garnish with more cilantro leaves and lime wedges. Serve the salad chilled for the best taste. Enjoy your meal! To cook shrimp just right, start with fresh shrimp. Avoid overcooking, as this makes shrimp tough. Use a skillet over medium-high heat. Add the marinated shrimp and cook for 2-3 minutes on each side. Watch for the color change. The shrimp should turn pink and opaque. Once done, take them off the heat and let them cool. This keeps them tender. When picking avocados, look for firmness with a slight give when pressed. Ripe avocados should feel soft but not mushy. If they are too hard, let them sit at room temperature for a few days. Once ripe, you can put them in the fridge to slow down the ripening process. Use them within a few days for the best taste. To store leftovers, keep them in an airtight container. Place the salad in the fridge, where it will stay fresh for about 1-2 days. If possible, store the shrimp and salad separately. This helps prevent the avocados from browning too quickly. Adding extra lime juice can also slow browning. Enjoy your salad cold for the best flavor! Pro Tips Fresh Ingredients: Always use ripe avocados and fresh shrimp for the best flavor and texture in your salad. Marinate for Flavor: Letting the shrimp marinate for at least 10 minutes enhances the taste and allows the spices to penetrate. Chill Before Serving: Refrigerate the salad for about 30 minutes before serving to let the flavors meld together beautifully. Customize the Spice: Adjust the amount of jalapeño pepper based on your spice preference; remove the seeds for less heat. {{image_2}} You can switch up the shrimp in this salad for other proteins. Chicken works well and adds a nice texture. To use chicken, simply grill or sauté it until cooked. Cut it into bite-sized pieces and mix it in. Fish, like salmon or tuna, also suits this salad. Just make sure to cook the fish properly for safety. Tofu is another great option for a plant-based twist. Choose firm tofu, press it to remove extra water, and pan-fry it until golden. If you want a vegetarian version, leave out the shrimp. You can add chickpeas for protein. They give a nice crunch and nutty flavor. Black beans are another tasty option. They add fiber and heartiness to the salad. Adding more veggies, like bell peppers or corn, can boost the color and flavor. You can even toss in some nuts or seeds for extra crunch. The dressing can change the whole vibe of your salad. If you want a creamier texture, mix in some Greek yogurt or avocado. For a spicy kick, add a dash of hot sauce to the lime juice. You can also try a honey-lime dressing. Just mix honey with lime juice for a sweet twist. For a Mediterranean flair, use balsamic vinegar or a tahini dressing. This salad is very adaptable, so experiment with what you love! You should store Zesty Lime Shrimp Avocado Salad in the fridge. Place it in an airtight container. This keeps it fresh and safe to eat. Enjoy your salad within 2 days for the best taste. Avocados can brown quickly. To slow this down, sprinkle lime juice on the avocado before mixing. I do not recommend freezing this salad. The texture of the shrimp and avocado changes when frozen. If you freeze it, the shrimp may become rubbery, and the avocado will become mushy. If you want to save the shrimp, freeze it on its own before adding it to the salad. - Shrimp: Fresh shrimp lasts 1-2 days in the fridge. Cooked shrimp lasts 3-4 days. - Avocados: Ripe avocados stay fresh for 1-2 days. Once cut, use them within a day. - Cherry Tomatoes: These can last about a week in the fridge. - Red Onion: Whole red onions can last 2-3 weeks. Once chopped, use them within a week. - Cilantro: Fresh cilantro lasts about 1 week in the fridge. Understanding how to store your salad helps maintain its freshness and flavor. The best way to marinate shrimp is simple. Use olive oil, cumin, garlic powder, salt, and pepper. Mix them in a bowl. Add the shrimp and toss well. Let it sit for about 10 minutes. This short time helps the shrimp soak up flavors. Yes, you can make this salad ahead of time. Prepare the shrimp and salad parts separately. Store them in the fridge until you're ready to serve. This way, the flavors stay fresh. Just mix everything together before serving. You can add many other vegetables to the salad. Consider bell peppers for crunch or cucumbers for freshness. Corn adds a nice sweet touch. You can also use radishes for a peppery kick. Feel free to get creative! To adjust the spice level, simply add or reduce jalapeño. For less spice, leave the jalapeño out. For more heat, add extra minced jalapeño or even some chili flakes. Taste as you go to find the right heat for you. This blog post showed you how to make a tasty shrimp salad. We covered key ingredients and optional flavors. I shared step-by-step instructions to get it just right. You learned useful tips, like cooking shrimp perfectly. We also explored fun variations to keep things fresh. Finally, I gave storage info to keep your salad safe. Enjoy your meals and get creative with your own twists!

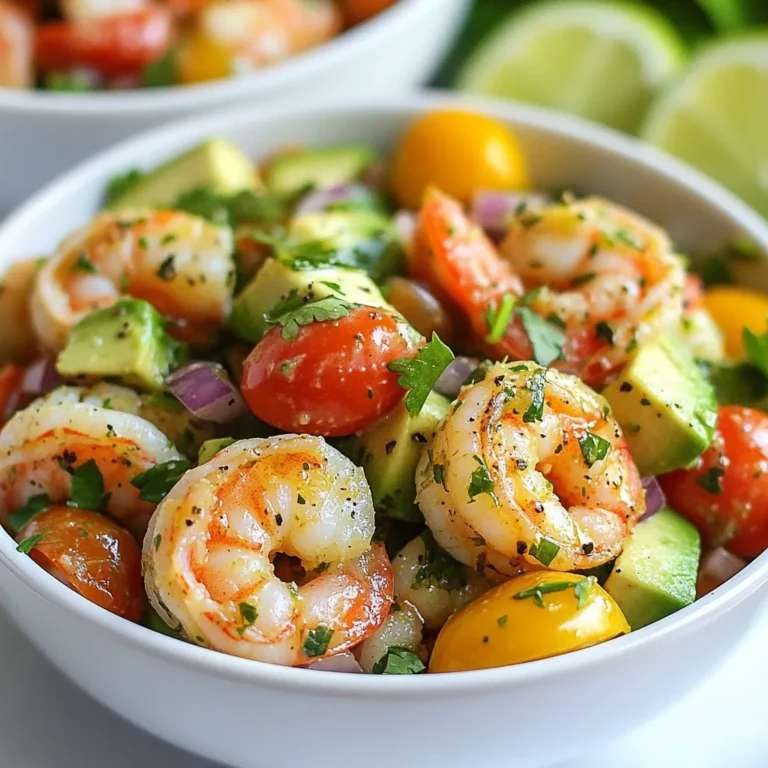
Zesty Lime Shrimp Avocado Salad Fresh and Flavorful

To make Spicy Garlic Shrimp Tacos, you need fresh and flavorful ingredients. Here’s what you will need: - 1 lb large shrimp, peeled and deveined - 4 cloves garlic, minced - 2 tablespoons olive oil - 1 teaspoon smoked paprika - 1 teaspoon cayenne pepper (adjust for spice level) - 1 teaspoon cumin - 1 tablespoon lime juice - Salt and pepper to taste - 8 small corn tortillas - 1 avocado, sliced - 1 cup red cabbage, shredded - 1/4 cup fresh cilantro, chopped - Lime wedges for serving These ingredients create a balanced mix of taste and texture. The shrimp bring protein, while garlic adds depth. Olive oil helps with cooking and flavor. Spices like paprika and cayenne give the dish its signature kick. Lime juice brightens up the whole meal. You can enhance the tacos with some extra ingredients. Here are a few to consider: - Sliced jalapeños for added heat - A dollop of sour cream for creaminess - Crumbled feta cheese for a tangy touch - Diced tomatoes for freshness These options allow you to customize the dish. Feel free to mix and match based on what you like! If you don’t have a certain ingredient, don’t worry! Here are some easy swaps: - Use shrimp alternatives like chicken or tofu. - Swap olive oil for avocado oil or melted butter. - Instead of corn tortillas, try flour tortillas or lettuce wraps. These substitutions keep the spirit of the dish while catering to your pantry. Get creative and make it your own! {{ingredient_image_1}} First, grab a large bowl. You will mix the shrimp with flavor. Add 1 pound of peeled and deveined shrimp. Then, toss in 4 minced garlic cloves. Next, drizzle in 2 tablespoons of olive oil. Sprinkle 1 teaspoon of smoked paprika for a deep flavor. If you want more heat, add 1 teaspoon of cayenne pepper. For earthiness, include 1 teaspoon of cumin. Squeeze in 1 tablespoon of lime juice. Finally, add salt and pepper to taste. Mix it well. Let the shrimp marinate for 15 minutes. This step helps the shrimp soak up all the flavors. Now, heat a large skillet over medium-high heat. Once it's hot, add the marinated shrimp. Make sure they lay flat in a single layer. Cook them for 2 to 3 minutes on each side. You want them to turn pink and opaque. This shows they are done. Remove the skillet from heat. The shrimp should look juicy and full of flavor. While the shrimp cook, warm up your corn tortillas. You can do this in a dry skillet or microwave them for a few seconds. Once warm, grab a tortilla. Place a few shrimp in the center. Top it with sliced avocado, shredded red cabbage, and fresh cilantro. The colors will pop! Serve with lime wedges on the side. Squeeze lime over the tacos for extra zest. Enjoy your delicious Spicy Garlic Shrimp Tacos! To get the right spice in your tacos, start with cayenne pepper. This spice packs a punch. Use one teaspoon for a good kick. If you want it milder, use half a teaspoon. You can always add more later if you like it hot. The smoked paprika adds flavor without heat. It gives a nice depth to the shrimp. Cooking shrimp is easy if you stick to a few tips. First, make sure your skillet is hot. A hot skillet sears the shrimp well. Cook them for just 2-3 minutes on each side. They’ll turn pink and opaque when done. Do not overcook them. Overcooked shrimp become rubbery. Remove them from heat as soon as they look perfect. Presentation makes your tacos look appetizing. Arrange them on a large platter for a feast. Add lime wedges for extra zest. A sprinkle of fresh cilantro on top adds color. I also like to serve a bowl of salsa on the side. This gives your guests a chance to add more flavor. It’s all about making the dish look and taste great! Pro Tips Marination Time: Allow the shrimp to marinate for at least 15 minutes to enhance the flavors. If time permits, marinating for up to an hour will infuse even more taste. Adjusting Spice Level: Feel free to adjust the cayenne pepper according to your spice preference. For a milder flavor, reduce the amount, or for extra heat, add more! Warm Tortillas: Warming the tortillas before assembling the tacos makes them more pliable and prevents tearing. Use a dry skillet or wrap them in a damp paper towel and microwave briefly. Presentation Tips: For a vibrant presentation, serve the tacos on a large platter, garnished with lime wedges and additional cilantro. A side of salsa adds a pop of color and flavor! {{image_2}} You can change the shrimp to fit your taste. Try chicken for a milder flavor. Fish works well too, especially white fish like tilapia or cod. For a smoky twist, use grilled steak. Switch up the spices for a new taste. Add chili powder for more heat. Try adding oregano for a fresh twist. For a sweet touch, mix in a dash of brown sugar. You can make these tacos plant-based. Replace shrimp with sautéed mushrooms or jackfruit. Both options soak up the flavors well. Use black beans or lentils for protein. Top with avocado and crunchy cabbage for a delicious meal. To store leftover shrimp tacos, keep them in an airtight container. Place the shrimp and toppings in separate containers to maintain freshness. The shrimp can last for up to two days in the fridge. If you mix everything together, the tortillas may get soggy. When you reheat the shrimp, do it gently. Use a skillet over low heat for the best results. This keeps the shrimp juicy and prevents them from drying out. Warm the tortillas in a dry pan or microwave just until soft. Avoid overheating them to keep them pliable. You can freeze the shrimp, but it's best to do this before cooking. Place the marinated shrimp in a freezer bag. Remove as much air as possible before sealing. They can last for up to three months in the freezer. When ready to eat, thaw them in the fridge overnight before cooking. Yes, you can use frozen shrimp. Just thaw them first. Place them in cold water for about 10-15 minutes. Once thawed, peel and devein if needed. Using frozen shrimp is a great time-saver. They work well in this recipe. The spice level depends on the cayenne pepper you use. The recipe calls for one teaspoon. If you like it milder, reduce the amount. You can also skip it entirely. The garlic and smoked paprika add great flavor without too much heat. These tacos pair well with lime wedges, salsa, and a fresh salad. You can also serve them with rice or beans for a complete meal. Avocado adds creaminess, while red cabbage gives a nice crunch. Enjoy your meal with a refreshing drink like iced tea or a fruity soda! This blog post covered the key ingredients, step-by-step cooking guide, tips, variations, and storage info for spicy garlic shrimp tacos. You can make these tacos with fresh shrimp or use alternatives for fun twists. Remember to control the spice level to match your taste. With the right cooking methods and presentation, these tacos can impress anyone. Enjoy making them and don't hesitate to experiment with flavors! Now, grab your ingredients and get cooking!

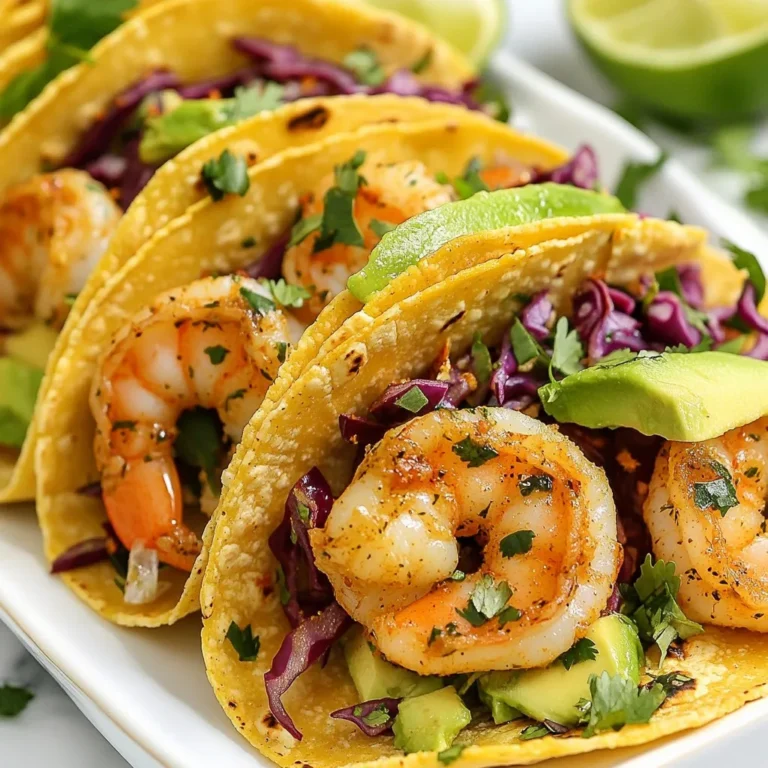
Spicy Garlic Shrimp Tacos Flavorful and Simple Meal

To make delicious pumpkin cream cheese muffins, gather these simple ingredients: - 1 ½ cups all-purpose flour - 1 teaspoon baking powder - 1 teaspoon baking soda - ½ teaspoon ground cinnamon - ¼ teaspoon ground nutmeg - ¼ teaspoon ground ginger - ½ teaspoon salt - 1 cup canned pumpkin puree - ¾ cup granulated sugar - ½ cup brown sugar, packed - 2 large eggs - ⅓ cup vegetable oil - 1 teaspoon vanilla extract - 4 oz cream cheese, softened - 2 tablespoons powdered sugar (for the cream cheese filling) If you need to swap some ingredients, here are a few ideas: - Use whole wheat flour instead of all-purpose flour for a healthier muffin. - Swap brown sugar for coconut sugar for a lower glycemic option. - You can use applesauce instead of vegetable oil for less fat. - Try almond milk or oat milk instead of eggs for a vegan muffin. - For a non-dairy option, use a vegan cream cheese. Each muffin is packed with flavor and nutrients. Here's what you'll get: - Calories: 200 - Total Fat: 8g - Saturated Fat: 2g - Cholesterol: 35mg - Sodium: 150mg - Total Carbohydrates: 30g - Dietary Fiber: 1g - Sugars: 10g - Protein: 3g These muffins are not only tasty but also provide a good source of energy, making them perfect for fall treats! {{ingredient_image_1}} First, turn your oven to 375°F (190°C). This step is key for even baking. While it heats, line a muffin tin with paper liners or give it a light grease. In a large bowl, add the flour, baking powder, baking soda, and spices. Use a whisk to mix them well. This helps the flavors blend and ensures the muffins rise nicely. In another bowl, combine the pumpkin puree, granulated sugar, brown sugar, eggs, vegetable oil, and vanilla extract. Whisk until the mixture is smooth and creamy. This step adds moisture and flavor to your muffins. Take a small bowl and mix the softened cream cheese with powdered sugar. Stir until it becomes smooth. This filling adds a sweet and tangy surprise in every bite. Spoon about 2 tablespoons of batter into each muffin cup. Then, add about 1 teaspoon of the cream cheese mixture. Top it off with another tablespoon of batter. This layering creates a delicious filling inside your muffins. Place the muffin tin in the preheated oven. Bake for 18-20 minutes. A toothpick should come out clean when inserted in the center. Once done, let them cool in the tin for about 5 minutes. Then, move them to a wire rack to cool completely. Enjoy the warm, cozy smells that fill your kitchen! To get a great muffin texture, do not overmix the batter. Combine the wet and dry ingredients gently. It’s okay if some lumps remain. The batter should be thick but not dry. Use fresh ingredients for the best results. Check the dates on your baking powder and soda. If they are old, they may not work well. One common mistake is using too much flour. Always spoon flour into your measuring cup and level it off. Using too much can make muffins dry. Another mistake is baking at the wrong temperature. Always preheat your oven to 375°F (190°C) before baking. Finally, don’t skip the cream cheese filling. It adds a lovely surprise and moisture to each bite. To serve your muffins beautifully, dust them lightly with cinnamon sugar. This adds a sweet touch. Place a small pumpkin next to the muffins for a festive look. Serve them warm for the best flavor. You can also use decorative muffin liners for a fun pop of color. These small details make your muffins stand out! Pro Tips Use Fresh Spices: Freshly ground spices can elevate the flavor of your muffins. Consider grinding your own cinnamon, nutmeg, and ginger for a more aromatic result. Check Pumpkin Consistency: Ensure your canned pumpkin puree is thick and not too watery, as this could affect the texture of your muffins. Don’t Overmix: To achieve a light and fluffy muffin, mix the wet and dry ingredients until just combined. Overmixing can lead to dense muffins. Cool Completely: Allow the muffins to cool completely on a wire rack before storing them. This prevents moisture buildup and keeps them from becoming soggy. {{image_2}} You can easily make gluten-free pumpkin cream cheese muffins. Use a gluten-free flour blend instead of all-purpose flour. Look for blends that include xanthan gum. This helps give the muffins the right texture. Follow the same steps in the recipe. You will still enjoy the rich taste! To create vegan pumpkin cream cheese muffins, swap eggs for flax eggs. Mix one tablespoon of flaxseed meal with three tablespoons of water for each egg. Let it sit for a few minutes to thicken. Instead of cream cheese, use vegan cream cheese or a mixture of blended silken tofu with a bit of lemon juice. This keeps the muffins creamy and delicious. Want to add more flavor? Here are some great ideas: - Chocolate Chips: Fold in semi-sweet or dark chocolate chips into the batter for a sweet surprise. - Nuts: Chopped walnuts or pecans add crunch and depth. Mix in about half a cup. - Dried Fruit: Raisins or cranberries bring a chewy texture. About a half cup works well. - Spices: Extra spices like cloves or allspice can add warmth. Just a pinch goes a long way. These variations let you enjoy muffins in new ways. Each option brings a unique taste to your fall baking! To keep your pumpkin cream cheese muffins fresh, store them in an airtight container. Place a piece of parchment paper between the muffins to avoid sticking. They will stay good at room temperature for up to three days. If you want them to last longer, refrigerate them. In the fridge, they can stay fresh for about a week. Freezing these muffins is easy. Allow them to cool completely first. Then, wrap each muffin tightly in plastic wrap. Place the wrapped muffins in a freezer-safe bag. They can last in the freezer for up to three months. When you’re ready to enjoy them, simply take out the amount you want. Reheating your muffins is quick and simple. For the best results, use the oven. Preheat your oven to 350°F (175°C). Place the muffins on a baking sheet and heat for about 10 minutes. You can also use a microwave. Heat each muffin for about 15 to 20 seconds. Enjoy them warm for the best taste! Yes, you can use fresh pumpkin. Start by roasting a pumpkin until soft. Then, scoop out the flesh and puree it until smooth. You need about one cup for this recipe. Fresh pumpkin gives a nice flavor, but it may have more water content. Adjusting the flour may help if the batter is too wet. Check the muffins at 18 minutes. Insert a toothpick into the center. If it comes out clean or with a few crumbs, the muffins are ready. If the toothpick has wet batter, bake for a few more minutes. Keep an eye on them to avoid overbaking. If you need a substitute for cream cheese, try Greek yogurt or mascarpone cheese. These options give a similar creaminess. You can also use a dairy-free cream cheese if you want a vegan choice. Adjust the sugar in the filling to match your taste. Yes, you can make mini muffins! Just fill the mini muffin tin with the batter. Bake for 10 to 12 minutes, checking with a toothpick. Mini muffins are great for snacks or sharing at parties. They still taste just as good! Store these muffins in an airtight container. They will last for about three days at room temperature. For longer storage, keep them in the fridge for up to a week. You can also freeze them for up to three months. Just thaw and enjoy! This guide covers all you need for making delicious pumpkin cream cheese muffins. You learned about key ingredients, substitutions, and nutritional info. Followed by step-by-step baking instructions, tips for perfect texture, and how to avoid mistakes. You also found out about variations, storage, and answers to common questions. Now you can bake tasty muffins that everyone will love. Enjoy the process and share them with friends!

Pumpkin Cream Cheese Muffins Flavorful Fall Treat

- 1 can (15 oz) chickpeas, drained and rinsed - 1 small red onion, roughly chopped - 2 cloves garlic, minced - 1/4 cup fresh parsley, chopped - 1/4 cup fresh cilantro, chopped - 1 tablespoon ground cumin - 1 teaspoon ground coriander - 1 teaspoon baking powder - Salt and pepper to taste Chickpeas form the base of falafel. You need canned chickpeas for ease. They add protein and fiber. Fresh parsley and cilantro give falafel a bright taste. The red onion and garlic add depth. Use cumin and coriander for warmth. Baking powder helps the falafel puff up. - Fresh vegetables (lettuce, cucumber, tomatoes) for topping - Pita bread or bowls for serving - Tahini sauce or yogurt for drizzling For toppings, use fresh veggies. They add crunch and color. Lettuce, cucumber, and tomatoes work well. Pita bread makes a great base. You can also use bowls filled with greens. Drizzle with tahini sauce or yogurt for creaminess. This enhances the falafel's taste. - 1/4 cup all-purpose flour (or chickpea flour for a gluten-free option) - 2 tablespoons olive oil Flour helps bind the falafel. Use all-purpose flour or chickpea flour for gluten-free needs. Olive oil is key for crispness. Brush it on the falafel before cooking. This ensures a golden and crunchy texture. {{ingredient_image_1}} To start, gather your ingredients. You need a food processor for this step. Add the chickpeas, chopped red onion, minced garlic, parsley, cilantro, cumin, coriander, baking powder, salt, and pepper into the processor. Pulse this mix until it looks coarse. The texture should be a bit chunky, not smooth. If you over-blend, it won’t hold together well. Next, transfer the mixture to a large bowl. Stir in the flour until it just combines with the chickpea mix. If it feels too wet, add a little extra flour. You want the mixture to hold its shape when you form it. Now, it’s time to shape the falafels. Use your hands to roll the mixture into small balls, about 1.5 inches wide. Then, gently flatten each ball to make patties. You should end up with about 12-15 falafels. Before cooking, preheat your air fryer to 375°F (190°C). This step is crucial for achieving that crispy texture. For cooking, lightly brush each falafel with olive oil. This will help them crisp up nicely. Place the patties in the air fryer basket in a single layer. Make sure not to overcrowd them; this ensures even cooking. You might need to cook in batches. Air fry the falafels for 10-12 minutes. Flip them halfway through the cooking time for even browning. They should come out golden brown and crispy on the outside. Enjoy the delightful aroma as they cook! To make crispy falafels, oil is key. I brush each patty lightly with olive oil. This helps them get that perfect crunch in the air fryer. If you skip this step, your falafels may end up dry. Next, avoid overcrowding the air fryer. Give each falafel space to cook evenly. If you pack them in, they will steam instead of crisp. It’s best to cook in batches to ensure they get that golden brown outside. Spices and herbs bring out the best in falafels. I always use ground cumin and coriander. They add warmth and depth to the flavor. Fresh parsley and cilantro are also a must for a bright taste. If your mixture feels too wet, add a bit more flour. This can help bind the ingredients together. I like to use all-purpose flour, but chickpea flour works great too. It’s gluten-free, so feel free to swap it in if you need. Garnishing enhances the look of your falafel bowls. I like to sprinkle extra chopped herbs on top. A wedge of lemon also adds a pop of color and freshness. For serving, you can lay the falafels over a bed of greens or in pita bread. You can even make a fun wrap. Drizzle tahini sauce or yogurt on top for an extra flavor boost. This makes your meal look beautiful and appetizing. Pro Tips Don’t Over-Blend: Ensure your chickpea mixture remains somewhat chunky for a better texture in your falafel. Over-blending can lead to a mushy outcome. Adjust for Moisture: If your mixture feels too wet, gradually add more flour until you achieve a manageable consistency for shaping the falafels. Preheat Your Air Fryer: Make sure to preheat your air fryer for even cooking. This helps the falafels get crispy on the outside while remaining tender inside. Batch Cooking: To avoid overcrowding, cook falafels in batches. This ensures they cook evenly and achieve that perfect crispiness. {{image_2}} You can easily make falafel gluten-free. Just swap all-purpose flour for chickpea flour. Chickpea flour binds the mix well. It also adds extra chickpea flavor. This change keeps your meal vegan and healthy. You can also get creative with your ingredients. Try adding grated zucchini for moisture. Or mix in some finely chopped spinach. These tweaks add nutrients and flavor. Want some heat? Add chili powder or diced jalapeños. This spice gives your falafel a nice kick. For a Mediterranean twist, try adding sun-dried tomatoes or olives. These ingredients enhance the flavor profile. They make your bowls even more exciting. Wrap your falafel in warm pita bread. This makes a fun and hand-held meal. You can also serve falafel on a bed of quinoa. Quinoa adds protein and a nutty taste. Use fresh vegetables like lettuce, cucumber, and tomatoes to top your bowls. This adds crunch and color. Drizzle tahini sauce or yogurt for creaminess. Each of these ideas makes your meal unique and delicious. To keep falafels fresh, store them in an airtight container. This helps prevent moisture loss. I recommend using glass containers or heavy-duty plastic bags. They work well to maintain crispness. Place a paper towel inside the container to absorb extra moisture. Store them in the fridge for up to three days. To reheat and keep the falafels crispy, use the air fryer. Preheat it to 350°F (175°C). Heat the falafels for about 5 to 7 minutes. Check them halfway through to ensure even heating. Avoid using the microwave, as it can make them soggy. You can freeze uncooked or cooked falafels. For uncooked falafels, place them on a baking sheet. Freeze them for about an hour, then transfer to a bag. This keeps them from sticking together. Cooked falafels can go directly into a freezer-safe container. They last about three months in the freezer. When ready to use, thaw them in the fridge overnight before reheating. Yes, you can prepare your falafel mixture ahead of time. Mix your ingredients and store them in the fridge. This way, they stay fresh and ready to cook. You can also form falafel patties and freeze them. Just make sure to separate them with parchment paper. When you want to cook them, no need to thaw. Just air fry them for a few extra minutes. If your falafel mixture feels too wet, don’t worry. This is a common issue. You can add more flour to thicken it up. Start with a tablespoon at a time until it holds shape. Another tip is to let the mixture sit for a few minutes. This can help absorb moisture. If you still find it too wet, try chilling the mixture for a bit. Toppings can make your falafel bowl special. Fresh vegetables like lettuce, cucumber, and tomatoes work great. You can also add radishes, bell peppers, or carrots for crunch. Try drizzling tahini sauce or yogurt for creaminess. Don’t forget to sprinkle some herbs like parsley or mint on top. Get creative with your favorite flavors! For the best results, set your air fryer to 375°F (190°C). Cook your falafels for 10-12 minutes. Make sure to flip them halfway through. This ensures they cook evenly and get crispy on both sides. Keep an eye on them, as air fryers can vary in cooking times. You want them golden brown and crunchy. Air fryer falafel is easy and tasty. We covered all the key steps, from mixing ingredients like chickpeas and herbs to cooking them to a perfect crisp. Don’t forget to try different toppings and sauces for a fun twist. You can also customize the falafel with spicy options or gluten-free swaps. Remember to store leftovers wisely and keep them crispy when reheating. Enjoy your healthy, homemade falafel bowls with friends or family!

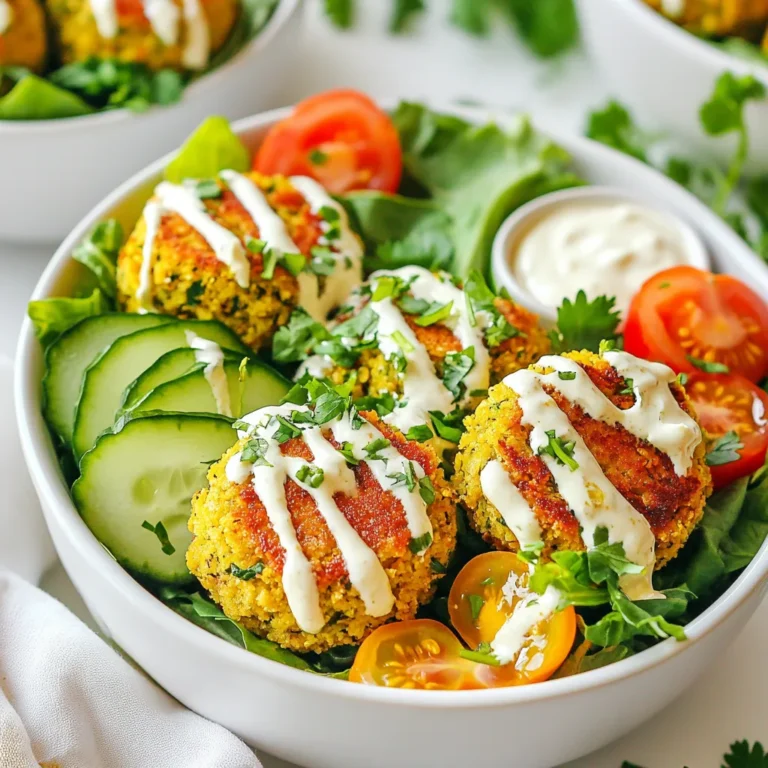
Air Fryer Falafel Bowls Flavorful and Healthy Meal

PREV 1 … 35 36 37 … 58 NEXT
quick dish kitchen

explore

DessertsDinnerAppetizersDrinks

Our Policies

  • Cookie Policy
  • Copyright Policy
  • Disclaimer
  • GDPR Policy
  • Terms Of Use
Back to Top
  • About
  • Contact Us
  • Privacy Policy
© 2025 quick dish kitchen