FREE DINNER EBOOK! Get your copy!
  • Cookie Policy
  • GDPR Policy
  • Disclaimer
  • Terms Of Use
  • Visit my other site: Fun Cookie Recipes
quick dish kitchen
  • Home
  • Dinner
  • Desserts
  • Drinks
  • Appetizers
  • Contact
  • About
  • Privacy Policy
  • Home
  • Dinner
  • Desserts
  • Drinks
  • Appetizers
  • Contact
  • About
  • Privacy Policy
  • Cookie Policy
  • GDPR Policy
  • Disclaimer
  • Terms Of Use
Visit my other site: Fun Cookie Recipes

HOME / CATEGORIES /

Latest

- 1 tablespoon olive oil - 1 medium onion, diced - 3 cloves garlic, minced - 2 medium carrots, diced - 2 celery stalks, diced - 4 cups vegetable broth - 1 can (14 oz) diced tomatoes, undrained - 1 teaspoon dried Italian herbs (basil, oregano, thyme) - 1 package (16 oz) gnocchi (store-bought) - 1 cup heavy cream - 2 cups fresh spinach, roughly chopped - Salt and pepper to taste This soup is simple yet full of flavor. The olive oil adds a nice base. Onions, garlic, carrots, and celery blend well and give a rich taste. Vegetable broth and diced tomatoes provide depth and a hint of sweetness. Gnocchi is the star here. It soaks up all those tasty flavors. The heavy cream makes the soup rich and creamy. Spinach adds a fresh touch, bringing color and nutrients. Always season with salt and pepper to taste. - 1 teaspoon red pepper flakes (optional, for heat) - Grated Parmesan cheese for serving Red pepper flakes can spice things up. They add a nice kick if you like heat. Grated Parmesan cheese is a great finishing touch. It gives extra flavor and makes your soup feel gourmet. First, heat 1 tablespoon of olive oil in a skillet over medium heat. Next, dice 1 medium onion, 2 medium carrots, and 2 celery stalks. Add these to the skillet. Sauté for about 5 minutes until the vegetables soften. Then, mince 3 cloves of garlic and add them to the skillet. Sauté for an extra 1-2 minutes until fragrant. This step builds a great base for your soup. After sautéing, transfer the vegetables to the slow cooker. Pour in 4 cups of vegetable broth and add 1 can of undrained diced tomatoes. Sprinkle in 1 teaspoon of dried Italian herbs and 1 teaspoon of red pepper flakes if you like heat. Stir everything well to combine the flavors. You can cook the soup on low for 6-7 hours or high for 3-4 hours. Choose what fits your schedule best. About 30 minutes before you plan to serve, add 1 package of gnocchi to the slow cooker. Let them cook until soft. Once they are tender, reduce the heat to low. Now, stir in 1 cup of heavy cream and 2 cups of roughly chopped spinach. Let this warm for 5-10 minutes. Taste the soup and season with salt and pepper as needed. This will make your soup creamy and rich. - First, taste the soup as it cooks. Adjust the salt and pepper to your liking. - Add more Italian herbs if you want a stronger flavor. - Just before serving, sprinkle grated Parmesan on top for a rich finish. - For a creamy texture, stir the heavy cream in slowly after cooking. - Keep the slow cooker on low when you add the cream. This helps it blend well. - Avoid overcooking the gnocchi. They should be soft but still hold their shape. - Ladle the soup into bowls and top with extra Parmesan cheese. - Add a few fresh spinach leaves for color and freshness. - Serve with crusty bread or a light salad for a complete meal. {{image_2}} To make this soup vegetarian, you can swap heavy cream for coconut milk. Coconut milk adds a rich texture without meat. You can also use cashew cream for a nutty flavor. Both options keep the soup creamy and satisfying. If you want to add protein, cooked chicken or sausage works great. Just shred cooked chicken and stir it in. For sausage, slice and brown it before adding to the pot. This change makes the soup heartier and fills you up. Using fresh herbs can brighten the soup. Basil or parsley adds a fresh taste. You can also throw in seasonal veggies like zucchini or bell peppers. These veggies add color and nutrients, making the soup even better. You can store leftovers of this soup in the fridge for up to three days. Make sure to place it in an airtight container. Cool the soup before sealing to maintain freshness. When you reheat, always check for any changes in texture or flavor. If you want to keep the soup longer, freezing is a great option. Use freezer-safe containers, leaving some space at the top for expansion. The soup can last for up to three months in the freezer. When ready to eat, move it to the fridge overnight to thaw. To reheat, use a pot on low heat. Stir often to keep the texture smooth. If the soup seems thick, add a splash of broth or water to loosen it. You can also microwave it in short bursts, stirring in between. Just make sure it heats evenly to keep that creamy goodness! Yes, you can use frozen gnocchi. Frozen gnocchi cooks well in this soup. Just add it directly to the slow cooker during the last 30 minutes of cooking. You do not need to thaw it first. This saves time and keeps the soup easy to make. If you don’t have vegetable broth, you can use chicken broth. This will add a richer flavor. Water with added seasonings can also work in a pinch. Just use herbs and spices to boost the taste. To make this soup dairy-free, replace heavy cream with coconut milk. Almond milk can also work, but it may change the flavor a bit. For cheese, use a dairy-free alternative or nutritional yeast. This keeps your soup creamy and adds flavor. This blog post outlined key ingredients and steps for making a delicious soup. We talked about essential items like olive oil, vegetables, and gnocchi. You learned how to sauté, combine, and cook everything in a slow cooker. I shared tips to perfect flavor and keep a creamy texture. Try variations with proteins or seasonal veggies for a twist. Store leftovers well, and reheat to enjoy later. Now, you have the tools to create a comforting meal that you can enjoy anytime.

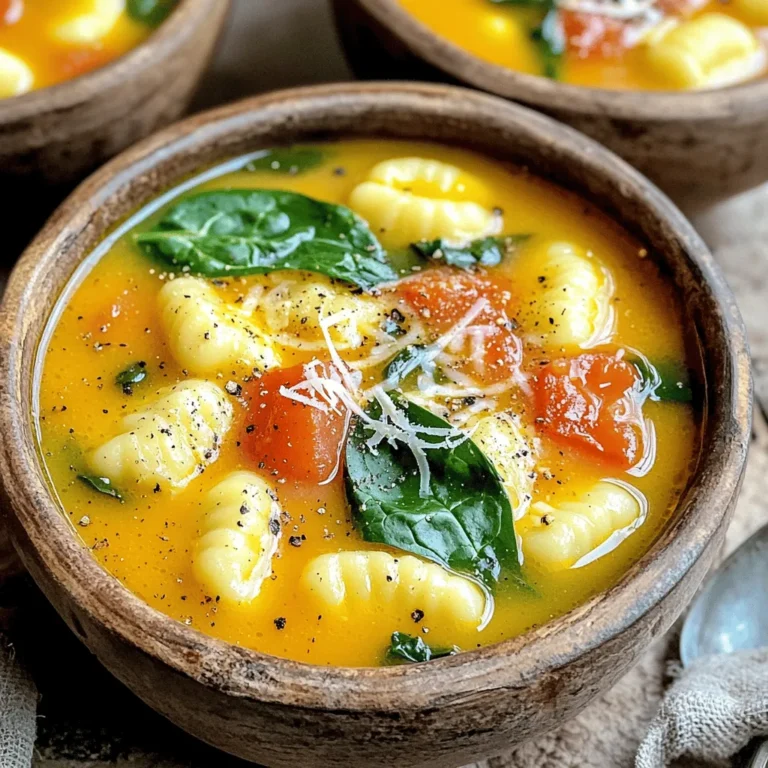
Slow Cooker Creamy Tuscan Gnocchi Soup Comfort Dish

For these tasty meatballs, you need: - 1 lb ground chicken - 1/4 cup breadcrumbs - 1/4 cup grated Parmesan cheese - 1/4 cup scallions, finely chopped - 1 egg - 2 cloves garlic, minced - 1 tablespoon fresh ginger, minced - Salt and pepper to taste These ingredients create a juicy and savory base for your meatballs. Ground chicken keeps them light and tender. Breadcrumbs help bind everything together, while Parmesan adds a nice cheesy flavor. Scallions give a hint of freshness, and garlic and ginger bring warmth. Next, for the sauce, use: - 1/4 cup honey - 1/4 cup soy sauce (or tamari for gluten-free) - 1 tablespoon sesame oil The honey adds sweetness. Soy sauce brings umami depth. Sesame oil adds a nutty note, creating a balanced, rich sauce. Together, they form a great glaze that caramelizes beautifully in the oven. Finally, for the veggies and garnish, you need: - 1 cup mixed bell peppers, chopped - 1 cup broccoli florets - Sesame seeds for garnish Mixed bell peppers give a sweet crunch. Broccoli adds color and nutrition. Sesame seeds on top not only look nice but add a slight crunch, making the dish even more delicious. This combination of flavors and colors makes a feast for the eyes and the palate. First, gather your ingredients. You need ground chicken, breadcrumbs, and Parmesan cheese. Next, add finely chopped scallions, one egg, minced garlic, and fresh ginger. Season with salt and pepper. In a large bowl, mix everything well. Use your hands to combine the ingredients. This ensures each meatball has great flavor. Now, shape the mixture into meatballs. Aim for about one inch in diameter. This size helps them cook evenly. Place the meatballs on a lined baking sheet. Make sure they have space between them. This helps them brown nicely. Preheat your oven to 400°F (200°C). While it heats, prepare the sauce. Whisk together honey, soy sauce, and sesame oil in a small bowl. Drizzle half of this sauce over the meatballs. Add chopped bell peppers and broccoli florets around them on the baking sheet. Drizzle the rest of the sauce over the veggies. Bake the tray in the oven for 20-25 minutes. Check that the meatballs are cooked through and golden. For extra crispiness, broil for 2-3 minutes at the end. When done, sprinkle sesame seeds on top for a nice finish. Enjoy your meal! To make moist meatballs, start with ground chicken. It has a nice fat content. Next, add breadcrumbs for texture. They help keep the meatballs juicy. Don't skip the egg; it acts as a binder. Mix all the ingredients gently. Over-mixing can make them tough. When shaping, form them softly. This keeps them light and airy. To bake meatballs evenly, preheat your oven to 400°F (200°C). Line your baking sheet with parchment paper. This prevents sticking and makes cleanup easy. Place meatballs on the sheet with space between them. This helps hot air circulate. Add veggies around the meatballs for extra flavor. The mixed bell peppers and broccoli will cook well together. For a beautiful presentation, use a large platter. Arrange the meatballs and veggies artfully. Drizzle extra honey garlic sauce on top. Sprinkle sesame seeds over everything for crunch. You can also add fresh scallions for a pop of color. This makes your dish look as good as it tastes. Serve hot for the best experience. {{image_2}} You can easily make this dish gluten-free. Simply swap out the breadcrumbs. Use gluten-free breadcrumbs or crushed gluten-free crackers. For the soy sauce, choose tamari instead. This keeps the flavor while making it safe for those with gluten issues. If you want a different protein, ground turkey works great. It has a mild flavor and stays moist. You can also use ground pork or beef. Just be mindful of the cooking time. Each protein may require a slight adjustment. Feel free to change the veggies to your liking. Zucchini or snap peas add a nice crunch. Carrots or green beans also work well. You can mix and match based on what you have. This keeps the dish fresh and exciting every time you make it. To store leftovers, let the meatballs cool down to room temperature. Then, place them in an airtight container. You can store the meatballs and veggies together or separately. Keep them in the fridge for up to three days. If you want to store them longer, freeze the meatballs. Use freezer-safe bags or containers. They can last up to three months in the freezer. When you're ready to eat the leftovers, you can reheat them easily. If they are in the fridge, heat them in the oven at 350°F (175°C) for about 10-15 minutes. If you're in a hurry, you can use the microwave. Heat in 30-second intervals, checking often. For frozen meatballs, thaw them overnight in the fridge. Then, follow the same reheating steps. Meal prep is a great way to save time. You can make a big batch of meatballs ahead of time. Shape and bake the meatballs, then let them cool. Store them in meal prep containers with your choice of veggies. This way, you can grab a meal when you need it. Feel free to mix and match sides like rice or quinoa for variety. Yes, you can use frozen chicken. However, make sure to fully thaw it first. Thawing helps the chicken mix well with other ingredients. It also ensures even cooking. If you skip this step, the meatballs may not cook through properly. Always check that the chicken reaches an internal temperature of 165°F. To keep meatballs moist, use ground chicken with some fat. Adding breadcrumbs and Parmesan cheese helps too. The egg in the mix binds everything and adds moisture. Be careful not to overbake the meatballs. Check them around the 20-minute mark. If they feel firm, they are done. You can also drizzle some sauce on them before serving for extra moisture. You can easily change the sauce flavor. Try adding sriracha for heat or lime juice for tang. Use different types of honey, like wildflower honey, for a unique twist. You can also mix in some fresh herbs like cilantro or basil. Experiment with spices too. A pinch of red pepper flakes can add warmth and flavor. You now have a clear path to making delicious chicken meatballs. We covered key ingredients, from meat to seasonings, and even vegetables. The step-by-step process ensures you shape, bake, and broil them to perfection. Plus, the tips I shared will help keep your meatballs moist and tasty. Don’t forget the fun variations to match your needs or tastes! Whatever you choose, these meatballs are a great way to enjoy meals. I hope you feel inspired to try these recipes and tips soon. Happy cooking!

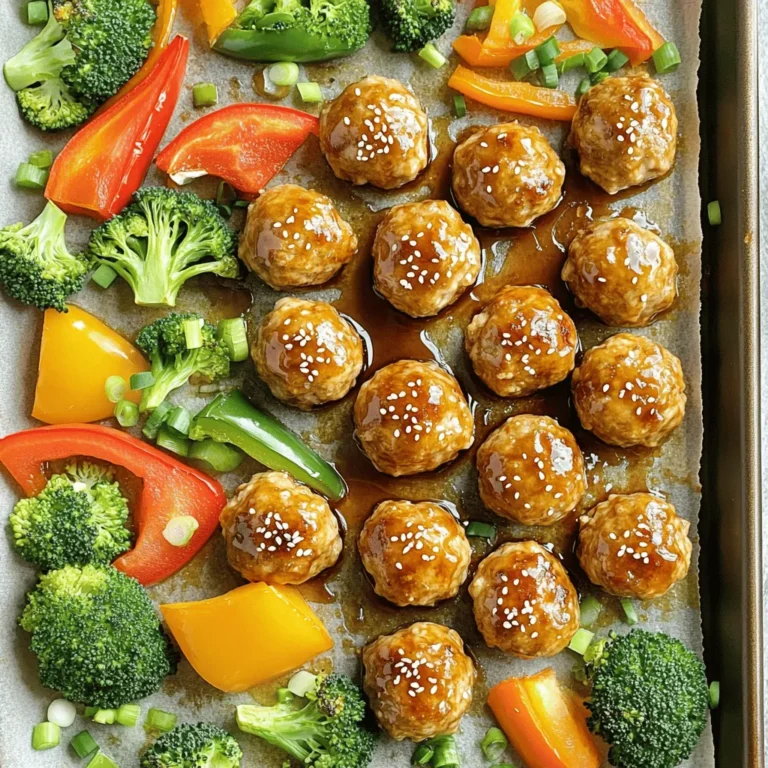
Sheet-Pan Honey Garlic Chicken Meatballs Delight

- 2 ripe avocados, halved and pitted - 1 cup breadcrumbs (preferably panko for extra crunch) - ½ cup grated Parmesan cheese - 2 large eggs - 1 tablespoon flour - 1 teaspoon garlic powder - 1 teaspoon onion powder - ½ teaspoon paprika - Salt and pepper to taste - Cooking spray Using fresh ingredients makes a big difference in taste. Ripe avocados are creamy and rich. They should feel soft but not mushy. Fresh breadcrumbs give a great crunch. Panko breadcrumbs are the best choice for a crispier texture. Fresh spices like garlic and paprika add more flavor. Quality Parmesan cheese also enhances the dish. Always check your ingredients before cooking. Freshness ensures the best taste and texture. You can mix it up if you don’t have one or two items. For breadcrumbs, use crushed crackers or cornflakes. You can swap Parmesan for another cheese like cheddar. If you want a vegan option, replace eggs with a mixture of ground flaxseed and water. Use almond flour instead of regular flour for gluten-free needs. Each change alters the taste but can still be delicious. Experiment with what you have on hand! To make Air Fryer Parmesan Crusted Avocado Fries, start by gathering all your ingredients. You will need ripe avocados, breadcrumbs, Parmesan cheese, eggs, flour, garlic powder, onion powder, paprika, salt, and pepper. This recipe takes about 10 minutes to prep and 10 minutes to cook. The total time is just 20 minutes. 1. First, preheat your air fryer to 400°F (200°C). This step ensures your fries cook evenly. 2. In a shallow bowl, mix the breadcrumbs, Parmesan cheese, garlic powder, onion powder, paprika, salt, and pepper. Stir well to combine. 3. In another shallow bowl, beat the eggs. In a third bowl, place the flour. 4. Take each avocado half and sprinkle flour on the cut side. This helps the egg stick better. 5. Dip the avocado half into the egg mixture, letting excess drip off. Then, coat it in the breadcrumb mix. Press lightly to make sure it sticks. 6. Repeat this for all avocado halves and place them on a plate. 7. Lightly spray the air fryer basket with cooking spray. Arrange the avocado fries in a single layer. Avoid overcrowding; you may have to cook in batches. 8. Air fry for 8-10 minutes. The crust should be golden and crispy. Flip them halfway through for even cooking. 9. Once done, carefully take the fries out and let them cool for a few moments before serving. To ensure even cooking, make sure to flip the avocado fries halfway through. This helps both sides brown nicely. Also, do not overcrowd the air fryer. Give each fry enough space for hot air to circulate. If your air fryer has a smaller basket, cook in batches. Enjoy your crispy avocado fries! To get the best crispy texture, use panko breadcrumbs. They are light and airy, which creates a great crunch. Make sure to coat each avocado well. Press the breadcrumbs onto the avocado to help them stick. Spray the fries lightly with cooking spray before cooking. This helps them brown nicely in the air fryer. One common mistake is overcrowding the air fryer. If you place too many fries at once, they won’t cook evenly. Always arrange them in a single layer. Another mistake is skipping the flour step. This helps the egg mix stick better. Finally, don’t forget to flip the fries halfway through cooking. This ensures both sides get crispy. You can enhance the flavor by adding spices. Try adding some cayenne pepper for heat or Italian herbs for a fresh taste. For a twist, mix some lemon zest into the breadcrumb mixture. It adds a nice brightness. Serve with a zesty dipping sauce like ranch or spicy aioli. This adds a fun contrast to the creamy avocado. {{image_2}} To make these avocado fries pop with flavor, consider adding a few extras. You can mix in some herbs like fresh parsley or basil into the breadcrumb mixture. A pinch of cayenne pepper can add heat if you like spice. For a tangy twist, try adding lemon zest. These small tweaks can boost the taste and make each bite exciting. While ranch and spicy aioli are great, there are many other tasty dips you can try. A creamy cilantro lime sauce pairs well with the richness of avocado. You might also enjoy a sweet chili sauce for a spicy-sweet contrast. For a classic option, a simple garlic yogurt dip can add a cool flavor. Each sauce gives you a new way to enjoy these fries. If you want a vegan version, swap the egg with a mixture of ground flaxseed and water. This will help the breadcrumbs stick just like eggs. For a gluten-free option, use gluten-free breadcrumbs instead of regular ones. You can also check if your Parmesan is dairy-free or use a vegan cheese. These alternatives keep the fries delicious while meeting your dietary needs. After enjoying your Air Fryer Parmesan Crusted Avocado Fries, you may have some left. To keep them fresh, let the fries cool down to room temperature. Place them in an airtight container. Store the container in the fridge. They will stay fresh for about 2-3 days. If you want the best taste, eat them within the first day. To reheat the avocado fries, use your air fryer. Preheat it to 350°F (175°C). Place the fries in the basket in a single layer. Heat for about 3-5 minutes. This way, they get crispy again. You can also use an oven. Set it to 350°F, and bake for 5-7 minutes. Avoid using a microwave; it can make them soggy. You can freeze the avocado fries before cooking them. After coating them, place them in a single layer on a baking sheet. Freeze until solid, then transfer them to a freezer bag. They will last for about 1 month. When ready to enjoy, cook them straight from frozen. Just add a few extra minutes to your cooking time. Yes, you can use ripe avocados. They should be soft but not mushy. Ripe avocados give a nice creamy texture. If they are too hard, they won’t fry well. You want them to hold their shape while cooking. These fries stay crisp for about 30 minutes after cooking. The air fryer gives them a crunchy crust. To keep them crispy, serve them right away. If you need to wait, place them on a wire rack. This will help air circulate and keep them from getting soggy. The best air fryer temperature for avocados is 400°F (200°C). This high heat cooks them quickly. It helps create a golden crust while keeping the inside soft. Make sure to preheat your air fryer for even cooking. This blog post covered key areas to make great fries at home. We talked about choosing fresh ingredients and how to prepare them well. I shared tips for getting that perfect crispy texture. Remember, avoid common mistakes and try new flavors. You can make this dish suit your needs, whether vegan or gluten-free. Proper storage and reheating can keep your fries tasty longer. With these steps, you can enjoy delicious fries any time. Get cooking and experiment with flavors while having fun!

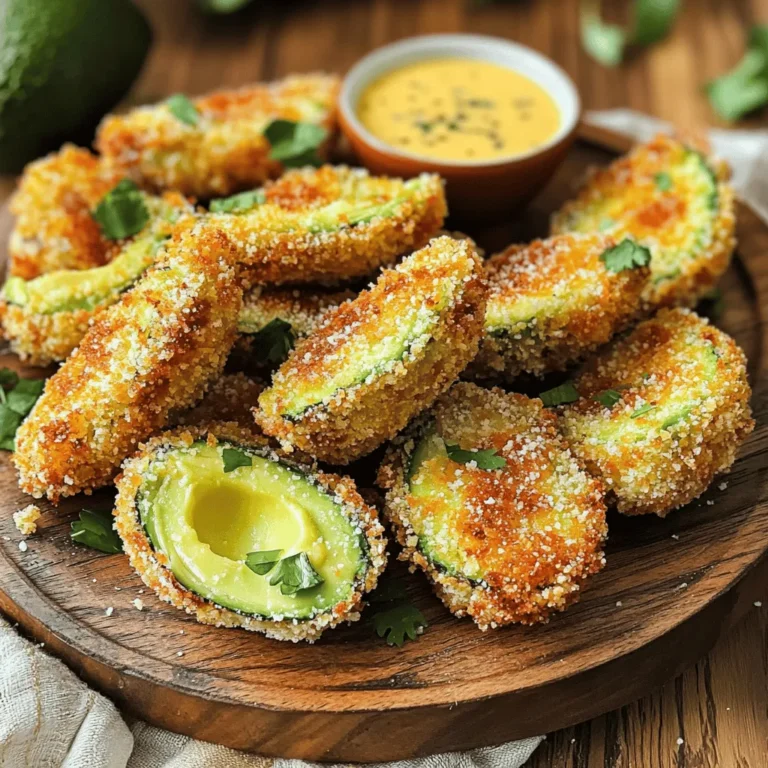
Air Fryer Parmesan Crusted Avocado Fries Delight

Here’s what you need to make No-Bake Lotus Biscoff Cheesecake Bars. Each ingredient plays a big role in the taste and texture of the bars. - 300g Lotus Biscoff biscuits, crushed - 150g unsalted butter, melted - 400g cream cheese, softened - 250g powdered sugar - 200ml heavy cream - 100g Lotus Biscoff spread - 1 teaspoon vanilla extract - A pinch of salt - Extra crushed Biscoff biscuits for topping The Lotus Biscoff biscuits create a crunchy base. The melted butter helps bind them together. Cream cheese adds creaminess, while powdered sugar sweetens the filling. Heavy cream makes it light and fluffy. Lotus Biscoff spread brings that delicious caramel flavor. Vanilla extract adds warmth, and a pinch of salt balances the sweetness. Finally, extra crushed biscuits give a nice touch on top. Make sure to gather these ingredients before you start. It makes the process smooth and easy. Enjoy the fun of creating this delightful treat! To start, you need to prepare the base for your cheesecake bars. First, take 300g of crushed Lotus Biscoff biscuits and place them in a mixing bowl. Next, add 150g of melted unsalted butter to the crumbs. Mix them together until all the crumbs are coated and it feels like wet sand. This step is key for a strong base. Now, take a lined 9x9 inch baking dish. Press the biscuit mix firmly into the bottom. Use the back of a measuring cup for an even layer. This creates a stable foundation for your cheesecake. Once done, place the dish in the fridge while you work on the filling. Next, it's time to make the cheesecake filling. In a separate bowl, beat 400g of softened cream cheese with 250g of powdered sugar. Mix until the blend is smooth and creamy. This is where the magic begins! In another bowl, whip 200ml of heavy cream until it forms stiff peaks. This means it should hold its shape when you lift the whisk. Then, gently fold the whipped cream into the cream cheese mixture. This keeps your filling light and airy, which is so important for a cheesecake. Now for the fun part! Stir in 100g of Lotus Biscoff spread, 1 teaspoon of vanilla extract, and a pinch of salt into the cream cheese mixture. Mix until everything is combined and fluffy. Pour this creamy filling over your chilled biscuit base. Smooth it out evenly with a spatula. Cover the dish with cling film or foil. Place it in the fridge for at least 4-6 hours, or even better, overnight. This chilling time helps the cheesecake set properly. Once set, lift the cheesecake bars out of the dish using the parchment paper. Cut them into squares or bars. For the final touch, sprinkle extra crushed Biscoff biscuits on top. Enjoy your no-bake Lotus Biscoff cheesecake bars! To achieve a smooth cheesecake filling, start with softened cream cheese. Cold cream cheese can make lumps. I suggest letting it sit out for about 30 minutes before mixing. Beat the cream cheese with powdered sugar until it's creamy and smooth. Whipping the heavy cream is also key. Beat it until you see stiff peaks. This lightens the filling and gives it a lovely texture. Gently fold the whipped cream into the cream cheese mixture. Use a spatula to keep it airy. Chilling time is very important. After assembling, cover the dish and refrigerate for at least 4-6 hours. Overnight is best. This allows the cheesecake to set well, making it easier to cut. For a lovely garnish, sprinkle extra crushed Biscoff biscuits on top. This adds crunch and looks great. You can also drizzle some melted Biscoff spread over the bars for an extra sweet touch. When serving, cut the bars into squares or rectangles. Use a sharp knife for clean edges. You can serve them plain or with a dollop of whipped cream on the side. Enjoying them with a cup of coffee or tea enhances the flavors. {{image_2}} You can make these cheesecake bars even more exciting! Adding different extracts can change the taste. Try almond extract for a nutty twist. A splash of lemon extract can give a fresh zing. You can also mix in flavors like chocolate. Melted chocolate or cocoa powder pairs well with the Biscoff flavor. For a fruity touch, consider adding pureed strawberries or raspberries. These flavors can brighten up the bars and surprise your taste buds! Switching up the base can create fun new textures. You can use other types of biscuits if you want. Digestive biscuits or graham crackers work great too. They add a different flavor while still being tasty. If you need a gluten-free option, look for gluten-free biscuits. This way, everyone can enjoy the treat! Just make sure to crush them well and mix with butter, just like the original recipe. To keep your No-Bake Lotus Biscoff Cheesecake Bars fresh, choose the right container. I recommend using an airtight container. This will help maintain the bars' creamy texture. Make sure to line the container with parchment paper to make removal easy later. Refrigerate the bars at a temperature below 40°F (4°C). They can stay fresh for about 5 to 7 days. Always cover them well to avoid absorbing odors from your fridge. Freezing is a great way to save leftover cheesecake bars. To freeze, cut the bars into squares first. Wrap each piece in plastic wrap, then place them in a freezer-safe bag. This prevents freezer burn and preserves flavor. When you want to enjoy a bar, simply take it out of the freezer. Place it in the fridge for a few hours to thaw. For best results, do not thaw them at room temperature. This keeps the texture smooth and creamy. These bars can last up to five days in the fridge. Make sure to store them in an airtight container. This helps keep them fresh and tasty. I enjoy making them ahead for gatherings. They always impress! Yes, you can use any cream cheese you prefer. Full-fat cream cheese gives the best flavor and texture. Low-fat cream cheese works, but it may alter the taste slightly. Just keep in mind that the bars may not be as rich. If you don't have Lotus Biscoff spread, try using cookie butter or another sweet spread. Nut butters can also work, but they change the flavor. For a different twist, consider using chocolate spread for a rich taste. You can swap to low-fat cream cheese and heavy cream. The bars will still taste good, but they might not be as creamy. Adjust the powdered sugar to balance the flavors. It’s a great way to enjoy dessert while being mindful of calories! This blog post guides you through making No-Bake Lotus Biscoff Cheesecake Bars. We covered the right ingredients, step-by-step instructions, and tips for the best texture. You learned decoration ideas and flavor variations, plus how to store and freeze your bars. Remember, the key to a great cheesecake lies in the chilling time and creamy texture. Enjoy exploring your creative side with flavors and decorations. Now, you have all the tools to make delicious treats that everyone will love.

No-Bake Lotus Biscoff Cheesecake Bars Delightful Treat

- 1 tablespoon olive oil - 1 medium onion, diced - 3 cloves garlic, minced - 1 can (14 oz) diced tomatoes (with juices) - 2 cups vegetable broth - 1 cup orzo pasta - 1 package (5.2 oz) Boursin cheese (garlic & fine herbs flavor) - 1 cup fresh spinach, chopped - 1 teaspoon dried Italian herbs (basil, oregano, thyme) - Salt and pepper, to taste - Fresh basil leaves, for garnish - Grated Parmesan cheese, for serving (optional) To start, gather all your ingredients. You want everything close by for easy cooking. First, the olive oil brings richness to the dish. The onion adds sweetness and depth. Garlic gives it a nice punch of flavor. Canned tomatoes add acidity and warmth. Vegetable broth helps the orzo cook and adds a savory base. Orzo pasta is the star here, soaking up all the goodness. Boursin cheese is what makes this dish creamy and flavorful. Fresh spinach adds color and nutrition. Italian herbs give it a nice aroma. Finally, salt and pepper are key for taste. Fresh basil leaves look great and add freshness. Parmesan cheese is optional but adds a lovely finish. With all these ingredients, you can create a comforting and tasty meal in one pot. - Sautéing the onion: Start by heating olive oil in a large pot over medium heat. Add the diced onion and sauté for about 5 minutes. You want it to turn translucent, which means it's ready for the next step. - Adding garlic for flavor: Next, stir in the minced garlic. Cook it for 1 to 2 minutes. You will notice a lovely aroma filling your kitchen. This step adds depth to the dish. - Incorporating diced tomatoes: Now, add the can of diced tomatoes with their juices. This brings a nice color and flavor. Pour in the vegetable broth and bring everything to a gentle simmer. - Simmering the broth and tomatoes: Once your mixture simmers, it’s time for the orzo. Add it along with the dried Italian herbs. Stir well to combine. - Cooking orzo to al dente: Let the orzo cook for about 8 to 10 minutes. Stir occasionally to keep it from sticking. You want the orzo to be al dente, which means it should still have a slight bite. - Melting in Boursin cheese: After the orzo is ready, reduce the heat to low. Add the Boursin cheese and stir until it melts completely. This adds a creamy, rich flavor that ties the dish together. - Adding spinach: Fold in the chopped fresh spinach. Cook for another 2 minutes. The spinach will wilt and add a nice color to your dish. - Seasoning to taste: Now, season with salt and pepper to your liking. If you want a thinner consistency, add a splash more vegetable broth. - Serving suggestions: Serve hot and garnish with fresh basil leaves. If you like, sprinkle some grated Parmesan cheese on top. This enhances the flavor and makes the dish look beautiful. - Sautéing onions and garlic: Start with medium heat. Add olive oil and diced onions. Cook for about five minutes. Wait until they turn soft and clear. Then, add minced garlic. Cook for one to two minutes. This brings out the sweet flavor of garlic. - Ensuring perfect orzo texture: Use plenty of broth for cooking orzo. Stir occasionally to keep it from sticking. Cook until al dente, which means firm to the bite. Overcooking will make it mushy. If you want a creamier dish, add a splash of broth at the end. - Alternative cheeses to use: If Boursin is not available, use cream cheese or goat cheese. Both options give a creamy texture. They will change the flavor a bit, but still taste great. - Vegetable broth variations: You can use homemade broth or low-sodium store-bought options. For added flavor, try mushroom broth. This gives a rich taste that pairs well with the dish. - Garnishing with fresh basil: Add fresh basil leaves on top before serving. This adds a pop of color and a fresh taste. Chiffonade the leaves for a fancy touch. - Serving options for versatility: Serve in shallow bowls for a casual feel. Pair it with a side salad or garlic bread. You can also add grilled chicken or shrimp for extra protein. {{image_2}} You can easily change this dish by adding protein. Chicken works well, especially when grilled or sautéed. Shrimp also adds a nice touch, cooking quickly in the pot. You can even use canned chickpeas for a plant-based boost. For more nutrition, think about adding vegetables. Chopped bell peppers or zucchini mix nicely and add color. You can also toss in frozen peas or corn for sweetness. They cook fast and brighten the dish. If you like a little heat, try adding red pepper flakes. Just a pinch can really wake up the flavors! You can also use different herb blends. Fresh thyme or dill can give a new taste. Experimenting with spices can add depth too. Try smoked paprika for a warm flavor. You can also add lemon zest for a fresh, zesty kick. Each twist makes the dish uniquely yours! To keep your One-Pot Creamy Boursin Tomato Orzo fresh, store leftovers in an airtight container. Let the dish cool down before sealing it. Place it in the fridge if you plan to eat it within three days. For longer storage, freeze it in a freezer-safe container. Just remember to leave some space at the top for expansion as it freezes. When you reheat, you want to keep that creamy texture. Heat it on the stove over low heat. Add a splash of vegetable broth or water to help it regain creaminess. Stir it often until warmed through. If you're in a hurry, you can use the microwave. Just cover the bowl and heat in short bursts, stirring in between. In the fridge, your orzo will last about three to four days. If you freeze it, it can stay good for up to three months. However, for the best taste and texture, enjoy it sooner rather than later. This dish tastes great fresh, so make sure to savor it! Can I make this dish vegetarian? Yes, this dish is already vegetarian! It uses vegetable broth and no meat. You can enjoy it as is. How do I adjust the recipe for more servings? To serve more people, simply double the ingredients. This will keep the flavors balanced. Cook time may remain the same, but check the orzo for doneness. What can I do if I don't have Boursin cheese? If you lack Boursin, use cream cheese mixed with garlic and herbs. It will give you a similar creamy touch and flavor. What to do if the orzo is too mushy? If your orzo turns mushy, reduce the cooking time next time. Ensure you keep an eye on it while it simmers. Tips for balancing flavors if too salty To fix salty flavors, add more vegetable broth or some chopped tomatoes. This will dilute the salt and add flavor. What side dishes pair well? Pair this orzo dish with a simple green salad or garlic bread. These sides add freshness and crunch. Drinks that complement the meal A light white wine, like Sauvignon Blanc, works well. You can also serve sparkling water with lemon for a refreshing touch. This blog post explored making a delicious orzo dish, outlining key ingredients, cooking steps, and helpful tips. You learned how to sauté onions, cook orzo, and add tasty Boursin cheese. I shared variations and storage tips to ensure your meal stays fresh. In closing, this dish is versatile and easy to adapt. It works well for any occasion. So, gather your ingredients and start cooking! Enjoy a tasty meal that friends and family will love.

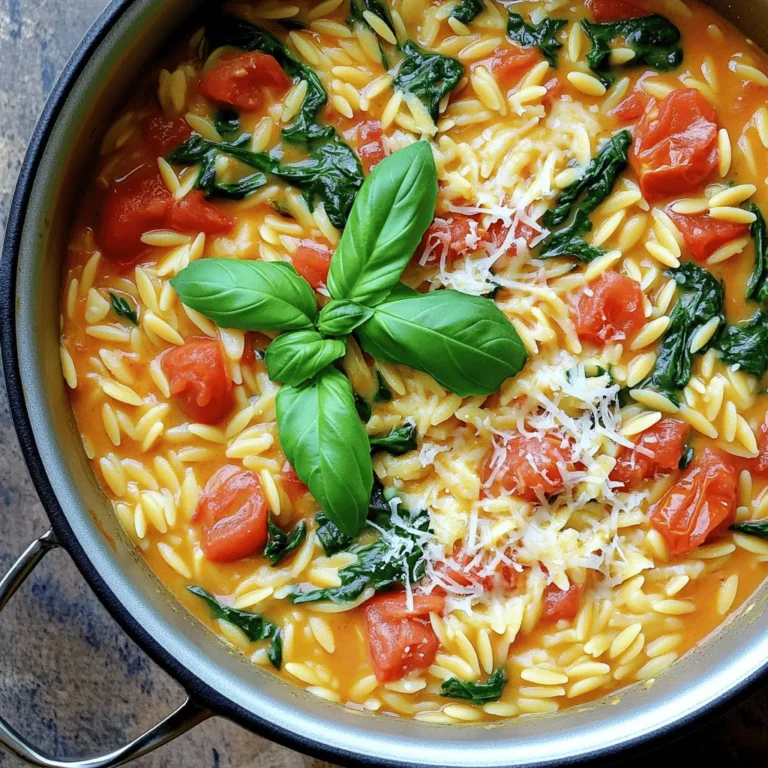
One-Pot Creamy Boursin Tomato Orzo Delight

- 200g feta cheese - 400g cherry tomatoes - 3 tablespoons olive oil - 3 cloves garlic, minced - 1 teaspoon dried oregano - 1 teaspoon red pepper flakes - Salt and pepper to taste - 300g penne pasta - Fresh basil leaves for garnish - Zest of 1 lemon - Baking dish - Pot for cooking pasta - Measuring cups and spoons - Mixing utensils The main ingredients create a rich, creamy dish. The feta cheese melts beautifully, giving the pasta a smooth texture. Cherry tomatoes add sweetness and a burst of flavor. Olive oil enhances the richness, while garlic and oregano bring depth. Adjusting the red pepper flakes lets you control the heat. For a fresh touch, consider adding basil leaves or lemon zest. These optional ingredients brighten the dish. The tools you need are simple. A baking dish, a pot for pasta, and measuring tools are all you need. Gather these items and ingredients, and you're ready to create a tasty meal. Trust me, this dish will impress everyone at your table! - Preheat the oven to 200°C (400°F). - Arrange feta and tomatoes in a baking dish. This step sets the stage for our dish. The hot oven will melt the feta and burst the tomatoes. Placing the feta in the center and surrounding it with tomatoes makes a beautiful presentation. - Drizzle olive oil and season with garlic, oregano, red pepper flakes, salt, and pepper. - Bake for 25-30 minutes until feta melts and tomatoes burst. Drizzling olive oil adds flavor and helps the cheese melt. The garlic and herbs create a great aroma while baking. When you open the oven, the cheese should be creamy, and the tomatoes should be soft and juicy. - Cook penne pasta according to package instructions. - Mix baked feta and tomatoes into a creamy sauce. - Combine with pasta, adjusting consistency with reserved pasta water. While the feta bakes, cook the penne until it’s just right. After baking, use a fork to mix the feta and tomatoes into a creamy sauce. Then, add the pasta. If it feels too thick, a splash of pasta water helps it blend perfectly. Enjoy this easy and tasty meal! - Adjust spice levels with more or fewer red pepper flakes. - Use high-quality feta for better flavor. To make this dish shine, the right feta is key. Choose a creamy, tangy feta for a rich taste. If you like heat, play around with the red pepper flakes. Add more for a spicy kick, or skip them for a milder version. - Reserve pasta water to help achieve desired sauce consistency. - Stir gently to avoid breaking the feta into too small pieces. While cooking the pasta, save some of that starchy water. It helps make the sauce creamy and smooth. When mixing, be gentle with the feta. You want to keep some nice chunks in your dish. - Pair with a light salad or garlic bread. - Serve with a sprinkle of extra herbs or cheese on top. This pasta loves company! A fresh salad adds a nice crunch. Garlic bread is perfect for scooping up every creamy bite. Don’t forget to top your dish with fresh herbs or more cheese for extra flavor. {{image_2}} - Substitute feta with goat cheese for a different taste. Goat cheese offers a creamy flavor. - Use different pasta shapes like fusilli or rigatoni. These shapes hold sauce well, adding texture. - Include spinach or kale for added nutrition. These greens boost vitamins and color. - Toss in olives or artichokes for a Mediterranean twist. They bring briny flavors and depth. - Add lemon juice or zest for brightness. This lifts the dish with a fresh zing. - Experiment with different herbs like thyme or rosemary. They add earthy notes and aroma. Store any leftovers in an airtight container. You can keep it in the fridge for up to 3 days. Make sure it’s sealed well to prevent drying out. To reheat, use the oven or microwave. For the oven, set it to low heat. Warm it until it’s heated through. In the microwave, heat in short bursts. Stir in between to warm evenly. You can freeze portions for future meals. However, the texture might change when you thaw it. It may not be as creamy, but it will still taste great. Just let it cool before freezing. Store it in a freezer-safe container for best results. Yes, goat cheese or mozzarella can be alternatives. Goat cheese gives a tangy flavor. Mozzarella offers a creamy texture. Both options add a new twist to the dish. Feel free to try them! Use a vegan feta alternative and plant-based pasta. Many stores sell vegan feta now. This keeps the dish creamy and flavorful. Remember to check the pasta for eggs. Most pasta is vegan, but some are not. It pairs well with a side salad or grilled vegetables. A fresh salad adds crunch and lightness. Grilled veggies bring smokiness and depth. Both options balance the creamy pasta well. Yes, prepare the components separately and combine before serving. You can bake the feta and tomatoes in advance. Cook the pasta separately and mix it later. This method saves time on busy days. This baked feta pasta is a simple and tasty dish. We covered all the key ingredients, tools, and steps you need. With easy options to customize and serve, this meal shines in any kitchen. Remember to adjust spices and experiment with add-ins to fit your taste. You can enjoy leftovers, too, making this dish perfect for busy days. Dive in and savor the wonderful flavors. Cooking can be fun, and this recipe shows just how easy and rewarding it can be!

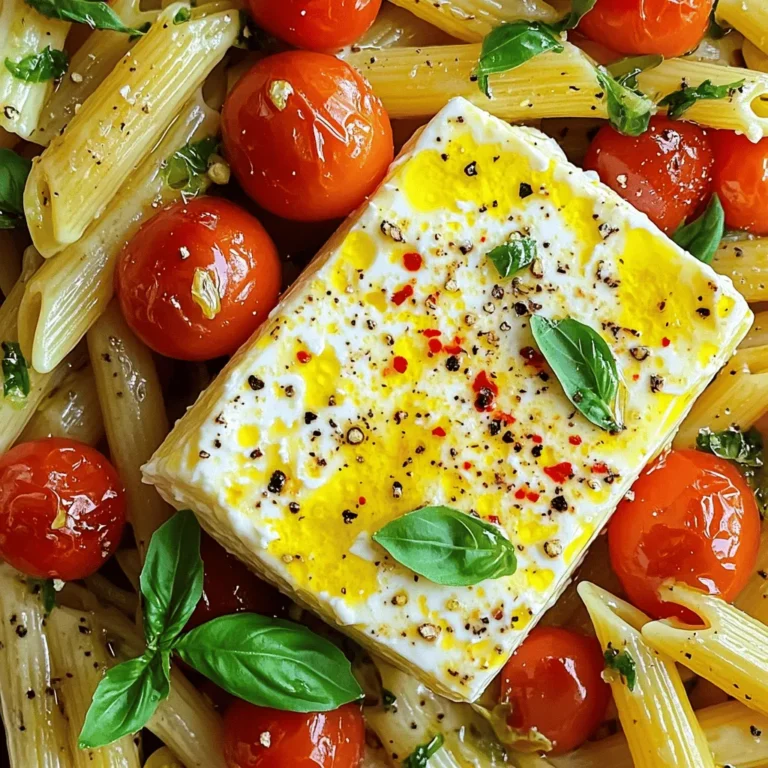
TikTok Baked Feta Pasta Tasty 30-Minute Meal

- 1 ½ cups graham cracker crumbs - ½ cup unsalted butter, melted - ¼ cup sugar - 2 (8 oz) packages cream cheese, softened - ¾ cup sugar - 2 large eggs - 1 teaspoon vanilla extract - 1 teaspoon cinnamon - 2 cups apples, peeled, cored, and diced - ¼ cup sugar - 1 teaspoon cinnamon - 2 tablespoons lemon juice - 1 tablespoon cornstarch - ½ cup caramel sauce - 1 teaspoon sea salt (optional) To make these caramel apple pie cheesecake bars, start with the crust. The crust has graham cracker crumbs, melted butter, and sugar. This mix creates a sweet and crunchy base. Next, for the cheesecake filling, use softened cream cheese, sugar, eggs, vanilla extract, and cinnamon. This filling is rich and smooth. Then, prepare the apple pie layer. Use two cups of diced apples, sugar, cinnamon, lemon juice, and cornstarch. The apples add sweetness and spice. Finally, for the topping, drizzle caramel sauce on top. You can add sea salt for balance. This mix of flavors makes your bars truly special. 1. First, preheat your oven to 350°F (175°C). Grease a 9x9-inch baking pan. You can also line it with parchment paper for easy removal. 2. In a bowl, mix together 1 ½ cups of graham cracker crumbs, ½ cup of melted unsalted butter, and ¼ cup of sugar. Stir until the mixture is well combined. 3. Press this mixture firmly into the bottom of your prepared pan. Bake the crust for 10 minutes. Allow it to cool completely before adding the filling. 1. In a mixing bowl, beat together 2 packages of softened cream cheese and ¾ cup of sugar. Mix until the mixture is smooth and creamy. 2. Next, add in 2 large eggs, 1 teaspoon of vanilla extract, and 1 teaspoon of cinnamon. Blend everything well until it is fully combined. 1. Pour the cheesecake filling over your cooled crust. Spread it evenly with a spatula. 2. In another bowl, toss together 2 cups of diced apples, ¼ cup of sugar, 1 teaspoon of cinnamon, 2 tablespoons of lemon juice, and 1 tablespoon of cornstarch. Make sure the apples are well coated. 3. Distribute the apple mixture evenly over the cheesecake layer. Gently press the apples down to nestle them into the filling. 4. Bake the entire pan for 40-45 minutes. The cheesecake should be set, and the apples should be tender. Once done, let it cool at room temperature for about 30 minutes. 1. Drizzle ½ cup of caramel sauce over the top while it is still warm or after it has completely cooled. 2. If you want, sprinkle 1 teaspoon of sea salt on top for an extra flavor boost. To make a great crust, aim for even thickness. I press the graham cracker mix firmly into the pan. This helps it hold together well. If you want a twist, try using crushed cookies instead of graham crackers. Oreos or gingersnaps can add fun flavors. For a creamy filling, beat the cream cheese until smooth. This step is key! If you can’t use cream cheese, try mascarpone or a dairy-free option like cashew cream. These swaps can still give you a tasty treat. When picking apples, use a mix of sweet and tart ones. Granny Smith and Honeycrisp are great choices. They add depth to the flavor. To enhance the apple taste, sprinkle in some nutmeg or allspice. These spices will make your bars shine even more. {{image_2}} You can change up the flavor of these bars easily. Try making caramel pecan apple pie cheesecake bars. Just add chopped pecans to the apple layer and drizzle some extra caramel on top. The nuts add a nice crunch that pairs well with the creamy filling. Another fun option is pumpkin spice apple cheesecake bars. Swap some of the cream cheese with pumpkin puree. Then, add pumpkin spice to the cheesecake filling. This gives a cozy fall flavor that many people love. If you need a gluten-free crust, use almond flour or gluten-free graham cracker crumbs. Mix it with melted butter and sugar just like in the regular recipe. This way, you keep the same great taste without gluten. For a vegan cheesecake, replace cream cheese with cashew cream or tofu. Use a plant-based butter for the crust. You can also substitute eggs with flaxseed meal mixed with water. This makes a nice creamy filling that everyone can enjoy. These bars are great with ice cream or whipped cream. A scoop of vanilla ice cream on top adds a creamy touch that complements the flavors well. You can also serve it with a dollop of whipped cream for a light finish. When it comes to serving, you can enjoy these bars warm or chilled. Warm bars have a soft and gooey texture. Cold bars give a firmer bite and are refreshing. You can choose based on your mood! Keep your leftover caramel apple pie cheesecake bars in the fridge. Use an airtight container to prevent them from drying out. They will stay fresh for about 5 days. The flavors deepen as they chill, making each bite even better. You can freeze these cheesecake bars for longer storage. First, cut them into squares. Wrap each square tightly in plastic wrap. Then, place them in a freezer bag. They can last up to 3 months in the freezer. To enjoy, take them out and let them thaw in the fridge overnight. If you want them warm, pop them in the oven at 350°F for about 10 minutes. Enjoy a sweet treat any time! Yes, you can. I recommend making them up to two days before serving. Just store them in the fridge. Keep them covered to stay fresh. If you want a dairy-free option, use cashew cream or tofu. For a lower-fat choice, try Greek yogurt or cottage cheese. Both options can work well in this recipe. Look for a slight jiggle in the center. The edges should be firm and not wobbly. When it cools, it will set more. Absolutely! You can use whole wheat flour instead of graham cracker crumbs. Swap out half the sugar for honey. You can also add oats for texture and fiber. You’ve learned how to make delicious Apple Pie Cheesecake Bars from scratch. We covered key ingredients, preparation steps, and helpful tips to perfect your creation. Remember to experiment with flavors and modifications to make the recipe your own. Whether you serve them warm or chilled, these bars offer a delightful mix of textures and tastes. Enjoy sharing your tasty treat with family and friends, and feel free to customize it to fit your style!

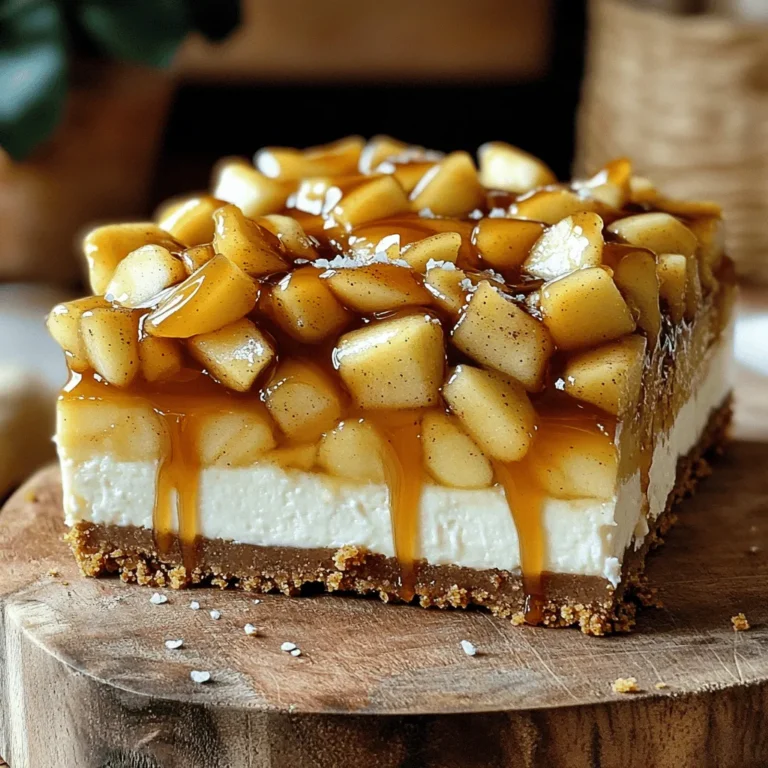
Caramel Apple Pie Cheesecake Bars Worth Savoring

To make these spicy maple Sriracha wings, you need: - 2 pounds chicken wings - 1/4 cup pure maple syrup - 1/4 cup Sriracha sauce - 2 tablespoons soy sauce - 1 tablespoon apple cider vinegar These wings get their base flavor from the chicken and the sweet and spicy sauce. The maple syrup adds rich sweetness, while Sriracha packs a punch. Soy sauce gives depth, and apple cider vinegar ties it all together. For the perfect flavor, grab these seasonings: - 1 tablespoon garlic powder - 1 teaspoon smoked paprika - Salt and pepper to taste Garlic powder adds a savory taste. Smoked paprika brings a hint of smokiness. Salt and pepper are key to enhancing all the flavors. To finish your wings, you can use: - 1 tablespoon sesame seeds (for garnish) - Fresh cilantro, chopped (for garnish) These garnishes not only look great but also add fresh notes. The sesame seeds add a nice crunch, while cilantro offers brightness. First, set your oven to 425°F (220°C). This high heat helps make the wings crispy. Next, line a baking sheet with parchment paper. This makes cleanup easy. Now, grab your chicken wings. Pat them dry with paper towels. This step helps the skin crisp up nicely. Place the wings in a large bowl. Season them with salt, pepper, garlic powder, and smoked paprika. Toss everything together until wings are coated evenly. In a separate bowl, mix together the sauce ingredients. Start with 1/4 cup of pure maple syrup. Add 1/4 cup of Sriracha sauce for heat. Then, stir in 2 tablespoons of soy sauce. This adds a nice umami flavor. Next, include 1 tablespoon of apple cider vinegar for some tang. Whisk these together until smooth and well combined. Pour this flavorful mix over the seasoned wings. Toss the wings again to ensure every piece gets a good coating. Now, arrange the wings on your lined baking sheet. Make sure they sit in a single layer. This way, they cook evenly. Bake them in the preheated oven for 30 to 35 minutes. Flip the wings halfway through cooking time. This helps them crisp up on both sides. If you want extra crunch, turn on the broiler for 2 to 3 minutes at the end. Just keep a close eye to prevent burning. When done, take them out and let them rest for a few minutes. Top with sesame seeds and fresh cilantro for a colorful finish. To get wings that are crispy, start with dry wings. Pat them with paper towels. This step removes excess moisture. The less moisture, the crispier the skin. Bake them at 425°F. Flip the wings halfway through cooking. This helps them brown evenly. For an extra crunch, broil them for 2-3 minutes at the end. Keep a close watch to avoid burning. The magic of these wings lies in the mix of heat and sweet. You want to feel the kick from the Sriracha but also enjoy the sweetness from the maple syrup. If you like it spicier, add more Sriracha. If you prefer sweeter wings, increase the maple syrup. Taste the sauce before coating the wings. This lets you adjust it to your liking. One common mistake is overcrowding the baking sheet. Give the wings space to cook. If they are too close, they will steam instead of crisp. Another mistake is not flipping the wings. Flipping helps both sides get crispy. Finally, be careful with the broiling step. It's easy to burn the wings if you don't keep an eye on them. {{image_2}} You can mix it up with different sauces. Try honey garlic or buffalo sauce. If you love a smoky flavor, use chipotle sauce. For a tangy twist, barbecue sauce works well too. Each sauce gives the wings a new taste. Experimenting can lead to your favorite version. The air fryer is a great option. It makes the wings crispy with less oil. Preheat your air fryer to 400°F (200°C). Cook the wings for about 25 minutes, shaking halfway. Grilling is another fun method. It adds a nice char and smoky flavor. Grill them over medium heat for 20-25 minutes. You can change some ingredients if needed. Use honey instead of maple syrup for sweetness. Coconut aminos can replace soy sauce for a gluten-free option. For a milder spice, use sweet chili sauce instead of Sriracha. These swaps keep the wings tasty while fitting your needs. After you enjoy your spicy maple Sriracha wings, store any leftovers in a safe way. Let the wings cool down first. Then, place them in an airtight container. You can keep them in the fridge for up to three days. Make sure to seal the container tightly to keep out air. When you want to enjoy those tasty wings again, reheating is key. Preheat your oven to 350°F (175°C). Place the wings on a baking sheet lined with foil. Heat them for about 10-15 minutes. This will help them become crispy again. You can also use a microwave, but they might not be as crispy. If you have more wings than you can eat, freezing is a great option! Place the cooled wings in a freezer-safe bag. Remove as much air as possible before sealing. You can freeze them for up to three months. When you’re ready to eat, thaw them in the fridge overnight before reheating. Yes, you can make these wings ahead of time. Cook them fully and let them cool. Store the cooked wings in an airtight container in the fridge for up to three days. When you're ready to eat, reheat them in the oven. This keeps them crispy and tasty. These wings pair great with a few sides. Here are some ideas: - Fresh veggies like carrots and celery - Creamy ranch or blue cheese dip - A simple green salad - Crispy potato wedges or fries - Cold drinks like beer or iced tea These sides add balance and flavor to your meal. To adjust the heat level, change the amount of Sriracha sauce. If you want it milder, use less Sriracha. You can also add honey to sweeten without heat. For more heat, add a dash of cayenne pepper or more Sriracha. Taste as you go to find your perfect heat! You now know how to make Spicy Maple Sriracha Wings. We covered the main ingredients, seasonings, and garnishes. I shared step-by-step instructions for cooking and baking them. You learned tips for the best crispiness and how to balance flavors. Variations and storage methods were also discussed. These wings are not just tasty; they are fun to make. Enjoy your cooking and impress your friends with this recipe!

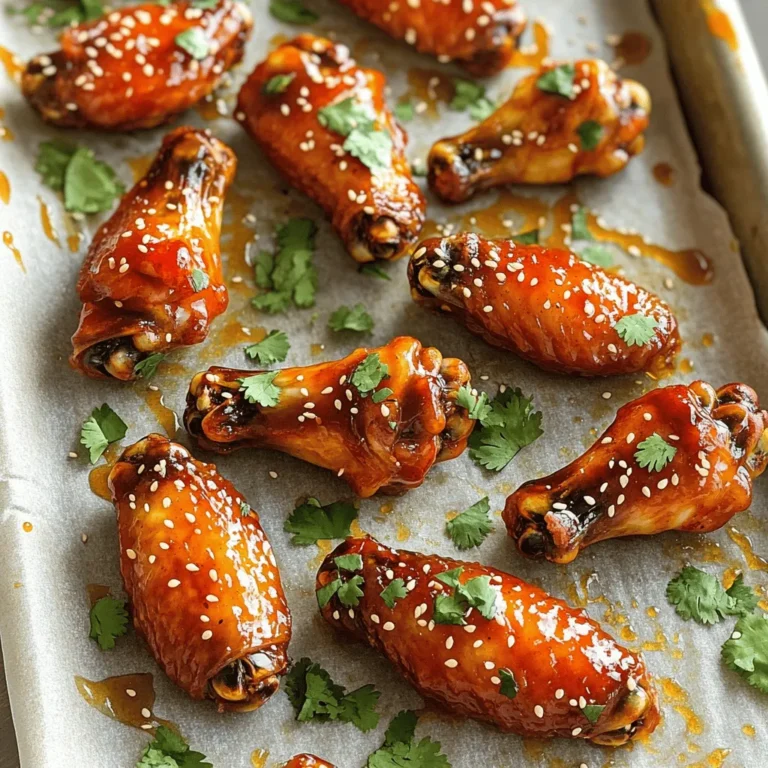
Spicy Maple Sriracha Wings Flavorful and Crispy Treat

To make a Blueberry Lemon Ricotta Galette, you will need: - 1 ½ cups all-purpose flour - ½ teaspoon salt - 2 tablespoons granulated sugar - ½ cup unsalted butter, cold and cubed - 4-5 tablespoons ice water - 1 cup ricotta cheese - 1 tablespoon lemon zest - 2 tablespoons fresh lemon juice - 2 cups fresh blueberries - 2 tablespoons honey - 1 tablespoon cornstarch - 1 egg, beaten (for egg wash) - Extra sugar for sprinkling If you want to switch things up, here are some easy swaps: - Use whole wheat flour instead of all-purpose flour for a nuttier taste. - Try cream cheese instead of ricotta for a richer filling. - Replace honey with maple syrup for a different sweet flavor. - For a gluten-free option, use a gluten-free flour blend. Choosing the best blueberries is key for this recipe. Follow these tips: - Look for plump, firm berries with a deep blue color. - Avoid berries with green or red spots, as they may not be ripe. - Check for any signs of mold or squished berries in the container. - Smell the blueberries; they should have a sweet, fruity scent. - If possible, buy organic blueberries for better flavor and less pesticide. Now you're ready to gather your ingredients and dive into making this delightful galette! To start, gather your ingredients. You will need flour, salt, sugar, butter, and ice water. In a large bowl, whisk together 1 ½ cups of flour, ½ teaspoon of salt, and 2 tablespoons of sugar. Next, add ½ cup of cold, cubed butter. Use your fingers or a pastry cutter to mix until it looks like coarse crumbs. This step is key for a flaky crust. Gradually add 4 to 5 tablespoons of ice water, one tablespoon at a time. Mix it until the dough starts to come together. You might not need all the water. Once it forms a ball, shape it into a disk. Wrap it in plastic and chill it in the fridge for at least 30 minutes. Chilling helps the butter firm up, which gives the crust a great texture. While the dough chills, prepare the filling. In a bowl, mix 1 cup of ricotta cheese, 1 tablespoon of lemon zest, and 2 tablespoons of fresh lemon juice. Also, add 2 tablespoons of honey and 1 tablespoon of cornstarch. Stir until the mixture is smooth. Be gentle when you fold in 2 cups of fresh blueberries. This keeps them whole and adds a nice texture. Once the dough is ready, preheat your oven to 375°F (190°C). Roll out the chilled dough on a floured surface into a 12-inch circle. Move the dough to a baking sheet lined with parchment paper. Now, spoon the ricotta mixture into the center of the dough, leaving a 2-inch border all around. Carefully fold the edges of the dough over the filling. Pleat it as you go to create a nice look. Brush the outer edge with a beaten egg and sprinkle some sugar on top. This gives it a lovely golden color when baked. Bake the galette for 35 to 40 minutes. You want the crust to be golden brown and the filling bubbly. Once it’s done, let it cool slightly before slicing. Serve it warm or at room temperature for a delightful treat! To get that perfect crust, use cold butter. Cut it into small cubes. This helps create flaky layers. Make sure to mix until it looks like coarse crumbs. When adding ice water, do so slowly. Use just enough to make the dough hold together. Chill the dough for at least 30 minutes. This step makes the crust easier to roll out. One common mistake is overworking the dough. This can make it tough. Mix just until combined. Another mistake is not chilling the dough. If the dough is warm, the butter melts. This stops the crust from being flaky. Lastly, don’t skip the egg wash. It gives the crust a nice shine and golden color. For serving, place the galette on a wooden board. This gives it a rustic feel. Garnish with fresh mint leaves for color. A light dusting of powdered sugar adds a sweet touch. You can also serve it warm with a scoop of vanilla ice cream. This enhances the flavors of the blueberries and lemon. Enjoy this treat with family and friends! {{image_2}} You can easily adapt this recipe for various diets. For a gluten-free version, swap all-purpose flour with a gluten-free blend. If you want a dairy-free option, use almond or coconut ricotta. For those who avoid sugar, try using a sugar substitute like stevia or erythritol instead of granulated sugar and honey. You can play with flavors in this galette. Add a pinch of cinnamon or nutmeg to the ricotta filling for warmth. For a different fruit twist, mix in peaches or raspberries with the blueberries. You can also add a splash of vanilla extract to enhance the flavor profile. If you like tartness, increase the lemon juice slightly. Serving this galette can be fun and fancy! A scoop of vanilla ice cream on top adds creaminess. You might also drizzle some honey or maple syrup over the slices for extra sweetness. Whipped cream pairs well, too. For a fresh touch, garnish with mint leaves or a sprinkle of powdered sugar. Enjoy it warm or at room temperature for the best taste! To keep your leftover galette fresh, wrap it well. Use plastic wrap or foil to cover it. You can also place it in an airtight container. Store it in the fridge for up to three days. This keeps the crust from getting too soggy. When you want to enjoy your galette again, preheat your oven to 350°F (175°C). Place the galette on a baking sheet. Bake for about 10-15 minutes. This helps to warm it through and crisp the crust. You can also use a microwave, but it may make the crust soft. If you want to save the galette for later, freezing is a great option. First, let it cool completely. Wrap it tightly in plastic wrap, then foil. This double layer helps prevent freezer burn. You can freeze it for up to three months. When ready to eat, thaw it in the fridge overnight and reheat it in the oven. Yes, you can use frozen blueberries. They work well in this galette. Just remember to thaw them first. Drain any excess liquid to prevent a soggy filling. Frozen blueberries are often picked at peak ripeness, so they can taste just as good as fresh ones. The galette is done when the crust turns golden brown. Check the filling, too; it should be bubbly. You can also check the bottom crust for a nice color. If it looks too pale, give it a few more minutes in the oven. Yes, you can prepare the dough ahead of time. Wrap it tightly in plastic and store it in the fridge for up to three days. You can also freeze the dough for up to a month. Just remember to thaw it in the fridge overnight before using it. You learned how to make a delicious blueberry galette, from selecting fresh berries to baking. I shared tips for choosing the best ingredients and avoiding common mistakes. I also covered variations to fit different diets and tastes. Remember, the best part about making this galette is experimenting with flavors. Enjoy it warm with ice cream or keep it simple. Your friends and family will love this treat. Happy baking!

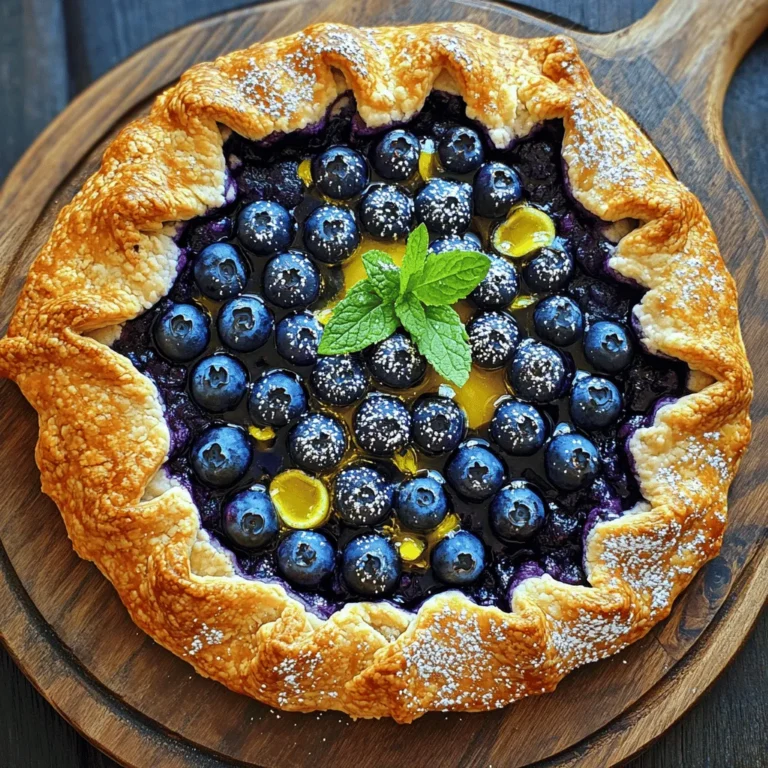
Blueberry Lemon Ricotta Galette Fresh and Simple Treat

To make delicious air fryer mozzarella stuffed meatballs, you need the following: - 1 lb ground beef - 1 lb ground pork - 1 cup breadcrumbs - 1/2 cup grated Parmesan cheese - 1 egg - 2 cloves garlic, minced - 1 teaspoon dried oregano - 1 teaspoon dried basil - Salt and pepper to taste - 8 oz fresh mozzarella cheese, cut into 1-inch cubes - 1/4 cup fresh parsley, chopped (for garnish) These ingredients come together to create juicy meatballs with a melty cheese center. You can enhance the flavor of your meatballs with a few extras. Consider adding: - Red pepper flakes for heat - Fresh herbs like thyme or rosemary - Italian seasoning for a richer taste Garnish with fresh parsley to give a pop of color and a fresh taste. A warm marinara sauce pairs perfectly with these meatballs. Look for a sauce that is rich and thick. You can use store-bought or make your own with tomatoes, garlic, and herbs. This adds a nice touch for dipping and elevates the entire dish. Enjoy! To start, grab a large mixing bowl. Add 1 pound of ground beef and 1 pound of ground pork. Then, mix in 1 cup of breadcrumbs and 1/2 cup of grated Parmesan cheese. Next, crack in 1 egg for binding. Add 2 minced garlic cloves, 1 teaspoon of dried oregano, and 1 teaspoon of dried basil. Don’t forget to sprinkle salt and pepper to taste. Use your hands to mix everything until well combined. This mix is key to making tasty meatballs. Once the meat mixture is ready, it’s time to shape the meatballs. Take about 2 tablespoons of the mix and flatten it in your palm. Place a 1-inch cube of fresh mozzarella in the center. Gently wrap the meat around the cheese until it forms a ball. Make sure the cheese is completely covered. This step is crucial; you want that gooey cheese inside! Repeat this until you use up all the meat mixture and cheese. Before cooking, preheat your air fryer to 400°F (200°C) for about 5 minutes. Lightly spray the air fryer basket with cooking spray. Place the meatballs in a single layer, ensuring they don’t touch. This helps them cook evenly. Air fry the meatballs at 400°F for 10-12 minutes. To check if they’re done, use a meat thermometer. Make sure they reach 160°F (70°C). Once cooked, carefully take them out and let them rest for a couple of minutes. They’ll be hot, so be careful! To make juicy meatballs, always mix your ingredients gently. Overmixing can lead to tough meatballs. Use equal parts ground beef and ground pork for the best flavor and moisture. Add breadcrumbs and Parmesan cheese to help bind the meat. These ingredients also add flavor and keep them moist. Don't skip the egg; it acts as a binding agent. For gooey cheese, use fresh mozzarella. Cut it into 1-inch cubes. When shaping the meatballs, ensure the cheese is fully enclosed. This step keeps the cheese from leaking out during cooking. Air fry the meatballs at the right temperature, 400°F, for the best melting effect. Keep an eye on them; they should be golden brown and oozing cheese. One common mistake is using too much seasoning. Salt and pepper should enhance the flavor, not overpower it. Also, avoid crowding the air fryer. Give each meatball space to cook evenly. Not checking the internal temperature can lead to undercooked meatballs. Aim for 160°F to ensure they are safe to eat. Lastly, don’t skip resting time after cooking; this helps keep the juices inside. {{image_2}} You can switch up the cheese for fun. Try cheddar for a sharp bite. Gouda adds a rich flavor. If you like spice, pepper jack is a great choice. Just cut the cheese into 1-inch cubes, like mozzarella. Each cheese brings its own taste to the meatballs. You don’t have to use just beef and pork. Ground turkey or chicken works well too. They are leaner and still tasty. For a fun twist, use lamb for a different flavor. Just keep the same amount in the recipe. It’s easy to change things up. Add herbs or spices for new flavors. A pinch of smoked paprika gives a nice smoky taste. Fresh herbs like cilantro or thyme can brighten the dish. For a kick, add crushed red pepper flakes. Mix and match to find your favorite flavor. Each change can make your meal unique and exciting! To store leftover meatballs, let them cool down first. Place them in an airtight container. You can keep them in the fridge for up to three days. Make sure to separate layers with parchment paper to avoid sticking. To reheat, use your air fryer. Heat it to 350°F (175°C). Place meatballs in the basket and cook for 5-7 minutes. This will keep them crispy. You can also use a microwave, but they might lose some crunch. Heat them for about 1-2 minutes. To freeze meatballs, let them cool completely. Arrange them on a baking sheet in a single layer. Freeze for 1-2 hours until firm. Then, transfer them to a freezer bag. They will last for up to three months. When ready to eat, thaw them in the fridge overnight and reheat as mentioned above. Yes, you can bake these meatballs. Preheat your oven to 400°F (200°C). Place the meatballs on a baking sheet lined with parchment paper. Bake for 20-25 minutes. Make sure they are golden brown. The air fryer gives a crisp texture, but baking works too. Check the meatballs with a meat thermometer. They should reach 160°F (70°C) inside. You can also cut one open. The meat should be brown, and the cheese should be melted. If you see any pink, cook them longer. Serve these meatballs with marinara sauce for dipping. You might also enjoy them on spaghetti. A fresh salad or garlic bread pairs well too. Try adding some roasted veggies for a complete meal. You learned how to make delicious air fryer mozzarella stuffed meatballs. We covered the key ingredients, cooking steps, and helpful tips for juicy results. You also discovered variations and storage options to keep meals exciting. Cooking should be fun and easy. Enjoy making these flavorful meatballs and impress your friends and family with your skills. Happy cooking!

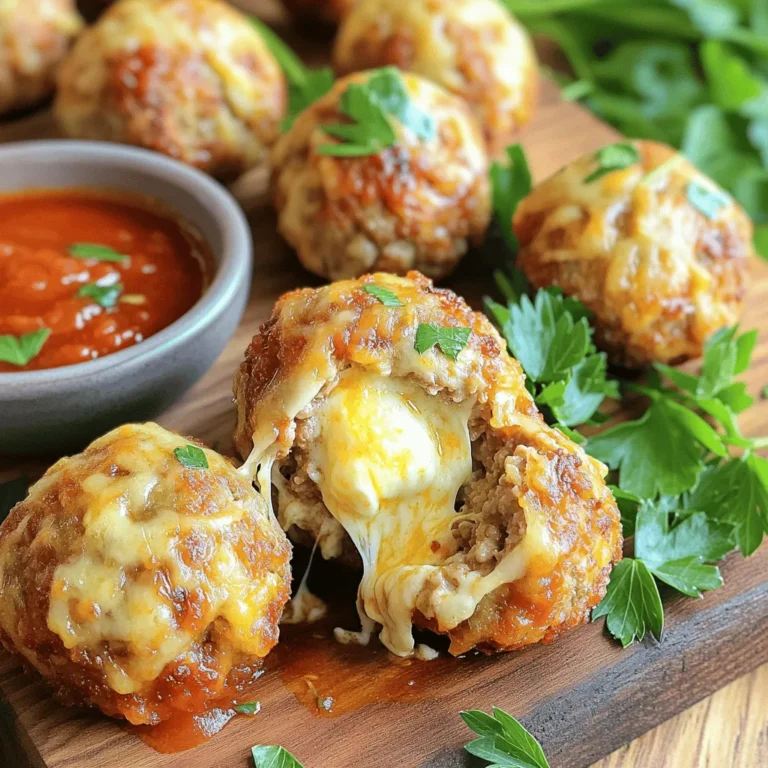
Savory Air Fryer Mozzarella Stuffed Meatballs Recipe

PREV 1 … 22 23 24 … 58 NEXT
quick dish kitchen

explore

DessertsDinnerAppetizersDrinks

Our Policies

  • Cookie Policy
  • Copyright Policy
  • Disclaimer
  • GDPR Policy
  • Terms Of Use
Back to Top
  • About
  • Contact Us
  • Privacy Policy
© 2025 quick dish kitchen