FREE DINNER EBOOK! Get your copy!
  • Cookie Policy
  • GDPR Policy
  • Disclaimer
  • Terms Of Use
  • Visit my other site: Fun Cookie Recipes
quick dish kitchen
  • Home
  • Dinner
  • Desserts
  • Drinks
  • Appetizers
  • Contact
  • About
  • Privacy Policy
  • Home
  • Dinner
  • Desserts
  • Drinks
  • Appetizers
  • Contact
  • About
  • Privacy Policy
  • Cookie Policy
  • GDPR Policy
  • Disclaimer
  • Terms Of Use
Visit my other site: Fun Cookie Recipes

HOME / CATEGORIES /

Latest

To make Mocha Iced Coffee Popsicles, you need these ingredients: - 2 cups brewed coffee, cooled - 1 cup milk (dairy or non-dairy) - 1/2 cup sweetened condensed milk - 1/4 cup cocoa powder - 1 tablespoon vanilla extract - 1/4 cup chocolate chips (optional) These simple ingredients create a rich and creamy treat. The brewed coffee gives it a strong flavor. You can use any milk you like. Sweetened condensed milk adds sweetness and creaminess. Cocoa powder brings that delightful chocolate taste. The vanilla extract enhances the overall flavor. If you love chocolate, add some chocolate chips for extra fun. Make sure your coffee is cooled before mixing. This step helps the popsicles freeze evenly. If you want a dairy-free version, use almond or oat milk. This recipe is flexible, so feel free to adjust it to your taste. Enjoy creating these popsicles! {{ingredient_image_1}} To make these mocha iced coffee popsicles, start by gathering your ingredients. You need: - 2 cups brewed coffee, cooled - 1 cup milk (dairy or non-dairy) - 1/2 cup sweetened condensed milk - 1/4 cup cocoa powder - 1 tablespoon vanilla extract - 1/4 cup chocolate chips (optional) In a large mixing bowl, combine the cooled brewed coffee, milk, sweetened condensed milk, cocoa powder, and vanilla extract. This blend creates a rich mocha flavor. Next, whisk all the ingredients together. Keep whisking until the mixture is smooth and free of lumps. This step is crucial for the best popsicle texture. If you like a little extra chocolate, add the chocolate chips now. Stir gently to mix them in. This mixture is what will become your delicious popsicles. It’s simple and quick to prepare! Pouring the mixture into the molds is a fun step. Start by taking your prepared coffee mixture. Hold the bowl steady as you pour. Make sure to fill each mold about 3/4 full. This gives space for the popsicles to expand as they freeze. If you fill them too much, they can overflow. Next, it’s time to insert the popsicle sticks. Take your sticks and place one in each mold. Make sure the stick is centered. This helps hold the popsicle together when you eat it. If the mixture is too warm, wait a minute before inserting the sticks. You want them to stand straight up. Once you fill the molds and insert the sticks, they are ready for the freezer. It’s a simple step, but it leads to a tasty treat later! Pro Tips Chill Your Ingredients: Make sure all your ingredients, especially the brewed coffee, are cool before mixing to ensure the popsicles freeze properly without ice crystals. Customize Sweetness: Adjust the amount of sweetened condensed milk based on your sweetness preference. You can also substitute it with a sugar alternative if desired. Add a Flavor Twist: Experiment with different extracts like almond or hazelnut to give your popsicles a unique flavor profile. Mix in Extras: Enhance your popsicles by incorporating crushed nuts or a swirl of caramel or chocolate sauce before freezing for added texture and flavor. {{image_2}} The freezing process is key to making great mocha iced coffee popsicles. You need to freeze the popsicles for at least 6 hours. This time allows them to become solid. If you want a faster freeze, use smaller molds. They will freeze faster than larger ones. To check if your popsicles are solid, gently pull one from the mold. If it comes out easily, it is ready. You can also feel the popsicle. It should feel firm and hard. If it is still soft, put it back in the freezer for more time. A tip for best results is to avoid opening the freezer too often. Each time you open it, warm air enters. This can slow down the freezing process. So, let the popsicles freeze without checking too much. Once they are solid, you will enjoy a cool and delicious treat. To make smooth popsicles, start with a good mix. Combine your cooled brewed coffee, milk, sweetened condensed milk, cocoa powder, and vanilla extract in a large bowl. Use a whisk to blend until everything is even. A smooth mix helps the popsicles freeze well. If you want to add some fun flavors, consider chocolate chips. They add a nice crunch. Just stir them in after mixing the base. You can also try adding a dash of cinnamon for warmth. It gives a unique twist. Another option is to use different types of milk. Almond or oat milk can change the taste and feel. Keep your popsicle molds about three-quarters full. This allows space for the mixture to expand while freezing. It helps prevent spills and keeps the texture right. The best way to enjoy your mocha iced coffee popsicles is on a hot day. They make a great treat after lunch or as a snack. You can eat them straight from the mold. Try letting them melt a little for a creamy drink. Pair your popsicles with a few fun toppings. Chocolate syrup drizzled on top adds extra sweetness. You can also sprinkle some cocoa powder for a rich taste. For a fun twist, add whipped cream or even a few chocolate chips. Each bite will be a treat! Feel free to get creative with your popsicle flavors. You can mix in spices like cinnamon or nutmeg for a unique taste. If you want a stronger coffee flavor, add a bit more brewed coffee to the mix. Enjoy making these popsicles your own! For those who prefer a dairy-free treat, there are great alternatives for milk. You can use almond milk, coconut milk, or oat milk. Each option gives a unique taste and texture. Almond milk is light and nutty. Coconut milk adds a creamy, tropical flavor. Oat milk is rich and smooth, making it my top choice. You can also change the sweeteners. Instead of sweetened condensed milk, try maple syrup or agave nectar. Both options add sweetness without dairy. You can adjust the amount to fit your taste. Just remember, the goal is to keep the popsicles sweet and tasty. You can add spices to boost the flavor. A pinch of cinnamon or nutmeg can warm up the taste. These spices pair well with coffee and chocolate. You can also mix in different types of chocolate. Dark chocolate adds richness, while white chocolate offers a sweet contrast. Switching up the coffee can also change the flavor. Use a flavored coffee, like hazelnut or caramel, for a fun twist. Each variation lets you create a unique version of these mocha iced coffee popsicles. You can make Mocha Iced Coffee Popsicles even better by adding spices. A pinch of cinnamon or nutmeg can bring warmth and depth to your treat. These spices pair well with coffee and chocolate. Just start with a small amount. You can always add more to match your taste. Another fun way to enhance flavor is by using different chocolates. Dark chocolate gives a rich taste, while milk chocolate adds sweetness. You can also try white chocolate for a creamy twist. Each type changes the flavor, so experiment to find your favorite mix. You can also play with coffee types. Try using flavored coffee, like hazelnut or vanilla. This will add a unique touch to your popsicles. With these simple changes, you can create a treat that feels special and tastes amazing. To keep your mocha iced coffee popsicles fresh, store them in an airtight container. This helps keep out air and moisture. If you don’t have a container, wrap the molds in plastic wrap. Make sure they are tightly sealed. This will help keep your treats safe. Freezer burn can ruin the taste of your popsicles. To avoid this, ensure they are well-wrapped or covered. Freezer burn happens when air gets to the food. It causes ice crystals to form. This can make your popsicles taste weird or dry. You can store your mocha iced coffee popsicles for up to two months in the freezer. After that, they may lose taste and texture. If you see any signs of ice crystals, it’s time to toss them. Always check for a strange smell or color before eating. If they look odd, don’t risk it! You can store your mocha iced coffee popsicles in the freezer for about three months. Make sure to keep them in an airtight container or wrap them tightly in plastic wrap. This way, they will not get freezer burn. Look for signs that your popsicles have gone bad. If you see ice crystals forming or a change in color, it’s time to toss them. If they smell off or have a strange texture, do not eat them. Always check before enjoying your sweet treat! Yes, you can use decaf coffee. It will still taste good, but the flavor may be milder. Decaf coffee has less caffeine, so you can enjoy these popsicles without the buzz. The other ingredients, like cocoa and sweetened condensed milk, help keep the flavor rich and creamy. If you love coffee but want to cut back on caffeine, decaf is a great choice. Just make sure to let it cool before mixing. This way, it blends well with the other ingredients. You will still get a tasty treat that is perfect for warm days. Enjoy your mocha iced coffee popsicles! To make Mocha Iced Coffee Popsicles, you need a few simple tools. Here’s what you’ll need: - Mixing bowl: A large bowl is best for combining all the ingredients. - Whisk: Use a whisk to mix everything until smooth. - Popsicle molds: These hold the mixture while it freezes. Choose any shape you like. - Popsicle sticks: These help you hold the popsicles. Most molds come with sticks. - Measuring cups: Use these to measure your ingredients accurately. - Spoon or spatula: This helps you fill the molds without spilling. - Freezer: A good freezer is key to making these popsicles solid. With this equipment, you're ready to create a treat that cools you down and satisfies your coffee cravings. Yes, you can customize the sweetness level in Mocha Iced Coffee Popsicles. Adjusting the sweetness lets you make the popsicles just right for your taste. Here are some tips for sweetening adjustments: - Sweetened condensed milk: This is the main sweetener. You can use less if you prefer a less sweet treat. Start with 1/3 cup instead of 1/2 cup. - Add sugar: If you want more sweetness, mix in sugar. Use granulated sugar or brown sugar. Start with 1 to 2 tablespoons. Taste it before adding more. - Honey or maple syrup: These are great natural sweeteners. Try using 2 tablespoons instead of sweetened condensed milk. - Stevia or monk fruit: These are good for low-calorie options. They are much sweeter, so use them sparingly. Start with 1 teaspoon and adjust to taste. Testing your mixture is key. After mixing, taste it before freezing. This way, you can perfect the flavor. Remember, popsicles taste less sweet after freezing. Adjust your sweetness to find your perfect blend! In this post, we explored how to make delicious Mocha Iced Coffee Popsicles. We listed the key ingredients and shared step-by-step instructions for making them. You learned tips for a perfect texture and serving ideas. We also discussed dairy-free options and how to store your popsicles well. Making these treats is simple and fun. Enjoy them on hot days or as a sweet treat anytime. Happy popping!

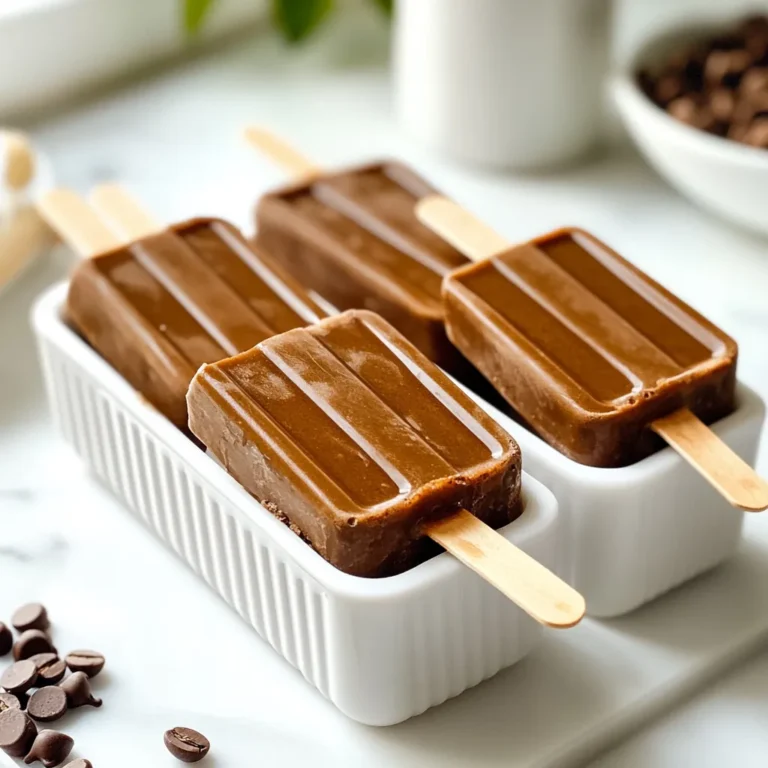
Mocha Iced Coffee Popsicles Simple and Delicious Treat

- 8 oz cream cheese, softened - 1/2 cup powdered sugar - 1/4 cup sour cream - 1 teaspoon vanilla extract - Zest of 1 lemon - 2 tablespoons fresh lemon juice - 1 cup fresh strawberries, chopped - Graham cracker crumbs for serving - Additional toppings (e.g., sliced strawberries, lemon wedges) To make Strawberry Lemon Cheesecake Dip, start with the main ingredients. Use 8 oz of softened cream cheese. This gives the dip a rich and creamy base. You need 1/2 cup of powdered sugar for sweetness. It balances the tangy flavors of the lemon and strawberries. Next, add 1/4 cup of sour cream. This adds a nice tartness and creaminess. Don’t forget 1 teaspoon of vanilla extract. It brings warmth and depth to the dip. For flavor enhancers, zest one lemon. This brightens up the dip with fresh lemon notes. Then squeeze in 2 tablespoons of fresh lemon juice. It makes the dip lively and zesty. Lastly, chop 1 cup of fresh strawberries. These juicy pieces add color and sweetness. For serving, sprinkle graham cracker crumbs on top. They add a nice crunch and look pretty. You can also add sliced strawberries and lemon wedges for a beautiful display. {{ingredient_image_1}} - First, combine 8 oz of softened cream cheese and 1/2 cup of powdered sugar in a bowl. - Use an electric mixer on medium speed. Beat the mixture until smooth and creamy. - Next, add 1/4 cup of sour cream, 1 teaspoon of vanilla extract, the zest of 1 lemon, and 2 tablespoons of fresh lemon juice. - Blend the mixture until it is fully combined and creamy. - After mixing, gently fold in 1 cup of chopped fresh strawberries. Be careful not to mush them. This keeps them intact and fresh. - Now, transfer the dip to a serving bowl. Smooth the top with a spatula for a nice look. - Chill the dip in the refrigerator for at least 30 minutes. This helps the flavors blend well. - For a finishing touch, sprinkle a light layer of graham cracker crumbs over the dip. To get the best texture, use softened cream cheese. This makes mixing easy and smooth. Cold cream cheese can lead to lumps. To avoid lumps, mix at medium speed. Start slow, then increase speed. This helps blend all the ingredients well. Adjust the sweetness to your taste. If you like it sweeter, add more powdered sugar. For a stronger lemon flavor, add extra lemon zest or juice. This brightens the dip and enhances its taste. Serve the dip with fresh fruits like strawberries and lemon wedges. This adds color and freshness. Layer graham cracker crumbs on top. It creates a nice crunch and looks pretty. You can also put extra graham crackers on the side for dipping. This makes it fun and tasty! Pro Tips Chill for Best Flavor: Allow the dip to chill for at least 30 minutes before serving. This helps the flavors meld together for a more delicious taste. Fresh Strawberries Only: Use fresh strawberries for the best flavor and texture. Frozen strawberries can make the dip watery and affect consistency. Customize the Sweetness: Adjust the powdered sugar according to your taste preference. Start with less and add more if you prefer a sweeter dip. Add a Twist: Experiment by adding other fruits or flavorings like blueberries or a splash of almond extract for a unique spin on the dip. {{image_2}} You can easily change the taste of your dip. Try adding other fruits, like blueberries or raspberries. These fruits add a new twist and vibrant color. You can also infuse the dip with almond extract. Just use a small amount to keep the flavor balanced. If you want a lighter dip, mix in some whipped cream. This adds air and makes it fluffy. Another option is to use Greek yogurt instead of sour cream. Greek yogurt gives a nice creaminess while adding protein. For gluten-free options, look for gluten-free graham crackers. They work great for dipping. If you're vegan, try using vegan cream cheese. This keeps the dip creamy and delicious without using dairy. This dip lasts about 3 to 5 days in the fridge. To keep it fresh, store it in an airtight container. A glass container works best. It keeps flavors locked in and helps avoid spills. Yes, you can freeze the dip! It stays good for up to 2 months in the freezer. To thaw, place it in the fridge overnight. This keeps the dip smooth and tasty. When serving chilled dip, take it out of the fridge about 10 minutes before. This helps soften it a bit. To refresh the dip, stir it gently. You can even add more chopped strawberries for a fresh touch. To make this dip, follow these steps: 1. In a bowl, mix 8 oz of softened cream cheese with 1/2 cup powdered sugar. Beat until smooth. 2. Add 1/4 cup sour cream, 1 teaspoon vanilla extract, the zest of 1 lemon, and 2 tablespoons of fresh lemon juice. Mix until creamy. 3. Gently fold in 1 cup of chopped strawberries. Be careful not to mash them. 4. Spoon the dip into a serving bowl. Smooth the top with a spatula. 5. Sprinkle graham cracker crumbs on top for decoration. 6. Chill the dip for at least 30 minutes. This helps the flavors blend. Yes, you can use frozen strawberries. Make sure to thaw them first. Pat them dry with a paper towel. This helps avoid extra moisture in your dip. Frozen strawberries work well, but fresh ones give a better texture and flavor. This dip pairs nicely with many dippers. Try these options: - Graham crackers - Sliced strawberries - Lemon wedges - Vanilla wafers - Pretzel sticks These crunchy and sweet dippers make the dip even more enjoyable. Yes, this dip is great for parties! It is easy to make and looks pretty. Here are some tips for serving: - Use a big bowl for the dip to serve many people. - Arrange dippers around the bowl for a nice display. - Consider adding a garnish of lemon slices or more strawberries on top. - Make it ahead of time. Chill it for the best taste. In this blog post, we covered how to make a tasty Strawberry Lemon Cheesecake Dip. We shared the main ingredients like cream cheese and strawberries, followed by easy steps to prepare it. You learned tips for getting the right texture and flavor. We also explored fun variations and how to store your dip. This dip is great for parties or just a sweet treat. With these tips, you can enjoy a simple and delicious dessert any time. Get ready to impress your friends and family!

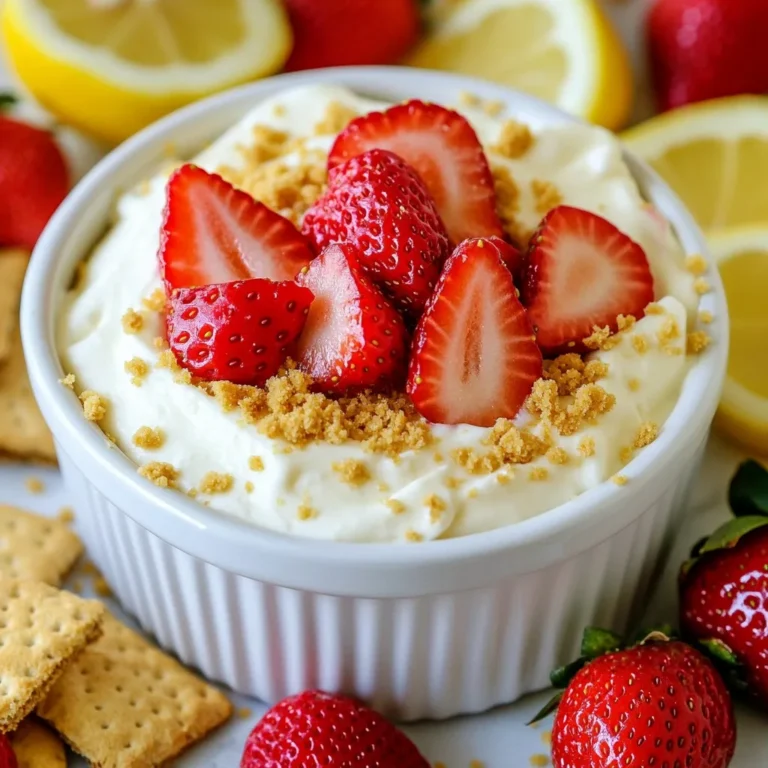
Strawberry Lemon Cheesecake Dip Easy and Tasty Treat

- 3 pounds beef chuck roast - 1 cup beef broth - 1 cup barbecue sauce (choose your favorite) - 1 onion, sliced - 4 cloves garlic, minced - 1 tablespoon Worcestershire sauce - 2 teaspoons smoked paprika - 1 teaspoon black pepper - 1 teaspoon salt - 8 hamburger buns - 1 cup coleslaw (store-bought or homemade) - Pickles for garnish (optional) Each ingredient plays a key role. The beef chuck roast gives great flavor and tenderness. The beef broth adds moisture during cooking. Barbecue sauce is the star, so pick one you love. Onion and garlic build a rich base. Worcestershire sauce adds depth. Smoked paprika gives a nice kick, while salt and pepper enhance the taste. Don’t forget the buns for serving! When it comes to barbecue sauce, I have a few favorites. Look for: - Sweet Baby Ray's: It's sweet and tangy, perfect for most palates. - Stubbs: This sauce has a nice smoky flavor with a hint of spice. - Kraft: A classic choice that balances sweetness and tang. You can pick any sauce you like, but these brands are crowd-pleasers. Garnishes can elevate your BBQ beef sandwich. Here are some extras to consider: - Coleslaw: It adds crunch and creaminess. You can use store-bought or make your own. - Pickles: They add a nice tang and crunch. Place them on the side or on the sandwich. - Fresh Parsley: Sprinkle it on top for a pop of color. These options can make your sandwich even more delicious and fun! Start with the beef. I use a 3-pound beef chuck roast. It is perfect for slow cooking. Place sliced onion at the bottom of the slow cooker. This adds flavor to the meat. Next, season the beef with salt, black pepper, and smoked paprika. Make sure to cover all sides. Now, let's make the sauce. In a bowl, mix beef broth, barbecue sauce, minced garlic, and Worcestershire sauce. Stir it all together until blended. This sauce will keep the beef juicy and tasty. Place the seasoned beef on top of the onions in the slow cooker. Pour the sauce mixture over the beef. Ensure the meat is fully coated. Cover the slow cooker with the lid. Cook on low for eight hours or high for four hours. The beef should be tender and easy to shred. Once the cooking time is up, carefully take out the beef. Let it rest for a few minutes. Use two forks to shred the meat into bite-sized pieces. Return the shredded beef to the slow cooker. Stir it well to mix with the sauce. Now, let’s build the sandwiches. Toast the hamburger buns if you like. Place a generous portion of shredded BBQ beef on the bottom half of each bun. Top with coleslaw and add pickles if you want. Place the top half of the bun on and serve. Enjoy your delicious Slow Cooker BBQ Beef Sandwiches! For BBQ beef sandwiches, I recommend using beef chuck roast. This cut has a good amount of fat, which makes it tender and juicy when cooked. You can also choose brisket or short ribs if you want different flavors. Just remember, the more marbled the meat, the better it will taste after slow cooking. Feel free to play with the seasonings! You can add cayenne pepper for heat or brown sugar for sweetness. If you like a smoky taste, try adding chipotle powder. Experiment with your favorite spices. The key is to balance the flavors to suit your taste buds. To get the best texture, cook the beef low and slow. This method allows the collagen in the meat to break down, resulting in tender shreds. Make sure to let the beef rest for a few minutes before shredding. This helps keep the juices inside. Shred the beef with two forks and mix it back into the sauce. This step ensures every bite is packed with flavor. {{image_2}} You can change the flavor of your BBQ beef sandwiches by using different sauces. Here are some options: - Honey BBQ Sauce: Adds sweetness to the dish. - Chipotle BBQ Sauce: Gives a smoky and spicy kick. - Mustard BBQ Sauce: Offers a tangy taste that brightens the meat. - Teriyaki Sauce: Adds a sweet and savory twist. Try mixing sauces for even more fun flavors. You can blend honey BBQ with chipotle for a sweet and spicy combo. The bun can change the whole sandwich game. Here are some great options: - Classic Hamburger Buns: Soft and perfect for BBQ. - Pretzel Buns: Add a nice chew and salty flavor. - Ciabatta Rolls: Give a rustic feel with great texture. - Whole Wheat Buns: Make your meal healthier while still tasty. Choosing the right bun can make your BBQ beef sandwich even better. You can enjoy BBQ flavors without meat. Here are some tasty options: - Jackfruit: Shredded jackfruit mimics the texture of pulled beef. - Mushrooms: Use portobello or shiitake for a meaty feel. - Lentils: Cooked lentils can soak up BBQ sauce well. - Tofu: Marinated and grilled tofu offers a protein-packed choice. These options let everyone enjoy BBQ beef sandwiches their way. To keep your leftovers fresh, place them in an airtight container. Make sure to store the shredded beef with its sauce. This keeps the beef moist and tasty. Refrigerate the container for up to three days. If you have extra coleslaw, store it in a separate container. This keeps it crunchy. To reheat the BBQ beef, use a saucepan over low heat. Stir the beef and sauce often. This helps the beef heat evenly. You can also use the microwave. Place the beef in a microwave-safe bowl and cover it. Heat in 30-second bursts until hot. If using a bun, toast it lightly before adding the beef. If you want to save some for later, freezing works well. Put the beef and sauce in a freezer-safe bag. Remove as much air as possible before sealing. You can freeze it for up to three months. For the coleslaw, it's best to freeze it without dressing. Add the dressing fresh when you are ready to eat. Yes, you can use other cuts of beef. Brisket or round roast works well. These cuts can also become tender with slow cooking. The key is to choose cuts that have some fat. Fat adds flavor and keeps the meat moist. If you pick a leaner cut, you might need to adjust the cooking time. To spice up your BBQ beef sandwiches, add chopped jalapeños. You can also mix in hot sauce. Another option is to use a spicy barbecue sauce. For a kick, add crushed red pepper flakes to the sauce. If you enjoy heat, consider using chipotle peppers in adobo sauce. Adjust the spice level to your taste. Many sides go well with BBQ beef sandwiches. Classic options include coleslaw and potato salad. Baked beans also add a nice touch. You can serve corn on the cob for a fun addition. If you want something lighter, a green salad works well too. Try sweet potato fries for a delicious twist. You now have all you need to make great BBQ beef sandwiches. We covered ingredients, step-by-step prep, and key tips. Don’t forget to try new sauces or buns to mix things up. Storing and reheating leftovers is simple, so enjoy your meal later, too. With these easy instructions, you can impress anyone with your cooking. Dive in and have fun with your BBQ beef sandwiches, and don’t hesitate to experiment. Happy cooking!

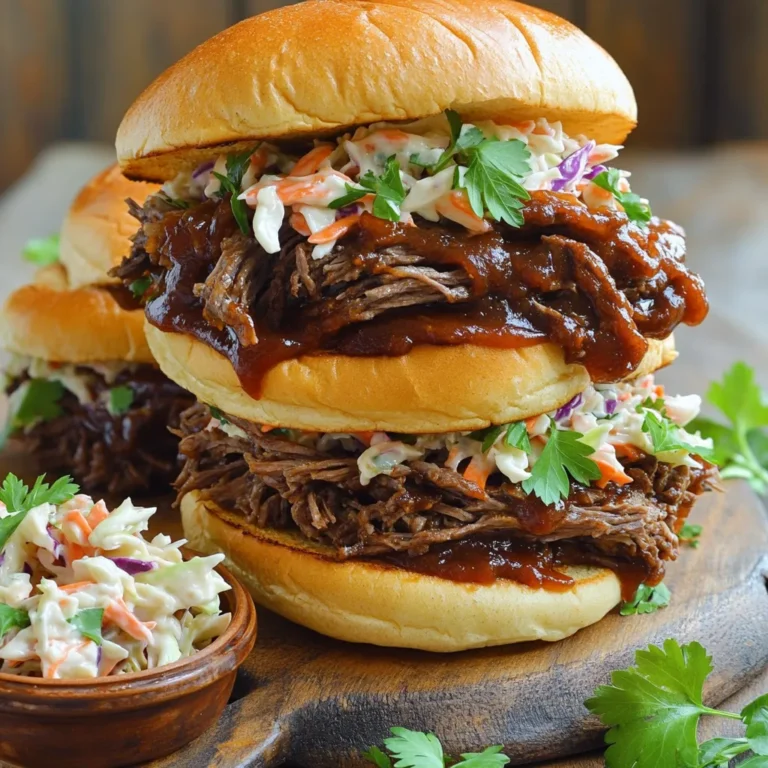
Slow Cooker BBQ Beef Sandwiches Savory and Simple Meal

To make these delightful pumpkin oatmeal chocolate chip cookies, gather the following: - 1 cup canned pumpkin puree - 1/2 cup brown sugar, packed - 1/4 cup granulated sugar - 1/2 cup unsalted butter, softened - 1 large egg - 1 teaspoon vanilla extract - 1 teaspoon ground cinnamon - 1/2 teaspoon ground nutmeg - 1/4 teaspoon salt - 1/2 teaspoon baking soda - 1 1/2 cups rolled oats - 1 cup all-purpose flour - 1 cup semi-sweet chocolate chips You can swap some ingredients if needed. Here are some ideas: - Use coconut oil instead of butter for a dairy-free option. - Replace brown sugar with coconut sugar for a healthier choice. - If you’re out of eggs, use 1/4 cup unsweetened applesauce as a binder. - For a gluten-free version, try almond flour instead of all-purpose flour. You’ll need a few basic tools to make these cookies: - Large mixing bowl - Measuring cups and spoons - Whisk or electric mixer - Baking sheet - Parchment paper - Cookie scoop or tablespoon - Wire rack for cooling These tools help keep your baking smooth and fun. Enjoy the process! Start by preheating your oven to 350°F (175°C). This helps the cookies bake evenly. Next, line a baking sheet with parchment paper. This keeps the cookies from sticking and makes cleanup easy. In a large mixing bowl, cream together the softened butter, brown sugar, and granulated sugar. Mix until the mixture is light and fluffy. This step adds air to the dough. Then, add the canned pumpkin puree, large egg, and vanilla extract. Beat these together until smooth. In another bowl, whisk together the ground cinnamon, nutmeg, salt, baking soda, oats, and all-purpose flour. This combines the dry ingredients well. Gradually fold the dry mix into the wet mix. Do this gently to avoid overmixing, which can make the cookies tough. Finally, stir in the chocolate chips evenly. Using a tablespoon or cookie scoop, drop rounded balls of dough onto the prepared baking sheet. Make sure to space them about 2 inches apart. This allows room for spreading. Bake in the preheated oven for 12-15 minutes. Look for lightly golden edges to know they’re done. After baking, remove the cookies from the oven. Let them cool on the baking sheet for 5 minutes. Then, transfer the cookies to a wire rack to cool completely. This helps them set and keeps them soft. Enjoy your delightful treats! To get the best cookie texture, mix your butter and sugars well. This step adds air and makes your cookies light. Use room temperature butter for easy mixing. When adding the pumpkin puree and egg, mix just until combined. You want a moist dough, not a cake batter. After you add the dry ingredients, fold gently. This keeps the cookies chewy and soft. A common mistake is overmixing the dough. This can make your cookies tough. Another mistake is not measuring your flour correctly. Too much flour will lead to dry cookies. Always spoon the flour into your measuring cup, then level it off. Lastly, don’t skip chilling the dough if it's too soft. Chilling helps the cookies hold their shape. Use a set of dry measuring cups for solids like flour and oats. For sticky ingredients like pumpkin puree, use a liquid measuring cup. Always check your ingredients for freshness. Old baking soda can affect the rise of your cookies. When measuring brown sugar, pack it into the cup firmly. This ensures you use the right amount for sweetness. {{image_2}} You can make these cookies even better by adding fun mix-ins. Try adding nuts like walnuts or pecans for crunch. Dried fruits, such as cranberries or raisins, can give a nice sweetness. You can also swap some chocolate chips for white chocolate or peanut butter chips. This way, you can create a cookie that fits your taste. If you want to make these cookies gluten-free, you can easily do that. Just replace the all-purpose flour with a gluten-free blend. Make sure the blend has xanthan gum to help with texture. You can also use almond flour or oat flour, but the taste will change a bit. Always check the oats, as some may have gluten. To boost the fall flavors, you can try adding spices. A dash of ginger or allspice can add warmth. You can also add a splash of maple syrup for a sweet twist. For a festive touch, sprinkle some pumpkin seeds on top before baking. These small changes can make your cookies shine with seasonal joy! To keep your pumpkin oatmeal chocolate chip cookies fresh, store them in an airtight container. This helps keep moisture in and prevents them from getting hard. Place parchment paper between layers if you stack them. They can last up to a week at room temperature. Freezing is a great way to save extra cookies. Start by letting the cookies cool completely. Then, place them in a single layer on a baking sheet. Freeze for about an hour until firm. After that, move them to a freezer-safe bag or container. They will stay fresh for about three months in the freezer. To reheat your cookies, preheat your oven to 350°F (175°C). Place the cookies on a baking sheet for about 5-7 minutes. This method keeps them soft and warm. You can also use the microwave for a quick fix. Heat them for about 10-15 seconds. Just be careful not to overdo it! Yes, you can use fresh pumpkin. First, cook it until soft. Then, puree it until smooth. Fresh pumpkin adds a nice flavor and texture. Just make sure to remove excess water. This ensures your cookies don't turn out too wet. To make your cookies chewy, try these tips. Use more brown sugar than white sugar. Brown sugar has more moisture. You can also add an extra egg yolk. This adds richness and chewiness. Bake the cookies just until the edges are set. This keeps the center soft. If your dough feels sticky, don't worry! You can add a bit more flour, one tablespoon at a time. Mix until it firms up a bit. You can also chill the dough for 30 minutes. This helps it firm up and makes it easier to scoop. You learned about key ingredients and how to use them. We covered mixing and baking steps. You also discovered tips for perfect cookies and variations for all tastes. Storing and reheating methods keep cookies fresh longer. Remember, baking is fun and easy when you follow these steps. Experiment with flavors and enjoy your creations! Happy baking!

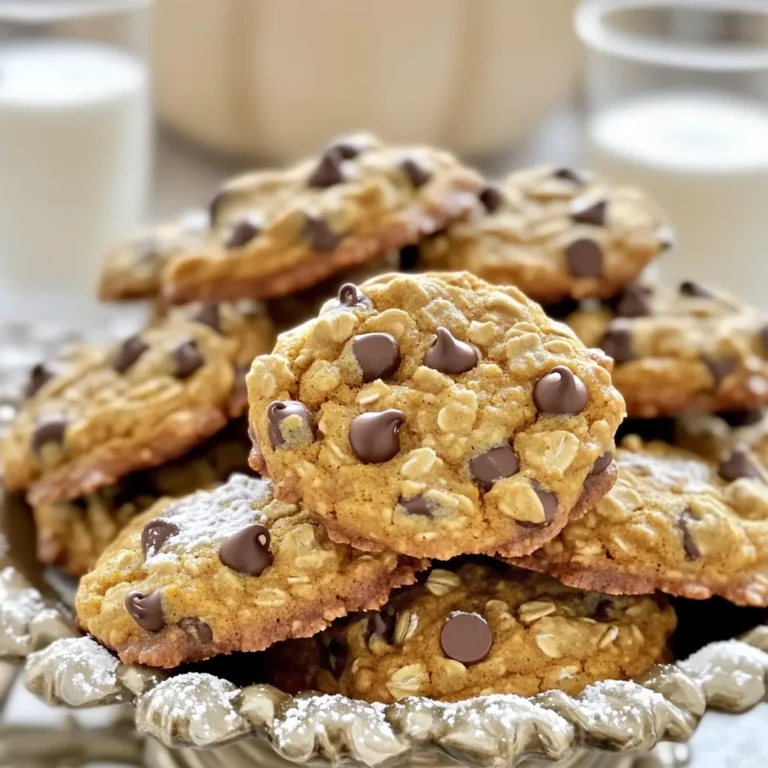
Pumpkin Oatmeal Chocolate Chip Cookies Delightful Treat

- 4 boneless, skinless chicken breasts - 2 cups Brussels sprouts, halved - 1 red bell pepper, sliced - 1 yellow bell pepper, sliced - 1 cup cherry tomatoes, halved - 1/4 cup balsamic vinegar - 2 tablespoons honey - 3 tablespoons olive oil - 2 cloves garlic, minced The chicken breasts are the star of this dish. They soak up the marinade while roasting. The Brussels sprouts, red and yellow bell peppers, and cherry tomatoes bring color and nutrition. Each veggie adds a unique taste. - 1 teaspoon dried Italian herbs (oregano, thyme, and basil) - Salt and pepper to taste Italian herbs mix well with the balsamic vinegar. They add depth to the dish. Salt and pepper bring out the flavors, making every bite tasty. - Fresh basil leaves Fresh basil leaves can add a bright touch. They give a nice aroma and a pop of green. You can add them just before serving for a final flourish. How to prepare the chicken Start with the chicken breasts. Rinse them under cold water. Pat them dry with paper towels. Trim off any fat. Then, season with salt and pepper. This step adds flavor and helps your chicken shine. Preparing the vegetables Next, wash your veggies. Cut the Brussels sprouts in half. Slice the red and yellow bell peppers. Halve the cherry tomatoes. Place all the veggies in a bowl. This makes it easy to coat them with the marinade later. Mixing balsamic vinegar and honey In a medium bowl, add balsamic vinegar and honey. Whisk them together until they blend well. This mix adds a tangy sweetness to the dish. Adding olive oil and spices Now, pour in the olive oil. Add minced garlic and dried Italian herbs. Whisk again until everything combines. This marinade will coat the chicken and veggies, adding great flavor. Placing chicken and veggies on the sheet pan Grab a large sheet pan. Place the seasoned chicken on one side. On the other side, add the bowl of veggies. Make sure they are spread out. This helps them roast evenly. Roasting in the oven Pour the remaining marinade over the chicken and veggies. Preheat your oven to 425°F (220°C). Bake for 25 to 30 minutes. Check that the chicken reaches 165°F inside. The veggies should be tender and lightly charred. Enjoy the delicious aroma while it cooks! To keep your chicken juicy, brine it for a few hours. A simple mix of salt and water does wonders. Letting it soak adds moisture. Always check the internal temperature. It should reach 165°F for safe eating. A meat thermometer is your best friend here. It helps avoid dry chicken. For even cooking, cut your veggies to similar sizes. This way, they cook at the same rate. Spread them out on the pan, giving them space. Crowding leads to steaming instead of roasting. For caramelization, roast at a high heat. The natural sugars in the veggies will brown beautifully. A little oil helps too, ensuring they don’t stick. Using parchment paper makes cleanup a breeze. Simply lift and toss when you’re done. No scrubbing needed! For storing leftovers, wait for the food to cool. Then place it in airtight containers. This keeps them fresh and prevents spills in your fridge. {{image_2}} You can switch out chicken for many other proteins. Try using turkey breast for a leaner option. Pork tenderloin also works well and adds a different flavor. If you want something plant-based, use firm tofu or chickpeas. Both soak up the marinade nicely. Seasonal veggies add a fresh twist. In spring, use asparagus or zucchini. Summer brings eggplant and corn. In fall, try sweet potatoes or carrots. Choose veggies you enjoy or whatever looks good at the store. Don't hesitate to mix and match for a colorful dish. Want to spice things up? Add chili flakes for heat or smoked paprika for a smoky touch. You can also use red wine vinegar or apple cider vinegar for a different taste. If you like it sweeter, drizzle in more honey or use maple syrup. Adjust the flavors to make it your own! To keep your sheet-pan balsamic chicken and veggies fresh, store them in an airtight container. Make sure the chicken and veggies cool down before sealing. This helps prevent moisture build-up. Place the container in the fridge. For best flavor, eat leftovers within three days. If you want to freeze leftovers, separate the chicken from the veggies. Place them in freezer-safe bags or containers. Squeeze out as much air as you can before sealing. This helps prevent freezer burn. You can keep them in the freezer for up to three months. When it’s time to enjoy your leftovers, reheat them in the oven for the best taste. Preheat your oven to 350°F (175°C). Place the chicken and veggies on a baking sheet. Cover with foil to keep moisture in. Heat for about 15-20 minutes or until warmed through. If you prefer the microwave, use a microwave-safe dish. Cover it with a lid or microwave-safe wrap. Heat in short bursts, checking every minute to avoid sogginess. In the fridge, your sheet-pan balsamic chicken and veggies last about three to four days. Always check for signs of spoilage before eating. If the chicken smells off or looks discolored, toss it. Veggies that are mushy or slimy should also be discarded. For frozen leftovers, they can last up to three months. After that, the taste and texture may change. Always label your containers with dates. This helps you keep track of how long they’ve been stored. You can tell the chicken is cooked when it reaches an internal temperature of 165°F. Use a meat thermometer to check the thickest part of the chicken. The juices should run clear, not pink. If you don’t have a thermometer, cut into the chicken. It should look white and not glossy. Yes, you can use frozen chicken, but it is best to thaw it first. Thawing helps the chicken cook evenly. If you cook it from frozen, it will take longer to cook. Ensure it still reaches 165°F by checking with a meat thermometer. This dish goes well with many sides, such as: - Rice or quinoa - Mashed potatoes - Garlic bread - A fresh salad - Roasted sweet potatoes These sides balance the flavors and add variety to your meal. Yes, this recipe is great for meal prep! You can make it ahead and store it in the fridge. Just divide the chicken and veggies into containers. They will stay fresh for about 3 to 4 days. You can also freeze individual portions for longer storage. This blog post provided a complete guide for making a tasty sheet-pan balsamic chicken dish. We covered key ingredients, like chicken, vegetables, and the marinade, along with special seasonings that enhance the flavor. I shared tips for perfect cooking and useful storage info to keep leftovers fresh. Incorporating different proteins or veggies lets you make this meal your own. I hope you feel confident trying this recipe and enjoy every bite!

Sheet-Pan Balsamic Chicken and Veggies Simple Meal

To make this caramel apple cheesecake dip, you need: - 1 package (8 oz) cream cheese, softened - 1/2 cup powdered sugar - 1/2 cup sour cream - 1 teaspoon vanilla extract - 1/2 teaspoon ground cinnamon - 1 large apple, diced (like Granny Smith or Honeycrisp) - 1/4 cup caramel sauce (store-bought or homemade) - 1/4 cup chopped nuts (pecans or walnuts) Each ingredient plays a key role in the flavor and texture of the dip. The cream cheese adds a rich creaminess. The powdered sugar adds sweetness, balancing the tanginess of the sour cream. Vanilla extract gives a nice warm note. Ground cinnamon adds a hint of spice, enhancing the apple flavor. The diced apple brings freshness, while the caramel sauce adds sweetness and a lovely sticky texture. Finally, chopped nuts provide crunch. For dipping, I recommend using: - Graham crackers - Sliced apples - Pretzel sticks These options add variety and fun. You can mix and match to find your favorite. Each one pairs well with the dip's creamy texture and sweet flavor. To start making the dip, grab a medium bowl. Beat the softened cream cheese with an electric mixer until it’s smooth and creamy. This step is key to a nice texture. Next, add the powdered sugar, sour cream, vanilla extract, and ground cinnamon to the bowl. Mix everything on low speed until it’s well combined and fluffy. This gives your dip a sweet and creamy base. Now it’s time to add in the fun stuff! Gently fold in the diced apple. I like using Granny Smith or Honeycrisp apples for their crispness and flavor. Make sure they are evenly spread throughout the mix. Then, drizzle the caramel sauce over the top of the mixture. Use a spatula to swirl it slightly. This creates a lovely marbled effect that looks great. Finally, sprinkle the chopped nuts over the top. This adds a nice crunch to every bite. Transfer the cheesecake dip to a serving bowl. You can serve it right away or chill it in the fridge for up to 2 hours. If you decide to chill it, remember to give it a quick stir before serving. For a fun touch, arrange graham crackers and apple slices around the dip on a platter. You can also drizzle some extra caramel sauce around the dip for a beautiful presentation. Enjoy this treat with family and friends! To get a creamy dip, use softened cream cheese. Beat it well until smooth. Mixing in sour cream makes it fluffy. Don’t overmix once you add the apples. This keeps the dip thick and rich. For a deeper taste, try adding more cinnamon. You can also use different extracts, like almond. Mixing in a little lemon juice brightens the flavor. For extra sweetness, drizzle more caramel sauce on top. Serve the dip in a large bowl. Arrange graham crackers and apple slices around it. Drizzle extra caramel sauce over the top. A sprinkle of cinnamon adds a nice touch. You can even use caramel apples for a fun twist! {{image_2}} You can change the fruit in this dip based on the season. In fall, try using diced pears or even dried cranberries for a unique twist. In summer, fresh berries like strawberries or blueberries add a burst of flavor. Each fruit brings its own taste and texture, making the dip fun and fresh all year long. Nuts add crunch and flavor. Pecans and walnuts work great, but you can also experiment. Try almonds for a light taste or hazelnuts for a rich flavor. You can even skip the nuts if you prefer a smoother dip. Just remember, the choice of nuts can change the whole vibe of your dish. If you want a healthier option, swap out the powdered sugar. Maple syrup or honey can sweeten the dip nicely. You can even use stevia or monk fruit for a low-calorie choice. Adjust the amount to your taste, but be careful! Too much sweetener might change the texture. To keep your caramel apple cheesecake dip fresh, store it in an airtight container. This prevents air from making it dry or change the taste. If you used graham crackers, keep them in a separate bag. This way, they stay crunchy. The dip can last for up to three days in the fridge. After that, it may lose its creamy taste and texture. When you take it out, check for any changes in smell or look. If it seems off, it's best to throw it away. You don’t need to heat this dip. It's best served cold or at room temperature. If you want it a bit softer, let it sit out for about 15 minutes before serving. Stir it gently to bring back that creamy texture. Enjoy it with fresh apple slices or crackers for dipping! Yes, you can make this dip ahead of time. Prepare it and store it in the fridge. It stays fresh for up to two hours before serving. If you chill it longer, stir it again for a smooth texture. This dip is great for parties, so prepping ahead helps you enjoy the fun. I love using Granny Smith or Honeycrisp apples. Granny Smith adds a nice tartness, while Honeycrisp offers sweetness and crunch. Both types hold their shape well when diced. You can mix different apples for a fun twist. The contrast in flavors makes the dip even tastier! Making this dip gluten-free is easy! All the ingredients are naturally gluten-free. Just choose gluten-free graham crackers for dipping. Fresh apple slices are also a great option. This way, everyone can enjoy this delightful treat without worry. In this article, we covered how to make a tasty caramel apple dip. We discussed the essential ingredients and their measurements. You learned step-by-step instructions and helpful tips for the best flavor and texture. We explored fun variations and storage guidelines. This dip is great for any occasion. Now you can impress your friends and family with your skills! Enjoy your delicious creation and have fun sharing it.

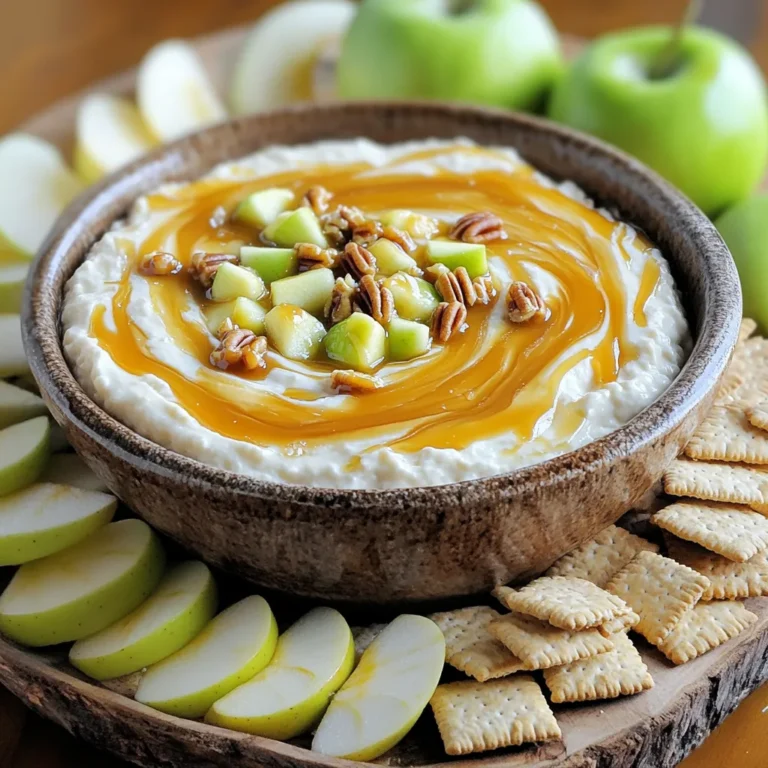
Caramel Apple Cheesecake Dip Easy and Delicious Recipe

- 10 oz cheese tortellini (fresh or frozen) - 2 tablespoons olive oil - 3 cloves garlic, minced - 4 cups fresh spinach, packed - 1 cup heavy cream - 1 cup vegetable broth - 1 cup grated Parmesan cheese - 1 teaspoon garlic powder - 1/2 teaspoon nutmeg - Salt and pepper to taste - Fresh parsley, chopped (for garnish) - Optional: Red pepper flakes for heat To make this creamy dish, you will need: - A large pot or Dutch oven - A cutting board and knife - A wooden spoon or spatula - Measuring cups and spoons Using good quality ingredients makes a big difference. Fresh spinach tastes bright and adds color. Choose a cheese tortellini that you love. Fresh tortellini can be softer and more flavorful. For the cream, use heavy cream for the best richness. Freshly grated Parmesan cheese melts better than pre-grated cheese. If you like spice, keep red pepper flakes on hand. This will add a nice kick if you want it. 1. Gather your ingredients first. You need cheese tortellini, spinach, and garlic. 2. Chop the garlic finely. Fresh garlic gives the best flavor. 3. Wash the spinach leaves. Make sure to remove any dirt. 4. Measure out the heavy cream and vegetable broth. 5. Grate your Parmesan cheese if not pre-grated. 1. Heat the olive oil in a large pot over medium heat. Look for a shimmering surface. 2. Add the minced garlic and stir for about one minute. You want it fragrant, not burnt. 3. Toss in the fresh spinach. Cook it until it wilts, which takes about 2-3 minutes. 4. Pour in the heavy cream and vegetable broth. Stir to mix everything well. 5. Bring the mix to a gentle simmer, which is when small bubbles form. 6. Add the tortellini, garlic powder, nutmeg, salt, and pepper. Stir until combined. 7. Cover the pot and cook for 5-7 minutes. Stir occasionally so it cooks evenly. 8. Check if the tortellini is tender and the sauce thickens. 9. Remove the pot from heat. Stir in the grated Parmesan until it melts. 10. If you like spice, sprinkle some red pepper flakes on top. 11. Serve the dish hot, and garnish with fresh parsley. - Set a timer for 5 minutes once you cover the pot. - Stir the tortellini every couple of minutes to prevent sticking. - Taste a piece to check for doneness; it should be soft but not mushy. - If the sauce seems too thick, add a splash more broth or cream. - Keep an eye on the heat; adjust it if the sauce simmers too hard. To make a creamy sauce, start with fresh ingredients. Using heavy cream gives the best texture. Cook garlic until it smells good, but don’t let it burn. The spinach should wilt but stay bright green. Stir in the cream and broth slowly for the best mix. When you add Parmesan, do it off the heat to keep it smooth. Want to boost the flavor? Add a pinch of nutmeg; it really wakes up the creaminess. If you like heat, sprinkle in some red pepper flakes. Fresh parsley on top adds color and flavor. You can also toss in more garlic powder for a richer taste. Each of these small changes makes a big difference. Don’t rush the garlic; let it cook gently. If you burn it, the sauce will taste bitter. Avoid overcooking the tortellini; it can turn mushy. Check the seasoning before serving; a little extra salt can bring out all the flavors. Lastly, don’t skip the garnish; it makes your dish pop and look inviting. {{image_2}} You can easily boost this dish by adding protein. Cooked chicken or shrimp works well here. Simply sauté your meat in the pot before adding the garlic. This adds flavor and makes the meal heartier. If using chicken, I recommend diced grilled chicken for best results. For shrimp, add them when the tortellini cooks. They only need a few minutes to get juicy and tender. Feel free to mix in other veggies for added nutrition. Broccoli, peas, or bell peppers add great color and taste. You can also use frozen spinach if fresh isn’t available. Just make sure to thaw and drain it first. Adding different vegetables keeps the dish fun and healthy. Try combining a few for extra flavor! Switching up the sauce or cheese can change the whole dish. Instead of heavy cream, you could use a light cream or even a dairy-free option. For cheese, try mozzarella for a milder taste or goat cheese for a tangy twist. You can also add Alfredo sauce for extra creaminess. Don’t be afraid to get creative! To keep your creamy one-pot spinach Alfredo tortellini fresh, store it in an airtight container. I recommend refrigerating it within two hours of cooking. It will stay good for about three to four days. If you have more leftovers, you can place them in smaller portions. This makes it easy to grab a quick meal later. When you're ready to enjoy your leftovers, heat them gently. You can use the microwave or a saucepan. If using the microwave, warm it in short bursts. Stir in between to ensure even heating. If you use a saucepan, add a splash of vegetable broth or cream. This helps bring back the creamy texture. If you want to freeze your tortellini, do it before adding the cheese. Place it in a freezer-safe container or bag. It will keep for up to two months. When you’re ready to eat it, thaw it in the fridge overnight. Then, heat it up in a pot, adding cream and cheese to restore the sauce's creaminess. Enjoy! Yes, you can use frozen tortellini. It works well in this recipe. Just add it directly to the pot without thawing. The cooking time may be a minute longer, so keep an eye on it. The frozen tortellini will still soak up all the creamy flavor. To make this dish lighter, you can use half-and-half instead of heavy cream. You can also replace some of the cheese with a low-fat version. Adding more spinach and other veggies can help too. This keeps the taste great while cutting down on calories. You can use a mix of milk and yogurt as a substitute for heavy cream. This blend gives you creaminess with fewer calories. Another option is to use coconut milk for a dairy-free twist. Each choice will change the flavor a bit, but it will still taste good. Yes, you can make this dish ahead of time. Just cook it and let it cool. Store it in the fridge for up to three days. When you’re ready to eat, reheat it on the stove. You may need to add a splash of milk or broth to thin the sauce back out. This blog post shared key steps for a tasty tortellini dish. We covered essential ingredients, equipment, and tips for cooking. You learned how to avoid common mistakes and add your favorite protein or veggies. Remember to store leftovers properly and use the reheating tips to enjoy meals later. With the right ingredients and techniques, you can make this dish your own. Cooking should be fun and creative, so don’t hesitate to experiment! Enjoy your delicious creations!

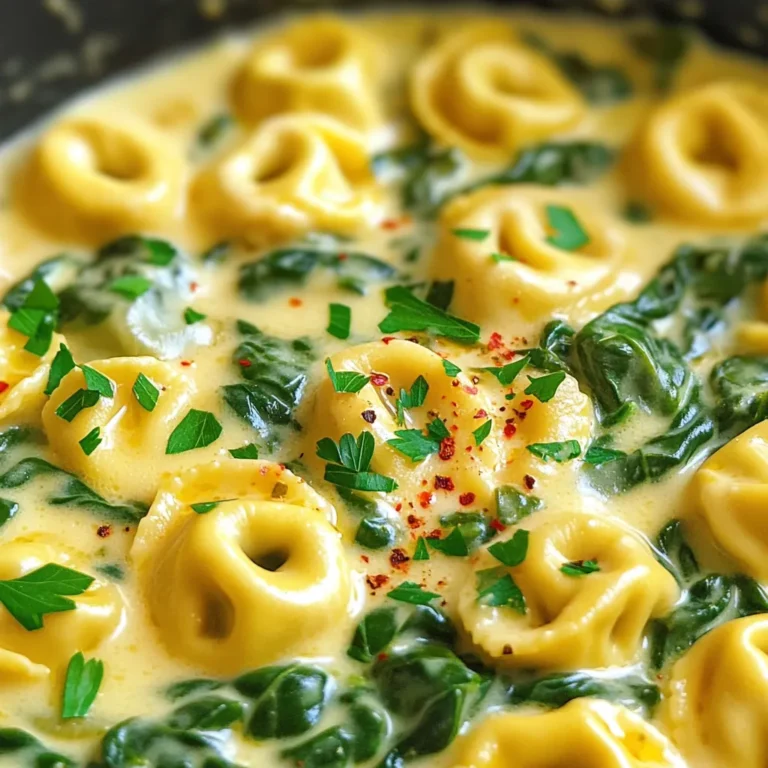
Creamy One-Pot Spinach Alfredo Tortellini Delight

To make these tasty muffins, gather the following: - 2 cups all-purpose flour - 1 cup brown sugar, packed - 1/2 cup granulated sugar - 1 tablespoon baking powder - 1/2 teaspoon baking soda - 1/2 teaspoon salt - 1 teaspoon ground cinnamon - 1/2 teaspoon ground nutmeg - 1/2 cup unsalted butter, melted - 1 large egg - 1 cup buttermilk (or milk + 1 tablespoon vinegar) - 1 teaspoon vanilla extract - 2 cups apples, peeled, cored, and chopped (about 2 medium apples) - 1/4 cup chopped walnuts or pecans (optional) - Extra brown sugar for topping Enhance your muffins with these options: - Chopped walnuts or pecans for crunch - A pinch of ginger for warmth - Dried cranberries for a tart kick You can swap ingredients if needed: - Use whole wheat flour instead of all-purpose flour for a healthier option. - Substitute coconut oil for butter for a dairy-free choice. - Replace brown sugar with coconut sugar for a different flavor. - Use almond milk or soy milk instead of buttermilk for a vegan version. These ingredients will create a rich and flavorful muffin that is moist and satisfying. Start by preheating your oven to 350°F (175°C). This step helps the muffins bake evenly. While the oven heats, line your muffin tin with paper liners. If you don’t have liners, lightly grease the tin with a bit of butter or oil. This will keep the muffins from sticking. In a large bowl, add 2 cups of all-purpose flour. Then, add 1 cup of packed brown sugar and ½ cup of granulated sugar. Next, mix in 1 tablespoon of baking powder, ½ teaspoon of baking soda, ½ teaspoon of salt, 1 teaspoon of ground cinnamon, and ½ teaspoon of ground nutmeg. Whisk these ingredients together until they are well combined. This step is key to getting a good rise and flavor. In a separate bowl, pour in ½ cup of melted unsalted butter. Crack in 1 large egg and add 1 cup of buttermilk. If you don’t have buttermilk, mix 1 tablespoon of vinegar with regular milk. Finally, add 1 teaspoon of vanilla extract. Whisk these ingredients together until they are smooth and fully blended. Slowly pour the wet mixture into the dry ingredients. Use a spatula or a wooden spoon to stir gently. Mix until just combined; you don’t want to overmix. Overmixing can make your muffins tough. Now, fold in 2 cups of chopped apples and ¼ cup of chopped walnuts or pecans if you like. Use a spoon to distribute the apples and nuts evenly in the batter. Then, scoop the batter into your prepared muffin tin. Fill each cup about ¾ full. This allows room for the muffins to rise. Sprinkle a little extra brown sugar on top of each muffin for a sweet, crunchy topping. Place the muffin tin in the preheated oven and bake for 20 to 25 minutes. To check if they're done, insert a toothpick into the center of a muffin. If it comes out clean, your muffins are ready. Once baked, let them cool for 5 minutes in the tin before moving them to a wire rack to cool completely. Enjoy the delightful aroma filling your kitchen! To get the best muffin texture, follow these simple steps. First, measure your flour correctly. Use the spoon-and-level method to avoid packing it down. Too much flour makes muffins dry. Mixing the batter should be gentle. Overmixing can lead to tough muffins. Aim for just combined ingredients. Finally, fill your muffin cups to about 3/4 full. This allows room for rising while keeping them moist. Adding spices makes your muffins taste amazing. Ground cinnamon is a must for warmth. Nutmeg adds a nice touch of sweetness. You can also try adding ginger for a bit of spice. Experiment with different amounts to find your favorite flavor blend. Spices not only enhance taste but also make your kitchen smell delightful while baking. Using fresh apples gives your muffins a great texture and flavor. Choose firm apples like Granny Smith or Honeycrisp for the best results. If you use canned apples, drain them well to avoid extra moisture. Fresh apples add crunch, while canned apples can make muffins softer. Both work, but fresh apples are my top choice for that just-picked taste. {{image_2}} You can make these muffins even more tasty by adding nuts or dried fruits. Try using walnuts or pecans for a nice crunch. You can also add raisins or dried cranberries for extra sweetness. Just fold in about 1/4 cup of your choice into the batter. This small change can make a big difference in flavor. To make gluten-free muffins, swap the all-purpose flour with a gluten-free blend. Check the blend for a good rise. For a vegan option, replace the egg with a flax egg or applesauce. Use plant-based milk instead of buttermilk. These swaps help you keep the delicious taste while fitting your diet. Toppings can take your muffins to the next level. Try adding a crumb topping made from flour, brown sugar, and butter. You can also sprinkle oats for a nutty flavor. A drizzle of honey or maple syrup adds a sweet finish. Get creative and find a topping you love! To keep your Bakery-Style Brown Sugar Apple Muffins fresh, store them in an airtight container. This prevents them from drying out or becoming stale. Place a paper towel in the container to absorb any moisture. This helps keep your muffins soft and fluffy. Want to save your muffins for later? You can freeze them! First, let the muffins cool completely. Wrap each muffin in plastic wrap. Then, place them in a freezer-safe bag. They will stay good for up to three months. When ready to enjoy, simply take one out and reheat it in the microwave for about 30 seconds. You can also bake them at 350°F until warmed through. These muffins are best enjoyed fresh, but they can last a few days. At room temperature, they stay fresh for about 2 to 3 days. If you keep them in the fridge, they can last up to a week. Always check for any signs of spoilage before eating. If they seem dry or hard, it’s time to toss them. Enjoying them at their best will make every bite delicious! Yes, you can use white sugar instead of brown sugar. It will change the flavor. You can also mix both sugars for a nice balance. Coconut sugar is another option, but it may alter the muffin's texture and taste. You can make your own buttermilk easily. Just mix one cup of milk with one tablespoon of vinegar. Let it sit for five minutes. This will give you a similar taste and texture. The best way to check is with a toothpick. Insert it into the center of a muffin. If it comes out clean, your muffins are ready. They should also be golden brown on top. Yes, you can add more apples if you like. Just make sure the batter is not too wet. Extra apples will add moisture and flavor, so adjust other ingredients if needed. Absolutely! You can use a mini muffin tin instead. Just reduce the baking time to about 12-15 minutes. Check with a toothpick to see if they are done. In this blog post, we covered all you need to bake muffins. We discussed essential and optional ingredients, plus tasty substitutions. You learned step-by-step instructions for prepping, mixing, and baking. I shared tips for texture and flavor and detailed storage methods to keep muffins fresh. Finally, we explored variations to make your muffins unique. With these insights, you can easily bake delicious muffins that suit your taste and needs. Enjoy the process, and have fun creating!

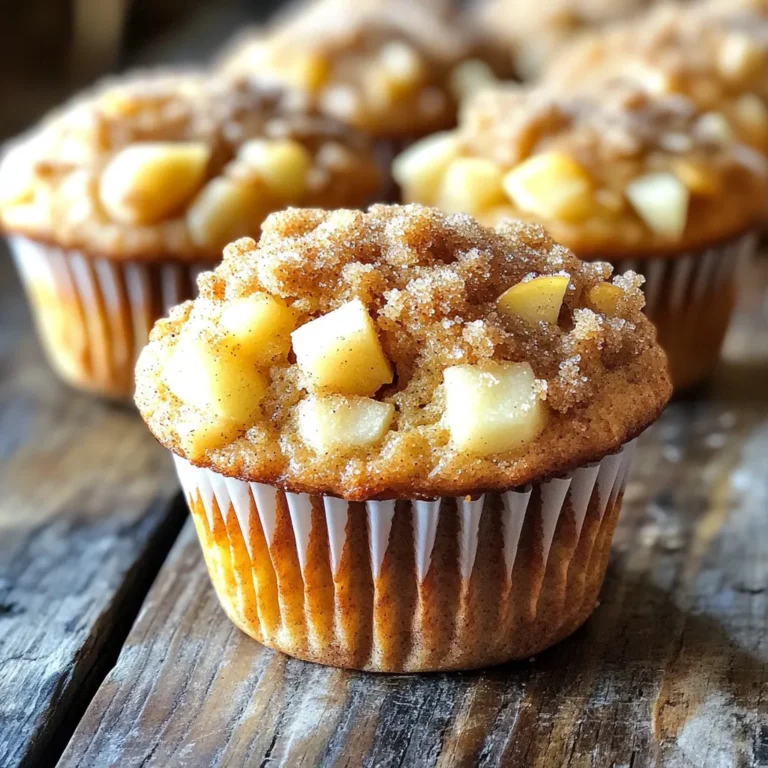
Bakery-Style Brown Sugar Apple Muffins Irresistible Treat

To create the No-Bake Chocolate Hazelnut Cheesecake Cups, you will need the following items: - 1 cup chocolate cookie crumbs - 4 tablespoons unsalted butter, melted - 8 oz cream cheese, softened - 1/2 cup powdered sugar - 1/2 cup hazelnut spread (like Nutella) - 1 teaspoon vanilla extract - 1 cup heavy cream - 1/2 cup crushed hazelnuts (for garnish) - Extra chocolate shavings (optional, for garnish) These ingredients blend to form a rich, creamy treat. The chocolate cookie crumbs provide a crunchy base. The melted butter helps bind them together. Cream cheese is the star of the filling, giving it a smooth texture. Powdered sugar adds sweetness without grittiness. Hazelnut spread brings a nutty flavor that pairs perfectly with chocolate. Vanilla extract enhances all the tastes. Heavy cream makes the filling light and airy. Finally, crushed hazelnuts and chocolate shavings add a delightful touch on top. Keep these ingredients handy, and get ready to enjoy a delicious dessert! - First, combine 1 cup of chocolate cookie crumbs with 4 tablespoons of melted butter in a bowl. - Mix well until the crumbs are fully coated and look like wet sand. - Next, divide this mixture evenly among your serving cups. - Press the crust firmly into the bottom of each cup. - Once done, place the cups in the fridge to set while you prepare the filling. - In another bowl, beat 8 ounces of softened cream cheese with an electric mixer until it is creamy. - Now, add 1/2 cup of powdered sugar, 1/2 cup of hazelnut spread, and 1 teaspoon of vanilla extract. - Mix until everything is fluffy and well combined. - In a separate bowl, whip 1 cup of heavy cream until soft peaks form. - Gently fold the whipped cream into the hazelnut cream cheese mixture. Be careful not to deflate the whipped cream. - Spoon the cheesecake filling over the chilled cookie crusts in each cup. - Use a spatula to smooth the tops. - Finally, chill the cups in the fridge for at least 2-3 hours. This allows the cheesecakes to set nicely. - Before serving, garnish with crushed hazelnuts and chocolate shavings if you want to impress! Using softened cream cheese is key. It mixes well and gives a smooth finish. If your cream cheese is cold, it clumps up. To soften it, let it sit outside for 30 minutes. You can also microwave it for 10 seconds. When you fold in whipped cream, do it gently. Use a spatula and scoop from the bottom. This keeps the air in the cream. If you mix too hard, the texture becomes flat. Aim for a light and fluffy filling. For a great look, add garnishes. Crushed hazelnuts give a nice crunch. Extra chocolate shavings add a rich touch. You can also drizzle some hazelnut spread on top for flair. Pair these cheesecake cups with coffee or tea. The flavors work well together. You can serve them at parties or for a sweet treat at home. Enjoy the creamy goodness! {{image_2}} You can change the flavor of your cheesecake cups easily. Try using different types of cookie crumbs. For example, ginger snaps or vanilla wafers add a unique twist. Each crumb type gives a new taste and texture. You can also swap out the hazelnut spread. Almond spread works well for a nutty flavor. Use peanut butter for a classic twist. Each choice creates a new dessert experience while keeping the same creamy texture. If you want vegan options, there are great alternatives. Use vegan cream cheese and coconut whip instead of regular products. Both options keep the dessert rich and tasty. For gluten-free needs, pick gluten-free cookies for the crust. There are many brands available that taste just as good. This way, everyone can enjoy these cheesecake cups without worry! Store your cheesecake cups in the fridge. Use an airtight container to keep them fresh. Place a piece of plastic wrap over the cups if you don’t have a container. This helps avoid any food odors. You can also freeze these cups. Just make sure to wrap them well. Use plastic wrap, then foil to protect them from freezer burn. These cheesecake cups stay fresh for about 3 days in the fridge. If you freeze them, they last up to a month. However, the texture might change after thawing. Look for signs of spoilage. If the cups smell off or have a watery layer on top, it’s time to toss them. Always trust your senses before enjoying. Yes, you can make these cheesecake cups in advance. They store well in the fridge. I suggest keeping them covered with plastic wrap or in an airtight container. You can prepare them up to two days ahead of time. Just make sure to add the garnishes before serving for the best look. To check if the cheesecake is set, gently touch the top. It should feel firm but not hard. If it jiggles too much, it needs more time. Chill the cups for at least 2-3 hours. For best results, let them sit overnight in the fridge. This gives the flavors time to blend and the texture to firm up. Yes, you can use other spreads if you like. Almond butter or sunflower seed butter works well. Each spread changes the flavor a bit. Almond butter gives a nutty twist, while sunflower seed butter adds a unique taste. Just remember, these substitutes will change the final flavor of your cheesecake cups. This blog post gave you a clear guide for making delicious cheesecake cups. You learned about the key ingredients, step-by-step instructions, and how to ensure the right texture. We explored serving ideas and variations for different tastes, too. In the end, these cheesecake cups are simple to make and perfect for any occasion. Enjoy trying out your own twists on this tasty treat. Happy baking!

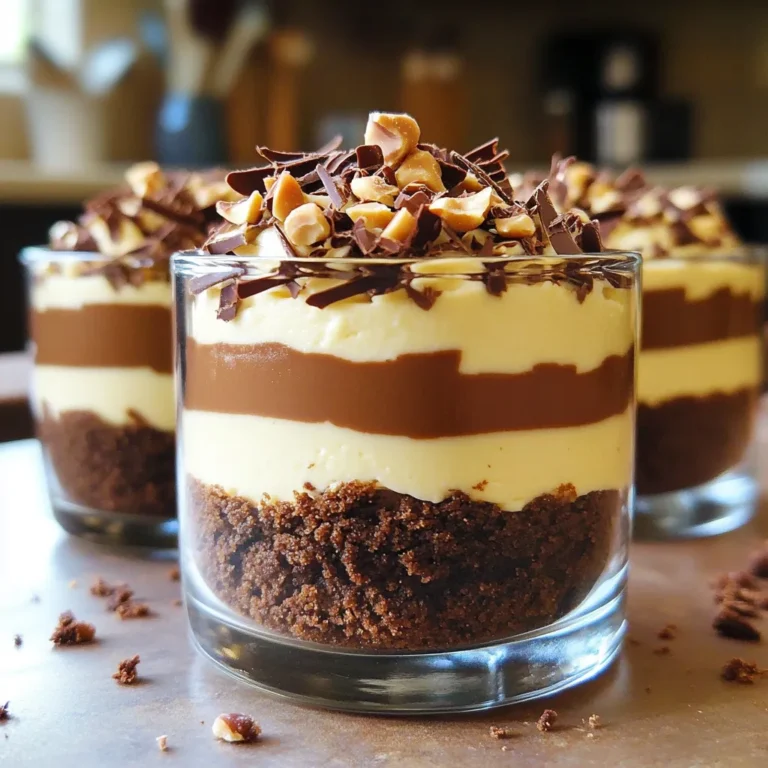
No-Bake Chocolate Hazelnut Cheesecake Cups Delight

To make Minute Spicy Chili Garlic Shrimp Noodles, you need these simple ingredients: - 8 oz (225g) rice noodles - 1 lb (450g) shrimp, peeled and deveined - 3 tablespoons vegetable oil - 4 cloves garlic, minced - 1-2 teaspoons red chili flakes (adjust for spiciness) - 2 tablespoons soy sauce - 1 tablespoon fish sauce - 1 tablespoon lime juice - 1 tablespoon brown sugar - 2 green onions, chopped - Fresh cilantro, for garnish - Salt and pepper to taste Each ingredient plays a key role. The rice noodles form the base. Shrimp adds protein and flavor. Vegetable oil helps cook the garlic and shrimp. Garlic gives a nice aroma and taste. Red chili flakes bring heat. Soy sauce adds umami, while fish sauce deepens the flavor. Lime juice balances the dish with a tangy kick. Brown sugar adds sweetness, rounding out the flavors. Green onions add freshness and crunch. Cilantro gives a pop of color and herbaceous notes. Salt and pepper elevate everything, making each bite taste better. Gather these ingredients before you start cooking. You’ll enjoy the dish more when everything is ready and fresh. First, you need to cook the rice noodles. Boil water in a large pot. Once boiling, add the noodles and cook for 4-5 minutes. You want them tender but not mushy. After cooking, drain the noodles and set them aside. Next, heat 3 tablespoons of vegetable oil in a large skillet or wok over medium-high heat. Add 4 cloves of minced garlic and sauté for about 30 seconds. You want it fragrant, not burnt. Now, sprinkle in 1-2 teaspoons of red chili flakes. Let them toast in the oil for a moment. This step deepens the flavor and adds heat. Now, add 1 pound of peeled and deveined shrimp. Season with salt and pepper. Cook for 2-3 minutes until the shrimp turn pink and opaque. While the shrimp cooks, mix your sauces. In a small bowl, combine 2 tablespoons of soy sauce, 1 tablespoon of fish sauce, 1 tablespoon of lime juice, and 1 tablespoon of brown sugar. Once the shrimp is ready, pour this sauce over them. Stir well to coat the shrimp evenly. Now, add the drained rice noodles to the skillet. Toss everything together, ensuring the noodles soak up the spicy sauce. Finally, toss in 2 chopped green onions and stir for an additional minute. This adds both flavor and color. Serve your spicy chili garlic shrimp noodles hot. Garnish with fresh cilantro for a touch of brightness. Enjoy your meal! To control the heat, start with 1 teaspoon of red chili flakes. Taste your dish, and add more if you like it spicier. You can also use fresh chili peppers for a different kick. Slicing them thin gives a nice heat boost. Remember, everyone's spice level is different, so adjust to your taste! When picking shrimp, look for firm, pink ones that smell fresh. If frozen, choose shrimp that are well-packaged and free from ice crystals. Large shrimp work best for this dish, as they have a great texture. Avoid shrimp labeled as "washed" or "treated," as they may lose flavor. Always peel and devein them for the best taste. For perfect rice noodles, boil them for 4-5 minutes until tender. Don’t overcook! They should be soft but not mushy. After draining, rinse them under cold water to stop cooking. This also helps keep them from sticking. Toss them in a little oil if you're not using them right away. This keeps them ready for your spicy mix! {{image_2}} You can easily boost flavor by adding vegetables to your noodles. Consider using bell peppers, snap peas, or broccoli. Just chop them up and add them to the skillet when you cook the shrimp. This way, they will soak up all the tasty sauce. You can also add carrots or zucchini for added crunch. If you want a fresh taste, toss in some baby spinach near the end. This adds color and nutrients. If shrimp isn’t your thing, you can try chicken or tofu. For chicken, use thin strips and cook them until no longer pink. Tofu is a great option for a vegetarian dish. Just cube the tofu and fry it until golden. Both options work well with the same spicy sauce. Feel free to mix things up by using scallops or even beef. Each protein will add its own twist to the dish. For a gluten-free meal, stick with rice noodles as they are naturally gluten-free. Check your soy sauce label to ensure it is gluten-free, as some brands include wheat. You can also use tamari as a soy sauce substitute. It has a similar flavor but is safe for those avoiding gluten. This way, everyone can enjoy the spicy chili garlic noodles without worry. You can store leftover Minute Spicy Chili Garlic Shrimp Noodles in an airtight container. Make sure to cool them down first. This way, the noodles stay fresh. They will last in the fridge for up to three days. If you notice any smell or change in color, it’s best to toss them. When you're ready to enjoy your leftovers, reheating is simple. You can use a microwave or a skillet. For the microwave, place the noodles in a bowl and cover it with a damp paper towel. Heat for 1-2 minutes. Stir halfway to ensure even heating. If you use a skillet, add a splash of water or oil. Heat over medium until warm, stirring often. If you want to save them for later, you can freeze the noodles. Place them in a freezer-safe bag or container. Remove as much air as possible to prevent freezer burn. They can last for up to two months in the freezer. To thaw, place the container in the fridge overnight. Once thawed, reheat as mentioned above. Avoid freezing the shrimp, as they may lose texture. It takes about 20 minutes to make this dish. You can prepare the rice noodles in just 4-5 minutes. Cooking the shrimp and mixing everything takes only about 10-15 minutes. This quick recipe is great for busy days. You can use both fresh or frozen shrimp. If using frozen shrimp, thaw them first. Rinse them under cold water until they are fully defrosted. This way, they cook evenly and taste great. You can add many extras to the noodles. Vegetables like bell peppers, snap peas, or broccoli work well. You can also try adding cashews or peanuts for crunch. These additions can make your meal even more filling and colorful. Yes, you can use soy sauce as a substitute. If you want a similar flavor, mix soy sauce with a bit of lime juice. Another option is to use coconut aminos, which is a good choice for a lighter taste. This blog covered how to make Minute Spicy Chili Garlic Shrimp Noodles. I shared the key ingredients, like rice noodles and shrimp, and gave you easy steps to follow. You can adjust the heat and add more veggies for your taste. Remember to store leftovers properly and reheat them well. Cooking can be fun, and this dish lets you experiment. Enjoy making this delicious meal!

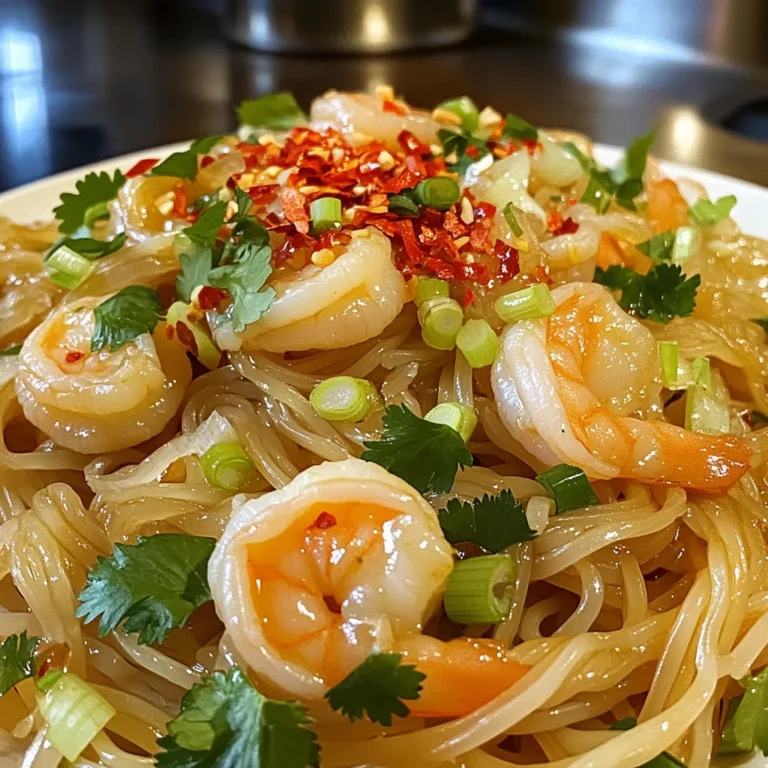
Minute Spicy Chili Garlic Shrimp Noodles Delight

PREV 1 … 11 12 13 … 57 NEXT
quick dish kitchen

explore

DessertsDinnerAppetizersDrinks

Our Policies

  • Cookie Policy
  • Copyright Policy
  • Disclaimer
  • GDPR Policy
  • Terms Of Use
Back to Top
  • About
  • Contact Us
  • Privacy Policy
© 2025 quick dish kitchen