If you’re craving a fun, easy dessert, you’re in the right place! These No Bake Biscoff Pumpkin Spice Bars are creamy, sweet, and bursting with fall flavor. Imagine a crunchy Biscoff crust topped with a smooth pumpkin layer. No baking means less mess and more enjoyment. Ready to dive into this delightful treat? Let’s gather our ingredients and get started on this tasty adventure together!

Ingredients
List of Ingredients
To make these No Bake Biscoff Pumpkin Spice Bars, gather the following:
– 1 ½ cups Biscoff cookies, crushed
– ½ cup unsweetened pumpkin puree
– ½ cup cream cheese, softened
– ¼ cup powdered sugar
– 1 teaspoon pumpkin pie spice
– ½ teaspoon vanilla extract
– ½ cup whipped cream (or whipped topping)
– ½ cup Biscoff spread
– 1 tablespoon melted coconut oil (optional)
Dietary Considerations
These bars can fit into many diets, but check the ingredients. If you are avoiding dairy, use a dairy-free cream cheese and whipped topping. For gluten-free options, choose gluten-free Biscoff cookies. Always check labels to ensure they meet your needs.
Recommended Brands or Substitutions
I love using Biscoff cookies for their unique flavor. If you can’t find them, any speculoos or gingersnap cookies work well. For the cream cheese, brands like Philadelphia or Kite Hill offer great options. If you prefer a lighter topping, try using a coconut whipped cream instead of regular whipped cream.
Step-by-Step Instructions
Preparation of the Biscoff Crust
First, gather your ingredients. You will need 1 ½ cups of crushed Biscoff cookies. If you like, add 1 tablespoon of melted coconut oil.
1. In a mixing bowl, combine the crushed Biscoff cookies and coconut oil (if using). Mix until the cookies are well coated.
2. Take a 9×9-inch square pan lined with parchment paper. Press the cookie mixture firmly into the bottom of the pan. Make sure to create an even layer.
3. Chill the crust in the refrigerator for 10 to 15 minutes. This helps it set properly.
Making the Pumpkin Layer
Next, it’s time to make the delicious pumpkin layer.
1. In another mixing bowl, beat ½ cup of softened cream cheese until smooth.
2. Add ½ cup of unsweetened pumpkin puree, ¼ cup of powdered sugar, 1 teaspoon of pumpkin pie spice, and ½ teaspoon of vanilla extract. Mix until it is creamy and well combined.
3. Now, gently fold in ½ cup of whipped cream or whipped topping. Be careful not to over-mix; you want it to stay airy.
Assembling the Bars
Now, we put everything together for these tasty bars.
1. Spread the pumpkin mixture evenly over the chilled Biscoff crust. Use a spatula to smooth it out.
2. Heat ½ cup of Biscoff spread in the microwave for about 15 to 20 seconds. It should be slightly melted and easy to drizzle.
3. Drizzle the melted Biscoff spread over the pumpkin layer. Use a toothpick or knife to create swirls for a pretty marbled effect.
4. Cover the bars with plastic wrap and refrigerate for at least 4 hours, or even overnight. This will firm them up nicely.
5. Once set, lift the bars out of the pan using the parchment paper. Cut them into squares and enjoy!
Tips & Tricks
Perfecting the Texture
To get the best texture, crush the Biscoff cookies finely. You can use a food processor or a rolling pin. The finer the crumbs, the better the crust. Mix in melted coconut oil for added richness. It helps bind the crust together and adds a nice flavor. Press the mixture firmly into the pan. This will make sure it holds its shape when cut.
Chilling and Setting Time
Chilling is key for these bars. After you press the crust, chill it for 10-15 minutes. This lets the crust set well. After adding the pumpkin layer, cover it and chill for at least 4 hours. For the best results, chill overnight. This allows all the flavors to blend and the bars to firm up perfectly.
Presentation Ideas
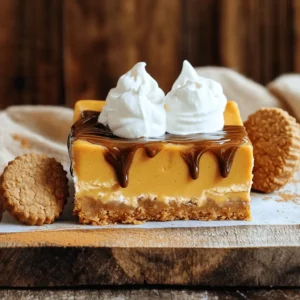
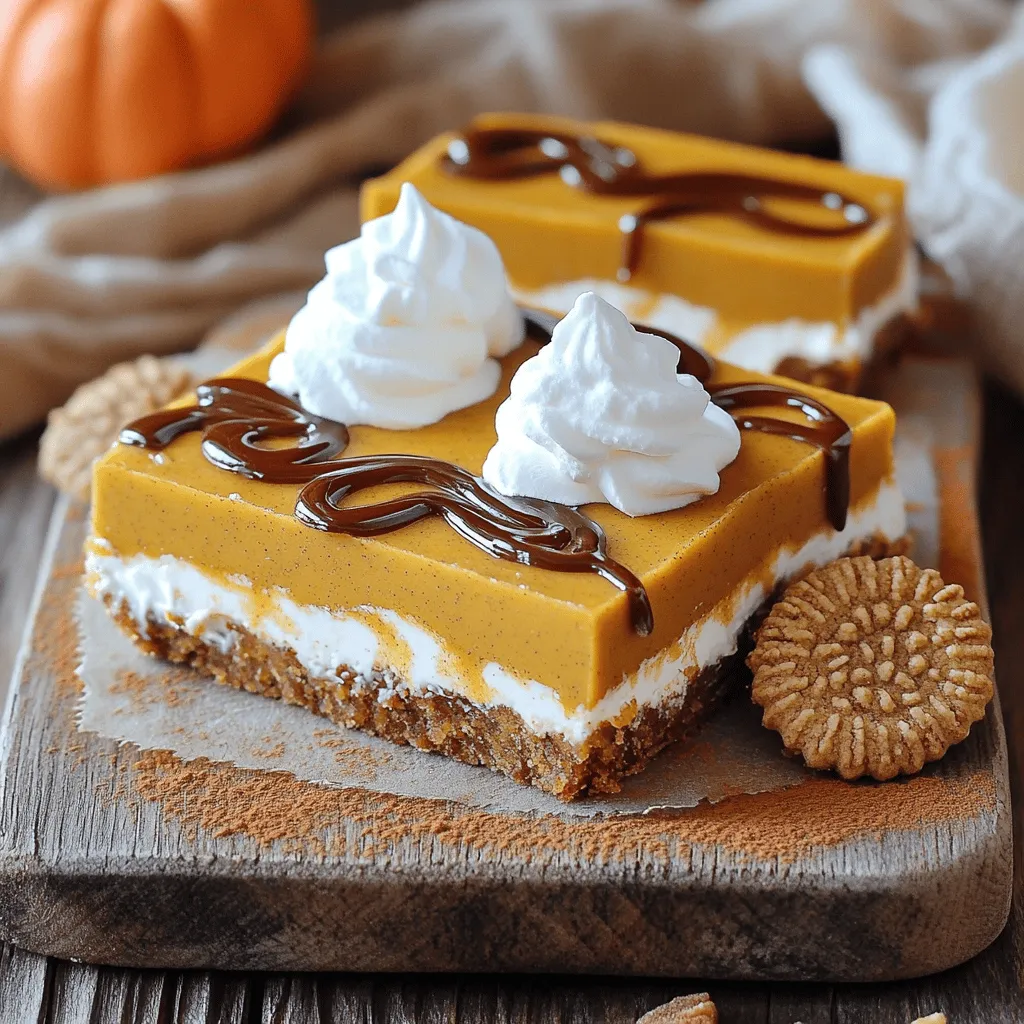
For a stunning presentation, serve the bars on a wooden board. Dust them lightly with pumpkin pie spice. This adds a nice touch and enhances the look. For extra flair, add a dollop of whipped cream on each bar. Place a whole Biscoff cookie on the side. These small details make your treat feel special and inviting.
Variations
Alternative Toppings and Drizzles
You can change the toppings on your No Bake Biscoff Pumpkin Spice Bars. For a nutty touch, add crushed walnuts or pecans on top. You can try drizzling with caramel sauce for extra sweetness. If you want a chocolate twist, use melted dark chocolate instead of Biscoff spread. These changes give your bars a nice flair.
Flavor Modifications
You can switch up the flavor of these bars too. Use chocolate Biscoff cookies for a richer taste. If you like a spicier kick, add more pumpkin pie spice. You can also mix in a bit of cinnamon or nutmeg to enhance the fall flavor. For a fruity twist, fold in some chopped apples or pears.
Gluten-Free & Vegan Alternatives
Making these bars gluten-free is easy. Just use gluten-free Biscoff cookies. For a vegan version, replace cream cheese with a dairy-free cream cheese. You can also swap whipped cream for coconut whipped cream. These simple swaps keep the bars delicious and suitable for everyone. Enjoy creating your own unique version!
Storage Info
Best Practices for Storing
To keep your no bake Biscoff pumpkin spice bars fresh, store them in the fridge. Use an airtight container to prevent moisture loss. This helps maintain the creamy texture and flavor. Make sure to place a piece of parchment paper between layers if stacking. This keeps the bars from sticking together.
Freezing Instructions
You can freeze these bars for later enjoyment. First, cut them into squares after they set. Then, wrap each square tightly in plastic wrap. Place the wrapped bars in a freezer-safe bag or container. This method helps prevent freezer burn. They can stay frozen for up to three months. Just thaw them in the fridge before serving.
Shelf Life
When stored properly in the fridge, these bars last about 5-7 days. After that, they may lose their freshness and texture. If you notice any changes in smell or color, it’s best to discard them. Enjoy these bars at their best for the tastiest experience!
FAQs
Can I use a different type of cookie for the crust?
Yes, you can use other cookies for the crust. Try graham crackers or Oreos. Each option adds a unique taste. Keep in mind that the texture may change slightly. If you use a sweeter cookie, reduce the sugar in the filling. Experiment to find your favorite!
How long do these bars need to set in the fridge?
These bars need to chill for at least four hours. For the best results, let them set overnight. This helps the flavors blend well. The longer they chill, the firmer the texture will be. You want them to slice easily without falling apart.
What can I use instead of whipped cream?
If you don’t have whipped cream, use whipped topping or yogurt. For a dairy-free option, try coconut whipped cream. These options keep the bars creamy and light. Just ensure you fold them in gently to maintain the airy texture of the filling.
This post covered how to make delicious pumpkin bars. We explored the key ingredients, giving you smart swaps for dietary needs. I shared step-by-step instructions for the crust and filling. You learned tips to get the perfect texture and ideas to impress with presentation. We also discussed fun ways to change up flavors and toppings to suit your taste.
In closing, making these pumpkin bars can be fun and rewarding. With the right ingredients and some care, you can enjoy a tasty treat all year. Happy baking!